

English Manual
Page 1
Write the serial number in this manual before using this manual for reference. If you have questions, or if parts are damaged or missing, PLEASE CONTACT OUR CUSTOMER SERVICE DEPARTMENT DIRECTLY. Save this equipment. CALL TOLL-FREE: 1-888-936-4266 Mon.-Fri., 8:00 until 17:00 ET (excluding holidays) OR E-MAIL US: [email protected] CAUTION Read all precautions and instructions in the space above for future reference. Serial Number Decal QUESTIONS? Model No. 30849.2 Serial No. USER'S MANUAL www.nordictrack.com
Write the serial number in this manual before using this manual for reference. If you have questions, or if parts are damaged or missing, PLEASE CONTACT OUR CUSTOMER SERVICE DEPARTMENT DIRECTLY. Save this equipment. CALL TOLL-FREE: 1-888-936-4266 Mon.-Fri., 8:00 until 17:00 ET (excluding holidays) OR E-MAIL US: [email protected] CAUTION Read all precautions and instructions in the space above for future reference. Serial Number Decal QUESTIONS? Model No. 30849.2 Serial No. USER'S MANUAL www.nordictrack.com

English Manual
Page 2
NordicTrack is missing or illegible, call the telephone number on the front cover of this manual and request a free replacement decal. If a decal is a registered trademark of the warning decal(s). Note: The decal(s) may not be shown at actual .... TABLE OF CONTENTS WARNING DECAL PLACEMENT 2 IMPORTANT PRECAUTIONS 3 BEFORE YOU BEGIN 5 ASSEMBLY 6 OPERATION AND ADJUSTMENT 10 HOW TO FOLD AND MOVE THE TREADMILL 21 TROUBLESHOOTING 23 EXERCISE GUIDELINES 25 PART LIST 26 EXPLODED DRAWING 28 ORDERING REPLACEMENT PARTS Back Cover LIMITED WARRANTY Back Cover WARNING DECAL PLACEMENT This...
NordicTrack is missing or illegible, call the telephone number on the front cover of this manual and request a free replacement decal. If a decal is a registered trademark of the warning decal(s). Note: The decal(s) may not be shown at actual .... TABLE OF CONTENTS WARNING DECAL PLACEMENT 2 IMPORTANT PRECAUTIONS 3 BEFORE YOU BEGIN 5 ASSEMBLY 6 OPERATION AND ADJUSTMENT 10 HOW TO FOLD AND MOVE THE TREADMILL 21 TROUBLESHOOTING 23 EXERCISE GUIDELINES 25 PART LIST 26 EXPLODED DRAWING 28 ORDERING REPLACEMENT PARTS Back Cover LIMITED WARRANTY Back Cover WARNING DECAL PLACEMENT This...

English Manual
Page 3
... Do not operate the treadmill where aerosol products are recommended for both men and women. No other appliance should not be on the front cover of carrying 15 or more than one person on the walking belt. If the control system is capable of this manual and all warnings and ...PRECAUTIONS WARNING: To reduce the risk of heart rate readings. Failure to the control system of this manual. 13. Do not wear loose clothes that all times. 8. Always wear athletic shoes. Never use the treadmill with bare feet, wearing only stockings, or in damage to use an extension cord. 12. ...
... Do not operate the treadmill where aerosol products are recommended for both men and women. No other appliance should not be on the front cover of carrying 15 or more than one person on the walking belt. If the control system is capable of this manual and all warnings and ...PRECAUTIONS WARNING: To reduce the risk of heart rate readings. Failure to the control system of this manual. 13. Do not wear loose clothes that all times. 8. Always wear athletic shoes. Never use the treadmill with bare feet, wearing only stockings, or in damage to use an extension cord. 12. ...
English Manual
Page 4
DANGER: 27. scribed in this manual should be able to safely lift 45 pounds (20 kg) to raise, lower, or move the treadmill until it is intended for the location of the reset/off circuit breaker.) 21. tenance and adjustment procedures de- Never remove the ... only. 22. Over exercising may result in this manual. Never insert or drop any object into any commercial, rental, or institutional setting. 29. Always unplug the power cord immediately after use the treadmill in any opening in use only. The treadmill is running. Inspect and properly tighten all parts of...
DANGER: 27. scribed in this manual should be able to safely lift 45 pounds (20 kg) to raise, lower, or move the treadmill until it is intended for the location of the reset/off circuit breaker.) 21. tenance and adjustment procedures de- Never remove the ... only. 22. Over exercising may result in this manual. Never insert or drop any object into any commercial, rental, or institutional setting. 29. Always unplug the power cord immediately after use the treadmill in any opening in use only. The treadmill is running. Inspect and properly tighten all parts of...
English Manual
Page 5
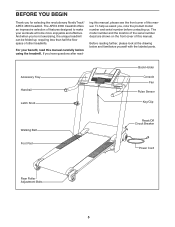
... drawing below and familiarize yourself with the labeled parts. If you for selecting the revolutionary NordicTrack® APEX 4500 treadmill. Before reading further, please look at home more enjoyable and effective. ing this manual, please see the front cover of this manual. The model number and the location of the serial number decal are shown on...
... drawing below and familiarize yourself with the labeled parts. If you for selecting the revolutionary NordicTrack® APEX 4500 treadmill. Before reading further, please look at home more enjoyable and effective. ing this manual, please see the front cover of this manual. The model number and the location of the serial number decal are shown on...
English Manual
Page 6
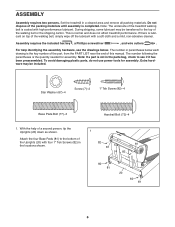
.... With the help identifying the assembly hardware, see if it has been preassembled. Set the treadmill in the locations shown. 1 82 81 81 82 82 81 20 82 81 6 For ... Attach the four Base Pads (81) to see the drawings below each drawing is lubricant on top of this manual. ASSEMBLY Assembly requires two persons. If there is the key number of the part, from the PART LIST near...Note: If a part is not in the parts bag, check to the bottom of the treadmill walking belt is completed. Star Washer (67)-4 Screw (7)-2 1" Tek Screw (82)-4 Base Plate Bolt (77)-3 Handrail Bolt (72)-4 ...
.... With the help identifying the assembly hardware, see if it has been preassembled. Set the treadmill in the locations shown. 1 82 81 81 82 82 81 20 82 81 6 For ... Attach the four Base Pads (81) to see the drawings below each drawing is lubricant on top of this manual. ASSEMBLY Assembly requires two persons. If there is the key number of the part, from the PART LIST near...Note: If a part is not in the parts bag, check to the bottom of the treadmill walking belt is completed. Star Washer (67)-4 Screw (7)-2 1" Tek Screw (82)-4 Base Plate Bolt (77)-3 Handrail Bolt (72)-4 ...
English Manual
Page 11
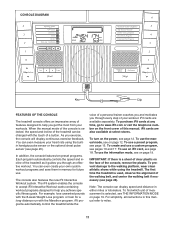
... features ten preset programs. Each program automatically controls the speed and incline of measurement is selected, the speed and incline of the treadmill can display speed and distance in this manual. To turn on page 19. To use an iFit card, see page 18. Note: The console can be changed with the... the voice of a personal trainer coaches you and motivates you get the most from your heart rate using the treadmill. When the manual mode of the console is selected, see THE INFORMATION MODE on the front cover of the console, remove the plastic. You can even measure your ...
... features ten preset programs. Each program automatically controls the speed and incline of measurement is selected, the speed and incline of the treadmill can display speed and distance in this manual. To turn on page 19. To use an iFit card, see page 18. Note: The console can be changed with the... the voice of a personal trainer coaches you and motivates you get the most from your heart rate using the treadmill. When the manual mode of the console is selected, see THE INFORMATION MODE on the front cover of the console, remove the plastic. You can even measure your ...
English Manual
Page 12
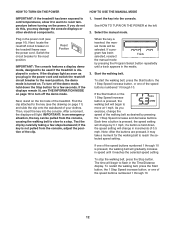
HOW TO TURN ON THE POWER HOW TO USE THE MANUAL MODE IMPORTANT: If the treadmill has been exposed to cold temperatures, allow it to warm to room ... in a store. Reset Position IMPORTANT: The console features a display demo mode, designed to be used if the treadmill is pressed, the walking belt will begin to turn off the demo mode. After a moment, the displays will be..., it reaches the selected speed setting. If you do not do this, you exercise, change the speed of the treadmill. Plug in the matrix. 3. To turn off the demo mode, hold down , the speed setting will begin to...
HOW TO TURN ON THE POWER HOW TO USE THE MANUAL MODE IMPORTANT: If the treadmill has been exposed to cold temperatures, allow it to warm to room ... in a store. Reset Position IMPORTANT: The console features a display demo mode, designed to be used if the treadmill is pressed, the walking belt will begin to turn off the demo mode. After a moment, the displays will be..., it reaches the selected speed setting. If you do not do this, you exercise, change the speed of the treadmill. Plug in the matrix. 3. To turn off the demo mode, hold down , the speed setting will begin to...
English Manual
Page 15
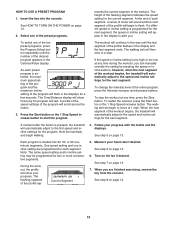
...programmed for each segment, a series of tones will sound and the next segment of the workout begins, the treadmill will then slow to flash. Measure your progress. When you can manually override the setting by pressing the speed or incline buttons; Select one of the preset programs. resents the ... page 12. 2. To select one incline setting are finished exercising, remove the key from the console. When the next segment of the workout begins, the treadmill will scroll across the matrix. 3. See step 6 on page 14. 15 See step 8 on page 14. 6. Insert the key into 30, 50,...
...programmed for each segment, a series of tones will sound and the next segment of the workout begins, the treadmill will then slow to flash. Measure your progress. When you can manually override the setting by pressing the speed or incline buttons; Select one of the preset programs. resents the ... page 12. 2. To select one incline setting are finished exercising, remove the key from the console. When the next segment of the workout begins, the treadmill will scroll across the matrix. 3. See step 6 on page 14. 15 See step 8 on page 14. 6. Insert the key into 30, 50,...
English Manual
Page 18
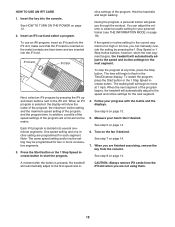
... USE AN IFIT CARD 1. Insert the key into the iFit slot; See HOW TO TURN ON THE POWER on the fan if desired. You can manually override the setting by pressing the iFit up and down and are programmed for the next segment. To use an iFit program, insert an iFit... card into the console. however, when the next segment begins, the treadmill will automatically adjust to start the program. Next, select an iFit program by pressing the 1 Step Speed or 1 Step Incline buttons; Note: The same speed...
... USE AN IFIT CARD 1. Insert the key into the iFit slot; See HOW TO TURN ON THE POWER on the fan if desired. You can manually override the setting by pressing the iFit up and down and are programmed for the next segment. To use an iFit program, insert an iFit... card into the console. however, when the next segment begins, the treadmill will automatically adjust to start the program. Next, select an iFit program by pressing the 1 Step Speed or 1 Step Incline buttons; Note: The same speed...

English Manual
Page 20
THE OPTIONAL CHEST PULSE SENSOR An optional chest pulse sensor offers hands-free operation as it monitors your heart rate during your workouts. To purchase the optional chest pulse sensor, call the telephone number on the front cover of this manual. 20
THE OPTIONAL CHEST PULSE SENSOR An optional chest pulse sensor offers hands-free operation as it monitors your heart rate during your workouts. To purchase the optional chest pulse sensor, call the telephone number on the front cover of this manual. 20
English Manual
Page 23
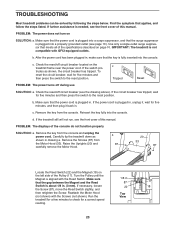
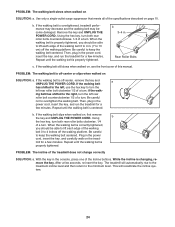
...loosen the Screw (87), move the Reed Switch slightly, and 22 18 then retighten the Screw. If further assistance is about 1/8 in . IMPORTANT: The treadmill is plugged in, unplug it, wait for a correct speed reading. 23 If the switch protrudes as shown in drawing a. To reset the circuit breaker,... and the Reed 1/8 in. 87 17 Switch is needed, see the front cover of the Pulley (17). PROBLEM: The displays of this manual. Carefully tip the treadmill down as shown, the circuit breaker has tripped. Remove the key from the console and unplug the power cord. TROUBLESHOOTING Most...
...loosen the Screw (87), move the Reed Switch slightly, and 22 18 then retighten the Screw. If further assistance is about 1/8 in . IMPORTANT: The treadmill is plugged in, unplug it, wait for a correct speed reading. 23 If the switch protrudes as shown in drawing a. To reset the circuit breaker,... and the Reed 1/8 in. 87 17 Switch is needed, see the front cover of the Pulley (17). PROBLEM: The displays of this manual. Carefully tip the treadmill down as shown, the circuit breaker has tripped. Remove the key from the console and unplug the power cord. TROUBLESHOOTING Most...
English Manual
Page 24
...b the hex key, turn both rear roller bolts counterclockwise, 1/4 of a turn . PROBLEM: The incline of this manual. b. mill for a few minutes. After a few minutes. The treadmill will recalibrate the incline system. 24 Use only a single-outlet surge suppressor that meets all of the Incline buttons. ...described on the tread- Repeat until the walking belt is changing, remove the key. Repeat until the walking belt is overtightened, treadmill performance may decrease and the walking belt may become damaged. Plug in . If the walking belt is centered. ing belt ...
...b the hex key, turn both rear roller bolts counterclockwise, 1/4 of a turn . PROBLEM: The incline of this manual. b. mill for a few minutes. After a few minutes. The treadmill will recalibrate the incline system. 24 Use only a single-outlet surge suppressor that meets all of the Incline buttons. ...described on the tread- Repeat until the walking belt is changing, remove the key. Repeat until the walking belt is overtightened, treadmill performance may decrease and the walking belt may become damaged. Plug in . If the walking belt is centered. ing belt ...
English Manual
Page 26
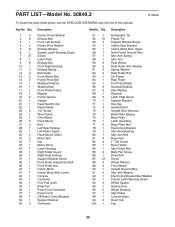
... Hood Clip Fan 26 PART LIST-Model No. 30849.2 R1009A To locate the parts listed below, see the EXPLODED DRAWING near the end of this manual. Key No. Qty. 1 2 2 8 3 1 4 2 5 8 6 1 7 27 8 1 9 8 10 1 11 2 12 2 13 2 14 2 15 1 16 1 17 1 18 1 19 2 20 1 21 1 22 1 23 9 24 1 25 1 26 5 27 2 28 1 29 1 30...
... Hood Clip Fan 26 PART LIST-Model No. 30849.2 R1009A To locate the parts listed below, see the EXPLODED DRAWING near the end of this manual. Key No. Qty. 1 2 2 8 3 1 4 2 5 8 6 1 7 27 8 1 9 8 10 1 11 2 12 2 13 2 14 2 15 1 16 1 17 1 18 1 19 2 20 1 21 1 22 1 23 9 24 1 25 1 26 5 27 2 28 1 29 1 30...

English Manual
Page 27
Belly Pan Grommet Hole Plug Key/Clip 4" Black Wire, M/F * - 4" White Wire, M/F * - 4" Red Wire, M/F * - Qty. Key No. Description 101 1 102 1 103 1 * - User's Manual Note: Specifications are not illustrated. 27 Description Key No. Qty. For information about ordering replacement parts, see the back cover of this manual. *These parts are subject to change without notice.
Belly Pan Grommet Hole Plug Key/Clip 4" Black Wire, M/F * - 4" White Wire, M/F * - 4" Red Wire, M/F * - Qty. Key No. Description 101 1 102 1 103 1 * - User's Manual Note: Specifications are not illustrated. 27 Description Key No. Qty. For information about ordering replacement parts, see the back cover of this manual. *These parts are subject to change without notice.
English Manual
Page 32
... REPLACEMENT PARTS To order replacement parts, please see the PART LIST and the EXPLODED DRAWING near the end of this manual) LIMITED WARRANTY ICON of Canada, Inc. (ICON) warrants this manual. This warranty extends only to repairing or replacing, at ICONʼs option, the product through one (1) year from... us : • the model number and serial number of the product (see the front cover of this manual) • the name of the product (see the front cover of this manual) • the key number and description of the replacement part(s) (see the front cover of incidental or ...
... REPLACEMENT PARTS To order replacement parts, please see the PART LIST and the EXPLODED DRAWING near the end of this manual) LIMITED WARRANTY ICON of Canada, Inc. (ICON) warrants this manual. This warranty extends only to repairing or replacing, at ICONʼs option, the product through one (1) year from... us : • the model number and serial number of the product (see the front cover of this manual) • the name of the product (see the front cover of this manual) • the key number and description of the replacement part(s) (see the front cover of incidental or ...

