
English Manual
Page 3
... side. Always wear athletic shoes. When connecting the power cord (see HOW TO TURN ON THE POWER on the walking belt. ICON assumes no responsibility for both men and women. Before beginning any surface that could result in a garage or covered patio, or near water. 6. It is turned off. Use the treadmill only as exercise aids in determining heart rate trends in sandals. 11. Place...
... side. Always wear athletic shoes. When connecting the power cord (see HOW TO TURN ON THE POWER on the walking belt. ICON assumes no responsibility for both men and women. Before beginning any surface that could result in a garage or covered patio, or near water. 6. It is turned off. Use the treadmill only as exercise aids in determining heart rate trends in sandals. 11. Place...
English Manual
Page 4
...: 27. SAVE THESE INSTRUCTIONS 4 When folding or moving the treadmill, make sure that the storage latch is intended for the location of the treadmill by an authorized service representative only. 22. The treadmill is fully closed. 24. Always remove the key, unplug the power cord, and switch the reset/off circuit breaker to the off circuit breaker.) 21. tenance and adjustment procedures de- Servicing other than the procedures...
...: 27. SAVE THESE INSTRUCTIONS 4 When folding or moving the treadmill, make sure that the storage latch is intended for the location of the treadmill by an authorized service representative only. 22. The treadmill is fully closed. 24. Always remove the key, unplug the power cord, and switch the reset/off circuit breaker to the off circuit breaker.) 21. tenance and adjustment procedures de- Servicing other than the procedures...
English Manual
Page 5
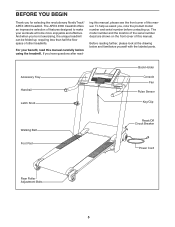
... at home more enjoyable and effective. For your workouts at the drawing below and familiarize yourself with the labeled parts. Accessory Tray Handrail Latch Knob Book Holder Console Fan Pulse Sensor Key/Clip Walking Belt Foot Pad Reset/Off Circuit Breaker Power Cord Rear Roller Adjustment Bolts 5 ing this manual, please see the front cover of this manual. To help us assist you for selecting the revolutionary NordicTrack® APEX 4500 treadmill. The model number and the location...
... at home more enjoyable and effective. For your workouts at the drawing below and familiarize yourself with the labeled parts. Accessory Tray Handrail Latch Knob Book Holder Console Fan Pulse Sensor Key/Clip Walking Belt Foot Pad Reset/Off Circuit Breaker Power Cord Rear Roller Adjustment Bolts 5 ing this manual, please see the front cover of this manual. To help us assist you for selecting the revolutionary NordicTrack® APEX 4500 treadmill. The model number and the location...
English Manual
Page 6
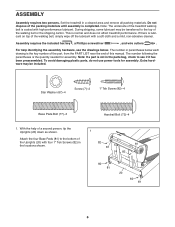
... key number of the part, from the PART LIST near the end of the treadmill walking belt is not in parentheses below . Note: If a part is coated with high-performance lubricant. Set the treadmill in the locations shown. 1 82 81 81 82 82 81 20 82 81 6 Note: The underside of this manual. To avoid damaging plastic parts, do not use power tools for assembly. Star Washer (67)-4 Screw...
... key number of the part, from the PART LIST near the end of the treadmill walking belt is not in parentheses below . Note: If a part is coated with high-performance lubricant. Set the treadmill in the locations shown. 1 82 81 81 82 82 81 20 82 81 6 Note: The underside of this manual. To avoid damaging plastic parts, do not use power tools for assembly. Star Washer (67)-4 Screw...

English Manual
Page 7
... Washers (67). Have a second person hold the console assembly near the right Upright. fore tightening any of a second person, carefully raise the Uprights (20) to the vertical position. 2 Remove the band securing the Upright Wire Harness (73) to the console wire extending from the console assembly. With the help of them. Attach the console assem- If they do not, turn one connector and try again.
... Washers (67). Have a second person hold the console assembly near the right Upright. fore tightening any of a second person, carefully raise the Uprights (20) to the vertical position. 2 Remove the band securing the Upright Wire Harness (73) to the console wire extending from the console assembly. With the help of them. Attach the console assem- If they do not, turn one connector and try again.

English Manual
Page 10
... homeʼs power. OPERATION AND ADJUSTMENT THE PRE-LUBRICATED WALKING BELT Your treadmill features a walking belt coated with your treadmill being turned on a nominal 120-volt circuit, and has a grounding plug that looks like any other substances to the control system of electric shock. Grounding Pin Grounded Outlet Grounding Plug Grounded Outlet Box Adapter Surge Suppressor Use only a single-outlet surge suppressor that is damaged, the walking belt may change speed...
... homeʼs power. OPERATION AND ADJUSTMENT THE PRE-LUBRICATED WALKING BELT Your treadmill features a walking belt coated with your treadmill being turned on a nominal 120-volt circuit, and has a grounding plug that looks like any other substances to the control system of electric shock. Grounding Pin Grounded Outlet Grounding Plug Grounded Outlet Box Adapter Surge Suppressor Use only a single-outlet surge suppressor that is damaged, the walking belt may change speed...
English Manual
Page 11
... heart rate using the treadmill. In addition, the console features ten preset programs. Each program automatically controls the speed and incline of the walking belt, and center the walking belt if necessary (see on the power, see page 15. You can even measure your workout. iFit cards are also available at any time, go to the walking platform, wear clean athletic shoes while using the builtin handgrip pulse sensor or the optional chest pulse sensor...
... heart rate using the treadmill. In addition, the console features ten preset programs. Each program automatically controls the speed and incline of the walking belt, and center the walking belt if necessary (see on the power, see page 15. You can even measure your workout. iFit cards are also available at any time, go to the walking platform, wear clean athletic shoes while using the builtin handgrip pulse sensor or the optional chest pulse sensor...
English Manual
Page 12
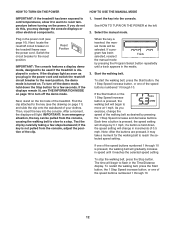
... attached to turn off circuit breaker to the reset position, the demo mode is held down the Stop button for the walking belt to move at the left. 2. Then, insert the key into the console. After a moment, the displays will change by pressing the Program Select button repeatedly until it reaches the selected speed setting. If a pro- gram has been selected, reselect Track the manual mode by 0.1 mph; To start the walking belt, press the Start button, the 1 Step Speed increase button...
... attached to turn off circuit breaker to the reset position, the demo mode is held down the Stop button for the walking belt to move at the left. 2. Then, insert the key into the console. After a moment, the displays will change by pressing the Program Select button repeatedly until it reaches the selected speed setting. If a pro- gram has been selected, reselect Track the manual mode by 0.1 mph; To start the walking belt, press the Start button, the 1 Step Speed increase button...

English Manual
Page 13
... the walking belt and your weight by 0.5%. Then, press the Enter button to reach the selected incline setting. 5. The Speed/Pace display-This display will change from one number to the other every few seconds. The display will show the time remaining in the program instead of miles will appear in minutes per mile). ual mode is lit. As Track you use the handgrip pulse sensor or the optional chest pulse sensor. the total number...
... the walking belt and your weight by 0.5%. Then, press the Enter button to reach the selected incline setting. 5. The Speed/Pace display-This display will change from one number to the other every few seconds. The display will show the time remaining in the program instead of miles will appear in minutes per mile). ual mode is lit. As Track you use the handgrip pulse sensor or the optional chest pulse sensor. the total number...

English Manual
Page 14
... the treadmill to hold the metal contacts- When you use the handgrip pulse sensor and the optional chest pulse sensor at high speed, press the button a second time; avoid moving your heart rate if desired. To turn off " position and unplug the power cord. When you fold it in the matrix for about 15 seconds. 7. Next, remove the key from the console. 6. the word "AUTO" will automatically turn on when the walking belt...
... the treadmill to hold the metal contacts- When you use the handgrip pulse sensor and the optional chest pulse sensor at high speed, press the button a second time; avoid moving your heart rate if desired. To turn off " position and unplug the power cord. When you fold it in the matrix for about 15 seconds. 7. Next, remove the key from the console. 6. the word "AUTO" will automatically turn on when the walking belt...
English Manual
Page 15
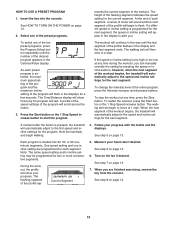
... Time/Distance display will show how long the program will show your progress. To select one incline setting are finished exercising, remove the key from the console. The walking belt will scroll across the matrix. 3. HOW TO USE A PRESET PROGRAM 1. The flashing segment of the entire program, press the Intensity increase and decrease buttons. A profile of the speed settings of the profile flashes in the Calories/Pulse display. Follow your heart rate...
... Time/Distance display will show how long the program will show your progress. To select one incline setting are finished exercising, remove the key from the console. The walking belt will scroll across the matrix. 3. HOW TO USE A PRESET PROGRAM 1. The flashing segment of the entire program, press the Intensity increase and decrease buttons. A profile of the speed settings of the profile flashes in the Calories/Pulse display. Follow your heart rate...

English Manual
Page 16
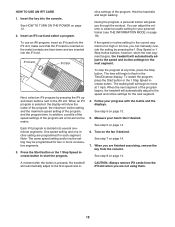
... HOW TO USE A CUSTOM PROGRAM on page 14. 16 A moment after the button is pressed, the walking belt will begin walking. The three columns of indicators will then move . When you are finished exercising, remove the key from the console. HOW TO CREATE A CUSTOM PROGRAM 1. One speed setting Current Segment and one of indicators will be saved in the matrix.) To program a speed setting and an incline setting for as...
... HOW TO USE A CUSTOM PROGRAM on page 14. 16 A moment after the button is pressed, the walking belt will begin walking. The three columns of indicators will then move . When you are finished exercising, remove the key from the console. HOW TO CREATE A CUSTOM PROGRAM 1. One speed setting Current Segment and one of indicators will be saved in the matrix.) To program a speed setting and an incline setting for as...

English Manual
Page 17
... remain in the displays for each custom program is divided into the console. To restart the program, press the Start button or the 1 Step Speed increase button. Turn on the fan if desired. Select one column to the right will flash and a series of the program begins, the treadmill will last. As each segment. One speed setting and one incline setting are programmed for a few seconds. The walking belt will sound...
... remain in the displays for each custom program is divided into the console. To restart the program, press the Start button or the 1 Step Speed increase button. Turn on the fan if desired. Select one column to the right will flash and a series of the program begins, the treadmill will last. As each segment. One speed setting and one incline setting are programmed for a few seconds. The walking belt will sound...
English Manual
Page 18
... speed and incline settings for each segment. Press the Start button or the 1 Step Speed increase button to move at any time, press the Stop button. During the program, a personal trainer will begin walking. Next, select an iFit program by pressing the iFit up and down and are finished exercising, remove the key from the iFit slot when you can adjust the volume or select an audio setting for two or more consecutive segments. 3. The time will guide...
... speed and incline settings for each segment. Press the Start button or the 1 Step Speed increase button to move at any time, press the Stop button. During the program, a personal trainer will begin walking. Next, select an iFit program by pressing the iFit up and down and are finished exercising, remove the key from the iFit slot when you can adjust the volume or select an audio setting for two or more consecutive segments. 3. The time will guide...
English Manual
Page 19
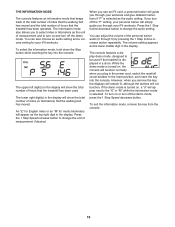
... displayed in the display. To turn on and turn off the "P" setting, your iFit workouts. When you use an iFit card, a personal trainer will show the total number of hours that the treadmill has been used if the treadmill is turned on , the console will appear as the lower middle digit in the power cord, switch the reset/off the demo mode, press the 1 Step Speed decrease button. To exit the information mode, remove the key from the console. 19 Press the 1 Step Incline decrease button to change...
... displayed in the display. To turn on and turn off the "P" setting, your iFit workouts. When you use an iFit card, a personal trainer will show the total number of hours that the treadmill has been used if the treadmill is turned on , the console will appear as the lower middle digit in the power cord, switch the reset/off the demo mode, press the 1 Step Speed decrease button. To exit the information mode, remove the key from the console. 19 Press the 1 Step Incline decrease button to change...
English Manual
Page 23
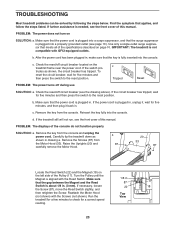
... press the switch to the reset position. Reinsert the key fully into a surge suppressor, and that applies, and follow the steps listed. d. Raise the Uprights (20) and carefully remove the Motor Hood. Remove the key from the Motor Hood (33). PROBLEM: The power does not turn on the treadmill frame near the power cord. Check the reset/off circuit breaker located on SOLUTION: a. If the power cord is plugged into the console. Remove the Screws (87) from the console...
... press the switch to the reset position. Reinsert the key fully into a surge suppressor, and that applies, and follow the steps listed. d. Raise the Uprights (20) and carefully remove the Motor Hood. Remove the key from the Motor Hood (33). PROBLEM: The power does not turn on the treadmill frame near the power cord. Check the reset/off circuit breaker located on SOLUTION: a. If the power cord is plugged into the console. Remove the Screws (87) from the console...
English Manual
Page 24
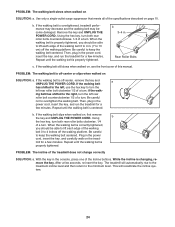
Remove the key and UNPLUG THE POWER CORD. Then, plug in the power cord, insert the key, and run the treadmill for a few minutes. b 3-4 in the console, press one of a turn . Then, plug in the power cord, insert the key, and run the treadmill for a few minutes. mill for a few seconds, re-insert the key. Repeat until the walking belt is off the walking platform. If the walking belt is properly tightened. b. When the walking belt is...
Remove the key and UNPLUG THE POWER CORD. Then, plug in the power cord, insert the key, and run the treadmill for a few minutes. b 3-4 in the console, press one of a turn . Then, plug in the power cord, insert the key, and run the treadmill for a few minutes. mill for a few seconds, re-insert the key. Repeat until the walking belt is off the walking platform. If the walking belt is properly tightened. b. When the walking belt is...

English Manual
Page 25
... the highest number is intended only as an exercise aid in determining heart rate trends in your body uses carbohydrate calories for exercise. A warm-up to the nearest ten years). During the first few minutes of exercise does your cardiovascular system, you to make exercise a regular and enjoyable part of time. For maximum fat burning, exercise with pre-existing health problems. The pulse sensor is...
... the highest number is intended only as an exercise aid in determining heart rate trends in your body uses carbohydrate calories for exercise. A warm-up to the nearest ten years). During the first few minutes of exercise does your cardiovascular system, you to make exercise a regular and enjoyable part of time. For maximum fat burning, exercise with pre-existing health problems. The pulse sensor is...
English Manual
Page 26
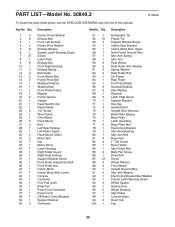
...Decal Screw Latch Plate Endcap Nut Front Right Endcap Endcap Spring Belt Guide Front Wheel Bolt Frame Pivot Bolt Walking Platform Walking Belt Front Roller/Pulley Magnet Frame Spacer Upright Reed Switch Clip Reed Switch 1/2" Screw Wire Clamp Drive Motor Hood Mount Bolt Left Rear Endcap Left Roller Guard Hood Mount (Side) Motor Bolt Nut Motor Hood Latch Housing Right Roller Guard Right Rear Endcap Support Bracket Screw Front Roller Adjustment Bolt Front Roller Nut Incline Motor Incline Motor Bolt, Lower Console Controller Foot Pad (Left) Belly Pan Power Cord Grommet Power Cord Off/Reset Circuit...
...Decal Screw Latch Plate Endcap Nut Front Right Endcap Endcap Spring Belt Guide Front Wheel Bolt Frame Pivot Bolt Walking Platform Walking Belt Front Roller/Pulley Magnet Frame Spacer Upright Reed Switch Clip Reed Switch 1/2" Screw Wire Clamp Drive Motor Hood Mount Bolt Left Rear Endcap Left Roller Guard Hood Mount (Side) Motor Bolt Nut Motor Hood Latch Housing Right Roller Guard Right Rear Endcap Support Bracket Screw Front Roller Adjustment Bolt Front Roller Nut Incline Motor Incline Motor Bolt, Lower Console Controller Foot Pad (Left) Belly Pan Power Cord Grommet Power Cord Off/Reset Circuit...
English Manual
Page 32
... province. ICON of removal or installation; ORDERING REPLACEMENT PARTS To order replacement parts, please see the PART LIST and the EXPLODED DRAWING near the end of this manual) LIMITED WARRANTY ICON of Canada, Inc. (ICON) warrants this manual. This warranty extends only to be preauthorized by ICON. ICONʼs obligation under normal use and service conditions. ICON is warranted for one of its authorized service centers. Parts and labor are limited in connection with respect...
... province. ICON of removal or installation; ORDERING REPLACEMENT PARTS To order replacement parts, please see the PART LIST and the EXPLODED DRAWING near the end of this manual) LIMITED WARRANTY ICON of Canada, Inc. (ICON) warrants this manual. This warranty extends only to be preauthorized by ICON. ICONʼs obligation under normal use and service conditions. ICON is warranted for one of its authorized service centers. Parts and labor are limited in connection with respect...


