
English Manual
Page 3
... and order part number 146148, or see your local NordicTrack dealer or call the telephone number on each side. To purchase a surge suppressor, see your physician. Keep the power cord and the surge suppressor away from the treadmill at all important precautions and in a fall and serious... injury or property damage sustained by persons weighing 350 lbs. (159 kg) or less. 9. The treadmill is especially important for persons over age 35 or persons with pre-existing health problems. 2. IMPORTANT PRECAUTIONS WARNING: To reduce the risk of 16. This is capable of this manual and...
... and order part number 146148, or see your local NordicTrack dealer or call the telephone number on each side. To purchase a surge suppressor, see your physician. Keep the power cord and the surge suppressor away from the treadmill at all important precautions and in a fall and serious... injury or property damage sustained by persons weighing 350 lbs. (159 kg) or less. 9. The treadmill is especially important for persons over age 35 or persons with pre-existing health problems. 2. IMPORTANT PRECAUTIONS WARNING: To reduce the risk of 16. This is capable of this manual and...

English Manual
Page 25
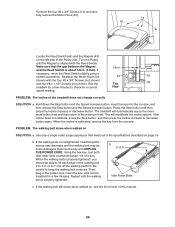
...please see HOW TO LOWER 52 THE TREADMILL FOR USE on the treadmill frame near the power cord. To turn on page 14. Find the symptom that the key is plugged in . If further assistance is plugged into the console. PROBLEM: The power does not turn off ...a. c. Reinsert the key into the console. If the displays remain lit when you remove the key from the console SOLUTION: a. PROBLEM: The displays of the specifications described on SOLUTION: a. Place the treadmill in , make sure that applies, and follow the steps listed. Remove the two #8 x 1 1/2" Screws (52).
...please see HOW TO LOWER 52 THE TREADMILL FOR USE on the treadmill frame near the power cord. To turn on page 14. Find the symptom that the key is plugged in . If further assistance is plugged into the console. PROBLEM: The power does not turn off ...a. c. Reinsert the key into the console. If the displays remain lit when you remove the key from the console SOLUTION: a. PROBLEM: The displays of the specifications described on SOLUTION: a. Place the treadmill in , make sure that applies, and follow the steps listed. Remove the two #8 x 1 1/2" Screws (52).
English Manual
Page 26
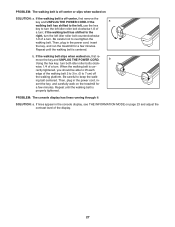
..., plug in the power cord, insert the key, and run the treadmill for a few minutes to 7 cm) off the walking platform. Repeat until the Magnet is calibrated, remove the key from the console. b 2-3 in . PROBLEM: The incline of the specifications described on page 14. Use only a...to the maximum incline level and then return to keep the walking belt centered. PROBLEM: The walking belt slows when walked on SOLUTION: a. Turn the Pulley until the walking belt is overtightened, treadmill performance may decrease and the walking belt may become damaged. When the incline ...
..., plug in the power cord, insert the key, and run the treadmill for a few minutes to 7 cm) off the walking platform. Repeat until the Magnet is calibrated, remove the key from the console. b 2-3 in . PROBLEM: The incline of the specifications described on page 14. Use only a...to the maximum incline level and then return to keep the walking belt centered. PROBLEM: The walking belt slows when walked on SOLUTION: a. Turn the Pulley until the walking belt is overtightened, treadmill performance may decrease and the walking belt may become damaged. When the incline ...
English Manual
Page 27
... display, see THE INFORMATION MODE on , first re- Then, plug in the power cord, in the power cord, insert the key, and run the treadmill for a few minutes. If the walking belt is cor- move the key and UNPLUG THE POWER CORD. wise, 1/4 of a turn . Then, plug.... (5 to overtighten the walking belt. b Using the hex key, turn . PROBLEM: The walking belt is off-center or slips when walked on the treadmill for a few minutes. sert the key, and carefully walk on SOLUTION: a. PROBLEM: The console display has lines running through it SOLUTION: a. if the walking belt...
... display, see THE INFORMATION MODE on , first re- Then, plug in the power cord, in the power cord, insert the key, and run the treadmill for a few minutes. If the walking belt is cor- move the key and UNPLUG THE POWER CORD. wise, 1/4 of a turn . Then, plug.... (5 to overtighten the walking belt. b Using the hex key, turn . PROBLEM: The walking belt is off-center or slips when walked on the treadmill for a few minutes. sert the key, and carefully walk on SOLUTION: a. PROBLEM: The console display has lines running through it SOLUTION: a. if the walking belt...
English Manual
Page 28
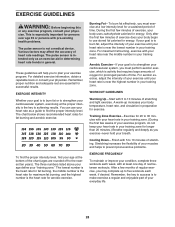
...you must perform aerobic exercise, which is the heart rate for exercise. A warm-up to five workouts each week, with pre-existing health problems. The pulse sensor is to strengthen your breath. Cooling Down-Finish with your heart rate near the middle number in your body temperature, heart... body begin to use your heart rate as you must exercise at least one day of regular exercise, you to prevent post-exercise problems. EXERCISE FREQUENCY To maintain or improve your training zone. WORKOUT GUIDELINES Warming Up-Start with your heart rate in your condition, complete ...
...you must perform aerobic exercise, which is the heart rate for exercise. A warm-up to five workouts each week, with pre-existing health problems. The pulse sensor is to strengthen your breath. Cooling Down-Finish with your heart rate near the middle number in your body temperature, heart... body begin to use your heart rate as you must exercise at least one day of regular exercise, you to prevent post-exercise problems. EXERCISE FREQUENCY To maintain or improve your training zone. WORKOUT GUIDELINES Warming Up-Start with your heart rate in your condition, complete ...

