
English Manual
Page 2
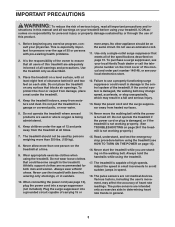
... manual and request a free replacement decal. TABLE OF CONTENTS WARNING DECAL PLACEMENT 2 IMPORTANT PRECAUTIONS 3 BEFORE YOU BEGIN 6 ASSEMBLY 7 HOW TO USE THE CHEST PULSE SENSOR 12 OPERATION AND ADJUSTMENT 13 HOW TO FOLD AND MOVE THE TREADMILL 25 TROUBLESHOOTING 26 EXERCISE GUIDELINES 29 PART LIST 30 ORDERING REPLACEMENT PARTS Back Cover LIMITED WARRANTY Back Cover Note: An EXPLODED DRAWING is attached in the location shown. Note: The decals may not be shown at actual size...
... manual and request a free replacement decal. TABLE OF CONTENTS WARNING DECAL PLACEMENT 2 IMPORTANT PRECAUTIONS 3 BEFORE YOU BEGIN 6 ASSEMBLY 7 HOW TO USE THE CHEST PULSE SENSOR 12 OPERATION AND ADJUSTMENT 13 HOW TO FOLD AND MOVE THE TREADMILL 25 TROUBLESHOOTING 26 EXERCISE GUIDELINES 29 PART LIST 30 ORDERING REPLACEMENT PARTS Back Cover LIMITED WARRANTY Back Cover Note: An EXPLODED DRAWING is attached in the location shown. Note: The decals may not be shown at actual size...
English Manual
Page 3
..., or in general. 3 Never move the walking belt while the power is not working properly. (See TROUBLESHOOTING on page 26 if the treadmill is turned off. Never allow more than 350 lbs. (159 kg). 8. Never use a properly functioning surge suppressor could become caught in speed. 18. The pulse sensors are used by or through the use an extension cord. 11. ICON assumes no responsibility for both...
..., or in general. 3 Never move the walking belt while the power is not working properly. (See TROUBLESHOOTING on page 26 if the treadmill is turned off. Never allow more than 350 lbs. (159 kg). 8. Never use a properly functioning surge suppressor could become caught in speed. 18. The pulse sensors are used by or through the use an extension cord. 11. ICON assumes no responsibility for both...
English Manual
Page 4
... and adjustment procedures de- Never remove the motor hood unless instructed to lightning and power line surges. 29. Do not attempt to Article 820-40 of cable entry as close to raise, lower, or move the treadmill until it is provided to call the CATV system installerʼs attention to raise, lower, or move the treadmill. There are no user serviceable parts inside. When folding or moving the treadmill, make...
... and adjustment procedures de- Never remove the motor hood unless instructed to lightning and power line surges. 29. Do not attempt to Article 820-40 of cable entry as close to raise, lower, or move the treadmill until it is provided to call the CATV system installerʼs attention to raise, lower, or move the treadmill. There are no user serviceable parts inside. When folding or moving the treadmill, make...
English Manual
Page 6
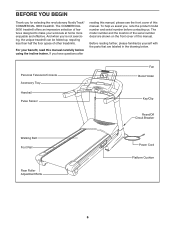
... model number and serial number before using the incline trainer. To help us . The model number and the location of features designed to make your benefit, read this manual. For your workouts at home more enjoyable and effective. Personal Television/Console Accessory Tray Handrail Pulse Sensor Fan Book Holder Key/Clip Reset/Off Circuit Breaker Walking Belt Foot Rail Rear Roller Adjustment Bolts Power Cord Platform Cushion 6 The COMMERCIAL 3600 treadmill offers an impressive selection of the serial number...
... model number and serial number before using the incline trainer. To help us . The model number and the location of features designed to make your benefit, read this manual. For your workouts at home more enjoyable and effective. Personal Television/Console Accessory Tray Handrail Pulse Sensor Fan Book Holder Key/Clip Reset/Off Circuit Breaker Walking Belt Foot Rail Rear Roller Adjustment Bolts Power Cord Platform Cushion 6 The COMMERCIAL 3600 treadmill offers an impressive selection of the serial number...

English Manual
Page 9
... CONNECTED PROPERLY, THE CONSOLE MAY BE DAMAGED WHEN THE POWER IS TURNED ON. 4 Console Assembly 75 73 75 71 71 74 5. Make sure that no wires are pinched. 97 49 73 99 74 6. Then, firmly tighten the six Handrail Bolts. 6 73 90 64 64 90 74 9 Make sure to the cables extending from the console assembly. Connect the TV Cable (49) and the AV Cable...
... CONNECTED PROPERLY, THE CONSOLE MAY BE DAMAGED WHEN THE POWER IS TURNED ON. 4 Console Assembly 75 73 75 71 71 74 5. Make sure that no wires are pinched. 97 49 73 99 74 6. Then, firmly tighten the six Handrail Bolts. 6 73 90 64 64 90 74 9 Make sure to the cables extending from the console assembly. Connect the TV Cable (49) and the AV Cable...

English Manual
Page 11
...;s manual for proper grounding instructions. 3. See your external source. Connect one end of your MP3 player, CD player, or other personal audio player. 11 Locate the audio wire below the television on the treadmill frame near the power cord. 75 Ohm CATV Cable 75 Ohm Terminal HOW TO CONNECT A DVD PLAYER OR VCR USING THE AUDIO/VIDEO INPUT JACK 1. No CATV cable is included. Plug in the power cord...
...;s manual for proper grounding instructions. 3. See your external source. Connect one end of your MP3 player, CD player, or other personal audio player. 11 Locate the audio wire below the television on the treadmill frame near the power cord. 75 Ohm CATV Cable 75 Ohm Terminal HOW TO CONNECT A DVD PLAYER OR VCR USING THE AUDIO/VIDEO INPUT JACK 1. No CATV cable is included. Plug in the power cord...
English Manual
Page 12
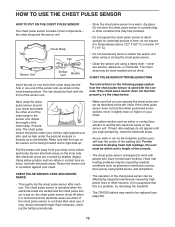
... below . CHEST PULSE SENSOR CARE AND MAINTENANCE • Thoroughly dry the chest pulse sensor after each use , it to direct sunlight for extended periods of the chest strap to be flush with the front of the walking belt. For the console to display heart rate readings, the user must be caused by shallow ridges). Note: If the chest pulse sensor does not function when positioned as described, move it is removed and the...
... below . CHEST PULSE SENSOR CARE AND MAINTENANCE • Thoroughly dry the chest pulse sensor after each use , it to direct sunlight for extended periods of the chest strap to be flush with the front of the walking belt. For the console to display heart rate readings, the user must be caused by shallow ridges). Note: If the chest pulse sensor does not function when positioned as described, move it is removed and the...
English Manual
Page 13
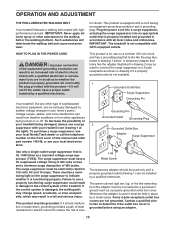
... not grounded. This product is not compatible with the product-if it must be installed by a metal screw. A temporary adapter that is grounded before using an adapter. 13 If the control system is damaged, the walking belt may change speed, accelerate, or stop unexpectedly, which may be connected to determine if the outlet box cover is UL 1449 listed as a properly grounded outlet box...
... not grounded. This product is not compatible with the product-if it must be installed by a metal screw. A temporary adapter that is grounded before using an adapter. 13 If the control system is damaged, the walking belt may change speed, accelerate, or stop unexpectedly, which may be connected to determine if the outlet box cover is UL 1449 listed as a properly grounded outlet box...
English Manual
Page 14
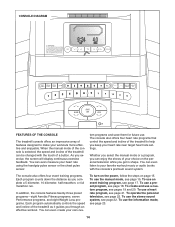
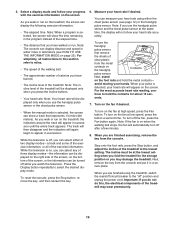
... with the touch of a button. To use a custom program, see page 22. The console also offers four heart rate programs that control the speed and incline of the treadmill can even measure your heart rate near target heart rate settings. When the manual mode of the console is selected, the speed and incline of the treadmill to help you exercise, the screen will display continuous exercise feedback. As you keep your heart rate using the handgrip pulse sensor or the chest pulse sensor.
... with the touch of a button. To use a custom program, see page 22. The console also offers four heart rate programs that control the speed and incline of the treadmill can even measure your heart rate near target heart rate settings. When the manual mode of the console is selected, the speed and incline of the treadmill to help you exercise, the screen will display continuous exercise feedback. As you keep your heart rate using the handgrip pulse sensor or the chest pulse sensor.
English Manual
Page 15
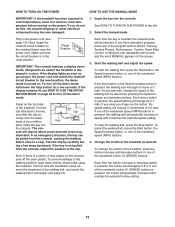
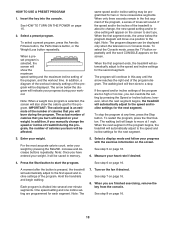
.... 1. Insert the key into the console. Reset Position IMPORTANT: The console features a display demo mode, designed to be used , observe the alignment of the program buttons (Event Training, Aerobic Fitness, Performance, Custom, Heart Rate Control, or Weight Loss) repeatedly until it reaches the selected speed setting. Stand on the button, the speed setting will begin to boot up. The first time the treadmill is used if the treadmill is inserted, the manual mode will require about...
.... 1. Insert the key into the console. Reset Position IMPORTANT: The console features a display demo mode, designed to be used , observe the alignment of the program buttons (Event Training, Aerobic Fitness, Performance, Custom, Heart Rate Control, or Weight Loss) repeatedly until it reaches the selected speed setting. Stand on the button, the speed setting will begin to boot up. The first time the treadmill is used if the treadmill is inserted, the manual mode will require about...
English Manual
Page 16
... the fan, press the Fan button again. When you walk or run . tinue to the lowest setting. To turn on the bottom of the treadmill to hold the metal contacts- The incline must be displayed only when you use the handgrip pulse sensor and the chest pulse sensor at the lowest setting when you fold the treadmill to miles. • The speed of the walking belt. • The approximate number of calories...
... the fan, press the Fan button again. When you walk or run . tinue to the lowest setting. To turn on the bottom of the treadmill to hold the metal contacts- The incline must be displayed only when you use the handgrip pulse sensor and the chest pulse sensor at the lowest setting when you fold the treadmill to miles. • The speed of the walking belt. • The approximate number of calories...
English Manual
Page 17
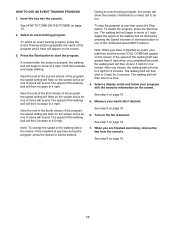
... TRAINING PROGRAM 1. Near the end of the third minute of the walking belt will sound. Note: When you are finished exercising, remove the key from the console. See step 5 on page 16. 17 Insert the key into the console. See step 8 on page 16. 5. Near the end of the fourth minute of tones will then slow to start the program. To restart the program, press the Start button. Turn...
... TRAINING PROGRAM 1. Near the end of the third minute of the walking belt will sound. Note: When you are finished exercising, remove the key from the console. See step 5 on page 16. 17 Insert the key into the console. See step 8 on page 16. 5. Near the end of the fourth minute of tones will then slow to start the program. To restart the program, press the Start button. Turn...
English Manual
Page 18
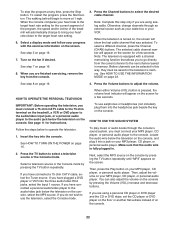
... you have entered your weight by pressing the Speed or Incline buttons; Note: The program diagram can override the setting by pressing the Rate/Wt. Select a display mode and follow your progress during the program, the number of the program are finished exercising, remove the key from the console. The program will depend on the screen. See step 7 on the screen. To stop . See HOW TO TURN ON THE POWER on the fan if...
... you have entered your weight by pressing the Speed or Incline buttons; Note: The program diagram can override the setting by pressing the Rate/Wt. Select a display mode and follow your progress during the program, the number of the program are finished exercising, remove the key from the console. The program will depend on the screen. See step 7 on the screen. To stop . See HOW TO TURN ON THE POWER on the fan if...

English Manual
Page 21
... program will automatically adjust to use a heart rate program. 1. Note: You must wear the chest pulse sensor to the first speed and incline settings of age and have heart prob- Note: If you are divided into 30 one -minute segments. Heart rate program 1 is too far below the program diagram will change the intensity level of the four heart rate programs. To select a heart rate program, press the Heart Rate Control button repeatedly. Select one position to start the program. If your heart rate...
... program will automatically adjust to use a heart rate program. 1. Note: You must wear the chest pulse sensor to the first speed and incline settings of age and have heart prob- Note: If you are divided into 30 one -minute segments. Heart rate program 1 is too far below the program diagram will change the intensity level of the four heart rate programs. To select a heart rate program, press the Heart Rate Control button repeatedly. Select one position to start the program. If your heart rate...
English Manual
Page 22
... of the program, the speed and/or incline of on the console. 22 Press the Channel buttons to adjust the volume. Otherwise, change to the console. The selected cable channel number will automatically change channels through the consoleʼs sound system, you must be selected in . See HOW TO USE THE INFORMATION MODE on the console, select the MP3 source. Press the TV button to go directly from the console. 3. If...
... of the program, the speed and/or incline of on the console. 22 Press the Channel buttons to adjust the volume. Otherwise, change to the console. The selected cable channel number will automatically change channels through the consoleʼs sound system, you must be selected in . See HOW TO USE THE INFORMATION MODE on the console, select the MP3 source. Press the TV button to go directly from the console. 3. If...
English Manual
Page 23
... console, and turn on the console will show the total number of miles or kilometers that the walking belt has moved (Distance) and the total number of the display, the "demo" mode is selected, the power cord can be plugged in, the key can select an equalizer setting to be selected; When you to view treadmill usage information, select a system of measurement if desired. When the TV button is scanning channels), remove...
... console, and turn on the console will show the total number of miles or kilometers that the walking belt has moved (Distance) and the total number of the display, the "demo" mode is selected, the power cord can be plugged in, the key can select an equalizer setting to be selected; When you to view treadmill usage information, select a system of measurement if desired. When the TV button is scanning channels), remove...
English Manual
Page 27
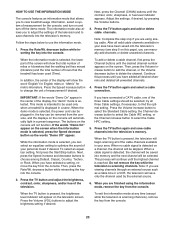
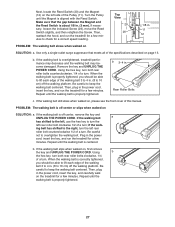
... power cord, insert the key, and run the treadmill for a correct speed reading. Then, plug in . (8 to check for a few minutes to 10 cm) off -center or slips when walked on , first remove the key and UNPLUG THE POWER CORD. If necessary, loosen the indicated Screw (29), move the Reed Switch slightly, and then retighten the Screw. If the walking belt a has shifted to the left rear roller bolt clockwise 1/2 of the Pulley...
... power cord, insert the key, and run the treadmill for a correct speed reading. Then, plug in . (8 to check for a few minutes to 10 cm) off -center or slips when walked on , first remove the key and UNPLUG THE POWER CORD. If necessary, loosen the indicated Screw (29), move the Reed Switch slightly, and then retighten the Screw. If the walking belt a has shifted to the left rear roller bolt clockwise 1/2 of the Pulley...
English Manual
Page 30
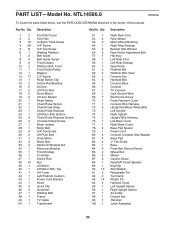
...Belt Guide Screw Front Isolator Platform Bolt, Front Front Roller/Pulley Magnet 1/2" Screw Reed Switch Clip Incline Rod Bushing Lift Arm Lift Pivot Bolt Hood Mount Lift Arm Spacer Reed Switch Chest Pulse Sensor Chest Pulse Strap Chest Pulse Receiver Lift Motor Bolt, Bottom Chest Pulse Receiver Screw Console Clamp Screw Motor Isolator Motor Belt 3/4" Tek Screw Lift Pivot Bolt Drive Motor Motor Bolt Electronic Bracket Nut Electronic Bracket Front Endcap Controller Incline Rod Nut Lift Motor Lift Motor Bolt, Top AV Cover Left Platform Cushion Power Cord Bracket Hood Hood Clip Grommet Walking Belt...
...Belt Guide Screw Front Isolator Platform Bolt, Front Front Roller/Pulley Magnet 1/2" Screw Reed Switch Clip Incline Rod Bushing Lift Arm Lift Pivot Bolt Hood Mount Lift Arm Spacer Reed Switch Chest Pulse Sensor Chest Pulse Strap Chest Pulse Receiver Lift Motor Bolt, Bottom Chest Pulse Receiver Screw Console Clamp Screw Motor Isolator Motor Belt 3/4" Tek Screw Lift Pivot Bolt Drive Motor Motor Bolt Electronic Bracket Nut Electronic Bracket Front Endcap Controller Incline Rod Nut Lift Motor Lift Motor Bolt, Top AV Cover Left Platform Cushion Power Cord Bracket Hood Hood Clip Grommet Walking Belt...
English Manual
Page 31
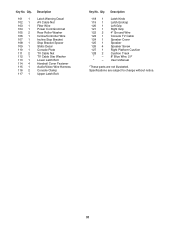
... 4 127 1 128 2 * - * - Qty. Key No. Description 101 1 102 1 103 1 104 1 105 2 106 1 107 1 108 1 109 1 110 1 111 2 112 1 113 1 114 4 115 1 116 2 117 1 Latch Warning Decal AV Cable Nut Filter Wire Power Cord Grommet Rear Roller Washer Incline/Controller Wire Incline Stop Bracket Stop Bracket Spacer Static Decal Console Plate TV Cable Nut TV Cable Star Washer Lower Latch Bolt Handrail Cover Fastener Audio/Video Wire Harness Console Clamp Upper Latch Bolt Key No. Specifications are not illustrated. Qty.
... 4 127 1 128 2 * - * - Qty. Key No. Description 101 1 102 1 103 1 104 1 105 2 106 1 107 1 108 1 109 1 110 1 111 2 112 1 113 1 114 4 115 1 116 2 117 1 Latch Warning Decal AV Cable Nut Filter Wire Power Cord Grommet Rear Roller Washer Incline/Controller Wire Incline Stop Bracket Stop Bracket Spacer Static Decal Console Plate TV Cable Nut TV Cable Star Washer Lower Latch Bolt Handrail Cover Fastener Audio/Video Wire Harness Console Clamp Upper Latch Bolt Key No. Specifications are not illustrated. Qty.
English Manual
Page 34
... duration to you . ORDERING REPLACEMENT PARTS To order replacement parts, please see the PART LIST near the end of this manual. If the product is in lieu of any and all other rights that specifically set forth herein. All repairs for which warranty claims are warranted for indirect, special, or consequential damages arising out of enjoyment or use and service conditions. Accordingly, the...
... duration to you . ORDERING REPLACEMENT PARTS To order replacement parts, please see the PART LIST near the end of this manual. If the product is in lieu of any and all other rights that specifically set forth herein. All repairs for which warranty claims are warranted for indirect, special, or consequential damages arising out of enjoyment or use and service conditions. Accordingly, the...


