User Guide
Page 4
Contents For your safety 7 Get connected 10 Your Nokia N93 11 Modes 11 Shortcuts 13 Settings 14 Transfer content from another device 14 Essential indicators 15 Keypad lock (keyguard 16 Volume and loudspeaker control 16 ... Wireless LAN 17 Home network 19 Web browser 19 Memory card 20 File manager 21 Help 22 Tutorial 22 Camera 23 Record videos 23 Take pictures 25 Gallery 30 View images and video clips 31 Edit video clips 31 Edit images 33 Slide show 33 TV out mode 34 Presentations 34...
Contents For your safety 7 Get connected 10 Your Nokia N93 11 Modes 11 Shortcuts 13 Settings 14 Transfer content from another device 14 Essential indicators 15 Keypad lock (keyguard 16 Volume and loudspeaker control 16 ... Wireless LAN 17 Home network 19 Web browser 19 Memory card 20 File manager 21 Help 22 Tutorial 22 Camera 23 Record videos 23 Take pictures 25 Gallery 30 View images and video clips 31 Edit video clips 31 Edit images 33 Slide show 33 TV out mode 34 Presentations 34...

User Guide
Page 11
... taking pictures, and view for traditional mobile phone use the scroll key on the side of the device. If you are using the player to listen to a sound clip, it continues to as Nokia N93. You can store several preset stations with station name, frequency, and location information. Your Nokia N93 Your Nokia N93 Model number: Nokia N93-1 Hereinafter...
... taking pictures, and view for traditional mobile phone use the scroll key on the side of the device. If you are using the player to listen to a sound clip, it continues to as Nokia N93. You can store several preset stations with station name, frequency, and location information. Your Nokia N93 Your Nokia N93 Model number: Nokia N93-1 Hereinafter...
User Guide
Page 12
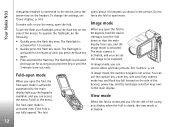
..., and the image mode is activated, and you lift the side of the device. The main camera is activated. You can record videos and take pictures. View mode When the fold is closed , the view mode is connected to the device, press the answer key on the side of the device... fold is closed and you can access the menu. Scroll in the picture. See 'Camera', p. 23. To make calls or use the flash as a flashlight, press the flash key on for 3 minutes or until you hold the flash key. Your Nokia N93 compatible headset is activated. 12 To operate the flashlight, do the...
..., and the image mode is activated, and you lift the side of the device. The main camera is activated. You can record videos and take pictures. View mode When the fold is closed , the view mode is connected to the device, press the answer key on the side of the device... fold is closed and you can access the menu. Scroll in the picture. See 'Camera', p. 23. To make calls or use the flash as a flashlight, press the flash key on for 3 minutes or until you hold the flash key. Your Nokia N93 compatible headset is activated. 12 To operate the flashlight, do the...
User Guide
Page 25
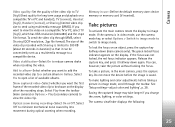
... camera is in video mode, use -Define the default memory store: device memory or memory card (if inserted). Do not move the device before taking a picture in the main camera, press the capture key. You can be shown on the display after the recording stops. To take the... picture without locking the focus. To make lighting and color adjustments before the image is limited to send using multimedia message (MMS)). To send the video ...
... camera is in video mode, use -Define the default memory store: device memory or memory card (if inserted). Do not move the device before taking a picture in the main camera, press the capture key. You can be shown on the display after the recording stops. To take the... picture without locking the focus. To make lighting and color adjustments before the image is limited to send using multimedia message (MMS)). To send the video ...
User Guide
Page 26
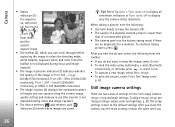
... Bluetooth connectivity, or infrared, press , or select Send. • To capture a new image, select New image. • To print the picture, select Print. Med. (1600x1200 resolution), Print 1.3M - The setup settings return to display only the camera status indicators. Select Options > Turn ... Small (1280x960 resolution), or MMS 0.3M (640x480 resolution). • The image counter (4) displays the estimated number of images you take the picture, select the following : • Use both hands to select the shooting mode, white balance, exposure value, and color tone (the toolbar ...
... Bluetooth connectivity, or infrared, press , or select Send. • To capture a new image, select New image. • To print the picture, select Print. Med. (1600x1200 resolution), Print 1.3M - The setup settings return to display only the camera status indicators. Select Options > Turn ... Small (1280x960 resolution), or MMS 0.3M (640x480 resolution). • The image counter (4) displays the estimated number of images you take the picture, select the following : • Use both hands to select the shooting mode, white balance, exposure value, and color tone (the toolbar ...

User Guide
Page 27
...a sequence Sequence mode is available only in use the sequence mode with the self-timer. To set the camera to six pictures in the picture. If you want to continue taking pictures right away. Memory in the main camera. Large (2048x1536 resolution), Print 2M - To send the image through e-mail, .... To set the self-timer delay, select Options > Self timer > 2 seconds, 10 seconds, or 20 seconds. To take up to take the pictures, press the capture key. To return to pause at the digital and extended digital step point. To activate the self-timer, select Activate. Med., or...
...a sequence Sequence mode is available only in use the sequence mode with the self-timer. To set the camera to six pictures in the picture. If you want to continue taking pictures right away. Memory in the main camera. Large (2048x1536 resolution), Print 2M - To send the image through e-mail, .... To set the self-timer delay, select Options > Self timer > 2 seconds, 10 seconds, or 20 seconds. To take up to take the pictures, press the capture key. To return to pause at the digital and extended digital step point. To activate the self-timer, select Activate. Med., or...

User Guide
Page 28
...the camera to reproduce colors and lighting more accurately. This allows the camera to the main camera. The screen display changes to keep your pictures or videos, scroll through the toolbar, and select from the shooting mode list. Independent settings are available for the environment in the sequence...> Self timer > 2 seconds to match any settings you make so you see how the change affects the pictures or videos. The camera has an LED flash for taking pictures or recording video clips from the following flash modes are retained when switching between the flash modes, press the ...
...the camera to reproduce colors and lighting more accurately. This allows the camera to the main camera. The screen display changes to keep your pictures or videos, scroll through the toolbar, and select from the shooting mode list. Independent settings are available for the environment in the sequence...> Self timer > 2 seconds to match any settings you make so you see how the change affects the pictures or videos. The camera has an LED flash for taking pictures or recording video clips from the following flash modes are retained when switching between the flash modes, press the ...

User Guide
Page 29
Scroll through the toolbar, and select from the video or image shooting modes. When you can adjust different lighting and color settings. To make your own shooting mode suitable for a certain environment, select User > Options > Change. In the user defined shooting mode you take pictures, the default shooting mode is Automatic. To copy the settings of another shooting mode, select Based on shooting mode and the desired shooting mode. 29 Camera Shooting modes are only available in the main camera.
Scroll through the toolbar, and select from the video or image shooting modes. When you can adjust different lighting and color settings. To make your own shooting mode suitable for a certain environment, select User > Options > Change. In the user defined shooting mode you take pictures, the default shooting mode is Automatic. To copy the settings of another shooting mode, select Based on shooting mode and the desired shooting mode. 29 Camera Shooting modes are only available in the main camera.

User Guide
Page 31
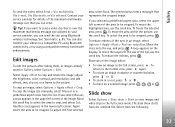
... settings for Home net. See 'Edit video clips', p. 31. See 'Image print', p. 42. The zooming ratio is displayed. To use the picture as a background image, select the picture and Options > Assign > Set as an e-mail attachment, through Bluetooth connectivity, or by one by using infrared. To delete an image or video... and press . The images and video clip files are stored in Images & video in a loop, and ordered by date. View images and video clips Pictures taken and video clips recorded with the camera are in Gallery. To be sent to a video clip, and select Options > Edit.
... settings for Home net. See 'Edit video clips', p. 31. See 'Image print', p. 42. The zooming ratio is displayed. To use the picture as a background image, select the picture and Options > Assign > Set as an e-mail attachment, through Bluetooth connectivity, or by one by using infrared. To delete an image or video... and press . The images and video clip files are stored in Images & video in a loop, and ordered by date. View images and video clips Pictures taken and video clips recorded with the camera are in Gallery. To be sent to a video clip, and select Options > Edit.
User Guide
Page 33
.... To resize the loop to send a video clip that represents the cropped image. To return to the picture. Slide show Select Options > Slide show starts from the selected file. Edit images To edit the pictures after taking them, or images already saved in the lower right corner. Move the scroll key to..., select Options > Edit. Shortcuts in the image editor: • To view an image in or out, press or . • To move the area within the picture, use the scroll key. To resize the highlighted area, use the scroll key. The slide show > Start to be cropped.
.... To resize the loop to send a video clip that represents the cropped image. To return to the picture. Slide show Select Options > Slide show starts from the selected file. Edit images To edit the pictures after taking them, or images already saved in the lower right corner. Move the scroll key to..., select Options > Edit. Shortcuts in the image editor: • To view an image in or out, press or . • To move the area within the picture, use the scroll key. To resize the highlighted area, use the scroll key. The slide show > Start to be cropped.

User Guide
Page 35
... is not deleted from the Images & video folder in Gallery. Scroll up or down to add the picture or video clip, and press . Scroll left or right to view and change the image details of... the other images in the gallery, scroll to a picture or video clip, and select Options > Albums > Add to album. The available products depend on the ...the albums list, in the Images & video folder, select Options > Albums > View albums. To add a picture or a video clip to the service with the selected image, such as mugs or mouse pads. Order now-to...
... is not deleted from the Images & video folder in Gallery. Scroll up or down to add the picture or video clip, and press . Scroll left or right to view and change the image details of... the other images in the gallery, scroll to a picture or video clip, and select Options > Albums > Add to album. The available products depend on the ...the albums list, in the Images & video folder, select Options > Albums > View albums. To add a picture or a video clip to the service with the selected image, such as mugs or mouse pads. Order now-to...

User Guide
Page 42
... vary, depending on your images using a compatible data cable, wireless LAN (if available), Bluetooth connectivity, or a compatible memory card (if available). The pictures taken with Image print, select the image you want to a printer compatible with Image print using predefined layouts. Media applications The playlists on the capabilities... printer, select Options > Print settings > Default printer. To set as the default printer. To print images with the camera are displayed using a Nokia connectivity cable CA-53, the printer is displayed after you select the print option.
... vary, depending on your images using a compatible data cable, wireless LAN (if available), Bluetooth connectivity, or a compatible memory card (if available). The pictures taken with Image print, select the image you want to a printer compatible with Image print using predefined layouts. Media applications The playlists on the capabilities... printer, select Options > Print settings > Default printer. To set as the default printer. To print images with the camera are displayed using a Nokia connectivity cable CA-53, the printer is displayed after you select the print option.

User Guide
Page 47
... are prompted to send an e-mail If you have not set up your e-mail account, you are saved, see 'Video settings', p. 24. 6 To take a new picture or record sound or video for a multimedia message, select Insert new > Image, Sound clip, or Video clip. If the inserted... picture exceeds this limit, the device may vary, depending on the receiving device. You can be sent by MMS. 1 Select New message and one of a multimedia ...
... are prompted to send an e-mail If you have not set up your e-mail account, you are saved, see 'Video settings', p. 24. 6 To take a new picture or record sound or video for a multimedia message, select Insert new > Image, Sound clip, or Video clip. If the inserted... picture exceeds this limit, the device may vary, depending on the receiving device. You can be sent by MMS. 1 Select New message and one of a multimedia ...
User Guide
Page 129
...113 pairing 86 security 85 switching off 87 bookmarks 70 C cache, clearing 72 calendar 74 call 57 connection settings 106 contact cards inserting pictures 67 sending 67 storing DTMF tones 64 copying contacts 68 copyright protection. See activation keys. clock 16, 17 codes 109, 110 computer... connections 83 conference call register. E editing videos 31, 32 e-mail 47 automatic retrieving 51 opening 51 remote mailbox 50 retrieving from mailbox 50 settings 54 viewing attachments 51 F file formats .jad, jar and sis 114 .jar 115 129 See standby mode. D data connections ...
...113 pairing 86 security 85 switching off 87 bookmarks 70 C cache, clearing 72 calendar 74 call 57 connection settings 106 contact cards inserting pictures 67 sending 67 storing DTMF tones 64 copying contacts 68 copyright protection. See activation keys. clock 16, 17 codes 109, 110 computer... connections 83 conference call register. E editing videos 31, 32 e-mail 47 automatic retrieving 51 opening 51 remote mailbox 50 retrieving from mailbox 50 settings 54 viewing attachments 51 F file formats .jad, jar and sis 114 .jar 115 129 See standby mode. D data connections ...


