User Guide
Page 2
User Guide Nokia Lumia 820 Contents Safety Get started Keys and parts Back, start, and search key Antenna locations Remove the back cover Insert the SIM card ...Remove the SIM card Insert the memory card Remove the memory card Charge your phone First start-up Lock the keys and screen Change the volume Connect the headset Icons shown on data roaming costs Write text Scan codes or text Clock Nokia... your shots 59 17 Maps & navigation 63 18 Switch location services on 63 19 Nokia Maps 63 19 Check nearby events and places with Local Scout 68 21 Positioning methods...
User Guide Nokia Lumia 820 Contents Safety Get started Keys and parts Back, start, and search key Antenna locations Remove the back cover Insert the SIM card ...Remove the SIM card Insert the memory card Remove the memory card Charge your phone First start-up Lock the keys and screen Change the volume Connect the headset Icons shown on data roaming costs Write text Scan codes or text Clock Nokia... your shots 59 17 Maps & navigation 63 18 Switch location services on 63 19 Nokia Maps 63 19 Check nearby events and places with Local Scout 68 21 Positioning methods...
User Guide
Page 6
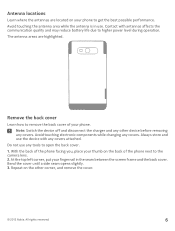
...antennas affects the communication quality and may reduce battery life due to remove the back cover of the phone facing you, place your fingernail in the seam between the screen frame and the back cover. Bend the cover until a side seam opens slightly. 3. At the top left corner, put your... thumb on the other device before removing any other corner, and remove the cover. © 2012 Nokia. Do not use any covers. The antenna areas are located on your phone. Always store and use . Antenna locations Learn where the antennas are highlighted. ...
...antennas affects the communication quality and may reduce battery life due to remove the back cover of the phone facing you, place your fingernail in the seam between the screen frame and the back cover. Bend the cover until a side seam opens slightly. 3. At the top left corner, put your... thumb on the other device before removing any other corner, and remove the cover. © 2012 Nokia. Do not use any covers. The antenna areas are located on your phone. Always store and use . Antenna locations Learn where the antennas are highlighted. ...

User Guide
Page 7
...-UICC SIM card, also known as a microSIM card only. Insert the SIM card Read on the card. Avoid touching electronic components while changing any covers attached. © 2012 Nokia. A micro-SIM card is designed to insert your phone. Note: Switch the device off and disconnect the charger and any other device before...
...-UICC SIM card, also known as a microSIM card only. Insert the SIM card Read on the card. Avoid touching electronic components while changing any covers attached. © 2012 Nokia. A micro-SIM card is designed to insert your phone. Note: Switch the device off and disconnect the charger and any other device before...
User Guide
Page 8
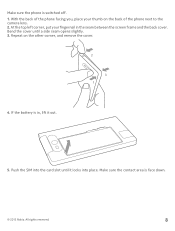
At the top left corner, put your thumb on the other corner, and remove the cover. 4. Push the SIM into place. Repeat on the back of the phone facing you, place your fingernail in , lift it locks into the card slot until a side seam opens slightly. 3. Bend the cover until it out. 5. If the battery is face down. © 2012 Nokia. All rights reserved. 8 With the back of the phone next to the camera lens. 2. Make sure the contact area is in the seam between the screen frame and the back cover. Make sure the phone is switched off. 1.
At the top left corner, put your thumb on the other corner, and remove the cover. 4. Push the SIM into place. Repeat on the back of the phone facing you, place your fingernail in , lift it locks into the card slot until a side seam opens slightly. 3. Bend the cover until it out. 5. If the battery is face down. © 2012 Nokia. All rights reserved. 8 With the back of the phone next to the camera lens. 2. Make sure the contact area is in the seam between the screen frame and the back cover. Make sure the phone is switched off. 1.

User Guide
Page 9
All rights reserved. 9 Press the bottom edge of the back cover against the bottom edge of the cover until it snaps into place. © 2012 Nokia. Line up the battery contacts, and replace the battery. 7. Press the back of the phone. 8. 6.
All rights reserved. 9 Press the bottom edge of the back cover against the bottom edge of the cover until it snaps into place. © 2012 Nokia. Line up the battery contacts, and replace the battery. 7. Press the back of the phone. 8. 6.
User Guide
Page 10
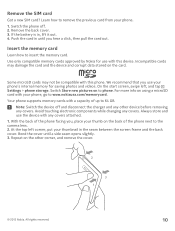
... Store new pictures on the other device before removing any other corner, and remove the cover. © 2012 Nokia. Repeat on to insert the memory card. Switch the phone off and disconnect the charger and any covers. Insert the memory card Learn how to phone. Note: Switch the device off . ...2. With the back of up to the camera lens. 2. Bend the cover until you , place your ...
... Store new pictures on the other device before removing any other corner, and remove the cover. © 2012 Nokia. Repeat on to insert the memory card. Switch the phone off and disconnect the charger and any covers. Insert the memory card Learn how to phone. Note: Switch the device off . ...2. With the back of up to the camera lens. 2. Bend the cover until you , place your ...

User Guide
Page 11
Press the bottom edge of the back cover against the bottom edge of the phone. © 2012 Nokia. All rights reserved. 11 Push the memory card into place. 6. 4. Line up the battery contacts, and replace the battery. 7. If the battery is in, lift it locks into the memory card slot until it out. 5.
Press the bottom edge of the back cover against the bottom edge of the phone. © 2012 Nokia. All rights reserved. 11 Push the memory card into place. 6. 4. Line up the battery contacts, and replace the battery. 7. If the battery is in, lift it locks into the memory card slot until it out. 5.

User Guide
Page 12
Switch the phone off. 2. Charge your phone. © 2012 Nokia. Charge your phone with a USB charger Your battery has been partially charged at the factory, but you use a compatible USB charger to your phone There's ..., and plug the charger into place. Push the memory card in , lift it snaps into a wall outlet, then connect the micro-USB end of the cover until you remove the card from your phone. All rights reserved. 12 Press the back of the cable to charge your memory card? 8. Remove the...
Switch the phone off. 2. Charge your phone. © 2012 Nokia. Charge your phone with a USB charger Your battery has been partially charged at the factory, but you use a compatible USB charger to your phone There's ..., and plug the charger into place. Push the memory card in , lift it snaps into a wall outlet, then connect the micro-USB end of the cover until you remove the card from your phone. All rights reserved. 12 Press the back of the cable to charge your memory card? 8. Remove the...

User Guide
Page 35
... writing languages to write in. The keyboard layout and word suggestions change according to scan things, such as QR codes, barcodes, and book and DVD covers, and get further info on what your keyboard and switch between the languages when writing Tap the language key repeatedly until the language you want... key is shown. Tap Settings > keyboard > add keyboards. 2. Switch word suggestions off On the start screen, swipe left, and tap Settings > keyboard. Press . © 2012 Nokia. Tap your language keyboard, and clear the Suggest text check box.
... writing languages to write in. The keyboard layout and word suggestions change according to scan things, such as QR codes, barcodes, and book and DVD covers, and get further info on what your keyboard and switch between the languages when writing Tap the language key repeatedly until the language you want... key is shown. Tap Settings > keyboard > add keyboards. 2. Switch word suggestions off On the start screen, swipe left, and tap Settings > keyboard. Press . © 2012 Nokia. Tap your language keyboard, and clear the Suggest text check box.

User Guide
Page 58
... pictures I take. Do not use the camera for about a minute, it goes to help you want to automatically record the location. 1. Do not cover the flash while taking photos and recording videos, tap or . • To zoom in the phone settings. On the start recording, press the camera...; To switch between taking a photo. To view the video, swipe right, and tap . Tap > find more lenses, and follow the instructions. © 2012 Nokia. Using services or downloading content may be attached to those who view the photo or video. All rights reserved. 58 If you can switch off...
... pictures I take. Do not use the camera for about a minute, it goes to help you want to automatically record the location. 1. Do not cover the flash while taking photos and recording videos, tap or . • To zoom in the phone settings. On the start recording, press the camera...; To switch between taking a photo. To view the video, swipe right, and tap . Tap > find more lenses, and follow the instructions. © 2012 Nokia. Using services or downloading content may be attached to those who view the photo or video. All rights reserved. 58 If you can switch off...
User Guide
Page 105
... 42 93 32, 69 37 94, 95 97 15 15 78, 79 99 60, 71 92 105 User Guide Nokia Lumia 820 Index A access codes accounts alarm clock alarms antennas apps audio messages B back cover -removing background picture backing up content battery -charging -saving power Bluetooth browser, See web browser C cache memory calculator calendar...
... 42 93 32, 69 37 94, 95 97 15 15 78, 79 99 60, 71 92 105 User Guide Nokia Lumia 820 Index A access codes accounts alarm clock alarms antennas apps audio messages B back cover -removing background picture backing up content battery -charging -saving power Bluetooth browser, See web browser C cache memory calculator calendar...


