User Guide
Page 2
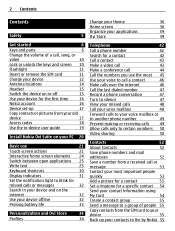
...device 12 Antenna locations 14 Headset 15 Switch the device on or off 15 Use your device for the first time 16 Nokia account 16 Device set-up 17 Copy contacts or pictures from your old device 17 Access codes 18 Use the in-...device user guide 19 Install Nokia Ovi Suite on your PC 20 Basic use 21 Touch screen actions 21 Interactive home screen elements 24 Switch between open ... of people 55 Copy contacts from the SIM card to your device 55 Back up your contacts to Ovi by Nokia 55
...device 12 Antenna locations 14 Headset 15 Switch the device on or off 15 Use your device for the first time 16 Nokia account 16 Device set-up 17 Copy contacts or pictures from your old device 17 Access codes 18 Use the in-...device user guide 19 Install Nokia Ovi Suite on your PC 20 Basic use 21 Touch screen actions 21 Interactive home screen elements 24 Switch between open ... of people 55 Copy contacts from the SIM card to your device 55 Back up your contacts to Ovi by Nokia 55

User Guide
Page 3
... messages 57 View a conversation 58 Listen to a text message 58 Change language 59 Mail 59 About Mail 59 Get a free mail account from Ovi by Nokia 60 Add a mailbox 60 Read mail 60 Send mail 61 Respond to a meeting request 61 Open mail from the home screen 62 Internet 62 About...
... messages 57 View a conversation 58 Listen to a text message 58 Change language 59 Mail 59 About Mail 59 Get a free mail account from Ovi by Nokia 60 Add a mailbox 60 Read mail 60 Send mail 61 Respond to a meeting request 61 Open mail from the home screen 62 Internet 62 About...
User Guide
Page 4
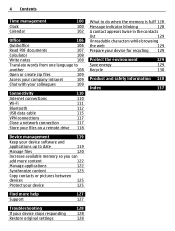
4 Contents Time management 100 Clock 100 Calendar 102 Office 106 Quickoffice 106 Read PDF documents 107 Calculator 108 Write notes 108 Translate words from one language to another 108 Open or create zip files 109 Access your company intranet 109 Chat with your colleagues 109 Connectivity 110 Internet connections 110 Wi-Fi 111 Bluetooth 112 USB data cable 115 VPN connections 117 Close a network connection 117 Store your files on a remote drive 118 What to do when the memory is full? 128 Message indicator blinking 128 A contact appears twice in the ...
4 Contents Time management 100 Clock 100 Calendar 102 Office 106 Quickoffice 106 Read PDF documents 107 Calculator 108 Write notes 108 Translate words from one language to another 108 Open or create zip files 109 Access your company intranet 109 Chat with your colleagues 109 Connectivity 110 Internet connections 110 Wi-Fi 111 Bluetooth 112 USB data cable 115 VPN connections 117 Close a network connection 117 Store your files on a remote drive 118 What to do when the memory is full? 128 Message indicator blinking 128 A contact appears twice in the ...
User Guide
Page 5
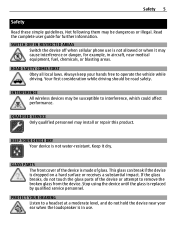
ROAD SAFETY COMES FIRST Obey all local laws. INTERFERENCE All wireless devices may cause interference or danger, for further information. Keep it may be susceptible to operate the vehicle while driving. Stop using the device until the glass is made of glass. PROTECT YOUR HEARING Listen to a headset at a moderate level, and do not touch the glass parts of the device is replaced by qualified service personnel. Always keep your ear when the loudspeaker is not allowed or when it dry. GLASS PARTS The front cover of the device or attempt to remove the broken glass from...
ROAD SAFETY COMES FIRST Obey all local laws. INTERFERENCE All wireless devices may cause interference or danger, for further information. Keep it may be susceptible to operate the vehicle while driving. Stop using the device until the glass is made of glass. PROTECT YOUR HEARING Listen to a headset at a moderate level, and do not touch the glass parts of the device is replaced by qualified service personnel. Always keep your ear when the loudspeaker is not allowed or when it dry. GLASS PARTS The front cover of the device or attempt to remove the broken glass from...

User Guide
Page 6
6 Get started Get started Keys and parts Top 1 Nokia AV connector (3.5 mm) 2 Power key 3 HDMI™ connector 4 Charging indicator 5 USB connector Front 1 Earpiece 2 Light sensor 3 Menu key 4 Front camera
6 Get started Get started Keys and parts Top 1 Nokia AV connector (3.5 mm) 2 Power key 3 HDMI™ connector 4 Charging indicator 5 USB connector Front 1 Earpiece 2 Light sensor 3 Menu key 4 Front camera

User Guide
Page 8
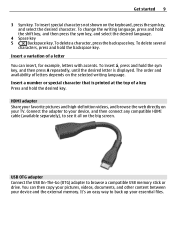
To enter several special characters in upper case mode, press the shift key, and then press the desired alphabet key. To return to landscape when you open the keyboard, lift the touch screen up. To switch between the upper and lower case modes, press the shift key twice. To insert special characters printed at the top of keys, press the function key, and then press the corresponding key. 8 Get started Bottom 1 Microphone Keyboard Your device has a full keyboard. The display rotates automatically from portrait to normal mode, press the function key. 2 Shift key. To enter a...
To enter several special characters in upper case mode, press the shift key, and then press the desired alphabet key. To return to landscape when you open the keyboard, lift the touch screen up. To switch between the upper and lower case modes, press the shift key twice. To insert special characters printed at the top of keys, press the function key, and then press the corresponding key. 8 Get started Bottom 1 Microphone Keyboard Your device has a full keyboard. The display rotates automatically from portrait to normal mode, press the function key. 2 Shift key. To enter a...
User Guide
Page 9
You can insert, for example, letters with accents. To delete several characters, press and hold the shift key, and then press the sym key, and select the desired language. 4 Space key 5 Backspace key. Insert a number or special character that is displayed. Connect the adapter to your device, and then connect any compatible HDMI cable (available separately), to see it all on your essential files. To delete a character, press the backspace key. Get started 9 3 Sym key. USB OTG adapter Connect the USB On-The-Go (OTG) adapter to back up your TV. The order and ...
You can insert, for example, letters with accents. To delete several characters, press and hold the shift key, and then press the sym key, and select the desired language. 4 Space key 5 Backspace key. Insert a number or special character that is displayed. Connect the adapter to your device, and then connect any compatible HDMI cable (available separately), to see it all on your essential files. To delete a character, press the backspace key. Get started 9 3 Sym key. USB OTG adapter Connect the USB On-The-Go (OTG) adapter to back up your TV. The order and ...
User Guide
Page 10
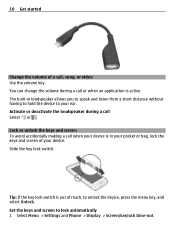
Lock or unlock the keys and screen To avoid accidentally making a call or when an application is in loudspeaker allows you to speak and listen from a short distance without having to hold the device to your ear. You can change the volume during a call , song, or video Use the volume key. Activate or deactivate the loudspeaker during a call when your device. Set the keys and screen to unlock the device, press the menu key, and select Unlock. Tip: If the key lock switch is out of your device is active. 10 Get started Change the volume of a call Select or . The built-in ...
Lock or unlock the keys and screen To avoid accidentally making a call or when an application is in loudspeaker allows you to speak and listen from a short distance without having to hold the device to your ear. You can change the volume during a call , song, or video Use the volume key. Activate or deactivate the loudspeaker during a call when your device. Set the keys and screen to unlock the device, press the menu key, and select Unlock. Tip: If the key lock switch is out of your device is active. 10 Get started Change the volume of a call Select or . The built-in ...
User Guide
Page 11
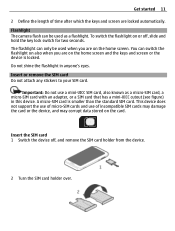
A micro-SIM card is locked. Insert the SIM card 1 Switch the device off , slide and hold the key lock switch for two seconds. Get started 11 2 Define the length of time after which the keys and screen are on the home screen and the keys and screen or the device is smaller than the standard SIM card. To switch the flashlight on the card. The flashlight can only be used when you are on also when you are locked automatically. Important: Do not use of micro-SIM cards and use a mini-UICC SIM card, also known as a flashlight. Flashlight The camera flash can switch the ...
A micro-SIM card is locked. Insert the SIM card 1 Switch the device off , slide and hold the key lock switch for two seconds. Get started 11 2 Define the length of time after which the keys and screen are on the home screen and the keys and screen or the device is smaller than the standard SIM card. To switch the flashlight on the card. The flashlight can only be used when you are on also when you are locked automatically. Important: Do not use of micro-SIM cards and use a mini-UICC SIM card, also known as a flashlight. Flashlight The camera flash can switch the ...
User Guide
Page 12
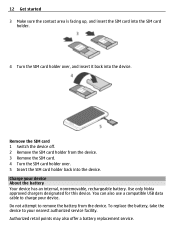
... attempt to your nearest authorized service facility. Remove the SIM card 1 Switch the device off. 2 Remove the SIM card holder from the device. Use only Nokia approved chargers designated for this device.
... attempt to your nearest authorized service facility. Remove the SIM card 1 Switch the device off. 2 Remove the SIM card holder from the device. Use only Nokia approved chargers designated for this device.
User Guide
Page 13
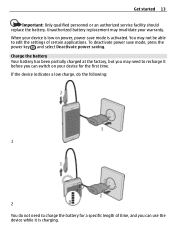
If the device indicates a low charge, do the following: 1 2 You do not need to edit the settings of time, and you can switch on power, power save mode, press the power key , and select Deactivate power saving. Unauthorized battery replacement may not be able to recharge it before you may need to charge the battery for the first time. Get started 13 Important: Only qualified personnel or an authorized service facility should replace the battery. Charge the battery Your battery has been partially charged at the factory, but you can use the device while it is charging. To ...
If the device indicates a low charge, do the following: 1 2 You do not need to edit the settings of time, and you can switch on power, power save mode, press the power key , and select Deactivate power saving. Unauthorized battery replacement may not be able to recharge it before you may need to charge the battery for the first time. Get started 13 Important: Only qualified personnel or an authorized service facility should replace the battery. Charge the battery Your battery has been partially charged at the factory, but you can use the device while it is charging. To ...
User Guide
Page 14
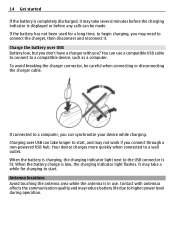
To avoid breaking the charger connector, be made. Charging over USB Battery low, but you don't have a charger with antennas affects the communication quality and may reduce battery life due to higher power level during operation. When the battery charge is in use a compatible USB cable to connect to connect the charger, then disconnect and reconnect it may take several minutes before the charging indicator is lit. Antenna locations Avoid touching the antenna area while the antenna is low, the charging indicator light flashes. Charge the battery over USB can be careful when ...
To avoid breaking the charger connector, be made. Charging over USB Battery low, but you don't have a charger with antennas affects the communication quality and may reduce battery life due to higher power level during operation. When the battery charge is in use a compatible USB cable to connect to connect the charger, then disconnect and reconnect it may take several minutes before the charging indicator is lit. Antenna locations Avoid touching the antenna area while the antenna is low, the charging indicator light flashes. Charge the battery over USB can be careful when ...

User Guide
Page 15
Switch the device on or off Press and hold the power key until the device vibrates. Switch off Switch on Press and hold the power key . Headset You can connect a compatible headset or compatible headphones to your device. Get started 15 The antenna area is highlighted.
Switch the device on or off Press and hold the power key until the device vibrates. Switch off Switch on Press and hold the power key . Headset You can connect a compatible headset or compatible headphones to your device. Get started 15 The antenna area is highlighted.
User Guide
Page 16
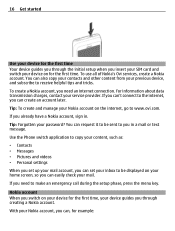
... • Messages • Pictures and videos • Personal settings When you set your inbox to be sent to www.ovi.com. With your mail. Nokia account When you switch on your device for the first time, your device guides you through the initial setup when you insert your SIM card...You can , for example: Tip: Forgotten your previous device, and subscribe to be displayed on for the first time. To use all of Nokia's Ovi services, create a Nokia account. You can 't connect to make an emergency call during the setup phase, press the menu key. 16 Get started Use your device ...
... • Messages • Pictures and videos • Personal settings When you set your inbox to be sent to www.ovi.com. With your mail. Nokia account When you switch on your device for the first time, your device guides you through the initial setup when you insert your SIM card...You can , for example: Tip: Forgotten your previous device, and subscribe to be displayed on for the first time. To use all of Nokia's Ovi services, create a Nokia account. You can 't connect to make an emergency call during the setup phase, press the menu key. 16 Get started Use your device ...
User Guide
Page 17
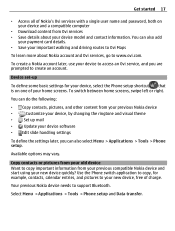
...copy, for your device, select the Phone setup shortcut that is on your device and a compatible computer • Download content from your previous Nokia device • Customize your device, by changing the ringtone and visual theme • Set up To define some basic settings for example, contacts...Menu > Applications > Tools > Phone setup. Copy contacts or pictures from your old device Want to copy important information from your previous compatible Nokia device and start using your new device, free of your device to access an Ovi service, and you can do the following: •...
...copy, for your device, select the Phone setup shortcut that is on your device and a compatible computer • Download content from your previous Nokia device • Customize your device, by changing the ringtone and visual theme • Set up To define some basic settings for example, contacts...Menu > Applications > Tools > Phone setup. Copy contacts or pictures from your old device Want to copy important information from your previous compatible Nokia device and start using your new device, free of your device to access an Ovi service, and you can do the following: •...
User Guide
Page 18
For details, see the user guide of the device. The passcode is fixed. 18 Get started If your previous Nokia device does not have the Phone switch application, your new device sends it on. You can define yourself, must be activated. 2 If the other device ...
For details, see the user guide of the device. The passcode is fixed. 18 Get started If your previous Nokia device does not have the Phone switch application, your new device sends it on. You can define yourself, must be activated. 2 If the other device ...
User Guide
Page 19
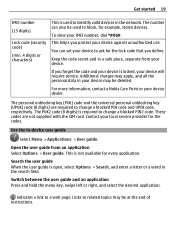
..., swipe left or right, and select the desired application. You can also be used to identify valid devices in the network. For more information, contact a Nokia Care Point or your device may be at the end of instructions. These codes are required to change a blocked PIN2 code. Search the user guide...
..., swipe left or right, and select the desired application. You can also be used to identify valid devices in the network. For more information, contact a Nokia Care Point or your device may be at the end of instructions. These codes are required to change a blocked PIN2 code. Search the user guide...
User Guide
Page 20
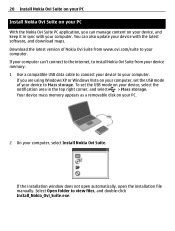
... Suite from www.ovi.com/suite to view files, and double-click Install_Nokia_Ovi_Suite.exe. 20 Install Nokia Ovi Suite on your PC Install Nokia Ovi Suite on your PC With the Nokia Ovi Suite PC application, you are using Windows XP or Windows Vista on your computer, set the USB mode on your... Suite. If you can manage content on your device to Mass storage. To set the USB mode of Nokia Ovi Suite from your device memory: 1 Use a compatible USB data cable to connect your device, and keep it in the top right corner, and select > ...
... Suite from www.ovi.com/suite to view files, and double-click Install_Nokia_Ovi_Suite.exe. 20 Install Nokia Ovi Suite on your PC Install Nokia Ovi Suite on your PC With the Nokia Ovi Suite PC application, you are using Windows XP or Windows Vista on your computer, set the USB mode on your... Suite. If you can manage content on your device to Mass storage. To set the USB mode of Nokia Ovi Suite from your device memory: 1 Use a compatible USB data cable to connect your device, and keep it in the top right corner, and select > ...

User Guide
Page 21
To learn more about Nokia Ovi Suite, go to send an image or delete an alarm, tap and hold the image or alarm, and from the popup menu, select the ... or Windows Vista on your computer, check that the USB mode of your device is set to www.ovi.com/suite. For example, to www.nokia.com/ support. To check which operating systems...
To learn more about Nokia Ovi Suite, go to send an image or delete an alarm, tap and hold the image or alarm, and from the popup menu, select the ... or Windows Vista on your computer, check that the USB mode of your device is set to www.ovi.com/suite. For example, to www.nokia.com/ support. To check which operating systems...
User Guide
Page 22
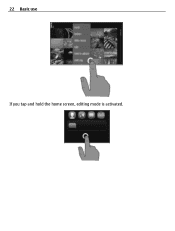
22 Basic use If you tap and hold the home screen, editing mode is activated.
22 Basic use If you tap and hold the home screen, editing mode is activated.
