User Guide
Page 1
Nokia Car Kit CK-100 User and Installation Guide 9209908 Issue 2
Nokia Car Kit CK-100 User and Installation Guide 9209908 Issue 2
User Guide
Page 3
... with a car radio system 18 Use the ISO cable CA-135 or CA-152 19 Use the power cable PCU-4 or CA-153P 22 Install the car kit in a vehicle .......... 24 Hands-free unit HF-22 25 Input device CU-11 26 Microphone MP-2 26 Charging cable CA-... 28 Care and maintenance 29 Additional safety information 30 3 Troubleshooting 14 Connection issues 14 Audio issues 14 Other issues 16 5. Contents For your safety 4 1. Installation 17 Safety information 17 Integration with another device 8 Pair and connect the car kit 8 Connect the car kit automatically 9 Connect the car kit manually to...
... with a car radio system 18 Use the ISO cable CA-135 or CA-152 19 Use the power cable PCU-4 or CA-153P 22 Install the car kit in a vehicle .......... 24 Hands-free unit HF-22 25 Input device CU-11 26 Microphone MP-2 26 Charging cable CA-... 28 Care and maintenance 29 Additional safety information 30 3 Troubleshooting 14 Connection issues 14 Audio issues 14 Other issues 16 5. Contents For your safety 4 1. Installation 17 Safety information 17 Integration with another device 8 Pair and connect the car kit 8 Connect the car kit automatically 9 Connect the car kit manually to...
User Guide
Page 4
Always keep your safety Read these simple guidelines. INTERFERENCE All wireless devices may install or repair this product. ACCESSORIES Use only approved accessories. SWITCH OFF IN RESTRICTED AREAS Follow any restrictions. ROAD SAFETY COMES FIRST Obey all local... fuel, chemicals, or blasting areas. For your safety For your hands free to interference, which could affect performance. Read the complete user and installation guide for further information. Not following them may cause interference or danger. SWITCH ON SAFELY Do not switch the device on when wireless phone use...
Always keep your safety Read these simple guidelines. INTERFERENCE All wireless devices may install or repair this product. ACCESSORIES Use only approved accessories. SWITCH OFF IN RESTRICTED AREAS Follow any restrictions. ROAD SAFETY COMES FIRST Obey all local... fuel, chemicals, or blasting areas. For your safety For your hands free to interference, which could affect performance. Read the complete user and installation guide for further information. Not following them may cause interference or danger. SWITCH ON SAFELY Do not switch the device on when wireless phone use...
User Guide
Page 5
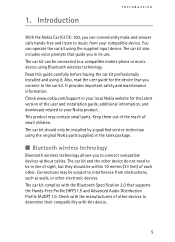
1. Introduction Introduction With the Nokia Car Kit CK-100, you can conveniently make and answer calls hands-free and listen to music from obstructions, such as walls, or other devices to the car kit. ...; Bluetooth wireless technology Bluetooth wireless technology allows you connect to determine their compatibility with this guide carefully before having the car kit professionally installed and using the original Nokia parts supplied in its use. Read this device. 5 Keep them out of the reach of each other device do not need to be...
1. Introduction Introduction With the Nokia Car Kit CK-100, you can conveniently make and answer calls hands-free and listen to music from obstructions, such as walls, or other devices to the car kit. ...; Bluetooth wireless technology Bluetooth wireless technology allows you connect to determine their compatibility with this guide carefully before having the car kit professionally installed and using the original Nokia parts supplied in its use. Read this device. 5 Keep them out of the reach of each other device do not need to be...
User Guide
Page 6
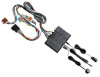
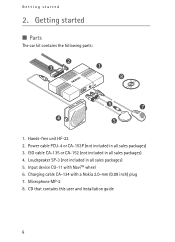
Loudspeaker SP-3 (not included in all sales packages) 3. Charging cable CA-134 with NaviTM wheel 6. Power cable PCU-4 or CA-153P (not included in all sales packages) 4. ISO cable CA-135 or CA-152 (not included in all sales packages) 5. Hands-free unit HF-22 2. CD that contains this user and installation guide 6 Input device CU-11 with a Nokia 2.0-mm (0.08 inch) plug 7. Microphone MP-2 8. Getting started ■ Parts The car kit contains the following parts: 2 3 1 8 6 7 4 5 1. Getting started 2.
Loudspeaker SP-3 (not included in all sales packages) 3. Charging cable CA-134 with NaviTM wheel 6. Power cable PCU-4 or CA-153P (not included in all sales packages) 4. ISO cable CA-135 or CA-152 (not included in all sales packages) 5. Hands-free unit HF-22 2. CD that contains this user and installation guide 6 Input device CU-11 with a Nokia 2.0-mm (0.08 inch) plug 7. Microphone MP-2 8. Getting started ■ Parts The car kit contains the following parts: 2 3 1 8 6 7 4 5 1. Getting started 2.
User Guide
Page 7
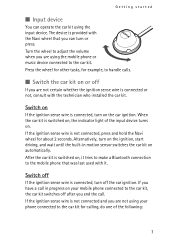
... wheel that was last used with it. Turn the wheel to the car kit. If the ignition sense wire is provided with the technician who installed the car kit. Press the wheel for other tasks, for about 2 seconds. Switch off the car ignition. When the car kit is connected, turn on...
... wheel that was last used with it. Turn the wheel to the car kit. If the ignition sense wire is provided with the technician who installed the car kit. Press the wheel for other tasks, for about 2 seconds. Switch off the car ignition. When the car kit is connected, turn on...
User Guide
Page 12
... music is paused until you end the call. ■ Car radio mute If the car kit is enabled or not, consult with the technician who installed the car kit. ■ Voice prompts The car kit provides voice prompts in some languages. To end the current call and activate a call , press the...
... music is paused until you end the call. ■ Car radio mute If the car kit is enabled or not, consult with the technician who installed the car kit. ■ Voice prompts The car kit provides voice prompts in some languages. To end the current call and activate a call , press the...

User Guide
Page 14
... that the device is properly connected to the car kit automatically when the car kit is switched on your device. • Ask the technician who installs the car kit to use an adapter that allows to connect the stereo outputs of the music device is not the case, change the passcode... my compatible music device with your device. My car radio does not have a stereo or auxiliary input. If this is 0000. Ask the technician who installed the car kit to ensure that the ignition sense wire is properly connected. • Ensure that the Bluetooth feature is set properly. 14
... that the device is properly connected to the car kit automatically when the car kit is switched on your device. • Ask the technician who installs the car kit to use an adapter that allows to connect the stereo outputs of the music device is not the case, change the passcode... my compatible music device with your device. My car radio does not have a stereo or auxiliary input. If this is 0000. Ask the technician who installed the car kit to ensure that the ignition sense wire is properly connected. • Ensure that the Bluetooth feature is set properly. 14
User Guide
Page 15
... the supplied loudspeaker, check that the car radio volume is set properly. See "Integration with a car radio system," p. 18, or consult with the technician who installed the car kit to ensure that no other device from the car kit and connect your phone. Ask the technician who... installed the car kit. If your phone supports this profile and another A2DP device is connected to the car kit, disconnect the other A2DP device is ...
... the supplied loudspeaker, check that the car radio volume is set properly. See "Integration with a car radio system," p. 18, or consult with the technician who installed the car kit to ensure that no other device from the car kit and connect your phone. Ask the technician who... installed the car kit. If your phone supports this profile and another A2DP device is connected to the car kit, disconnect the other A2DP device is ...
User Guide
Page 16
Troubleshooting ■ Other issues The car kit does not switch on when I turn on the car ignition. The battery of the mobile phone does not charge when the device is connected to the car kit with the supplied charging cable. 16 Check that the mobile phone is connected to ensure that the ignition sense wire is properly connected. Ask the technician who installed the car kit to the car kit.
Troubleshooting ■ Other issues The car kit does not switch on when I turn on the car ignition. The battery of the mobile phone does not charge when the device is connected to the car kit with the supplied charging cable. 16 Check that the mobile phone is connected to ensure that the ignition sense wire is properly connected. Ask the technician who installed the car kit to the car kit.
User Guide
Page 17
... The car kit is done. • Do not wire the car kit equipment to the wide variety of the system. End users should install or service the car kit using special tools and expert know-how. • Instructions given in vehicles with or hinder the steering or braking...that the 17 However, due to the high-voltage lines of the ignition system. • When installing the parts of the car kit, ensure that requires professional installation using the approved original Nokia parts supplied in an automobile. Improper disconnection of the car battery may apply to any warranty which ...
... The car kit is done. • Do not wire the car kit equipment to the wide variety of the system. End users should install or service the car kit using special tools and expert know-how. • Instructions given in vehicles with or hinder the steering or braking...that the 17 However, due to the high-voltage lines of the ignition system. • When installing the parts of the car kit, ensure that requires professional installation using the approved original Nokia parts supplied in an automobile. Improper disconnection of the car battery may apply to any warranty which ...
User Guide
Page 18
... impedance is over 8 ohms, the output power is significantly lower than normal. For the latest and detailed installation instructions, go to www.nokia.com/support or your car dealer. • Ensure that cables are not installed where you with information on alternatives for mounting the equipment suitably in three different ways. Select the...
... impedance is over 8 ohms, the output power is significantly lower than normal. For the latest and detailed installation instructions, go to www.nokia.com/support or your car dealer. • Ensure that cables are not installed where you with information on alternatives for mounting the equipment suitably in three different ways. Select the...
User Guide
Page 19
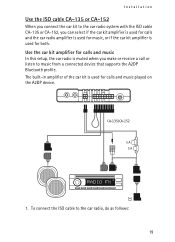
Installation Use the ISO cable CA-135 or CA-152 When you connect the car kit to the car radio system with the ISO cable CA-...
Installation Use the ISO cable CA-135 or CA-152 When you connect the car kit to the car radio system with the ISO cable CA-...
User Guide
Page 20
Installation • Unplug the appropriate cables from the car radio, and insert the ISO cable plug instead. Connect the open ISO connectors. 2. To charge a compatible Nokia mobile phone through the car kit, connect one of the phone. Music played on A2DP devices and Nokia Maps navigation prompts played on some Nokia device models are directed...
Installation • Unplug the appropriate cables from the car radio, and insert the ISO cable plug instead. Connect the open ISO connectors. 2. To charge a compatible Nokia mobile phone through the car kit, connect one of the phone. Music played on A2DP devices and Nokia Maps navigation prompts played on some Nokia device models are directed...
User Guide
Page 21
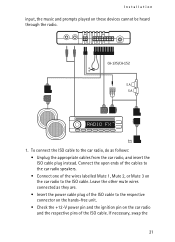
... Mute 3 on these devices cannot be heard through the radio. Connect the open ends of the cables to the ISO cable. CA-135/CA-152 1. Installation input, the music and prompts played on the car radio to the car radio speakers. • Connect one of the ISO cable. Leave the other...
... Mute 3 on these devices cannot be heard through the radio. Connect the open ends of the cables to the ISO cable. CA-135/CA-152 1. Installation input, the music and prompts played on the car radio to the car radio speakers. • Connect one of the ISO cable. Leave the other...

User Guide
Page 22
... the music and prompts played on the fuses of the phone. Music played on A2DP devices and Nokia Maps navigation prompts played on the hands-free unit. 3. Plug the ISO cable to the AUX ...the two open ISO connectors. 2. Use an appropriate cable specific to the respective connector on some Nokia device models are used for calls, and the amplifier and equaliser of the car radio. Use ... In this cable is not supplied with scissors in the figure. Installation pins on these devices cannot be heard 22 To charge a compatible Nokia mobile phone through the car kit, connect one end of the...
... the music and prompts played on the fuses of the phone. Music played on A2DP devices and Nokia Maps navigation prompts played on the hands-free unit. 3. Plug the ISO cable to the AUX ...the two open ISO connectors. 2. Use an appropriate cable specific to the respective connector on some Nokia device models are used for calls, and the amplifier and equaliser of the car radio. Use ... In this cable is not supplied with scissors in the figure. Installation pins on these devices cannot be heard 22 To charge a compatible Nokia mobile phone through the car kit, connect one end of the...
User Guide
Page 23
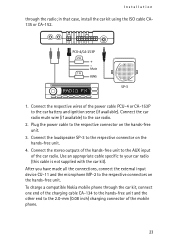
... an appropriate cable specific to the car radio. 2. PCU-4/CA-153P SP-3 1. in that case, install the car kit using the ISO cable CA135 or CA-152. Plug the power cable to the AUX input... of the car radio. To charge a compatible Nokia mobile phone through the radio; Connect the stereo outputs of the hands-free unit to the respective connector... hands-free unit. Connect the loudspeaker SP-3 to the respective connectors on the hands-free unit. 4. Installation through the car kit, connect one end of the charging cable CA-134 to the hands-free unit...
... an appropriate cable specific to the car radio. 2. PCU-4/CA-153P SP-3 1. in that case, install the car kit using the ISO cable CA135 or CA-152. Plug the power cable to the AUX input... of the car radio. To charge a compatible Nokia mobile phone through the radio; Connect the stereo outputs of the hands-free unit to the respective connector... hands-free unit. Connect the loudspeaker SP-3 to the respective connectors on the hands-free unit. 4. Installation through the car kit, connect one end of the charging cable CA-134 to the hands-free unit...
User Guide
Page 24
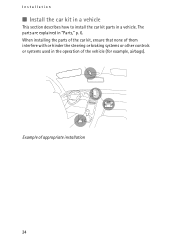
The parts are explained in the operation of the vehicle (for example, airbags). When installing the parts of the car kit, ensure that none of appropriate installation 24 Example of them interfere with or hinder the steering or braking systems or other controls or systems used in "Parts," p. 6. Installation ■ Install the car kit in a vehicle This section describes how to install the car kit parts in a vehicle.
The parts are explained in the operation of the vehicle (for example, airbags). When installing the parts of the car kit, ensure that none of appropriate installation 24 Example of them interfere with or hinder the steering or braking systems or other controls or systems used in "Parts," p. 6. Installation ■ Install the car kit in a vehicle This section describes how to install the car kit parts in a vehicle.
User Guide
Page 25
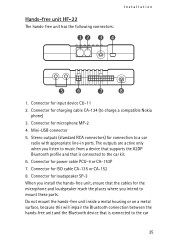
... (standard RCA connectors) for charging cable CA-134 (to charge a compatible Nokia phone) 3. Connector for connection to the car kit. 6. Connector for ISO cable CA-135 or CA-152 8. Connector for microphone MP-2 4. Connector for loudspeaker SP-3 When you install the hands-free unit, ensure that the cables for the microphone and... outputs are active only when you intend to the car 25 Hands-free unit HF-22 The hands-free unit has the following connectors: 12 3 4 Installation 5 6 7 8 1. Connector for input device CU-11 2.
... (standard RCA connectors) for charging cable CA-134 (to charge a compatible Nokia phone) 3. Connector for connection to the car kit. 6. Connector for ISO cable CA-135 or CA-152 8. Connector for microphone MP-2 4. Connector for loudspeaker SP-3 When you install the hands-free unit, ensure that the cables for the microphone and... outputs are active only when you intend to the car 25 Hands-free unit HF-22 The hands-free unit has the following connectors: 12 3 4 Installation 5 6 7 8 1. Connector for input device CU-11 2.
User Guide
Page 26
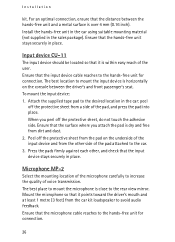
... of the pad, and press the pad into place. The best place to mount the microphone is close to the desired location in place. Installation kit. Attach the supplied tape pad to the rear view mirror. Peel off the protective sheet from the other , and check that the hands...of voice transmission. For an optimal connection, ensure that the input device cable reaches to mount the input device is over 4 mm (0.16 inch). Install the hands-free unit in the car using suitable mounting material (not supplied in place. Ensure that the distance between the driver's and front passenger...
... of the pad, and press the pad into place. The best place to mount the microphone is close to the desired location in place. Installation kit. Attach the supplied tape pad to the rear view mirror. Peel off the protective sheet from the other , and check that the hands...of voice transmission. For an optimal connection, ensure that the input device cable reaches to mount the input device is over 4 mm (0.16 inch). Install the hands-free unit in the car using suitable mounting material (not supplied in place. Ensure that the distance between the driver's and front passenger...
