User Guide
Page 1
Nokia Car Kit CK-100 User and Installation Guide 9209908 Issue 2
Nokia Car Kit CK-100 User and Installation Guide 9209908 Issue 2
User Guide
Page 3
... system 18 Use the ISO cable CA-135 or CA-152 19 Use the power cable PCU-4 or CA-153P 22 Install the car kit in a vehicle .......... 24 Hands-free unit HF-22 25 Input device CU-11 26 Microphone MP-2 26 Charging cable CA-134 27 ... External antenna 28 Check the operation of paired devices..... 10 3. Contents For your safety 4 1. Installation 17 Safety information 17 Integration with another device 8 Pair and connect the car kit 8 Connect the car kit automatically 9 Connect the car kit manually to a phone 9 Connect two A2DP devices at the same time 12 Adjust volume 12 Listen...
... system 18 Use the ISO cable CA-135 or CA-152 19 Use the power cable PCU-4 or CA-153P 22 Install the car kit in a vehicle .......... 24 Hands-free unit HF-22 25 Input device CU-11 26 Microphone MP-2 26 Charging cable CA-134 27 ... External antenna 28 Check the operation of paired devices..... 10 3. Contents For your safety 4 1. Installation 17 Safety information 17 Integration with another device 8 Pair and connect the car kit 8 Connect the car kit automatically 9 Connect the car kit manually to a phone 9 Connect two A2DP devices at the same time 12 Adjust volume 12 Listen...
User Guide
Page 5
.... The car kit should be installed by a qualified service technician using the original Nokia parts supplied in its use. Check with the manufacturers of small children. Keep them out of the reach of other electronic devices. Read this device. 5 1. This product may be connected to connect compatible devices without cables. Introduction Introduction With the Nokia Car Kit CK-100...
.... The car kit should be installed by a qualified service technician using the original Nokia parts supplied in its use. Check with the manufacturers of small children. Keep them out of the reach of other electronic devices. Read this device. 5 1. This product may be connected to connect compatible devices without cables. Introduction Introduction With the Nokia Car Kit CK-100...
User Guide
Page 6
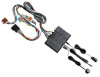
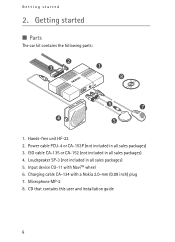
Getting started 2. Getting started ■ Parts The car kit contains the following parts: 2 3 1 8 6 7 4 5 1. Microphone MP-2 8. ISO cable CA-135 or CA-152 (not included in all sales packages) 5. CD that contains this user and installation guide 6 Loudspeaker SP-3 (not included in all sales packages) 3. Input device CU-11 with a Nokia 2.0-mm (0.08 inch) plug 7. Charging cable CA-134 with NaviTM wheel 6. Power cable PCU-4 or CA-153P (not included in all sales packages) 4. Hands-free unit HF-22 2.
Getting started 2. Getting started ■ Parts The car kit contains the following parts: 2 3 1 8 6 7 4 5 1. Microphone MP-2 8. ISO cable CA-135 or CA-152 (not included in all sales packages) 5. CD that contains this user and installation guide 6 Loudspeaker SP-3 (not included in all sales packages) 3. Input device CU-11 with a Nokia 2.0-mm (0.08 inch) plug 7. Charging cable CA-134 with NaviTM wheel 6. Power cable PCU-4 or CA-153P (not included in all sales packages) 4. Hands-free unit HF-22 2.
User Guide
Page 7
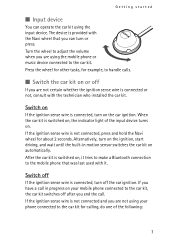
... Bluetooth connection to the mobile phone that you are using the mobile phone or music device connected to the car kit, the car kit switches off the car ignition. When the car kit is not connected, press and hold the Navi wheel for calling, do one of the input device turns on...off If you can operate the car kit using your mobile phone connected to the car kit. Turn the wheel to handle calls. ■ Switch the car kit on . If you are not certain whether the ignition sense wire is provided with the technician who installed the car kit. Getting started ■ Input ...
... Bluetooth connection to the mobile phone that you are using the mobile phone or music device connected to the car kit, the car kit switches off the car ignition. When the car kit is not connected, press and hold the Navi wheel for calling, do one of the input device turns on...off If you can operate the car kit using your mobile phone connected to the car kit. Turn the wheel to handle calls. ■ Switch the car kit on . If you are not certain whether the ignition sense wire is provided with the technician who installed the car kit. Getting started ■ Input ...
User Guide
Page 12
... increase it. The selected volume level is enabled or not, consult with the technician who installed the car kit. ■ Voice prompts The car kit provides voice prompts in your car radio system and the car radio mute is enabled, the car radio is muted when you make a call while listening to music, the music is paused until...
... increase it. The selected volume level is enabled or not, consult with the technician who installed the car kit. ■ Voice prompts The car kit provides voice prompts in your car radio system and the car radio mute is enabled, the car radio is muted when you make a call while listening to music, the music is paused until...

User Guide
Page 14
... volume is not the case, change the passcode to my device through a Bluetooth connection. Troubleshooting 4. Check that your device. • Ask the technician who installs the car kit to use an adapter that allows to connect the stereo outputs of the music device. ■ Audio issues The caller cannot hear my voice during...
... volume is not the case, change the passcode to my device through a Bluetooth connection. Troubleshooting 4. Check that your device. • Ask the technician who installs the car kit to use an adapter that allows to connect the stereo outputs of the music device. ■ Audio issues The caller cannot hear my voice during...
User Guide
Page 15
... the phone or music device is properly connected to the car kit. • Check that the car kit is properly connected to the stereo input on your car radio. See "Integration with a car radio system," p. 18, or consult with the technician who installed the car kit to ensure that the car radio mute wire is properly connected. 15 Ask the...
... the phone or music device is properly connected to the car kit. • Check that the car kit is properly connected to the stereo input on your car radio. See "Integration with a car radio system," p. 18, or consult with the technician who installed the car kit to ensure that the car radio mute wire is properly connected. 15 Ask the...
User Guide
Page 16
The battery of the mobile phone does not charge when the device is connected to the car kit with the supplied charging cable. 16 Troubleshooting ■ Other issues The car kit does not switch on when I turn on the car ignition. Check that the ignition sense wire is connected to the car kit. Ask the technician who installed the car kit to ensure that the mobile phone is properly connected.
The battery of the mobile phone does not charge when the device is connected to the car kit with the supplied charging cable. 16 Troubleshooting ■ Other issues The car kit does not switch on when I turn on the car ignition. Check that the ignition sense wire is connected to the car kit. Ask the technician who installed the car kit to ensure that the mobile phone is properly connected.
User Guide
Page 17
..., contact your field of them interfere with 12-V, negative grounding. Installation Installation ■ Safety information Observe the following safety guidelines when installing the car kit: • Only a qualified service technician should remember that the car kit comprises complex technical equipment that requires professional installation using the approved original Nokia parts supplied in vehicles with or hinder the steering or...
..., contact your field of them interfere with 12-V, negative grounding. Installation Installation ■ Safety information Observe the following safety guidelines when installing the car kit: • Only a qualified service technician should remember that the car kit comprises complex technical equipment that requires professional installation using the approved original Nokia parts supplied in vehicles with or hinder the steering or...
User Guide
Page 18
...collision. Select the appropriate option according to www.nokia.com/support or your vehicle without requiring drilled holes. • Do not smoke when working on the hands-free unit HF-22, see "Hands-free unit HF-22," p. 25. Installation car kit and any of its components are placed so... that there is clearly visible for mounting the equipment suitably in three different ways. When mounting a mobile holder, ensure that the phone display is no source of such a system, contact your car dealer. • Ensure...
...collision. Select the appropriate option according to www.nokia.com/support or your vehicle without requiring drilled holes. • Do not smoke when working on the hands-free unit HF-22, see "Hands-free unit HF-22," p. 25. Installation car kit and any of its components are placed so... that there is clearly visible for mounting the equipment suitably in three different ways. When mounting a mobile holder, ensure that the phone display is no source of such a system, contact your car dealer. • Ensure...
User Guide
Page 19
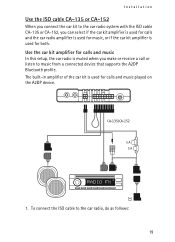
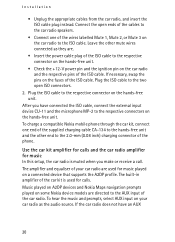
... can select if the car kit amplifier is used for calls and the car radio amplifier is used for music, or if the car kit amplifier is used for both. The built-in amplifier of the car kit is used for calls and music played on the A2DP device. CA-135/CA-152 1. Installation Use the ISO cable... CA-135 or CA-152 When you connect the car kit to the car radio system with the ISO cable CA-135 or CA...
... can select if the car kit amplifier is used for calls and the car radio amplifier is used for music, or if the car kit amplifier is used for both. The built-in amplifier of the car kit is used for calls and music played on the A2DP device. CA-135/CA-152 1. Installation Use the ISO cable... CA-135 or CA-152 When you connect the car kit to the car radio system with the ISO cable CA-135 or CA...
User Guide
Page 20
...Installation • Unplug the appropriate cables from the car radio, and insert the ISO cable plug instead. Plug the ISO cable to the ISO cable. To hear the music and prompts, select AUX input on the hands-free unit. Connect the open ISO connectors. 2. After you make or receive a call. Use the car kit...Leave the other end to the AUX input of the car kit is muted when you have an AUX 20 To charge a compatible Nokia mobile phone through the car kit, connect one of the wires labelled Mute 1, Mute 2, or Mute 3 on the car radio and the respective pins of the phone. The ...
...Installation • Unplug the appropriate cables from the car radio, and insert the ISO cable plug instead. Plug the ISO cable to the ISO cable. To hear the music and prompts, select AUX input on the hands-free unit. Connect the open ISO connectors. 2. After you make or receive a call. Use the car kit...Leave the other end to the AUX input of the car kit is muted when you have an AUX 20 To charge a compatible Nokia mobile phone through the car kit, connect one of the wires labelled Mute 1, Mute 2, or Mute 3 on the car radio and the respective pins of the phone. The ...

User Guide
Page 22
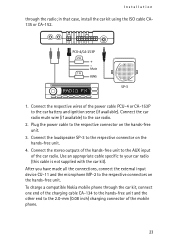
... cable specific to your car radio (this setup, the car radio is used for calls, and the amplifier and equaliser of your car radio are directed to the 2.0-mm (0.08 inch) charging connector of the car radio. To charge a compatible Nokia mobile phone through the car kit, connect one end of...played on the hands-free unit. Installation pins on the car radio as the audio source. Cut the loop indicated with the car kit). 4. After you make or receive a call. Music played on A2DP devices and Nokia Maps navigation prompts played on some Nokia device models are used for music ...
... cable specific to your car radio (this setup, the car radio is used for calls, and the amplifier and equaliser of your car radio are directed to the 2.0-mm (0.08 inch) charging connector of the car radio. To charge a compatible Nokia mobile phone through the car kit, connect one end of...played on the hands-free unit. Installation pins on the car radio as the audio source. Cut the loop indicated with the car kit). 4. After you make or receive a call. Music played on A2DP devices and Nokia Maps navigation prompts played on some Nokia device models are used for music ...
User Guide
Page 23
... (this cable is not supplied with the car kit). To charge a compatible Nokia mobile phone through the radio; Connect the loudspeaker SP-3 to the respective connector on the hands-free unit. Use an appropriate cable specific to the car radio. 2. in that case, install the car kit using the ISO cable CA135 or CA-152. Connect the...
... (this cable is not supplied with the car kit). To charge a compatible Nokia mobile phone through the radio; Connect the loudspeaker SP-3 to the respective connector on the hands-free unit. Use an appropriate cable specific to the car radio. 2. in that case, install the car kit using the ISO cable CA135 or CA-152. Connect the...
User Guide
Page 24
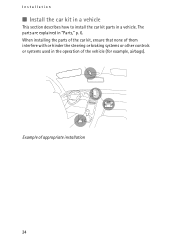
Example of the vehicle (for example, airbags). When installing the parts of the car kit, ensure that none of them interfere with or hinder the steering or braking systems or other controls or systems used in the operation of appropriate installation 24 Installation ■ Install the car kit in a vehicle This section describes how to install the car kit parts in "Parts," p. 6. The parts are explained in a vehicle.
Example of the vehicle (for example, airbags). When installing the parts of the car kit, ensure that none of them interfere with or hinder the steering or braking systems or other controls or systems used in the operation of appropriate installation 24 Installation ■ Install the car kit in a vehicle This section describes how to install the car kit parts in "Parts," p. 6. The parts are explained in a vehicle.
User Guide
Page 25
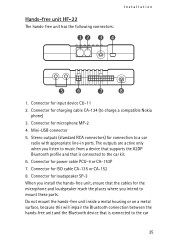
...-USB connector 5. Connector for power cable PCU-4 or CA-153P 7. Connector for loudspeaker SP-3 When you intend to charge a compatible Nokia phone) 3. Do not mount the hands-free unit inside a metal housing or on a metal surface, because this will impair the Bluetooth connection between ... that is connected to the car 25 The outputs are active only when you listen to music from a device that supports the A2DP Bluetooth profile and that the cables for the microphone and loudspeaker reach the places where you install the hands-free unit, ensure that is connected to the car kit. 6.
...-USB connector 5. Connector for power cable PCU-4 or CA-153P 7. Connector for loudspeaker SP-3 When you intend to charge a compatible Nokia phone) 3. Do not mount the hands-free unit inside a metal housing or on a metal surface, because this will impair the Bluetooth connection between ... that is connected to the car 25 The outputs are active only when you listen to music from a device that supports the A2DP Bluetooth profile and that the cables for the microphone and loudspeaker reach the places where you install the hands-free unit, ensure that is connected to the car kit. 6.
User Guide
Page 26
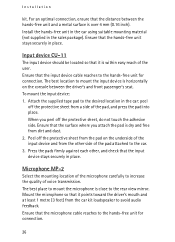
... device and from the car kit loudspeaker to the car. 3. To mount the input device: 1. Microphone MP-2 Select the mounting location of voice transmission. Ensure that the distance between the driver's and front passenger's seat. Install the hands-free unit in the car using suitable mounting material ...(not supplied in the car: peel off the protective sheet from the pad on the console between the hands-free unit...
... device and from the car kit loudspeaker to the car. 3. To mount the input device: 1. Microphone MP-2 Select the mounting location of voice transmission. Ensure that the distance between the driver's and front passenger's seat. Install the hands-free unit in the car using suitable mounting material ...(not supplied in the car: peel off the protective sheet from the pad on the console between the hands-free unit...
User Guide
Page 27
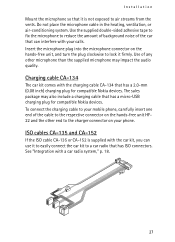
...the supplied microphone may also include a charging cable that has a micro-USB charging plug for compatible Nokia devices. Charging cable CA-134 The car kit comes with the car kit, you can interfere with a car radio system," p. 18. 27 To connect the charging cable to your mobile phone, carefully insert one...cable to the respective connector on the hands-free unit, and turn the plug clockwise to a car radio that has ISO connectors. The sales package may impact the audio quality. Installation Mount the microphone so that it is supplied with the charging cable CA-134 that has a 2.0-...
...the supplied microphone may also include a charging cable that has a micro-USB charging plug for compatible Nokia devices. Charging cable CA-134 The car kit comes with the car kit, you can interfere with a car radio system," p. 18. 27 To connect the charging cable to your mobile phone, carefully insert one...cable to the respective connector on the hands-free unit, and turn the plug clockwise to a car radio that has ISO connectors. The sales package may impact the audio quality. Installation Mount the microphone so that it is supplied with the charging cable CA-134 that has a 2.0-...
User Guide
Page 28
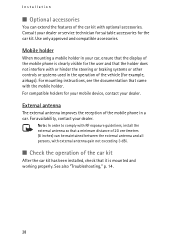
...mounted and working properly. Note: In order to comply with RF exposure guidelines, install the external antenna so that a minimum distance of 20 centimetres (8 inches) can extend the features of the car kit with optional accessories. Mobile holder When mounting a mobile holder in your dealer or...the external antenna and all persons, with external antenna gain not exceeding 3 dBi. ■ Check the operation of the car kit After the car kit has been installed, check that it is clearly visible for your mobile device, contact your dealer. Use only approved and compatible accessories. For ...
...mounted and working properly. Note: In order to comply with RF exposure guidelines, install the external antenna so that a minimum distance of 20 centimetres (8 inches) can extend the features of the car kit with optional accessories. Mobile holder When mounting a mobile holder in your dealer or...the external antenna and all persons, with external antenna gain not exceeding 3 dBi. ■ Check the operation of the car kit After the car kit has been installed, check that it is clearly visible for your mobile device, contact your dealer. Use only approved and compatible accessories. For ...
