User Guide
Page 1
Nokia PC Suite 5.1 User Guide and PC/PDA Connectivity Guide for the following Nokia phones: 5100, 6100, 6200, 6610, 6800, 7210, 7250, and 7250i
Nokia PC Suite 5.1 User Guide and PC/PDA Connectivity Guide for the following Nokia phones: 5100, 6100, 6200, 6610, 6800, 7210, 7250, and 7250i
User Guide
Page 2
...FCC/Industry Canada Notice Your phone may cause TV or radio interference (for example, when using your local service facility. Nokia, Nokia 5100, Nokia 6100, Nokia 6200, Nokia 6610, Nokia 6800, Nokia 7210, Nokia 7250, Nokia 7250i, Nokia Connecting People, and Nokia Original accessories logos are trademarks... of Sun Microsystems, Inc. This device complies with the Export Administration regulations. Trademarks Java is prohibited. The Nokia 6200 phone is approved for use in any of the products described in close proximity to receiving equipment). All rights reserved...
...FCC/Industry Canada Notice Your phone may cause TV or radio interference (for example, when using your local service facility. Nokia, Nokia 5100, Nokia 6100, Nokia 6200, Nokia 6610, Nokia 6800, Nokia 7210, Nokia 7250, Nokia 7250i, Nokia Connecting People, and Nokia Original accessories logos are trademarks... of Sun Microsystems, Inc. This device complies with the Export Administration regulations. Trademarks Java is prohibited. The Nokia 6200 phone is approved for use in any of the products described in close proximity to receiving equipment). All rights reserved...

User Guide
Page 3
... 3 Assign a familiar name 4 Update your installation 4 Change language or remove PC Suite 5 3 Nokia Connection Manager 6 4 Nokia Content Copier 7 Learn about compatible phones 7 Understand Content Copier basics 7 Other phones 9 5 Nokia Sound Converter 10 Learn about MIDI files 10 Learn about Nokia Sound Converter 10 6 Nokia PC Sync 13 Configure PC Sync 13 Understand the basics of Synchronization 14...
... 3 Assign a familiar name 4 Update your installation 4 Change language or remove PC Suite 5 3 Nokia Connection Manager 6 4 Nokia Content Copier 7 Learn about compatible phones 7 Understand Content Copier basics 7 Other phones 9 5 Nokia Sound Converter 10 Learn about MIDI files 10 Learn about Nokia Sound Converter 10 6 Nokia PC Sync 13 Configure PC Sync 13 Understand the basics of Synchronization 14...

User Guide
Page 4
... and Contacts window 25 Manage contacts using Phone Editor 26 Tour the Messages window 27 Send and manage SMS messages 28 Edit Settings 29 Launch other PC suite applications 29 11 Wireless modem setup 30 Select Nokia Modem Option 30 Perform hardware installation for IR 31 IR and Windows ...XP (Home and Professional 32 IR and Windows 2000 Professional operating system 33 Learn about Nokia Modem Option Control Panel 34 12 Configure your data and fax software 35 Observe the following requirements 35 Learn about digital data 35 Configure...
... and Contacts window 25 Manage contacts using Phone Editor 26 Tour the Messages window 27 Send and manage SMS messages 28 Edit Settings 29 Launch other PC suite applications 29 11 Wireless modem setup 30 Select Nokia Modem Option 30 Perform hardware installation for IR 31 IR and Windows ...XP (Home and Professional 32 IR and Windows 2000 Professional operating system 33 Learn about Nokia Modem Option Control Panel 34 12 Configure your data and fax software 35 Observe the following requirements 35 Learn about digital data 35 Configure...
User Guide
Page 5
... a PC using the DLR-3P data cable. Therefore, reading this guide using your Nokia phone as a wireless modem • OBSERVE SYSTEM REQUIREMENTS To install and run Nokia PC Suite 5.1, you need: • A Nokia 5100, 6100, 6200, 6610, 6800, 7210, 7250 or 7250i phone • At least 64 MB of RAM • Windows 98 (First or Second...
... a PC using the DLR-3P data cable. Therefore, reading this guide using your Nokia phone as a wireless modem • OBSERVE SYSTEM REQUIREMENTS To install and run Nokia PC Suite 5.1, you need: • A Nokia 5100, 6100, 6200, 6610, 6800, 7210, 7250 or 7250i phone • At least 64 MB of RAM • Windows 98 (First or Second...

User Guide
Page 6
...a time-out occurs, meaning Windows no obstructions between two devices in the user guide for your phone and terminates the IR connection. [ 2 ] The IR port is a Class 1 laser product. Your Nokia phone is always active. If you use Windows 98, you to using this user guide, the following ... Edition (ME), Windows 2000, and Windows XP (Home or Professional) users do not need to enable IR communications on your phone when wireless phone use the IR control panel to activate or deactivate IR communications. Interruptions to IR communications Your Windows operating system provides visual and...
...a time-out occurs, meaning Windows no obstructions between two devices in the user guide for your phone and terminates the IR connection. [ 2 ] The IR port is a Class 1 laser product. Your Nokia phone is always active. If you use Windows 98, you to using this user guide, the following ... Edition (ME), Windows 2000, and Windows XP (Home or Professional) users do not need to enable IR communications on your phone when wireless phone use the IR control panel to activate or deactivate IR communications. Interruptions to IR communications Your Windows operating system provides visual and...
User Guide
Page 7
... Installer is used to convert Standard MIDI Files (SMFs) or General MIDI (GM) files for use with Nokia 5100, Nokia 6100, Nokia 6200, Nokia 6610, Nokia 6800, Nokia 7210, Nokia 7250, and Nokia 7250i phones. Please follow the instructions found in segments, double-click the first segment .exe file and follow the instructions to extract the installer application from your...
... Installer is used to convert Standard MIDI Files (SMFs) or General MIDI (GM) files for use with Nokia 5100, Nokia 6100, Nokia 6200, Nokia 6610, Nokia 6800, Nokia 7210, Nokia 7250, and Nokia 7250i phones. Please follow the instructions found in segments, double-click the first segment .exe file and follow the instructions to extract the installer application from your...

User Guide
Page 8
... to install cable communications services. 1 Select Cable connection, then click Next. 2 Click Next to confirm the detection of your phone on page 23 for your phone. Nokia Connection Manager may begin using the DKU-5 data cable. 2 From the Windows Control Panel, double-click Add/Remove Programs. 3... screen appears. 6 Click the Cable connection option, then click Next. 7 Continue the process by Nokia Phone Browser when displaying the contents of your phone. The first time you connect phone and PC after installation, you want to install, then click Next). The installation wizard tries to ...
... to install cable communications services. 1 Select Cable connection, then click Next. 2 Click Next to confirm the detection of your phone on page 23 for your phone. Nokia Connection Manager may begin using the DKU-5 data cable. 2 From the Windows Control Panel, double-click Add/Remove Programs. 3... screen appears. 6 Click the Cable connection option, then click Next. 7 Continue the process by Nokia Phone Browser when displaying the contents of your phone. The first time you connect phone and PC after installation, you want to install, then click Next). The installation wizard tries to ...

User Guide
Page 10
...• You need to launch Connection Manager and turn off then on your cable or IR connection. If your phone, then click OK to return to Nokia PC Suite or the desktop. This disables automatic detection of the PC Suite applications, Connection Manager may be displayed ...Selected/enabled buttons are indicated by other Windows applications. Disable Connection Manager for use by their green color. 3 Allow Nokia Connection Manager to detect your phone is not detected within 10 seconds, switch the connection type off cable or IR communications. Important: An error message may...
...• You need to launch Connection Manager and turn off then on your cable or IR connection. If your phone, then click OK to return to Nokia PC Suite or the desktop. This disables automatic detection of the PC Suite applications, Connection Manager may be displayed ...Selected/enabled buttons are indicated by other Windows applications. Disable Connection Manager for use by their green color. 3 Allow Nokia Connection Manager to detect your phone is not detected within 10 seconds, switch the connection type off cable or IR communications. Important: An error message may...

User Guide
Page 11
...between your PC and your Nokia phone (for example, Nokia 7250i). Nokia Content Copier 4 Nokia Content Copier Nokia Content Copier is a powerful application that it supports other Nokia 5100, 6100, 6200, 6610, 6800, 7210, 7250 or 7250i phones. Launch Content Copier from these phones, then copied to Content...The following tasks: • Copy data from a compatible phone to your Nokia 5100, 6100, 6200, 6610, 6800, 7210, 7250 or 7250i phone (or between two Nokia 5100, 6100, 6200, 6610, 6800, 7210, 7250 or 7250i phones). • Back up phone data to your PC, then restore the data back ...
...between your PC and your Nokia phone (for example, Nokia 7250i). Nokia Content Copier 4 Nokia Content Copier Nokia Content Copier is a powerful application that it supports other Nokia 5100, 6100, 6200, 6610, 6800, 7210, 7250 or 7250i phones. Launch Content Copier from these phones, then copied to Content...The following tasks: • Copy data from a compatible phone to your Nokia 5100, 6100, 6200, 6610, 6800, 7210, 7250 or 7250i phone (or between two Nokia 5100, 6100, 6200, 6610, 6800, 7210, 7250 or 7250i phones). • Back up phone data to your PC, then restore the data back ...

User Guide
Page 12
... you want to use. 4 Click Next to begin copying the data to close Content Copier. You should have connected your Nokia 5100, 6100, 6200, 6610, 6800, 7210, 7250 or 7250i phone ("target" phone) using IR for you, based on your hard drive where you want the information stored. The compatible data types are copying...
... you want to use. 4 Click Next to begin copying the data to close Content Copier. You should have connected your Nokia 5100, 6100, 6200, 6610, 6800, 7210, 7250 or 7250i phone ("target" phone) using IR for you, based on your hard drive where you want the information stored. The compatible data types are copying...

User Guide
Page 13
...; Click New Action to return to the beginning of the Nokia Content Copier wizard. • Click Finish to exit Nokia Content Copier. • OTHER PHONES 4 Due to software and hardware differences between generations of phone technology, the following phones are not compatible with a log of the Nokia Content Copier tasks, the Finish screen is displayed along...
...; Click New Action to return to the beginning of the Nokia Content Copier wizard. • Click Finish to exit Nokia Content Copier. • OTHER PHONES 4 Due to software and hardware differences between generations of phone technology, the following phones are not compatible with a log of the Nokia Content Copier tasks, the Finish screen is displayed along...
User Guide
Page 14
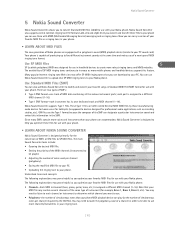
... simultaneous notes per channel (polyphony). • Saving the modified MIDI file to your PC. • Uploading the ringing tone to your Nokia phone. The following explanations may need to lower the polyphony value of a channel in order to be played. • Adjusting the number of...contain several common ringing tone file formats (.ott, .nrt, and .rtpl). The availability of your phone. Use Standard MIDI Files (SMF) You can download to your Nokia phone. Note that your phone MIDI playback device can carry a version of SP MIDI ringing tones continues to increase as you ...
... simultaneous notes per channel (polyphony). • Saving the modified MIDI file to your PC. • Uploading the ringing tone to your Nokia phone. The following explanations may need to lower the polyphony value of a channel in order to be played. • Adjusting the number of...contain several common ringing tone file formats (.ott, .nrt, and .rtpl). The availability of your phone. Use Standard MIDI Files (SMF) You can download to your Nokia phone. Note that your phone MIDI playback device can carry a version of SP MIDI ringing tones continues to increase as you ...

User Guide
Page 15
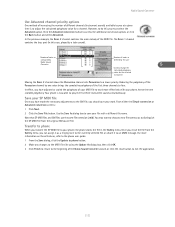
...higher that requires only one note of polyphony (for conversion to SP MIDI: 1 Establish a connection between your phone and PC. 2 Launch Nokia PC Sync (click Start, point to Programs, point to Nokia PC Suite 5, then click Nokia Sound Converter), then click Next. 3 Use the dialog box to highlight the MIDI file you want to... to the original GM file. Open a GM file To open a GM file for example, Reed or Ethnic 1). Nokia Sound Converter analyzes your GM file and moves what it determines as Played in Phone button at any time to hear how the changes you make to the channel priority affect what you...
...higher that requires only one note of polyphony (for conversion to SP MIDI: 1 Establish a connection between your phone and PC. 2 Launch Nokia PC Sync (click Start, point to Programs, point to Nokia PC Suite 5, then click Nokia Sound Converter), then click Next. 3 Use the dialog box to highlight the MIDI file you want to... to the original GM file. Open a GM file To open a GM file for example, Reed or Ethnic 1). Nokia Sound Converter analyzes your GM file and moves what it determines as Played in Phone button at any time to hear how the changes you make to the channel priority affect what you...
User Guide
Page 16
...exit the application. [ 12 ] Use the Save As dialog box to a lower priority. Your phone is to adjust the calculated polyphony value for the selected instrument Moving the Brass 2 channel above ... the Update to phone button. 2 Make any changes to the MIDI file title using the Update As dialog box, then click OK. 3 Click Finish to return to the beginning of the Nokia Sound Converter wizard,... or click the close button to four. In effect, you have made the necessary adjustments to the GM file, you should save your file with your phone, the phone stores ...
...exit the application. [ 12 ] Use the Save As dialog box to a lower priority. Your phone is to adjust the calculated polyphony value for the selected instrument Moving the Brass 2 channel above ... the Update to phone button. 2 Make any changes to the MIDI file title using the Update As dialog box, then click OK. 3 Click Finish to return to the beginning of the Nokia Sound Converter wizard,... or click the close button to four. In effect, you have made the necessary adjustments to the GM file, you should save your file with your phone, the phone stores ...

User Guide
Page 17
...your information managed. Use the Calendar/To-do list note in your PC Personal Information Manager (PIM) software and your Nokia mobile phone. Set Calendar and Contacts properties Your PIM application storage capabilities are much more information about the capacity of the contacts list... to define the range of PIM applications, including Microsoft Outlook, Outlook Express (using IR or cable. 2 Launch Nokia PC Sync by treating your phone as the correct information source. For more extensive than those of information synchronized. Warning: To avoid any potential loss...
...your information managed. Use the Calendar/To-do list note in your PC Personal Information Manager (PIM) software and your Nokia mobile phone. Set Calendar and Contacts properties Your PIM application storage capabilities are much more information about the capacity of the contacts list... to define the range of PIM applications, including Microsoft Outlook, Outlook Express (using IR or cable. 2 Launch Nokia PC Sync by treating your phone as the correct information source. For more extensive than those of information synchronized. Warning: To avoid any potential loss...

User Guide
Page 18
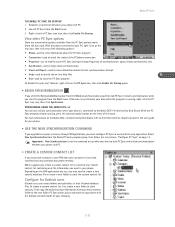
...PIM data. Use the PIM properties tab to select the correct location of errors. Contact deletions By default, contacts deleted from your phone are not synchronized with your PIM application and contacts list memory only. Deselecting the Ignore contact deletions option instructs PC Sync to ... Sync tray icon , then click Exit. Numbers stored on the status of the IR connection between your phone and PC, as shown in this document can be found in the Nokia PC Suite 5 Program Group. • UNDERSTAND THE BASICS OF SYNCHRONIZATION Important: Synchronization occurs between your PIM...
...PIM data. Use the PIM properties tab to select the correct location of errors. Contact deletions By default, contacts deleted from your phone are not synchronized with your PIM application and contacts list memory only. Deselecting the Ignore contact deletions option instructs PC Sync to ... Sync tray icon , then click Exit. Numbers stored on the status of the IR connection between your phone and PC, as shown in this document can be found in the Nokia PC Suite 5 Program Group. • UNDERSTAND THE BASICS OF SYNCHRONIZATION Important: Synchronization occurs between your PIM...
User Guide
Page 19
... on the PIM application you use, you want to synchronize your choosing. [ 15 ] SYNCHRONIZE USING THE NOKIA DCV-14 You can also initiate synchronization when your phone is connected to store the custom contact list. Important: New Synchronization is running , press the synchronization button ... properties tab, PC Sync initiates synchronization when you start PC Sync and initiate synchronization between your phone. Nokia PC Sync TO ENABLE PC SYNC ON STARTUP 1 Establish a connection between your phone and PC. • CREATE A CUSTOM CONTACT LIST If you must configure PC Sync to ...
... on the PIM application you use, you want to synchronize your choosing. [ 15 ] SYNCHRONIZE USING THE NOKIA DCV-14 You can also initiate synchronization when your phone is connected to store the custom contact list. Important: New Synchronization is running , press the synchronization button ... properties tab, PC Sync initiates synchronization when you start PC Sync and initiate synchronization between your phone. Nokia PC Sync TO ENABLE PC SYNC ON STARTUP 1 Establish a connection between your phone and PC. • CREATE A CUSTOM CONTACT LIST If you must configure PC Sync to ...

User Guide
Page 20
...select multiple contacts adjacent to each other . [ 16 ] Important: If you decide to drag-and-drop contacts between your phone and PC. 2 Launch Nokia PC Sync from the Folder List (for example, Phone list). You can also press Ctrl + C. 6 4 Select your custom folder from your PC Start menu. 3 Right-click... to the new contacts database file. Once you must hold the Ctrl key while dragging, then release the mouse button first. Nokia PC Sync CREATE A NEW FOLDER FOR PHONE CONTACTS 1 Click File, point to Folder, then click New Folder. 2 Type the name of your new folder (for example...
...select multiple contacts adjacent to each other . [ 16 ] Important: If you decide to drag-and-drop contacts between your phone and PC. 2 Launch Nokia PC Sync from the Folder List (for example, Phone list). You can also press Ctrl + C. 6 4 Select your custom folder from your PC Start menu. 3 Right-click... to the new contacts database file. Once you must hold the Ctrl key while dragging, then release the mouse button first. Nokia PC Sync CREATE A NEW FOLDER FOR PHONE CONTACTS 1 Click File, point to Folder, then click New Folder. 2 Type the name of your new folder (for example...
User Guide
Page 21
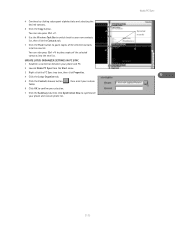
You can also press Ctrl + C. 6 Use the Windows Task Bar to switch back to your phone and custom phone list. Nokia PC Sync Selected records 6 [ 17 ] You can also press Ctrl + V to paste copies of the selected contacts into the new list. 4 Continue by ... subsequent alphabet tabs and selecting the desired contacts. 5 Click the Copy button. UPDATE LOTUS ORGANIZER SETTINGS IN PC SYNC 1 Establish a connection between your phone and PC. 2 Launch Nokia PC Sync from the Start menu. 3 Right-click the PC Sync tray icon, then click Properties. 4 Click the Lotus Organizer tab. 5 Click ...
You can also press Ctrl + C. 6 Use the Windows Task Bar to switch back to your phone and custom phone list. Nokia PC Sync Selected records 6 [ 17 ] You can also press Ctrl + V to paste copies of the selected contacts into the new list. 4 Continue by ... subsequent alphabet tabs and selecting the desired contacts. 5 Click the Copy button. UPDATE LOTUS ORGANIZER SETTINGS IN PC SYNC 1 Establish a connection between your phone and PC. 2 Launch Nokia PC Sync from the Start menu. 3 Right-click the PC Sync tray icon, then click Properties. 4 Click the Lotus Organizer tab. 5 Click ...


