
User Guide
Page 13
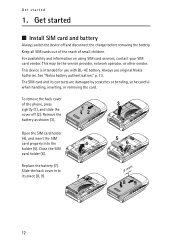
..., so be the service provider, network operator, or other vendor. Close the SIM card holder (6). Slide the back cover into the holder (5). See "Nokia battery authentication," p. 73. Always use with BL-4C battery. To remove the back cover of small children. This device is intended for use original... on using SIM card services, contact your SIM card vendor. Replace the battery (7). Keep all SIM cards out of the reach of the phone, press sightly (1), and slide the cover off and disconnect the charger before removing the battery. The SIM card and its place (8, 9). 12
..., so be the service provider, network operator, or other vendor. Close the SIM card holder (6). Slide the back cover into the holder (5). See "Nokia battery authentication," p. 73. Always use with BL-4C battery. To remove the back cover of small children. This device is intended for use original... on using SIM card services, contact your SIM card vendor. Replace the battery (7). Keep all SIM cards out of the reach of the phone, press sightly (1), and slide the cover off and disconnect the charger before removing the battery. The SIM card and its place (8, 9). 12

User Guide
Page 14
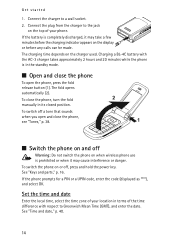
... correctly or be fully compatible with this device. Press the microSD card slightly in the middle of the phone. 3. Warning: Use only batteries, chargers, and enhancements approved by Nokia for use with power from the slot. ■ Charge the battery Check the model number of approved ...availability of any approval or warranty, and may be dangerous. Nokia utilizes the approved industry standards for use with this device. Remove the microSD card from an AC-3 or AC-4 charger. When you disconnect the power cord of the phone. 2. Get started ■ Insert a microSD card Keep all...
... correctly or be fully compatible with this device. Press the microSD card slightly in the middle of the phone. 3. Warning: Use only batteries, chargers, and enhancements approved by Nokia for use with power from the slot. ■ Charge the battery Check the model number of approved ...availability of any approval or warranty, and may be dangerous. Nokia utilizes the approved industry standards for use with this device. Remove the microSD card from an AC-3 or AC-4 charger. When you disconnect the power cord of the phone. 2. Get started ■ Insert a microSD card Keep all...
User Guide
Page 15
...the top of the time difference with the AC-3 charger takes approximately 2 hours and 20 minutes while the phone is completely discharged, it may take a few minutes before any calls can be made. The charging time depends on when wireless phone use is prohibited or when it may cause interference...or a UPIN code, enter the code (displayed as ****), and select OK. To close the phone, see "Tones," p. 38. ■ Switch the phone on and off , press and hold the power key. See "Keys and parts," p. 16. Connect the charger to Greenwich Mean Time (GMT), and enter the date. To switch the...
...the top of the time difference with the AC-3 charger takes approximately 2 hours and 20 minutes while the phone is completely discharged, it may take a few minutes before any calls can be made. The charging time depends on when wireless phone use is prohibited or when it may cause interference...or a UPIN code, enter the code (displayed as ****), and select OK. To close the phone, see "Tones," p. 38. ■ Switch the phone on and off , press and hold the power key. See "Keys and parts," p. 16. Connect the charger to Greenwich Mean Time (GMT), and enter the date. To switch the...
User Guide
Page 17
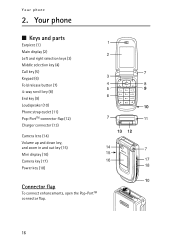
Your phone 2. Your phone ■ Keys and parts Earpiece (1) Main display (2) Left and right selection keys (3) Middle selection key (4) Call key (5) Keypad (6) Fold release button (7) 4-way scroll key (8) End key (9) Loudspeaker (10) Phone strap eyelet (11) Pop-PortTM connector flap (12) Charger connector (13) Camera lens (14) Volume up and down key, and zoom in and out key (15) Mini display (16) Camera key (17) Power key (18) Connector flap To connect enhancements, open the Pop-PortTM connector flap. 16
Your phone 2. Your phone ■ Keys and parts Earpiece (1) Main display (2) Left and right selection keys (3) Middle selection key (4) Call key (5) Keypad (6) Fold release button (7) 4-way scroll key (8) End key (9) Loudspeaker (10) Phone strap eyelet (11) Pop-PortTM connector flap (12) Charger connector (13) Camera lens (14) Volume up and down key, and zoom in and out key (15) Mini display (16) Camera key (17) Power key (18) Connector flap To connect enhancements, open the Pop-PortTM connector flap. 16

User Guide
Page 72
... normal voice or data calls. You may find more information and PC Suite on the Nokia Web site at www.nokia.com/support. ■ EGPRS, HSCSD, and CSD With your phone you can synchronize contacts, calendar, notes, and to a charger for the duration of data transfer. See "Modem settings," p. 43. ■ Data communication applications...
... normal voice or data calls. You may find more information and PC Suite on the Nokia Web site at www.nokia.com/support. ■ EGPRS, HSCSD, and CSD With your phone you can synchronize contacts, calendar, notes, and to a charger for the duration of data transfer. See "Modem settings," p. 43. ■ Data communication applications...

User Guide
Page 73
... are noticeably shorter than normal, replace the battery. Use the battery only for this device. A device with Nokia approved chargers designated for its charge over time. Do not leave fully charged battery connected to a charger, since overcharging may not work temporarily, even when the battery is fully charged. Accidental short-circuiting can occur...
... are noticeably shorter than normal, replace the battery. Use the battery only for this device. A device with Nokia approved chargers designated for its charge over time. Do not leave fully charged battery connected to a charger, since overcharging may not work temporarily, even when the battery is fully charged. Accidental short-circuiting can occur...

User Guide
Page 76
...operation. • Do not touch the main display with care. Objects like earrings or jewelry may violate regulations governing radio devices. • Use chargers indoors. • Always create a backup of the above suggestions apply equally to open the device other than as instructed in cold areas. When ...returns to its normal temperature, moisture can be treated with hard or angular materials. All of data you protect your device, battery, charger, or any lenses (such as contacts and calendar notes) before replacing it to clean the device. • Do not paint the device.
...operation. • Do not touch the main display with care. Objects like earrings or jewelry may violate regulations governing radio devices. • Use chargers indoors. • Always create a backup of the above suggestions apply equally to open the device other than as instructed in cold areas. When ...returns to its normal temperature, moisture can be treated with hard or angular materials. All of data you protect your device, battery, charger, or any lenses (such as contacts and calendar notes) before replacing it to clean the device. • Do not paint the device.

User Guide
Page 82
... a photo 54 zoom 16 care 75 certificates 69 certification information 79 character case 23 charge the battery 13 charger connector 16 circuit switched data 71 clock settings 40 codes 10 configuration 47 setting service 11 contacts copy 34 delete 35 edit 35 81 active standby 17, 39 alarm clock 58 antenna 15... applications collection 62 download 11 audio message 50 B battery authentication 73 charging 13, 72 discharging 72 installation 12 Bluetooth 41 bookmarks 66 browser appearance settings 67 bookmarks 66 browsing pages...
... a photo 54 zoom 16 care 75 certificates 69 certification information 79 character case 23 charge the battery 13 charger connector 16 circuit switched data 71 clock settings 40 codes 10 configuration 47 setting service 11 contacts copy 34 delete 35 edit 35 81 active standby 17, 39 alarm clock 58 antenna 15... applications collection 62 download 11 audio message 50 B battery authentication 73 charging 13, 72 discharging 72 installation 12 Bluetooth 41 bookmarks 66 browser appearance settings 67 bookmarks 66 browsing pages...


