User Guide
Page 9
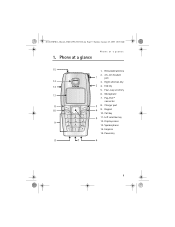
End key 5. Call key 11. Power key 9 6015i.CNFRv1_Chariot_VMC_JWS_9237202.fm Page 9 Tuesday, January 25, 2005 10:05 AM 1. Charger port 9. Keypad 10. Earpiece 15. Speakerphone 14. Right selection key 4. Left selection key 12. Microphone 7. Pop-Port™ connector 8. Phone at a glance Phone at a glance 1. Retractable antenna 2. 2.5-mm headset jack 3. Display screen 13. Four-way scroll key 6.
End key 5. Call key 11. Power key 9 6015i.CNFRv1_Chariot_VMC_JWS_9237202.fm Page 9 Tuesday, January 25, 2005 10:05 AM 1. Charger port 9. Keypad 10. Earpiece 15. Speakerphone 14. Right selection key 4. Left selection key 12. Microphone 7. Pop-Port™ connector 8. Phone at a glance Phone at a glance 1. Retractable antenna 2. 2.5-mm headset jack 3. Display screen 13. Four-way scroll key 6.

User Guide
Page 15
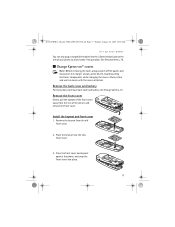
...the other end of the phone facing you have removed the back cover, insert your phone I Change battery Always switch the device off, and disconnect the charger before removing the battery. ...back cover toward the bottom of the phone until the back cover is securely in place. 15 Always use original Nokia batteries, see Nokia battery authentication guidelines, 78. The ...battery label must face away from its compartment. Remove the back cover 1. 6015i.CNFRv1_Chariot_VMC_JWS_9237202.fm Page ...
...the other end of the phone facing you have removed the back cover, insert your phone I Change battery Always switch the device off, and disconnect the charger before removing the battery. ...back cover toward the bottom of the phone until the back cover is securely in place. 15 Always use original Nokia batteries, see Nokia battery authentication guidelines, 78. The ...battery label must face away from its compartment. Remove the back cover 1. 6015i.CNFRv1_Chariot_VMC_JWS_9237202.fm Page ...

User Guide
Page 16
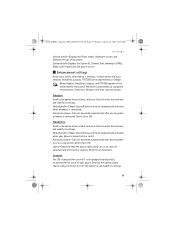
... before any calls can make, answer, and end calls as an enhancement. (See Enhancements, 76.) 1. Plug the charger into the round jack at the bottom end of your phone Charge the battery 1. With the headset connected, you can be purchased separately as usual. • Use the keypad... starts to scroll from bottom to end a call. 16 6015i.CNFRv1_Chariot_VMC_JWS_9237202.fm Page 16 Tuesday, January 25, 2005 10:05 AM Set up your phone. Plug the headset connector into the Pop-Port™ connector at least 3 seconds. Insert the charger output plug into a standard ac outlet. 2. I Turn ...
... before any calls can make, answer, and end calls as an enhancement. (See Enhancements, 76.) 1. Plug the charger into the round jack at the bottom end of your phone Charge the battery 1. With the headset connected, you can be purchased separately as usual. • Use the keypad... starts to scroll from bottom to end a call. 16 6015i.CNFRv1_Chariot_VMC_JWS_9237202.fm Page 16 Tuesday, January 25, 2005 10:05 AM Set up your phone. Plug the headset connector into the Pop-Port™ connector at least 3 seconds. Insert the charger output plug into a standard ac outlet. 2. I Turn ...
User Guide
Page 17
Install the keymat and front cover 1. 6015i.CNFRv1_Chariot_VMC_JWS_9237202.fm Page 17 Tuesday, January 25, 2005 10:05 AM Set up your phone to remove back cover and battery, see Change battery, 15. Avoid touching electronic components while changing the covers. Place the keymat into place.... cover. 3. Remove the keymat from the rest of your phone You can also plug a compatible headset into the 2.5mm headset jack on ™ covers Note: Before removing the cover, always switch off the power, and disconnect the charger and any other device. Remove the front cover Gently pull ...
Install the keymat and front cover 1. 6015i.CNFRv1_Chariot_VMC_JWS_9237202.fm Page 17 Tuesday, January 25, 2005 10:05 AM Set up your phone to remove back cover and battery, see Change battery, 15. Avoid touching electronic components while changing the covers. Place the keymat into place.... cover. 3. Remove the keymat from the rest of your phone You can also plug a compatible headset into the 2.5mm headset jack on ™ covers Note: Before removing the cover, always switch off the power, and disconnect the charger and any other device. Remove the front cover Gently pull ...
User Guide
Page 59
6015i.CNFRv1_Chariot_VMC_JWS_9237202.fm Page 59 Tuesday, January 25, 2005 10:05 AM Settings Version details-Displays the Phone model, Hardware version, and Software version of your choice, and press Select to enter the submenu and modify its settings. Note: ... Off. Loopset The LPS-4 Loopset (for use with your choice, and press Select to the option of the phone. roaming list (PRL), Mode, and Frequency of your phone. Otherwise, Charger is connected to a compatible enhancement. Handsfree Scroll to be automatically activated when a headset is connected. Default profile-Choose...
6015i.CNFRv1_Chariot_VMC_JWS_9237202.fm Page 59 Tuesday, January 25, 2005 10:05 AM Settings Version details-Displays the Phone model, Hardware version, and Software version of your choice, and press Select to enter the submenu and modify its settings. Note: ... Off. Loopset The LPS-4 Loopset (for use with your choice, and press Select to the option of the phone. roaming list (PRL), Mode, and Frequency of your phone. Otherwise, Charger is connected to a compatible enhancement. Handsfree Scroll to be automatically activated when a headset is connected. Default profile-Choose...

User Guide
Page 61
... to information stored in the device. Default profile-Choose the profile you turn your phone. 2. Select one of your device from unauthorized outgoing calls or unauthorized access to the charger. Charger Scroll to end the call 1. Press End to the option of the following options...: • Off-Immediately turns off automatically after power on . When the receiving party answers, begin typing your responses on the TTY/TDD. 3. Press End to answer the call . 6015i...
... to information stored in the device. Default profile-Choose the profile you turn your phone. 2. Select one of your device from unauthorized outgoing calls or unauthorized access to the charger. Charger Scroll to end the call 1. Press End to the option of the following options...: • Off-Immediately turns off automatically after power on . When the receiving party answers, begin typing your responses on the TTY/TDD. 3. Press End to answer the call . 6015i...

User Guide
Page 76
Your device and its enhancements may be made by Nokia for use of any other types may invalidate any complex car enhancements must be dangerous. Warning: Use only batteries, chargers, and enhancements approved by qualified personnel only. The use when supplied with power from ACP... or warranty, and may contain small parts. 6015i.CNFRv1_Chariot_VMC_JWS_9237202.fm Page 76 Tuesday, January 25, 2005 10:05 AM Enhancements 13. Enhancements Check the model number of approved enhancements, please check with Sync (DCV-15) • Retractable Charger (AC-1U) Car Audio • Full Car...
Your device and its enhancements may be made by Nokia for use of any other types may invalidate any complex car enhancements must be dangerous. Warning: Use only batteries, chargers, and enhancements approved by qualified personnel only. The use when supplied with power from ACP... or warranty, and may contain small parts. 6015i.CNFRv1_Chariot_VMC_JWS_9237202.fm Page 76 Tuesday, January 25, 2005 10:05 AM Enhancements 13. Enhancements Check the model number of approved enhancements, please check with Sync (DCV-15) • Retractable Charger (AC-1U) Car Audio • Full Car...

User Guide
Page 77
...subject to charge. Use the battery only for its charge over time. Always try to a charger, since overcharging may damage the battery or the connecting object. A device with Nokia approved chargers designated for example, when you carry a spare battery in temperatures well below freezing. 77 The...77°F). Do not short-circuit the battery. 6015i.CNFRv1_Chariot_VMC_JWS_9237202.fm Page 77 Tuesday, January 25, 2005 10:05 AM Battery information 14. Unplug the charger from the electrical plug and the device when not in use any charger or battery that the information in summer or winter...
...subject to charge. Use the battery only for its charge over time. Always try to a charger, since overcharging may damage the battery or the connecting object. A device with Nokia approved chargers designated for example, when you carry a spare battery in temperatures well below freezing. 77 The...77°F). Do not short-circuit the battery. 6015i.CNFRv1_Chariot_VMC_JWS_9237202.fm Page 77 Tuesday, January 25, 2005 10:05 AM Battery information 14. Unplug the charger from the electrical plug and the device when not in use any charger or battery that the information in summer or winter...

User Guide
Page 78
... steps. If you have any reason to the nearest authorized Nokia service point or dealer for authenticity. 6015i.CNFRv1_Chariot_VMC_JWS_9237202.fm Page 78 Tuesday, January 25, 2005 10:05...75 hours using it and take it to believe that the phone is exposed, use original Nokia batteries for the Nokia Original Enhancements logo on and in a fire, as household ...Nokia dealer, look for your battery is up to 288 hours. Please recycle when possible. I Standby and talk times Battery talk and standby times are getting an original Nokia battery, purchase it from using the ACP-7U charger...
... steps. If you have any reason to the nearest authorized Nokia service point or dealer for authenticity. 6015i.CNFRv1_Chariot_VMC_JWS_9237202.fm Page 78 Tuesday, January 25, 2005 10:05...75 hours using it and take it to believe that the phone is exposed, use original Nokia batteries for the Nokia Original Enhancements logo on and in a fire, as household ...Nokia dealer, look for your battery is up to 288 hours. Please recycle when possible. I Standby and talk times Battery talk and standby times are getting an original Nokia battery, purchase it from using the ACP-7U charger...

User Guide
Page 80
...Keep the device dry. Unauthorized antennas, modifications, or attachments could damage the device and may violate regulations governing radio devices. • Use chargers indoors. When the device returns to its parts and accessories out of the reach of superior design and craftsmanship and should be damaged. •...; Do not store the device in cold areas. 6015i.CNFRv1_Chariot_VMC_JWS_9237202.fm Page 80 Tuesday, January 25, 2005 10:05 AM Care and maintenance Care and maintenance Your device is not working ...
...Keep the device dry. Unauthorized antennas, modifications, or attachments could damage the device and may violate regulations governing radio devices. • Use chargers indoors. When the device returns to its parts and accessories out of the reach of superior design and craftsmanship and should be damaged. •...; Do not store the device in cold areas. 6015i.CNFRv1_Chariot_VMC_JWS_9237202.fm Page 80 Tuesday, January 25, 2005 10:05 AM Care and maintenance Care and maintenance Your device is not working ...

User Guide
Page 93
6015i.CNFRv1_Chariot_VMC_JWS_9237202.fm Page 93 Tuesday, January 25, 2005 10:05 AM Index A accessories battery ... answering 21 in-call options 22 making 20 care and maintenance 84 certification information (SAR) 88 charge battery 81 charger 65 connecting 18 contacts add 41 delete 46 edit 44 list 41 search 41 send 49 view 46 countdown timer...display language 57 display settings 59 E emergency calls 87 while using wireless Internet 37 with keypad locked 58 enhancement settings 63 charger 65 handsfree 63 headset 63 loopset 63 TTY/TDD 64 enhancements 80 ESN 9 exchange rate 75 Extra Virgin 36 sign on...
6015i.CNFRv1_Chariot_VMC_JWS_9237202.fm Page 93 Tuesday, January 25, 2005 10:05 AM Index A accessories battery ... answering 21 in-call options 22 making 20 care and maintenance 84 certification information (SAR) 88 charge battery 81 charger 65 connecting 18 contacts add 41 delete 46 edit 44 list 41 search 41 send 49 view 46 countdown timer...display language 57 display settings 59 E emergency calls 87 while using wireless Internet 37 with keypad locked 58 enhancement settings 63 charger 65 handsfree 63 headset 63 loopset 63 TTY/TDD 64 enhancements 80 ESN 9 exchange rate 75 Extra Virgin 36 sign on...

User Manual
Page 5
... notes 60 Calculator 60 Currency converter 61 Countdown timer 61 Set the countdown timer 61 Change the time 62 Copyright © 2004 Nokia. All rights reserved. v Colour scheme 41 Banner 42 Screen saver timeout 42 Display brightness 42 Tone settings 42 Enhancement settings 42... Headset 43 Handsfree 43 Loopset 43 Charger 43 Security settings 43 Restrict calls 43 Activate or deactivate phone lock ... 44 Allow numbers when phone locked. 44 Call the allowed phone number.... 45 Lock code 45 Security code 45 Voice privacy 46 ...
... notes 60 Calculator 60 Currency converter 61 Countdown timer 61 Set the countdown timer 61 Change the time 62 Copyright © 2004 Nokia. All rights reserved. v Colour scheme 41 Banner 42 Screen saver timeout 42 Display brightness 42 Tone settings 42 Enhancement settings 42... Headset 43 Handsfree 43 Loopset 43 Charger 43 Security settings 43 Restrict calls 43 Activate or deactivate phone lock ... 44 Allow numbers when phone locked. 44 Call the allowed phone number.... 45 Lock code 45 Security code 45 Voice privacy 46 ...

User Manual
Page 6
Stop the timer before the alarm sounds 62 Stopwatch 62 Measure time 62 Measure split time 62 Save the split time 62 Measure lap time 63 Save the lap time 63 Operation note 63 Options 63 14.Applications (Menu 10)....... 64 Launch 64 Download 64 Browser downloads 64 PC Suite 65 Modem setup 65 Memory status 65 15.Enhancements 66 16.Reference information ......... 68 Batteries and chargers 68 Care and maintenance 70 Additional safety information .. 71 Index 76 vi Copyright © 2004 Nokia. All rights reserved.
Stop the timer before the alarm sounds 62 Stopwatch 62 Measure time 62 Measure split time 62 Save the split time 62 Measure lap time 63 Save the lap time 63 Operation note 63 Options 63 14.Applications (Menu 10)....... 64 Launch 64 Download 64 Browser downloads 64 PC Suite 65 Modem setup 65 Memory status 65 15.Enhancements 66 16.Reference information ......... 68 Batteries and chargers 68 Care and maintenance 70 Additional safety information .. 71 Index 76 vi Copyright © 2004 Nokia. All rights reserved.

User Manual
Page 16
...over your shoulder. Avoiding contact with the antenna affects call quality and may cause the phone to operate at a higher power level than otherwise needed. Set up your phone ■ Antenna Your phone has two antennas: • The retractable antenna is active when fully extended (1). &#... located towards the top of the phone. Contact with the antenna area when operating the phone optimises the antenna performance and the battery life. ■ Battery Always switch the device off, and disconnect the charger before removing the battery. 6 Copyright © 2004 Nokia. Set up your...
...over your shoulder. Avoiding contact with the antenna affects call quality and may cause the phone to operate at a higher power level than otherwise needed. Set up your phone ■ Antenna Your phone has two antennas: • The retractable antenna is active when fully extended (1). &#... located towards the top of the phone. Contact with the antenna area when operating the phone optimises the antenna performance and the battery life. ■ Battery Always switch the device off, and disconnect the charger before removing the battery. 6 Copyright © 2004 Nokia. Set up your...

User Manual
Page 18
...8482; connector at least 3 seconds. 2. Set up your phone on or off, press and hold the Power key on or off 1. Plug the charger into the 2.5mm headset jack on the side of the phone for information.) 8 Copyright © 2004 Nokia. Plug the headset connector into the round jack at the ...bottom end of your phone. Position the headset on page 66 for at the ...
...8482; connector at least 3 seconds. 2. Set up your phone on or off, press and hold the Power key on or off 1. Plug the charger into the 2.5mm headset jack on the side of the phone for information.) 8 Copyright © 2004 Nokia. Plug the headset connector into the round jack at the ...bottom end of your phone. Position the headset on page 66 for at the ...

User Manual
Page 19
... All rights reserved. 9 ■ Change the Xpress-on the back cover release button, and slide the back cover toward the bottom of the phone. Set up your finger into the new front cover. Remove the battery After you , push down on ™ covers Note: Before removing the ...disconnect the charger and any other device. Avoid touching electronic components while changing the covers. Remove the back cover With the back of the phone facing you have removed the back cover, insert your phone Remove the front cover Gently pull the bottom of the phone. Copyright © 2004 Nokia. Install ...
... All rights reserved. 9 ■ Change the Xpress-on the back cover release button, and slide the back cover toward the bottom of the phone. Set up your finger into the new front cover. Remove the battery After you , push down on ™ covers Note: Before removing the ...disconnect the charger and any other device. Avoid touching electronic components while changing the covers. Remove the back cover With the back of the phone facing you have removed the back cover, insert your phone Remove the front cover Gently pull the bottom of the phone. Copyright © 2004 Nokia. Install ...

User Manual
Page 52
... settings for the currently active profile. Scroll to the option of your preference. 3. All rights reserved. Press any key to your phone display. 1. You can change the brightness of your choosing. 1. Display brightness You can set a custom time (up to 60 ...been connected to a compatible enhancement. In the standby mode, select Menu > Settings > Enhancement settings > Headset, Text phone, Handsfree, Loopset, or Charger. 42 Copyright © 2004 Nokia. See "Network services"ix for more information on page 34 for more information. In the standby mode, select Menu >...
... settings for the currently active profile. Scroll to the option of your preference. 3. All rights reserved. Press any key to your phone display. 1. You can change the brightness of your choosing. 1. Display brightness You can set a custom time (up to 60 ...been connected to a compatible enhancement. In the standby mode, select Menu > Settings > Enhancement settings > Headset, Text phone, Handsfree, Loopset, or Charger. 42 Copyright © 2004 Nokia. See "Network services"ix for more information on page 34 for more information. In the standby mode, select Menu >...

User Manual
Page 53
... Loopset (for use with Tcoil equipped hearing aids) is recommended for more information. Select On or Off. Lights-Choose to keep the phone lights always on , or to shut off automatically after one ring when a car kit is connected Automatic answer-Calls are answered automatically ...a network service. Select On or Automatic. If your wireless service provider supports this feature, you wish to be possible Copyright © 2004 Nokia. Charger Scroll to the option of your Settings (Menu 4) choice, and press Select to enter the submenu and modify its settings. Handsfree Scroll to...
... Loopset (for use with Tcoil equipped hearing aids) is recommended for more information. Select On or Off. Lights-Choose to keep the phone lights always on , or to shut off automatically after one ring when a car kit is connected Automatic answer-Calls are answered automatically ...a network service. Select On or Automatic. If your wireless service provider supports this feature, you wish to be possible Copyright © 2004 Nokia. Charger Scroll to the option of your Settings (Menu 4) choice, and press Select to enter the submenu and modify its settings. Handsfree Scroll to...

User Manual
Page 76
.... Power • Standard 1070 mAh Li-Ion Battery (BL-6C) • Standard Travel Charger (ACP-7) • Travel Charger (ACP-12) • Mobile Charger (LCH-12) • Retractable Charger (AC-1) Audio • Headset (HS-5) • Boom Headset (HDB-4) • Loopset... (LPS-4) • FM Radio Headset (HS-2R) • Retractable Headset (HS-10) 66 Copyright © 2004 Nokia. Enhancements Check the model number of any complex car enhancements must be made by Nokia...
.... Power • Standard 1070 mAh Li-Ion Battery (BL-6C) • Standard Travel Charger (ACP-7) • Travel Charger (ACP-12) • Mobile Charger (LCH-12) • Retractable Charger (AC-1) Audio • Headset (HS-5) • Boom Headset (HDB-4) • Loopset... (LPS-4) • FM Radio Headset (HS-2R) • Retractable Headset (HS-10) 66 Copyright © 2004 Nokia. Enhancements Check the model number of any complex car enhancements must be made by Nokia...

User Manual
Page 77
All rights reserved. 67 Data • Data Cable (DKU-5) • Desk Stand with Sync (DCV-15) Car • Full Car Kit (CK-6) • Car Installation Kit (CARK-126) • Mobile Holder (MBC-17) • Mobile Lighter Charger (LCH-12) • Headrest Handsfree (BHF-1) Enhancements Copyright © 2004 Nokia.
All rights reserved. 67 Data • Data Cable (DKU-5) • Desk Stand with Sync (DCV-15) Car • Full Car Kit (CK-6) • Car Installation Kit (CARK-126) • Mobile Holder (MBC-17) • Mobile Lighter Charger (LCH-12) • Headrest Handsfree (BHF-1) Enhancements Copyright © 2004 Nokia.


