User Guide
Page 1
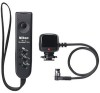
... of F5, F100, F90X/N90s, F90-Series/N90 or D1 camera by using the auto trigger function. The Nikon ML-3 combines a transmitter and receiver for purchasing the Nikon Modulite Remote Control Set ML-3. CONTENTS FOREWORD NOMENCLATURE PREPARATION Transmitter 3 4-6 7-18 Installing batteries and checking battery power.......-22 23-24 25-28 Test mode 25-26 Auto triggering operation 26-28 Transmitter, receiver and camera indica ions... 29 WIRELESS FLASH OPERATION 30-31 TIPS ON CARE 32-33 ABOUT BATTERIES 33 SPECIFICATIONS 34-35 2 FOREWORD Thank you press the transmission ...
... of F5, F100, F90X/N90s, F90-Series/N90 or D1 camera by using the auto trigger function. The Nikon ML-3 combines a transmitter and receiver for purchasing the Nikon Modulite Remote Control Set ML-3. CONTENTS FOREWORD NOMENCLATURE PREPARATION Transmitter 3 4-6 7-18 Installing batteries and checking battery power.......-22 23-24 25-28 Test mode 25-26 Auto triggering operation 26-28 Transmitter, receiver and camera indica ions... 29 WIRELESS FLASH OPERATION 30-31 TIPS ON CARE 32-33 ABOUT BATTERIES 33 SPECIFICATIONS 34-35 2 FOREWORD Thank you press the transmission ...
User Guide
Page 15
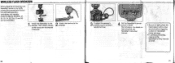
WIRELESS FLASH OPERATION When preparing for shooting, turn Speedlight power on by lightly pressing the transmission button. For extended operation, speedlights with standby positions (SB-29, 28/28DX, 27, 26, 25, 24, 23, 22s, 22 and 20) are recommended. 1 Attach the Speedlight to the tripod with the bracket in between. camera. Then, attach camera to the . camera plug to the 2 . bracket. No a 3 Connect the receiver's . r O Attach the receiver to camera's remote terminal. F
WIRELESS FLASH OPERATION When preparing for shooting, turn Speedlight power on by lightly pressing the transmission button. For extended operation, speedlights with standby positions (SB-29, 28/28DX, 27, 26, 25, 24, 23, 22s, 22 and 20) are recommended. 1 Attach the Speedlight to the tripod with the bracket in between. camera. Then, attach camera to the . camera plug to the 2 . bracket. No a 3 Connect the receiver's . r O Attach the receiver to camera's remote terminal. F
