User Guide
Page 1
...-33 ABOUT BATTERIES 33 SPECIFICATIONS 34-35 2 FOREWORD Thank you for the remote control of F5, F100, F90X/N90s, F90-Series/N90 or D1 camera by infrared ray. The Nikon ML-3 combines a transmitter and receiver for purchasing the Nikon Modulite Remote Control Set ML-3. For example, lightly pressing the transmission button turns on the camera. For optimum results, read this manual and the instruction manual of a small...
...-33 ABOUT BATTERIES 33 SPECIFICATIONS 34-35 2 FOREWORD Thank you for the remote control of F5, F100, F90X/N90s, F90-Series/N90 or D1 camera by infrared ray. The Nikon ML-3 combines a transmitter and receiver for purchasing the Nikon Modulite Remote Control Set ML-3. For example, lightly pressing the transmission button turns on the camera. For optimum results, read this manual and the instruction manual of a small...
User Guide
Page 2
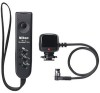
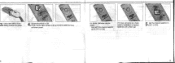
...; Transmission button: Lightly press to transmit the signal that releases the shutter ® Battery chamber: Accepts two AAA-type batteries (alkaline-manganese or manganese) 4 RECEIVER C) Camera plug ® Remote cord ® Mounting foot lock screw: Be sure to tighten firmly when attaching receiver to the camera or bracket ® Power/channel selector switch: OFF - NOMENCLATURE 0 0 O 00 TRANSMITTER C) Shooting mode selector...
...; Transmission button: Lightly press to transmit the signal that releases the shutter ® Battery chamber: Accepts two AAA-type batteries (alkaline-manganese or manganese) 4 RECEIVER C) Camera plug ® Remote cord ® Mounting foot lock screw: Be sure to tighten firmly when attaching receiver to the camera or bracket ® Power/channel selector switch: OFF - NOMENCLATURE 0 0 O 00 TRANSMITTER C) Shooting mode selector...
User Guide
Page 3
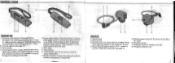
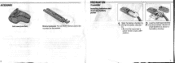
sliding the battery chamber lid. • Be sure the transmitter's power switch is set to install batteries as shown in the battery chamber. 7 ACCESSORIES Soft case (provided) Bracket (optional): For use when receiver cannot be mounted on the camera. Be sure to OFF position. into the chamber. f) Load two AAA-type batteries . PREPARATION Transmitter Installing batteries and checking battery power 1 Open the battery chamber by .
sliding the battery chamber lid. • Be sure the transmitter's power switch is set to install batteries as shown in the battery chamber. 7 ACCESSORIES Soft case (provided) Bracket (optional): For use when receiver cannot be mounted on the camera. Be sure to OFF position. into the chamber. f) Load two AAA-type batteries . PREPARATION Transmitter Installing batteries and checking battery power 1 Open the battery chamber by .
User Guide
Page 4
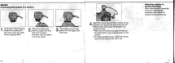
If the monitor light comes on , check battery installation or replace batteries with the channel selector set . 5 Set the channel selector to . c H1_472 IA* If it blinks, batteries may be weak.* * Only with a fresh set to ON. . Close the battery lid by 3 . sliding it does not come on for a moment, batteries have sufficient power. If it back into place. ON FF O cHL,caip TRIG (MD ) Cir Y ((1a) ) 4 Set power switch to CH1 or CH2. CH1 or CH2. 9
If the monitor light comes on , check battery installation or replace batteries with the channel selector set . 5 Set the channel selector to . c H1_472 IA* If it blinks, batteries may be weak.* * Only with a fresh set to ON. . Close the battery lid by 3 . sliding it does not come on for a moment, batteries have sufficient power. If it back into place. ON FF O cHL,caip TRIG (MD ) Cir Y ((1a) ) 4 Set power switch to CH1 or CH2. CH1 or CH2. 9
User Guide
Page 5
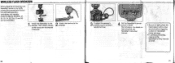
...terminal. • Make sure the remote cord does not obstruct the camera lens or the reception sensor on the . Then screw the threaded ring into the remote terminal of the camera. Receiver Connecting the receiver to the camera's accessory shoe, attach the receiver by using the bracket. loosen ...symbol on the receiver. • To conserve battery power, detach the remote cord from the camera when not in as far as it goes. 3 Using finger pressure only, . Attaching receiver to the camera's accessory shoe and slide it in use. gently but firmly tighten the lock screw Nikon 4 Insert the...
...terminal. • Make sure the remote cord does not obstruct the camera lens or the reception sensor on the . Then screw the threaded ring into the remote terminal of the camera. Receiver Connecting the receiver to the camera's accessory shoe, attach the receiver by using the bracket. loosen ...symbol on the receiver. • To conserve battery power, detach the remote cord from the camera when not in as far as it goes. 3 Using finger pressure only, . Attaching receiver to the camera's accessory shoe and slide it in use. gently but firmly tighten the lock screw Nikon 4 Insert the...

User Guide
Page 6
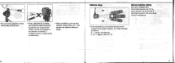
... plug with a fresh set. the A symbol on , check camera's battery installation or replace camera's batteries with . to secure the assembly. 2 Insert the receiver into the . TRIG.) If the reception indicator LED lights up for a moment, the camera's batteries have sufficient power. bracket and tighten the lock screw. • Make sure the receiver and/or bracket is at A. Battery check Nikon M.3 RECENER O it does...
... plug with a fresh set. the A symbol on , check camera's battery installation or replace camera's batteries with . to secure the assembly. 2 Insert the receiver into the . TRIG.) If the reception indicator LED lights up for a moment, the camera's batteries have sufficient power. bracket and tighten the lock screw. • Make sure the receiver and/or bracket is at A. Battery check Nikon M.3 RECENER O it does...

User Guide
Page 7
... the transmitter and receiver, check the following to operate even with fresh, correctly installed batteries. In this case, turn on. (The receiver operates in either CH1 or CH2 setting when the channel selector setting on the receiver must coincide with transmission. • The receiver's reception sensor directly faces the transmitter head. 14 15 TRIG.) • As both transmitter and receiver are controlled by microprocessors, sometimes...
... the transmitter and receiver, check the following to operate even with fresh, correctly installed batteries. In this case, turn on. (The receiver operates in either CH1 or CH2 setting when the channel selector setting on the receiver must coincide with transmission. • The receiver's reception sensor directly faces the transmitter head. 14 15 TRIG.) • As both transmitter and receiver are controlled by microprocessors, sometimes...
User Guide
Page 8
...° oc ,o0g AD, ,9a8 Channel selector setting Set each corresponding transmitter/receiver pair to two ML-3 sets can be used in the same area without interference. • If the transmitter is not pointed directly at the same time as video recording equipment, do not point the video's remote commander in the direction of the ML-3 reception sensor; 0 The receiver's reception sensor faces away from...
...° oc ,o0g AD, ,9a8 Channel selector setting Set each corresponding transmitter/receiver pair to two ML-3 sets can be used in the same area without interference. • If the transmitter is not pointed directly at the same time as video recording equipment, do not point the video's remote commander in the direction of the ML-3 reception sensor; 0 The receiver's reception sensor faces away from...
User Guide
Page 9
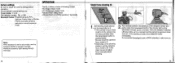
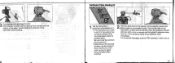
... . lightly press the transmission button. The monitor light on the transmitter will light up for a moment. Recommended camera settings are: Focus modes: C or M Film advance modes: C-1L or lat, Exposure modes: Programmed auto (PIPs), Aperture-Priority Auto or ShutterPriority Auto (see camera's instruction manual) exposure mode. Be sure to set the camera's focus mode to adjust the camera settings before shooting. ( 2 Point the transmitter in the direction of shooting modes...
... . lightly press the transmission button. The monitor light on the transmitter will light up for a moment. Recommended camera settings are: Focus modes: C or M Film advance modes: C-1L or lat, Exposure modes: Programmed auto (PIPs), Aperture-Priority Auto or ShutterPriority Auto (see camera's instruction manual) exposure mode. Be sure to set the camera's focus mode to adjust the camera settings before shooting. ( 2 Point the transmitter in the direction of shooting modes...
User Guide
Page 10
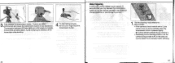
... C. • If the camera's focus mode is set at STBY (standby), it also turns on. 21 lightly press the transmission button. Then, the reception indicator LED also lights up for a moment. If a connected Speedlight is pressed lightly. Avoid changing the direction of the reception sensor and . Continuous frame shooting (C) 0 1 Set the transmitter's . O 3 Fully depress the transmission button. . Point the transmitter in the...
... C. • If the camera's focus mode is set at STBY (standby), it also turns on. 21 lightly press the transmission button. Then, the reception indicator LED also lights up for a moment. If a connected Speedlight is pressed lightly. Avoid changing the direction of the reception sensor and . Continuous frame shooting (C) 0 1 Set the transmitter's . O 3 Fully depress the transmission button. . Point the transmitter in the...
User Guide
Page 11
...) r 1 Set the shooting mode selector to S, the camera may not focus correctly when the transmission button is set the camera's focus mode to adjust focus manually before shooting. 23 Avoid changing the direction of the transmitter while shooting. 4 To stop taking pictures, . Delay triggering In this case, be sure to M. DELAY/TEST. • If the camera's focus mode is pressed lightly. Pictures are...
...) r 1 Set the shooting mode selector to S, the camera may not focus correctly when the transmission button is set the camera's focus mode to adjust focus manually before shooting. 23 Avoid changing the direction of the transmitter while shooting. 4 To stop taking pictures, . Delay triggering In this case, be sure to M. DELAY/TEST. • If the camera's focus mode is pressed lightly. Pictures are...
User Guide
Page 12
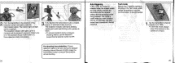
... presence. This mode is useful when you want to take a picture. selector to OFF. shooting interval, set to secure focus before actual shooting. 24 Auto triggering In this mode, the shutter is released when the subject enters the area directly between the transmitter and the receiver, without the transmission button being pressed. It takes 3 . The reception indicator LED lights up for...
... presence. This mode is useful when you want to take a picture. selector to OFF. shooting interval, set to secure focus before actual shooting. 24 Auto triggering In this mode, the shutter is released when the subject enters the area directly between the transmitter and the receiver, without the transmission button being pressed. It takes 3 . The reception indicator LED lights up for...
User Guide
Page 13
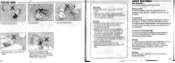
... tripods as illustrated. • Use optional Extension Cord MC-21 (3m or 9.8 ft.) to S or C. A Set camera, transmitter and 4 . Up to CH 1 or CH2. Auto triggering operation c Q14 3 Point the transmitter toward . Replace camera batteries. 1 Set the camera's focus mode . RaNi3 iRkECoEInVER • Set the receiver's 14/ ) . the receiver and block infrared ray with your hand. ( Set the shooting mode . power/channel selector switch to three...
... tripods as illustrated. • Use optional Extension Cord MC-21 (3m or 9.8 ft.) to S or C. A Set camera, transmitter and 4 . Up to CH 1 or CH2. Auto triggering operation c Q14 3 Point the transmitter toward . Replace camera batteries. 1 Set the camera's focus mode . RaNi3 iRkECoEInVER • Set the receiver's 14/ ) . the receiver and block infrared ray with your hand. ( Set the shooting mode . power/channel selector switch to three...

User Guide
Page 14
...'s channel . The monitor light starts blinking and the shutter is released automatically when the subject enters the preset focused point. • To cancel operation at any time, set the transmitter's channel selector to CH2 or the receiver's power/channel selector switch to OFF. • Unclear pictures may result from one or more factors related to subject movement, such as crossing the infrared ray...
...'s channel . The monitor light starts blinking and the shutter is released automatically when the subject enters the preset focused point. • To cancel operation at any time, set the transmitter's channel selector to CH2 or the receiver's power/channel selector switch to OFF. • Unclear pictures may result from one or more factors related to subject movement, such as crossing the infrared ray...
User Guide
Page 15
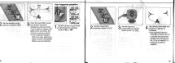
For extended operation, speedlights with the bracket in between. F r O Attach the receiver to camera's remote terminal. camera plug to the 2 . camera. bracket. Then, attach camera to the tripod with standby positions (SB-29, 28/28DX, 27, 26, 25, 24, 23, 22s, 22 and 20) are recommended. 1 Attach the Speedlight to the . No a 3 Connect the receiver's . WIRELESS FLASH OPERATION When preparing for shooting, turn Speedlight power on by lightly pressing the transmission button.
For extended operation, speedlights with the bracket in between. F r O Attach the receiver to camera's remote terminal. camera plug to the 2 . camera. bracket. Then, attach camera to the tripod with standby positions (SB-29, 28/28DX, 27, 26, 25, 24, 23, 22s, 22 and 20) are recommended. 1 Attach the Speedlight to the . No a 3 Connect the receiver's . WIRELESS FLASH OPERATION When preparing for shooting, turn Speedlight power on by lightly pressing the transmission button.
User Guide
Page 16
...is not in direct sunlight, and keep out dust, moisture and salt. • Keep equipment away from other temperatures battery life and shooting range will be shortened. ABOUT BATTERIES New batteries Puchase the freshest batteries possible. Do not use , turn it away from ...8226; Clean with different model numbers. Storage To minimize power drainage, store batteries in a hot or humid place. 32 • Avoid using the equipment at around 20°C (68°F). At other electrical equipment such as radios or TV sets. Alkaline-manganese batteries are discharged (e.g., near the...
...is not in direct sunlight, and keep out dust, moisture and salt. • Keep equipment away from other temperatures battery life and shooting range will be shortened. ABOUT BATTERIES New batteries Puchase the freshest batteries possible. Do not use , turn it away from ...8226; Clean with different model numbers. Storage To minimize power drainage, store batteries in a hot or humid place. 32 • Avoid using the equipment at around 20°C (68°F). At other electrical equipment such as radios or TV sets. Alkaline-manganese batteries are discharged (e.g., near the...
User Guide
Page 17
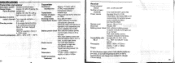
... provided (for EIAJ RC-5320) Remote cord Approx. 28cm (11in.) Shoe foot Rotates 360° Battery power check With sufficient battery power, reception indicator LED lights up for a moment With weak battery power and channel selector set to change without notice. 35 34 manganese battery) Transmission Infrared rays Number of control output channels Two channels available - Weight (excluding batteries) 40g (1.4oz.) Specifications and designs are used, at normal temperature (20...
... provided (for EIAJ RC-5320) Remote cord Approx. 28cm (11in.) Shoe foot Rotates 360° Battery power check With sufficient battery power, reception indicator LED lights up for a moment With weak battery power and channel selector set to change without notice. 35 34 manganese battery) Transmission Infrared rays Number of control output channels Two channels available - Weight (excluding batteries) 40g (1.4oz.) Specifications and designs are used, at normal temperature (20...
