

S60 User's Manual
Page 4
...the result of children Particular care should be taken to prevent infants from the camera or AC adapter, unplug the AC adapter and remove the battery immediately, taking care to a Nikon-authorized service representative for inspection, after unplugging the product and/or removing the battery.... WARNINGS Turn off in the event of the camera or AC adapter could result in injury. Do not disassemble ...
...the result of children Particular care should be taken to prevent infants from the camera or AC adapter, unplug the AC adapter and remove the battery immediately, taking care to a Nikon-authorized service representative for inspection, after unplugging the product and/or removing the battery.... WARNINGS Turn off in the event of the camera or AC adapter could result in injury. Do not disassemble ...

S60 User's Manual
Page 9
... Menu Screen...13 First Steps ...14 Charging the Battery ...14 Inserting the Battery ...16 Removing the Battery ...17 Turning On and Off the Camera...17 Setting Display Language, Date and Time 18 Inserting Memory Cards ...20 Removing Memory Cards...20 A Basic Photography and Playback: Auto Mode 22... Step 1 Turn the Camera On and Select A (Auto) Mode 22 Indicators Displayed in A (Auto) Mode 23 Step 2 Frame a Picture ...24 Using the Zoom...25 Step 3...
... Menu Screen...13 First Steps ...14 Charging the Battery ...14 Inserting the Battery ...16 Removing the Battery ...17 Turning On and Off the Camera...17 Setting Display Language, Date and Time 18 Inserting Memory Cards ...20 Removing Memory Cards...20 A Basic Photography and Playback: Auto Mode 22... Step 1 Turn the Camera On and Select A (Auto) Mode 22 Indicators Displayed in A (Auto) Mode 23 Step 2 Frame a Picture ...24 Using the Zoom...25 Step 3...

S60 User's Manual
Page 10
... Suited for the Scene 36 Shooting in Scene Mode ...36 Setting the Scene Mode...36 Features ...37 Shooting in the Scene Mode Selected by the Camera (Scene Auto Selector)...43 Shooting in Portrait/Night Portrait Scene Mode 45 Taking Pictures in Food Mode...47 Using the Draw Option...49 Taking Pictures...
... Suited for the Scene 36 Shooting in Scene Mode ...36 Setting the Scene Mode...36 Features ...37 Shooting in the Scene Mode Selected by the Camera (Scene Auto Selector)...43 Shooting in Portrait/Night Portrait Scene Mode 45 Taking Pictures in Food Mode...47 Using the Draw Option...49 Taking Pictures...

S60 User's Manual
Page 11
......98 Connecting to Televisions, Computers and Printers 99 Connecting to a TV...99 Connecting to a Computer...101 Before Connecting the Camera...101 Transferring Pictures from a Camera to a Computer 102 Connecting to a Printer...105 Connecting the Camera and Printer...106 Printing Pictures One at a Time ...107 Printing Multiple Pictures ...108 Creating a DPOF Print Order: Print...
......98 Connecting to Televisions, Computers and Printers 99 Connecting to a TV...99 Connecting to a Computer...101 Before Connecting the Camera...101 Transferring Pictures from a Camera to a Computer 102 Connecting to a Printer...105 Connecting the Camera and Printer...106 Printing Pictures One at a Time ...107 Printing Multiple Pictures ...108 Creating a DPOF Print Order: Print...

S60 User's Manual
Page 12
... Playback Options: The Playback Menu 129 Displaying the Playback Menu...129 Delete ...130 Protect ...131 Rotate Image ...131 Copy...132 Basic Camera Setup: The Setup Menu 133 Displaying the Setup Menu...134 Choose HOME Display ...134 Welcome Screen ...135 Date...136 Monitor Settings...139... Date Imprint...140 Vibration Reduction ...142 AF Assist ...142 Digital Zoom...143 Sound Settings ...143 Record Orientation ...144 Auto Off ...144 Format Memory/Format Card...145 Language...146 TV Settings ...146 Blink ...
... Playback Options: The Playback Menu 129 Displaying the Playback Menu...129 Delete ...130 Protect ...131 Rotate Image ...131 Copy...132 Basic Camera Setup: The Setup Menu 133 Displaying the Setup Menu...134 Choose HOME Display ...134 Welcome Screen ...135 Date...136 Monitor Settings...139... Date Imprint...140 Vibration Reduction ...142 AF Assist ...142 Digital Zoom...143 Sound Settings ...143 Record Orientation ...144 Auto Off ...144 Format Memory/Format Card...145 Language...146 TV Settings ...146 Blink ...

S60 User's Manual
Page 13
...additional D information that may differ from monitor display samples so that more clearly shown. Screen Samples In this camera can be helpful when using the camera. Notations • A Secure Digital (SD) memory card is referred to as a "memory card." • The setting at the time of...are used to store pictures to as the "default setting." • The names of menu items displayed in the camera monitor, and the names of a Nikon COOLPIX S60 digital camera. C Memory Cards Pictures taken with your purchase of buttons or messages displayed in the computer monitor appear in bold....
...additional D information that may differ from monitor display samples so that more clearly shown. Screen Samples In this camera can be helpful when using the camera. Notations • A Secure Digital (SD) memory card is referred to as a "memory card." • The setting at the time of...are used to store pictures to as the "default setting." • The names of menu items displayed in the camera monitor, and the names of a Nikon COOLPIX S60 digital camera. C Memory Cards Pictures taken with your purchase of buttons or messages displayed in the computer monitor appear in bold....

S60 User's Manual
Page 14
... for any errors or omissions to the attention of the 2 Nikon representative in your area. Rechargeable Li-ion Battery EN-EL10 Before Taking Important Pictures Before taking the camera on digital imaging and photography. Introduction Information and Precautions Life-Long Learning As... in a retrieval system, or translated into any language in any form, by Nikon specifically for contact information: http://imaging.nikon.com/ Use Only Nikon Brand Electronic Accessories Nikon COOLPIX cameras are engineered and proven to operate within the operational and safety requirements of the...
... for any errors or omissions to the attention of the 2 Nikon representative in your area. Rechargeable Li-ion Battery EN-EL10 Before Taking Important Pictures Before taking the camera on digital imaging and photography. Introduction Information and Precautions Life-Long Learning As... in a retrieval system, or translated into any language in any form, by Nikon specifically for contact information: http://imaging.nikon.com/ Use Only Nikon Brand Electronic Accessories Nikon COOLPIX cameras are engineered and proven to operate within the operational and safety requirements of the...
S60 User's Manual
Page 15
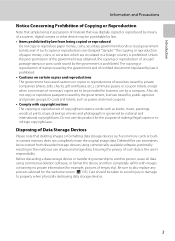
... groups, ID cards and tickets, such as memory cards or builtin camera memory does not completely erase the original image data. Ensuring the privacy of Data Storage Devices Please note that was digitally copied or reproduced by national and international copyright laws. Disposing of such...using commercial deletion software, or format the device and then completely refill it with copyright notices The copying or reproduction of a scanner, digital camera or other device may be provided for business use this product for the welcome screen (A 135). The copying or reproduction of unused...
... groups, ID cards and tickets, such as memory cards or builtin camera memory does not completely erase the original image data. Ensuring the privacy of Data Storage Devices Please note that was digitally copied or reproduced by national and international copyright laws. Disposing of such...using commercial deletion software, or format the device and then completely refill it with copyright notices The copying or reproduction of a scanner, digital camera or other device may be provided for business use this product for the welcome screen (A 135). The copying or reproduction of unused...

S60 User's Manual
Page 16
.... Press the shutter- To release the shutter and take picture. Focus and exposure lock while the shutter-release button is held in camera shake and blurred pictures. Press the shutter- to set focus and exposure, press the shutter-release button halfway, stopping when you feel... resistance. To set focus rest of the way down 4 and exposure. Introduction Parts of the Camera The Camera Body 12 3 4 5 Lens cover closed 6 7 8 1 Shutter-release button 26 2 Power switch/Power-on lamp 22, 144 3 Built-in flash ...
.... Press the shutter- To release the shutter and take picture. Focus and exposure lock while the shutter-release button is held in camera shake and blurred pictures. Press the shutter- to set focus and exposure, press the shutter-release button halfway, stopping when you feel... resistance. To set focus rest of the way down 4 and exposure. Introduction Parts of the Camera The Camera Body 12 3 4 5 Lens cover closed 6 7 8 1 Shutter-release button 26 2 Power switch/Power-on lamp 22, 144 3 Built-in flash ...

S60 User's Manual
Page 17
Introduction 1 54 3 Parts of the Camera 6 7 2 1 Monitor/touch panel 8 2 Eyelet for camera strap 5 3 Battery-chamber/ memory card slot cover 16, 20 4 Tripod socket 5 Multi connector 99, 102, 106 10 9 8 6 HDMI connector cover 99 7 HDMI Mini Connector 99 8 Battery-chamber 16 9 Memory card slot 20 10 Battery latch 16, 17 Attaching the Camera Strap 5
Introduction 1 54 3 Parts of the Camera 6 7 2 1 Monitor/touch panel 8 2 Eyelet for camera strap 5 3 Battery-chamber/ memory card slot cover 16, 20 4 Tripod socket 5 Multi connector 99, 102, 106 10 9 8 6 HDMI connector cover 99 7 HDMI Mini Connector 99 8 Battery-chamber 16 9 Memory card slot 20 10 Battery latch 16, 17 Attaching the Camera Strap 5

S60 User's Manual
Page 19
The strap may slip off the stylus and the camera may fall. 7 Introduction Operating the Touch Panel B Notes on the Touch Panel and the Stylus • Do not press on the touch panel with pointed objects other than the supplied stylus. • Do not scratch or press the touch panel too hard. • Do not place the stylus where small children can reach. • Do not carry the camera by the stylus.
The strap may slip off the stylus and the camera may fall. 7 Introduction Operating the Touch Panel B Notes on the Touch Panel and the Stylus • Do not press on the touch panel with pointed objects other than the supplied stylus. • Do not scratch or press the touch panel too hard. • Do not place the stylus where small children can reach. • Do not carry the camera by the stylus.

S60 User's Manual
Page 20
... Operations Shooting (Operation Controls) Tap the following controls to change settings. • The controls available and indicators displayed vary with shooting mode and the current camera settings. 1 6 2 7 3 8 4 9 5 10 A x K c d e f g h i 1 jkulmnAopED Shooting mode 22, 36, 87 2 c Switch to playback mode 28 3 Flash mode 30 4 Self-timer 32 Smile timer 33 5 Macro mode 35...
... Operations Shooting (Operation Controls) Tap the following controls to change settings. • The controls available and indicators displayed vary with shooting mode and the current camera settings. 1 6 2 7 3 8 4 9 5 10 A x K c d e f g h i 1 jkulmnAopED Shooting mode 22, 36, 87 2 c Switch to playback mode 28 3 Flash mode 30 4 Self-timer 32 Smile timer 33 5 Macro mode 35...

S60 User's Manual
Page 21
... (still pictures 22 Movie length 87 10 Focus area (touch AF/AE 24 C Information Displayed in the Monitor • The indicators displayed vary with current camera settings and shooting mode. • Information on settings applied from the shooting menu is displayed for only a few seconds (A 139). 9
... (still pictures 22 Movie length 87 10 Focus area (touch AF/AE 24 C Information Displayed in the Monitor • The indicators displayed vary with current camera settings and shooting mode. • Information on settings applied from the shooting menu is displayed for only a few seconds (A 139). 9

S60 User's Manual
Page 22
... playback mode from shooting mode, the information display turns off . Playback mode monitor displays, with the picture played back and the current camera settings. 1 5 6 2 7 3 8 4 9 A C D 1 Switch to shooting mode 22, 36, 87 z Editing (still pictures 54 2D Volume (HD Pictmotion slide show, movie, or sound file playback 65, 86, ...
... playback mode from shooting mode, the information display turns off . Playback mode monitor displays, with the picture played back and the current camera settings. 1 5 6 2 7 3 8 4 9 A C D 1 Switch to shooting mode 22, 36, 87 z Editing (still pictures 54 2D Volume (HD Pictmotion slide show, movie, or sound file playback 65, 86, ...

S60 User's Manual
Page 23
... mode 116 8 Movie options 88 9 C Internal memory indicator 28 Current frame number/ 10 total number of frames 28 Movie length 93 C Picture Display When the camera is rotated, the picture displayed is pointing up or down. 11 A 66, 69, 73). 15 / 11/ 2008 15 30 0004 4/ 4 15 / 11/ 2008 15 30...
... mode 116 8 Movie options 88 9 C Internal memory indicator 28 Current frame number/ 10 total number of frames 28 Movie length 93 C Picture Display When the camera is rotated, the picture displayed is pointing up or down. 11 A 66, 69, 73). 15 / 11/ 2008 15 30 0004 4/ 4 15 / 11/ 2008 15 30...

S60 User's Manual
Page 24
... mode 87 4 Switch to playback mode 28 5 Display the menu available for the current mode 88, 115, 129 6 Display the setup menu to adjust basic camera setup options 133 7 Return to the HOME screen. The shooting, playback, and setup menus can be displayed from the Choose HOME display option 12 (A 134...
... mode 87 4 Switch to playback mode 28 5 Display the menu available for the current mode 88, 115, 129 6 Display the setup menu to adjust basic camera setup options 133 7 Return to the HOME screen. The shooting, playback, and setup menus can be displayed from the Choose HOME display option 12 (A 134...

S60 User's Manual
Page 26
First Steps First Steps Charging the Battery The camera uses a Rechargeable Li-ion Battery EN-EL10 (supplied). The CHARGE lamp will light to the battery charger 2. 1 2 CHARGE lamp starts blinking when 3 4 battery is running low. 1 Connect the power cable. Connect the ...
First Steps First Steps Charging the Battery The camera uses a Rechargeable Li-ion Battery EN-EL10 (supplied). The CHARGE lamp will light to the battery charger 2. 1 2 CHARGE lamp starts blinking when 3 4 battery is running low. 1 Connect the power cable. Connect the ...

S60 User's Manual
Page 27
...faulty. Do not use . • The battery is not inserted correctly. Do not, under any circumstances, use only with a Rechargeable Li-ion Battery EN-EL10. Bring the battery and charger to 95 °F) before using the battery charger. • If the battery will not be used for inspection. 3... Unplug the charger when charging is for the battery on AC power supply To power the camera continuously for extended periods, use an AC Adapter EH-63 (available separately from Nikon) (A 150). C Note on page iii and the section, "The Battery" (A 153), before use with...
...faulty. Do not use . • The battery is not inserted correctly. Do not, under any circumstances, use only with a Rechargeable Li-ion Battery EN-EL10. Bring the battery and charger to 95 °F) before using the battery charger. • If the battery will not be used for inspection. 3... Unplug the charger when charging is for the battery on AC power supply To power the camera continuously for extended periods, use an AC Adapter EH-63 (available separately from Nikon) (A 150). C Note on page iii and the section, "The Battery" (A 153), before use with...
S60 User's Manual
Page 28
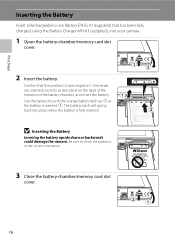
...battery is in the correct orientation. 3 Close the battery-chamber/memory card slot cover. 16 The battery latch will spring back into your camera. 1 Open the battery-chamber/memory card slot cover. 2 Insert the battery. Be sure to push the orange battery latch up 1 ... chamber, and insert the battery. B Inserting the Battery Inserting the battery upside down or backwards could damage the camera. First Steps Inserting the Battery Insert a Rechargeable Li-ion Battery EN-EL10 (supplied) that the positive (+) and negative (-) terminals are oriented correctly as the battery is inserted 2.
...battery is in the correct orientation. 3 Close the battery-chamber/memory card slot cover. 16 The battery latch will spring back into your camera. 1 Open the battery-chamber/memory card slot cover. 2 Insert the battery. Be sure to push the orange battery latch up 1 ... chamber, and insert the battery. B Inserting the Battery Inserting the battery upside down or backwards could damage the camera. First Steps Inserting the Battery Insert a Rechargeable Li-ion Battery EN-EL10 (supplied) that the positive (+) and negative (-) terminals are oriented correctly as the battery is inserted 2.

S60 User's Manual
Page 29
...on . observe due caution when removing the battery. Turning On and Off the Camera To turn off the camera, press the power switch again. If no operations are performed for another three minutes, the camera will turn on lamp and monitor will turn off automatically (the auto off function)....will light for about a minute (default setting), the monitor will turn off automatically and the camera will turn off. The power-on lamp and the monitor have gone out before the camera enters standby mode can then be changed from before opening the battery-chamber/memory card slot cover....
...on . observe due caution when removing the battery. Turning On and Off the Camera To turn off the camera, press the power switch again. If no operations are performed for another three minutes, the camera will turn on lamp and monitor will turn off automatically (the auto off function)....will light for about a minute (default setting), the monitor will turn off automatically and the camera will turn off. The power-on lamp and the monitor have gone out before the camera enters standby mode can then be changed from before opening the battery-chamber/memory card slot cover....


