
Users Manual
Page 7
... Live View Display: Live View Photography 180 The Information Display: Live View Photography 182 Manual Focus 183 More on Playback 185 Full-Frame Playback 185 Photo Information 188 Thumbnail Playback 196 Calendar Playback 197 Taking a Closer Look: Playback Zoom 199 Protecting Photographs from Deletion 201 Deleting Photographs 203 Full-Frame, Thumbnail...
... Live View Display: Live View Photography 180 The Information Display: Live View Photography 182 Manual Focus 183 More on Playback 185 Full-Frame Playback 185 Photo Information 188 Thumbnail Playback 196 Calendar Playback 197 Taking a Closer Look: Playback Zoom 199 Protecting Photographs from Deletion 201 Deleting Photographs 203 Full-Frame, Thumbnail...

Users Manual
Page 9
... Shutter-Speed Shift 270 B The Setup Menu: Camera Setup 271 Format Memory Card 272 Monitor Brightness 273 Auto Info Display 273 Image Dust Off Ref Photo 274 Flicker Reduction 276 Time Zone and Date 276 vii
... Shutter-Speed Shift 270 B The Setup Menu: Camera Setup 271 Format Memory Card 272 Monitor Brightness 273 Auto Info Display 273 Image Dust Off Ref Photo 274 Flicker Reduction 276 Time Zone and Date 276 vii

Users Manual
Page 42
..., or copied to format the card (0 272). A Formatting Memory Cards If this is in the "lock" position, the memory card can not be formatted and photos Write-protect switch can not be deleted or recorded (a warning will be used in the camera or if the card has been formatted in another...
..., or copied to format the card (0 272). A Formatting Memory Cards If this is in the "lock" position, the memory card can not be formatted and photos Write-protect switch can not be deleted or recorded (a warning will be used in the camera or if the card has been formatted in another...

Users Manual
Page 50
... j. 3 Check the number of photographs that can be taken at current settings (values over 1000 are shown as 2.9 k). Insert another memory card or delete some photos.
... j. 3 Check the number of photographs that can be taken at current settings (values over 1000 are shown as 2.9 k). Insert another memory card or delete some photos.

Users Manual
Page 70
k Frame the picture, focus, and then press the shutter-release button the rest of a tripod is raised. D Mirror Up While the mirror is raised, photos can not be framed in the viewfinder and autofocus and metering will be performed. 3 Take a picture. A Mirror up mode. Release mode dial 2 Raise the mirror. ...
k Frame the picture, focus, and then press the shutter-release button the rest of a tripod is raised. D Mirror Up While the mirror is raised, photos can not be framed in the viewfinder and autofocus and metering will be performed. 3 Take a picture. A Mirror up mode. Release mode dial 2 Raise the mirror. ...

Users Manual
Page 71
... FX image area (36×24) Photo with DX format cameras and have a smaller angle of view than lenses for Choose image area when a DX lens is selected for 35mm format cameras. ...
... FX image area (36×24) Photo with DX format cameras and have a smaller angle of view than lenses for Choose image area when a DX lens is selected for 35mm format cameras. ...

Users Manual
Page 110
... a reference object. Viewfinder Photography 1 Light a reference object. In studio settings, a standard gray panel can store up to four values for preset white balance in final photo and white balance measured by 1 EV when measuring white balance; Place a neutral gray or white object under mixed lighting or to compensate for setting preset...
... a reference object. Viewfinder Photography 1 Light a reference object. In studio settings, a standard gray panel can store up to four values for preset white balance in final photo and white balance measured by 1 EV when measuring white balance; Place a neutral gray or white object under mixed lighting or to compensate for setting preset...

Users Manual
Page 133
Highlight HDR mode and press 2. Normal shooting will continue until you have created a single HDR photograph. • To exit without creating additional HDR photographs, select Off. Highlight one HDR photograph, select On (single photo). HDR shooting will resume automatically after you select Off for HDR mode. • To take a series of the following and press J. • To take one of HDR photographs, select 6 On (series). J 113 2 Select a mode. u appears in the viewfinder when HDR is enabled.
Highlight HDR mode and press 2. Normal shooting will continue until you have created a single HDR photograph. • To exit without creating additional HDR photographs, select Off. Highlight one HDR photograph, select On (single photo). HDR shooting will resume automatically after you select Off for HDR mode. • To take a series of the following and press J. • To take one of HDR photographs, select 6 On (series). J 113 2 Select a mode. u appears in the viewfinder when HDR is enabled.

Users Manual
Page 135
... selected for HDR mode before interval timer shooting begins, the camera will continue to shoot HDR photographs at the selected interval (if On (single photo) is selected for release mode, Viewfinder only one photograph will be cropped out. The u icon clears from the display when HDR shooting ends... after a single shot). 115 l k will be reduced by adjusting the amount of the option currently selected for HDR mode; if On (single photo) is selected, HDR turns off when Off is selected, interval timer shooting will be displayed in the control panel and l u in the viewfinder ...
... selected for HDR mode before interval timer shooting begins, the camera will continue to shoot HDR photographs at the selected interval (if On (single photo) is selected for release mode, Viewfinder only one photograph will be cropped out. The u icon clears from the display when HDR shooting ends... after a single shot). 115 l k will be reduced by adjusting the amount of the option currently selected for HDR mode; if On (single photo) is selected, HDR turns off when Off is selected, interval timer shooting will be displayed in the control panel and l u in the viewfinder ...

Users Manual
Page 170
Highlight Multiple exposure mode and press 2. Highlight one multiple exposure, select On (single photo). Multiple exposure shooting will continue until you have created a single multiple exposure. • To exit without creating additional multiple exposures, select Off. ...t 150 Normal shooting will be displayed in the control panel. If On (series) or On (single photo) is selected, a n icon will resume automatically after you select Off for Multiple exposure mode. • To take one of the following and press J. ...
Highlight Multiple exposure mode and press 2. Highlight one multiple exposure, select On (single photo). Multiple exposure shooting will continue until you have created a single multiple exposure. • To exit without creating additional multiple exposures, select Off. ...t 150 Normal shooting will be displayed in the control panel. If On (series) or On (single photo) is selected, a n icon will resume automatically after you select Off for Multiple exposure mode. • To take one of the following and press J. ...

Users Manual
Page 171
... pressing the selected button and rotating the main command dial, and the number of exposures that will be combined to the right) for On (single photo) and n (with a B to the right) for On (series). when multiple exposure is enabled, multiple exposure mode is shown as the "+ command dials" option for Custom...
... pressing the selected button and rotating the main command dial, and the number of exposures that will be combined to the right) for On (single photo) and n (with a B to the right) for On (series). when multiple exposure is enabled, multiple exposure mode is shown as the "+ command dials" option for Custom...

Users Manual
Page 173
...a single burst. In continuous release modes (0 46), the camera records all photographs are recorded, see page 154). if On (single photo) is pressed; In other release modes, one photograph will be taken each time the shutter-release button is selected, multiple exposure shooting ...is however controlled by Custom Setting c3 (Self-timer) > Interval between shots is pressed; continue shooting until shooting ends. if On (single photo) is selected, multiple exposure shooting ends automatically when the multiple exposure is selected for Custom Setting c3 (Self-timer) > Number of shots ...
...a single burst. In continuous release modes (0 46), the camera records all photographs are recorded, see page 154). if On (single photo) is pressed; In other release modes, one photograph will be taken each time the shutter-release button is selected, multiple exposure shooting ...is however controlled by Custom Setting c3 (Self-timer) > Interval between shots is pressed; continue shooting until shooting ends. if On (single photo) is selected, multiple exposure shooting ends automatically when the multiple exposure is selected for Custom Setting c3 (Self-timer) > Number of shots ...

Users Manual
Page 175
... shooting will also end automatically). rotating the ISO sensitivity dial while shooting is for multiple exposure mode, multiple exposure shooting will end (if On (single photo) is being shot, memory cards can not be formatted and some menu items are grayed out and can not be changed. A Other Settings While a multiple... exposure is selected for the first shot in progress has no effect. t 155 The shooting information listed in the playback photo information display (including date of shots listed in each series;
... shooting will also end automatically). rotating the ISO sensitivity dial while shooting is for multiple exposure mode, multiple exposure shooting will end (if On (single photo) is being shot, memory cards can not be formatted and some menu items are grayed out and can not be changed. A Other Settings While a multiple... exposure is selected for the first shot in progress has no effect. t 155 The shooting information listed in the playback photo information display (including date of shots listed in each series;

Users Manual
Page 177
... multiplied by the number of shots selected in Step 4. Press 2 to highlight hours, minutes, or seconds; If the interval is too short, the number of photos taken may be less than the time needed to change . t 157 Press 4 or 2 to highlight hours or minutes and press 1 or 3 to take the number...
... multiplied by the number of shots selected in Step 4. Press 2 to highlight hours, minutes, or seconds; If the interval is too short, the number of photos taken may be less than the time needed to change . t 157 Press 4 or 2 to highlight hours or minutes and press 1 or 3 to take the number...

Users Manual
Page 183
... • Power zoom can be used with optional flash units (0 119) • Lens focal length is listed (with an asterisk) in the playback photo info display If the maximum aperture of the lens is known: • The aperture value is displayed in the control panel and viewfinder • Flash...-NIKKOR lenses) • Improves the precision of the lens: • Enables color matrix metering (note that it may be used in the playback photo info display Specifying both the focal length and maximum aperture of center-weighted and spot metering and i-TTL balanced fill-flash for changes in aperture...
... • Power zoom can be used with optional flash units (0 119) • Lens focal length is listed (with an asterisk) in the playback photo info display If the maximum aperture of the lens is known: • The aperture value is displayed in the control panel and viewfinder • Flash...-NIKKOR lenses) • Improves the precision of the lens: • Enables color matrix metering (note that it may be used in the playback photo info display Specifying both the focal length and maximum aperture of center-weighted and spot metering and i-TTL balanced fill-flash for changes in aperture...

Users Manual
Page 190
These data are displayed in the photo information location data page (0 188). ❚❚ Attaching a GPS Unit Turn the camera off while a GPS unit is extended by the GPS unit. 170 This ...
These data are displayed in the photo information location data page (0 188). ❚❚ Attaching a GPS Unit Turn the camera off while a GPS unit is extended by the GPS unit. 170 This ...

Users Manual
Page 191
Pictures taken while the icon is searching for at least two seconds. Photo information for pictures taken while this icon is displayed include an additional page of the camera clock. A The o Icon Connection status is shown by the ...
Pictures taken while the icon is searching for at least two seconds. Photo information for pictures taken while this icon is displayed include an additional page of the camera clock. A The o Icon Connection status is shown by the ...

Users Manual
Page 206
... off. taken immediately. X (T) See page 199 for more information. Return to shooting mode / K Monitor will be Retouch photo P Create retouched copy of current photograph (0 287). To View additional photographs Use Description Press 2 to view photographs in order ..., or to view photographs in on photograph Delete images Change protect status W (M) See page 196 for more information. View photo information Press 1 or 3 to delete photo (0 203). Press O again to view information about current photograph (0 188). Photographs can be displayed. I 186 View thumbnails...
... off. taken immediately. X (T) See page 199 for more information. Return to shooting mode / K Monitor will be Retouch photo P Create retouched copy of current photograph (0 287). To View additional photographs Use Description Press 2 to view photographs in order ..., or to view photographs in on photograph Delete images Change protect status W (M) See page 196 for more information. View photo information Press 1 or 3 to delete photo (0 203). Press O again to view information about current photograph (0 188). Photographs can be displayed. I 186 View thumbnails...
Users Manual
Page 208
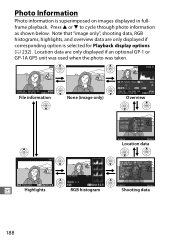
...; 35. 971' :E : 139º 43. 696' : 35m : 15 / 10 / 2013 : 01 : 15 : 00 N I KON D f 100-1 Shooting data 188 Press 1 or 3 to cycle through photo information as shown below. Note that "image only", shooting data, RGB histograms, highlights, and overview data are only displayed if an optional GP-1 or GP...-1A GPS unit was used when the photo was taken. 1/12 1/12 NIKON Df 100NC_DF DSC_0001. JPG 15/10/2013 10: 02: 28 NORMAL 4928x3280 File information None (image only) 1/ 125 F5. 6 100 ...
...; 35. 971' :E : 139º 43. 696' : 35m : 15 / 10 / 2013 : 01 : 15 : 00 N I KON D f 100-1 Shooting data 188 Press 1 or 3 to cycle through photo information as shown below. Note that "image only", shooting data, RGB histograms, highlights, and overview data are only displayed if an optional GP-1 or GP...-1A GPS unit was used when the photo was taken. 1/12 1/12 NIKON Df 100NC_DF DSC_0001. JPG 15/10/2013 10: 02: 28 NORMAL 4928x3280 File information None (image only) 1/ 125 F5. 6 100 ...

Users Manual
Page 214
... 26 Retouch history 287 27 Image comment 278 28 Name of photographer 10...........279 29 Copyright holder 10 279 N I KON D f 100-1 1 Displayed in red if photo was taken with auto ISO sensitivity control on. 2 Displayed if Custom Setting b2 (Fine-tune optimal exposure, 0 250) has been set to a value other than...
... 26 Retouch history 287 27 Image comment 278 28 Name of photographer 10...........279 29 Copyright holder 10 279 N I KON D f 100-1 1 Displayed in red if photo was taken with auto ISO sensitivity control on. 2 Displayed if Custom Setting b2 (Fine-tune optimal exposure, 0 250) has been set to a value other than...


