Product Manual
Page 2
... notes; Download of charge from your camera, please be sure to other pages in the camera monitor are used . information that default settings are used : D This icon marks cautions; Symbols and Conventions To make it easier to the camera. Menu items, options, and messages...damage to find the information you need, the following symbols and conventions are shown in bold. Camera Settings The explanations in "For Your Safety" (0 xiii-xvi). Nikon Manual Viewer 2 Install the Nikon Manual Viewer 2 app on your phone or Internet service provider. A For Your Safety Before using...
... notes; Download of charge from your camera, please be sure to other pages in the camera monitor are used . information that default settings are used : D This icon marks cautions; Symbols and Conventions To make it easier to the camera. Menu items, options, and messages...damage to find the information you need, the following symbols and conventions are shown in bold. Camera Settings The explanations in "For Your Safety" (0 xiii-xvi). Nikon Manual Viewer 2 Install the Nikon Manual Viewer 2 app on your phone or Internet service provider. A For Your Safety Before using...
Product Manual
Page 5
Movie Live View 49 Indices...54 Using the b Button 55 The Live View Display: Movie Live View 57 The Information Display: Movie Live View 58 Image Area 59 Taking Photos During Movie Live View 60 Movie Settings 62 Viewing Movies 65 Editing Movies 67 Trimming Movies 67 Saving Selected Frames 72 Image Recording Options 74 Image Area 74 Image Quality 79 Image Size 83 Using Two Memory Cards 86 Focus 87 Autofocus 87 Autofocus Mode 87 AF-Area Mode 90 Focus Point Selection 94 Focus Lock 96 Manual Focus 100 iii
Movie Live View 49 Indices...54 Using the b Button 55 The Live View Display: Movie Live View 57 The Information Display: Movie Live View 58 Image Area 59 Taking Photos During Movie Live View 60 Movie Settings 62 Viewing Movies 65 Editing Movies 67 Trimming Movies 67 Saving Selected Frames 72 Image Recording Options 74 Image Area 74 Image Quality 79 Image Size 83 Using Two Memory Cards 86 Focus 87 Autofocus 87 Autofocus Mode 87 AF-Area Mode 90 Focus Point Selection 94 Focus Lock 96 Manual Focus 100 iii
Product Manual
Page 7
... Modes 191 Flash Compensation 196 FV Lock 198 Other Shooting Options 201 The R Button (Viewfinder Photography 201 The b button 205 Two-Button Reset: Restoring Default Settings 206 Multiple Exposure 209 Interval Timer Photography 216 Time-Lapse Photography 223 Non-CPU Lenses 229 Location Data 233 More About Playback 235 Viewing Images...
... Modes 191 Flash Compensation 196 FV Lock 198 Other Shooting Options 201 The R Button (Viewfinder Photography 201 The b button 205 Two-Button Reset: Restoring Default Settings 206 Multiple Exposure 209 Interval Timer Photography 216 Time-Lapse Photography 223 Non-CPU Lenses 229 Location Data 233 More About Playback 235 Viewing Images...
Product Manual
Page 8
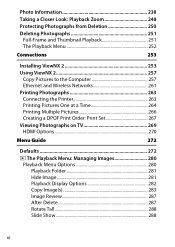
... Wireless Networks 261 Printing Photographs 263 Connecting the Printer 263 Printing Pictures One at a Time 264 Printing Multiple Pictures 266 Creating a DPOF Print Order: Print Set 267 Viewing Photographs on TV 269 HDMI Options 270 Menu Guide 272 Defaults 272 D The Playback Menu: Managing Images 280 Playback Menu Options 280 Playback...
... Wireless Networks 261 Printing Photographs 263 Connecting the Printer 263 Printing Pictures One at a Time 264 Printing Multiple Pictures 266 Creating a DPOF Print Order: Print Set 267 Viewing Photographs on TV 269 HDMI Options 270 Menu Guide 272 Defaults 272 D The Playback Menu: Managing Images 280 Playback Menu Options 280 Playback...
Product Manual
Page 9
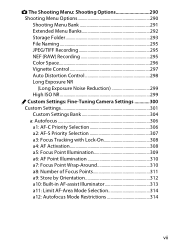
... Space 296 Vignette Control 297 Auto Distortion Control 298 Long Exposure NR (Long Exposure Noise Reduction 299 High ISO NR 299 A Custom Settings: Fine-Tuning Camera Settings 300 Custom Settings 301 Custom Settings Bank 304 a: Autofocus 306 a1: AF-C Priority Selection 306 a2: AF-S Priority Selection 307 a3: Focus Tracking with Lock-On 308...
... Space 296 Vignette Control 297 Auto Distortion Control 298 Long Exposure NR (Long Exposure Noise Reduction 299 High ISO NR 299 A Custom Settings: Fine-Tuning Camera Settings 300 Custom Settings 301 Custom Settings Bank 304 a: Autofocus 306 a1: AF-C Priority Selection 306 a2: AF-S Priority Selection 307 a3: Focus Tracking with Lock-On 308...
Product Manual
Page 11
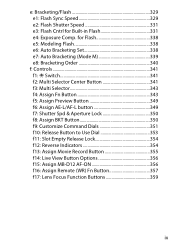
.../Flash 329 e1: Flash Sync Speed 329 e2: Flash Shutter Speed 331 e3: Flash Cntrl for Flash 338 e5: Modeling Flash 338 e6: Auto Bracketing Set 338 e7: Auto Bracketing (Mode M 339 e8: Bracketing Order 340 f: Controls 341 f1: D Switch 341 f2: Multi Selector Center Button 341 f3: Multi Selector 343...
.../Flash 329 e1: Flash Sync Speed 329 e2: Flash Shutter Speed 331 e3: Flash Cntrl for Flash 338 e5: Modeling Flash 338 e6: Auto Bracketing Set 338 e7: Auto Bracketing (Mode M 339 e8: Bracketing Order 340 f: Controls 341 f1: D Switch 341 f2: Multi Selector Center Button 341 f3: Multi Selector 343...
Product Manual
Page 12
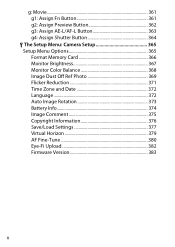
g: Movie 361 g1: Assign Fn Button 361 g2: Assign Preview Button 362 g3: Assign AE-L/AF-L Button 363 g4: Assign Shutter Button 364 B The Setup Menu: Camera Setup 365 Setup Menu Options 365 Format Memory Card 366 Monitor Brightness 367 Monitor Color Balance 368 Image Dust Off Ref Photo 369 Flicker Reduction 371 Time Zone and Date 372 Language 372 Auto Image Rotation 373 Battery Info 374 Image Comment 375 Copyright Information 376 Save/Load Settings 377 Virtual Horizon 379 AF Fine-Tune 380 Eye-Fi Upload 382 Firmware Version 383 x
g: Movie 361 g1: Assign Fn Button 361 g2: Assign Preview Button 362 g3: Assign AE-L/AF-L Button 363 g4: Assign Shutter Button 364 B The Setup Menu: Camera Setup 365 Setup Menu Options 365 Format Memory Card 366 Monitor Brightness 367 Monitor Color Balance 368 Image Dust Off Ref Photo 369 Flicker Reduction 371 Time Zone and Date 372 Language 372 Auto Image Rotation 373 Battery Info 374 Image Comment 375 Copyright Information 376 Save/Load Settings 377 Virtual Horizon 379 AF Fine-Tune 380 Eye-Fi Upload 382 Firmware Version 383 x
Product Manual
Page 13
N The Retouch Menu: Creating Retouched Copies ...........384 Retouch Menu Options 384 D-Lighting 388 Red-Eye Correction 389 Trim 390 Monochrome 392 Filter Effects 393 Color Balance 394 Image Overlay 395 NEF (RAW) Processing 399 Resize 401 Quick Retouch 404 Straighten 404 Distortion Control 405 Fisheye 406 Color Outline 406 Color Sketch 407 Perspective Control 408 Miniature Effect 409 Selective Color 410 Side-by-Side Comparison 412 O My Menu/m Recent Settings 414 xi
N The Retouch Menu: Creating Retouched Copies ...........384 Retouch Menu Options 384 D-Lighting 388 Red-Eye Correction 389 Trim 390 Monochrome 392 Filter Effects 393 Color Balance 394 Image Overlay 395 NEF (RAW) Processing 399 Resize 401 Quick Retouch 404 Straighten 404 Distortion Control 405 Fisheye 406 Color Outline 406 Color Sketch 407 Perspective Control 408 Miniature Effect 409 Selective Color 410 Side-by-Side Comparison 412 O My Menu/m Recent Settings 414 xi
Product Manual
Page 22
... a data storage device or transferring ownership to another person, erase all data using commercially available software, potentially resulting in the malicious use the Network > Network settings option in the camera setup menu to another person, you should be recovered from discarded storage devices using commercial deletion software, or format the device...
... a data storage device or transferring ownership to another person, erase all data using commercially available software, potentially resulting in the malicious use the Network > Network settings option in the camera setup menu to another person, you should be recovered from discarded storage devices using commercial deletion software, or format the device...
Product Manual
Page 29
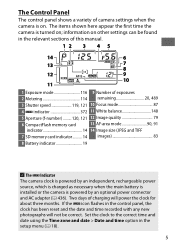
Set the clock to the correct time and date using the Time zone and date > Date and time option in the control panel, the clock has ... sections of this manual. 12 3 4 5 14 6 13 7 8 12 9 10 11 1 Exposure mode 116 9 Number of camera settings when the camera is on ; If the B icon flashes in the setup menu (0 18). 5 information on other settings can be correct. The Control Panel The control panel shows a variety of exposures 2 Metering 114 remaining 20...
Set the clock to the correct time and date using the Time zone and date > Date and time option in the control panel, the clock has ... sections of this manual. 12 3 4 5 14 6 13 7 8 12 9 10 11 1 Exposure mode 116 9 Number of camera settings when the camera is on ; If the B icon flashes in the setup menu (0 18). 5 information on other settings can be correct. The Control Panel The control panel shows a variety of exposures 2 Metering 114 remaining 20...
Product Manual
Page 30
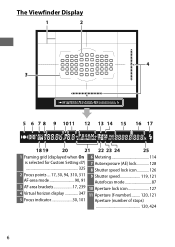
The Viewfinder Display 1 Framing grid (displayed when On 6 Metering 114 is selected for Custom Setting d7) 7 Autoexposure (AE) lock 128 325 8 Shutter speed lock icon 126 2 Focus points.... 17, 30, 94, 310, 311 9 Shutter speed 119, 121 AF-area mode 90, 91 Autofocus mode 87 3 AF area brackets 17, 239 10 Aperture lock icon 127 4 Virtual horizon display 347 11 Aperture (f-number)......... 120, 121 5 Focus indicator 30, 101 Aperture (number of stops) 120, 424 6
The Viewfinder Display 1 Framing grid (displayed when On 6 Metering 114 is selected for Custom Setting d7) 7 Autoexposure (AE) lock 128 325 8 Shutter speed lock icon 126 2 Focus points.... 17, 30, 94, 310, 311 9 Shutter speed 119, 121 AF-area mode 90, 91 Autofocus mode 87 3 AF area brackets 17, 239 10 Aperture lock icon 127 4 Virtual horizon display 347 11 Aperture (f-number)......... 120, 121 5 Focus indicator 30, 101 Aperture (number of stops) 120, 424 6
Product Manual
Page 33
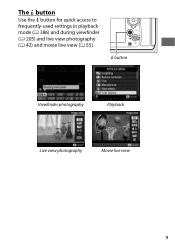
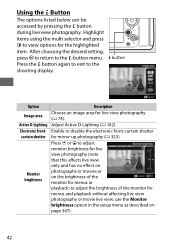
The b button Use the b button for quick access to frequently-used settings in playback mode (0 386) and during viewfinder (0 205) and live view photography (0 42) and movie live view 9 b button Viewfinder photography Playback Live view photography Movie live view (0 55).
The b button Use the b button for quick access to frequently-used settings in playback mode (0 386) and during viewfinder (0 205) and live view photography (0 42) and movie live view 9 b button Viewfinder photography Playback Live view photography Movie live view (0 55).
Product Manual
Page 42
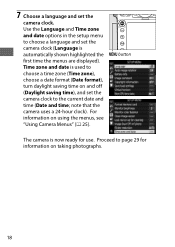
... ready for information on taking photographs. 18 G button The camera is used to the current date and time (Date and time; 7 Choose a language and set the camera clock (Language is automatically shown highlighted the first time the menus are displayed). Use the Language and Time zone and date options in... the setup menu to page 29 for use. For information on and off (Daylight saving time), and set the camera clock to choose a time zone (Time zone), choose a date format (Date format), turn daylight saving time on using the menus, see "...
... ready for information on taking photographs. 18 G button The camera is used to the current date and time (Date and time; 7 Choose a language and set the camera clock (Language is automatically shown highlighted the first time the menus are displayed). Use the Language and Time zone and date options in... the setup menu to page 29 for use. For information on and off (Daylight saving time), and set the camera clock to choose a time zone (Time zone), choose a date format (Date format), turn daylight saving time on using the menus, see "...
Product Manual
Page 44
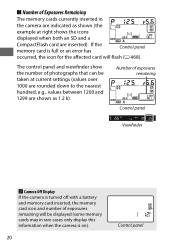
... viewfinder show the number of photographs that can be displayed (some memory cards may in the camera are indicated as shown (the example at current settings (values over 1000 are shown as 1.2 k). If the memory card is full or an error has Control panel occurred, the icon for the affected card...
... viewfinder show the number of photographs that can be displayed (some memory cards may in the camera are indicated as shown (the example at current settings (values over 1000 are shown as 1.2 k). If the memory card is full or an error has Control panel occurred, the icon for the affected card...
Product Manual
Page 47
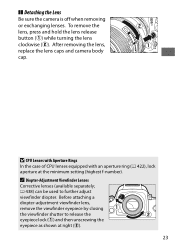
... Viewfinder Lenses Corrective lenses (available separately; 0 438) can be used to release the eyepiece lock (q) and then unscrewing the eyepiece as shown at the minimum setting (highest f-number). ❚❚ Detaching the Lens Be sure the camera is off when removing or exchanging lenses. To remove the lens, press and hold...
... Viewfinder Lenses Corrective lenses (available separately; 0 438) can be used to release the eyepiece lock (q) and then unscrewing the eyepiece as shown at the minimum setting (highest f-number). ❚❚ Detaching the Lens Be sure the camera is off when removing or exchanging lenses. To remove the lens, press and hold...
Product Manual
Page 48
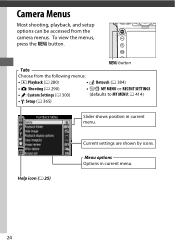
G button Tabs Choose from the camera menus. To view the menus, press the G button. Camera Menus Most shooting, playback, and setup options can be accessed from the following menus: • D: Playback (0 280) • N: Retouch (0 384) • C: Shooting (0 290) • O/m: MY MENU or RECENT SETTINGS • A: Custom Settings (0 300) (defaults to MY MENU; 0 414) • B: Setup (0 365) Slider shows position in current menu. 24 Menu options Options in current menu. Help icon (0 25) Current settings are shown by icons.
G button Tabs Choose from the camera menus. To view the menus, press the G button. Camera Menus Most shooting, playback, and setup options can be accessed from the following menus: • D: Playback (0 280) • N: Retouch (0 384) • C: Shooting (0 290) • O/m: MY MENU or RECENT SETTINGS • A: Custom Settings (0 300) (defaults to MY MENU; 0 414) • B: Setup (0 365) Slider shows position in current menu. 24 Menu options Options in current menu. Help icon (0 25) Current settings are shown by icons.

Product Manual
Page 53
Frame a photograph in the center focus point. When framing photographs in portrait (tall) orientation, hold the handgrip in your right hand and cradle the camera body or lens with the main subject in the viewfinder with your left. When framing photographs in the center focus point. At default settings, the camera will focus on the subject in the viewfinder, hold the camera as shown at right. 2 Frame the photograph. Focus point 29 Basic Photography and Playback "Point-and-Shoot" Photography 1 Ready the Camera.
Frame a photograph in the center focus point. When framing photographs in portrait (tall) orientation, hold the handgrip in your right hand and cradle the camera body or lens with the main subject in the viewfinder with your left. When framing photographs in the center focus point. At default settings, the camera will focus on the subject in the viewfinder, hold the camera as shown at right. 2 Frame the photograph. Focus point 29 Basic Photography and Playback "Point-and-Shoot" Photography 1 Ready the Camera.
Product Manual
Page 58
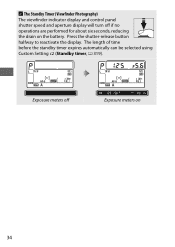
Press the shutter-release button halfway to reactivate the display. Exposure meters off if no operations are performed for about six seconds, reducing the drain on 34 The length of time before the standby timer expires automatically can be selected using Custom Setting c2 (Standby timer, 0 319). A The Standby Timer (Viewfinder Photography) The viewfinder indicator display and control panel shutter speed and aperture display will turn off Exposure meters on the battery.
Press the shutter-release button halfway to reactivate the display. Exposure meters off if no operations are performed for about six seconds, reducing the drain on 34 The length of time before the standby timer expires automatically can be selected using Custom Setting c2 (Standby timer, 0 319). A The Standby Timer (Viewfinder Photography) The viewfinder indicator display and control panel shutter speed and aperture display will turn off Exposure meters on the battery.
Product Manual
Page 61
... the camera is slower and the monitor may brighten or darken while the camera focuses. Press the shutter-release button the rest of the setting selected for Custom Setting c2 (Standby timer, 0 319), the standby timer will turn off. 37 Note that changes in Live View Photography and Movie Live View Use...
... the camera is slower and the monitor may brighten or darken while the camera focuses. Press the shutter-release button the rest of the setting selected for Custom Setting c2 (Standby timer, 0 319), the standby timer will turn off. 37 Note that changes in Live View Photography and Movie Live View Use...
Product Manual
Page 66
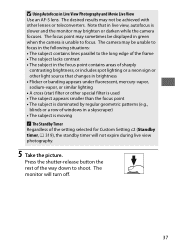
Press 1 or 3 to adjust monitor brightness for live view photography (note that this affects live view photography (0 74). After choosing the desired setting, press J to return to the shooting display. Enable or disable the electronic front-curtain shutter for live view only and has no effect on photographs ...
Press 1 or 3 to adjust monitor brightness for live view photography (note that this affects live view photography (0 74). After choosing the desired setting, press J to return to the shooting display. Enable or disable the electronic front-curtain shutter for live view only and has no effect on photographs ...


