Product Manual
Page 2
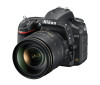
...D750 Model Name: N1404 To get the most from the App Store and Google Play. information that should be read before using the camera for which fees may be downloaded free of the app and any product manuals requires an Internet connection, for the first time, read before use the product. Nikon... you need, the following symbols and conventions are shown in this manual. Camera Settings The explanations in bold. AFor Your Safety Before using the camera. 0 This icon marks references to the camera. Nikon Manual Viewer 2 can be levied by all who use to prevent damage to ...
...D750 Model Name: N1404 To get the most from the App Store and Google Play. information that should be read before using the camera for which fees may be downloaded free of the app and any product manuals requires an Internet connection, for the first time, read before use the product. Nikon... you need, the following symbols and conventions are shown in this manual. Camera Settings The explanations in bold. AFor Your Safety Before using the camera. 0 This icon marks references to the camera. Nikon Manual Viewer 2 can be levied by all who use to prevent damage to ...

Product Manual
Page 4
... Menus 21 First Steps 24 Basic Photography and Playback 34 "Point-and-Shoot" Photography (i and j Modes 34 Basic Playback 37 Deleting Unwanted Photographs 38 Matching Settings to the Subject or Situation (Scene Mode) 41 k Portrait 42 l Landscape 42 p Child 42 m Sports 42 ii
... Menus 21 First Steps 24 Basic Photography and Playback 34 "Point-and-Shoot" Photography (i and j Modes 34 Basic Playback 37 Deleting Unwanted Photographs 38 Matching Settings to the Subject or Situation (Scene Mode) 41 k Portrait 42 l Landscape 42 p Child 42 m Sports 42 ii

Product Manual
Page 6
... 89 S: Shutter-Priority Auto 90 A: Aperture-Priority Auto 91 M: Manual 93 Long Time-Exposures (M Mode Only 95 User Settings: U1 and U2 Modes 99 Saving User Settings 99 Recalling User Settings 101 Resetting User Settings 101 Release Mode 103 Choosing a Release Mode 103 Self-Timer Mode (E 106 Mirror up Mode (V 109 Image Recording Options...
... 89 S: Shutter-Priority Auto 90 A: Aperture-Priority Auto 91 M: Manual 93 Long Time-Exposures (M Mode Only 95 User Settings: U1 and U2 Modes 99 Saving User Settings 99 Recalling User Settings 101 Resetting User Settings 101 Release Mode 103 Choosing a Release Mode 103 Self-Timer Mode (E 106 Mirror up Mode (V 109 Image Recording Options...

Product Manual
Page 8
... Remote Controllers 197 WR-R10/WR-T10 Wireless Remote Controllers 197 Other Shooting Options 198 Viewfinder Photography: The P Button 198 Two-Button Reset: Restoring Default Settings 199 Bracketing 202 Multiple Exposure 216 Interval Timer Photography 222 Time-Lapse Photography 229 Non-CPU Lenses 235 Location Data 239 More on Playback 241...
... Remote Controllers 197 WR-R10/WR-T10 Wireless Remote Controllers 197 Other Shooting Options 198 Viewfinder Photography: The P Button 198 Two-Button Reset: Restoring Default Settings 199 Bracketing 202 Multiple Exposure 216 Interval Timer Photography 222 Time-Lapse Photography 229 Non-CPU Lenses 235 Location Data 239 More on Playback 241...

Product Manual
Page 9
... Wireless Networks 269 Printing Photographs 271 Connecting the Printer 271 Printing Pictures One at a Time 272 Printing Multiple Pictures 274 Creating a DPOF Print Order: Print Set 275 Viewing Photographs on TV 277 HDMI Options 278 Wi-Fi 281 What Wi-Fi Can Do for You 281 Accessing the Camera 282 WPS...
... Wireless Networks 269 Printing Photographs 271 Connecting the Printer 271 Printing Pictures One at a Time 272 Printing Multiple Pictures 274 Creating a DPOF Print Order: Print Set 275 Viewing Photographs on TV 277 HDMI Options 278 Wi-Fi 281 What Wi-Fi Can Do for You 281 Accessing the Camera 282 WPS...

Product Manual
Page 12
.../Flash 345 e1: Flash Sync Speed 345 e2: Flash Shutter Speed 346 e3: Flash Cntrl for Flash 353 e5: Modeling Flash 353 e6: Auto Bracketing Set 353 e7: Bracketing Order 354 f: Controls 354 f1: OK Button 354 f2: Assign Fn Button 356 f3: Assign Preview Button 361 f4: Assign AE-L/AF...
.../Flash 345 e1: Flash Sync Speed 345 e2: Flash Shutter Speed 346 e3: Flash Cntrl for Flash 353 e5: Modeling Flash 353 e6: Auto Bracketing Set 353 e7: Bracketing Order 354 f: Controls 354 f1: OK Button 354 f2: Assign Fn Button 356 f3: Assign Preview Button 361 f4: Assign AE-L/AF...

Product Manual
Page 13
Time Zone and Date 381 Language 381 Auto Image Rotation 382 Battery Info 383 Image Comment 384 Copyright Information 385 Save/Load Settings 386 Virtual Horizon 388 AF Fine-tune 389 Eye-Fi Upload 391 Conformity Marking 392 Firmware Version 392 N The Retouch Menu: Creating Retouched Copies .......... 393 ...
Time Zone and Date 381 Language 381 Auto Image Rotation 382 Battery Info 383 Image Comment 384 Copyright Information 385 Save/Load Settings 386 Virtual Horizon 388 AF Fine-tune 389 Eye-Fi Upload 391 Conformity Marking 392 Firmware Version 392 N The Retouch Menu: Creating Retouched Copies .......... 393 ...
Product Manual
Page 14
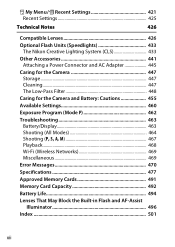
O My Menu/m Recent Settings 421 Recent Settings 425 Technical Notes 426 Compatible Lenses 426 Optional Flash Units (Speedlights 433 The Nikon Creative Lighting System (CLS 433 Other Accessories 441 Attaching a Power Connector and AC Adapter 445 Caring for the Camera 447 ...Storage 447 Cleaning 447 The Low-Pass Filter 448 Caring for the Camera and Battery: Cautions 455 Available Settings 460 Exposure Program (Mode ...
O My Menu/m Recent Settings 421 Recent Settings 425 Technical Notes 426 Compatible Lenses 426 Optional Flash Units (Speedlights 433 The Nikon Creative Lighting System (CLS 433 Other Accessories 441 Attaching a Power Connector and AC Adapter 445 Caring for the Camera 447 ...Storage 447 Cleaning 447 The Low-Pass Filter 448 Caring for the Camera and Battery: Cautions 455 Available Settings 460 Exposure Program (Mode ...

Product Manual
Page 22
..., you should be recovered from discarded storage devices using commercially available software, potentially resulting in the malicious use the Wi-Fi > Network settings > Reset network settings (0 288) and Network > Network settings options in the camera setup menu to another person, erase all data using commercial deletion software, or format the device and then...
..., you should be recovered from discarded storage devices using commercially available software, potentially resulting in the malicious use the Wi-Fi > Network settings > Reset network settings (0 288) and Network > Network settings options in the camera setup menu to another person, erase all data using commercial deletion software, or format the device and then...

Product Manual
Page 27
... not produce heating effects causes no known adverse health effects. Whereas high levels of RF can produce health effects (by additional research. The D750, which is subject to the following two conditions: (1) this device may cause undesired operation of the device. Low power Wireless devices emit low... are absolutely safe. Notices for Customers in Canada CAN ICES-3 B / NMB-3 B This device complies with FCC/IC radiation exposure limits set forth for an uncontrolled environment and meets the FCC radio frequency (RF) Exposure Guidelines in the microwave range while being used.
... not produce heating effects causes no known adverse health effects. Whereas high levels of RF can produce health effects (by additional research. The D750, which is subject to the following two conditions: (1) this device may cause undesired operation of the device. Low power Wireless devices emit low... are absolutely safe. Notices for Customers in Canada CAN ICES-3 B / NMB-3 B This device complies with FCC/IC radiation exposure limits set forth for an uncontrolled environment and meets the FCC radio frequency (RF) Exposure Guidelines in the microwave range while being used.

Product Manual
Page 32
...7 19 18 8 17 9 16 10 15 11 14 13 12 1 Viewfinder eyepiece 10, 29 14 Tilting monitor 17 2 Rubber eyecup 107 Viewing settings 12 3 Diopter adjustment control ........29 Live view 54, 66 4 A button Viewing pictures 37 Full-frame playback 241 Using the AE/AF lock button.......... 129, 141, 361, 373 15 P button 5 R (info) button 12, 64, 75 Changing shooting settings 198 6 Multi selector 19, 21 Changing settings during live 7 J (OK) button 19, 21, 354 view/movie recording ... 61, 71 8 Focus selector lock 127 Retouching pictures 396...
...7 19 18 8 17 9 16 10 15 11 14 13 12 1 Viewfinder eyepiece 10, 29 14 Tilting monitor 17 2 Rubber eyecup 107 Viewing settings 12 3 Diopter adjustment control ........29 Live view 54, 66 4 A button Viewing pictures 37 Full-frame playback 241 Using the AE/AF lock button.......... 129, 141, 361, 373 15 P button 5 R (info) button 12, 64, 75 Changing shooting settings 198 6 Multi selector 19, 21 Changing settings during live 7 J (OK) button 19, 21, 354 view/movie recording ... 61, 71 8 Focus selector lock 127 Retouching pictures 396...

Product Manual
Page 35
The Release-Mode Dial To choose a release mode, press the release mode dial lock release and turn the release mode dial to the desired setting (0 103). Release mode dial lock release Release mode dial 123 4 5 6 7 1 S Single frame 103 2 T Continuous low speed ........103 3 U Continuous high speed.......103 4 J Quiet shutter-release 103 5 M ...
The Release-Mode Dial To choose a release mode, press the release mode dial lock release and turn the release mode dial to the desired setting (0 103). Release mode dial lock release Release mode dial 123 4 5 6 7 1 S Single frame 103 2 T Continuous low speed ........103 3 U Continuous high speed.......103 4 J Quiet shutter-release 103 5 M ...

Product Manual
Page 38
... 22 23 24 25 26 27 28 29 30 31 32 1 Special effects mode 6 Framing grid (displayed when On indicator 46 is selected for Custom Setting d7, 2 Monochrome indicator (displayed Viewfinder grid display)... 341 in % mode or when the 7 Focus points.........36, 127, 329, 330 Monochrome Picture Control or AF-area...
... 22 23 24 25 26 27 28 29 30 31 32 1 Special effects mode 6 Framing grid (displayed when On indicator 46 is selected for Custom Setting d7, 2 Monochrome indicator (displayed Viewfinder grid display)... 341 in % mode or when the 7 Focus points.........36, 127, 329, 330 Monochrome Picture Control or AF-area...

Product Manual
Page 41
... the monitor, press the R button again or press the shutter-release button halfway. 7 Exposure indicator 94 14 Copyright information 385 Exposure compensation 15 "Clock not set" indicator .... 15, 381 display 143 16 Image quality 116 Bracketing progress indicator Role played by card in slot 2 .... 119 Exposure and flash bracketing 203 17...
... the monitor, press the R button again or press the shutter-release button halfway. 7 Exposure indicator 94 14 Copyright information 385 Exposure compensation 15 "Clock not set" indicator .... 15, 381 display 143 16 Image quality 116 Bracketing progress indicator Role played by card in slot 2 .... 119 Exposure and flash bracketing 203 17...

Product Manual
Page 43
... recorded with new photographs will power the clock for about three months. For information on , see Custom Setting d9 (Information display, 0 341). Two days of the lettering in the information display, see Custom Setting c4 (Monitor off delay, 0 337). A See Also For information on choosing how long the monitor ...time pieces and reset as necessary when the main battery is installed or the camera is reset and a Y icon flashes in the setup menu to set the clock to the correct time and date (0 28, 381). If the camera displays a warning stating that the clock is powered by an independent...
... recorded with new photographs will power the clock for about three months. For information on , see Custom Setting d9 (Information display, 0 341). Two days of the lettering in the information display, see Custom Setting c4 (Monitor off delay, 0 337). A See Also For information on choosing how long the monitor ...time pieces and reset as necessary when the main battery is installed or the camera is reset and a Y icon flashes in the setup menu to set the clock to the correct time and date (0 28, 381). If the camera displays a warning stating that the clock is powered by an independent...

Product Manual
Page 44
The P button Use the P button for quick access to frequently-used settings in playback mode (0 245) and during viewfinder (0 198) and live view photography (0 61) and movie live view 16 P button Viewfinder photography Playback Live view photography Movie live view (0 71).
The P button Use the P button for quick access to frequently-used settings in playback mode (0 245) and during viewfinder (0 198) and live view photography (0 61) and movie live view 16 P button Viewfinder photography Playback Live view photography Movie live view (0 71).

Product Manual
Page 48
G button Tabs Choose from the camera menus. Help icon (0 21) Menu options Options in current menu. To view the menus, press the G button. Camera Menus Most shooting, playback, and setup options can be accessed from the following menus: • D: Playback (0 300) • B: Setup (0 374) • C: Photo Shooting (0 310) • N: Retouch (0 393) • 1: Movie Shooting (0 318) • O/m: MY MENU or RECENT SETTINGS • A: Custom Settings (0 323) (defaults to MY MENU; 0 421) Slider shows position in current menu. 20 Current settings are shown by icons.
G button Tabs Choose from the camera menus. Help icon (0 21) Menu options Options in current menu. To view the menus, press the G button. Camera Menus Most shooting, playback, and setup options can be accessed from the following menus: • D: Playback (0 300) • B: Setup (0 374) • C: Photo Shooting (0 310) • N: Retouch (0 393) • 1: Movie Shooting (0 318) • O/m: MY MENU or RECENT SETTINGS • A: Custom Settings (0 323) (defaults to MY MENU; 0 421) Slider shows position in current menu. 20 Current settings are shown by icons.

Product Manual
Page 56
...: select highlighted item Select highlighted item or display submenu Move cursor down choose a time zone, date format, and daylight saving time option before setting the time and date; Power switch Control panel A Image Sensor Cleaning The camera vibrates the low-pass filter covering the image sensor to select... a language and set the camera clock. Language and date/time settings can be changed at any time using the Language (0 381) and Time zone and date (0 381) options in the...
...: select highlighted item Select highlighted item or display submenu Move cursor down choose a time zone, date format, and daylight saving time option before setting the time and date; Power switch Control panel A Image Sensor Cleaning The camera vibrates the low-pass filter covering the image sensor to select... a language and set the camera clock. Language and date/time settings can be changed at any time using the Language (0 381) and Time zone and date (0 381) options in the...

Product Manual
Page 59
... 2 Control panel Number of Exposures Remaining The camera has two memory card slots: slot 1 and slot 2. If the default setting of photographs that currently hold a memory card (the example at current settings (values over 1000 are rounded down to the nearest hundred; e.g., values between 1800 and 1899 are inserted, the card in...
... 2 Control panel Number of Exposures Remaining The camera has two memory card slots: slot 1 and slot 2. If the default setting of photographs that currently hold a memory card (the example at current settings (values over 1000 are rounded down to the nearest hundred; e.g., values between 1800 and 1899 are inserted, the card in...

Product Manual
Page 61
... the camera is turned off when removing or exchanging lenses. If the camera is off with an aperture ring (0 429), lock aperture at the minimum setting (highest f-number). 33 To unlock the memory card, slide the switch to prevent accidental loss of CPU lenses equipped with a charged battery and no memory...
... the camera is turned off when removing or exchanging lenses. If the camera is off with an aperture ring (0 429), lock aperture at the minimum setting (highest f-number). 33 To unlock the memory card, slide the switch to prevent accidental loss of CPU lenses equipped with a charged battery and no memory...


