

Product Manual
Page 2
..." manuals in movie form, is available from the following items: BS-1 accessory shoe cover DK-23 rubber eyecup D7100 camera BF-1B body cap EN-EL15 rechargeable Li-ion battery (with terminal cover) MH-25 battery charger (AC wall adapter supplied only in "For Your Safety" (0 xxi-xxvi). Shape of power cable depends...
..." manuals in movie form, is available from the following items: BS-1 accessory shoe cover DK-23 rubber eyecup D7100 camera BF-1B body cap EN-EL15 rechargeable Li-ion battery (with terminal cover) MH-25 battery charger (AC wall adapter supplied only in "For Your Safety" (0 xxi-xxvi). Shape of power cable depends...

Product Manual
Page 6
Mounting mark (camera) Mounting mark (lens) Keeping marks (indicated by white dot) aligned, position lens on camera, then rotate until lens clicks into place. Quick Start Guide Follow these steps for a quick start with the D7100. 1 Attach the camera strap. Attach the strap securely to the camera eyelets. 2 Charge (0 22) and insert the battery (0 24). 3 Attach a lens (0 26). iv
Mounting mark (camera) Mounting mark (lens) Keeping marks (indicated by white dot) aligned, position lens on camera, then rotate until lens clicks into place. Quick Start Guide Follow these steps for a quick start with the D7100. 1 Attach the camera strap. Attach the strap securely to the camera eyelets. 2 Charge (0 22) and insert the battery (0 24). 3 Attach a lens (0 26). iv

Product Manual
Page 10
... 3 s delay mode 2 s 1 s Off (default) d11 Flash warning On (default) Off d12 MB-D15 LR6 (AA alkaline) battery type HR6 (AA Ni-MH) (default) FR6 (AA lithium) d13 Battery order Use MB-D15 batteries first (default) Use camera battery first viii b Metering/exposure b1 ISOsensitivity 1/3 step step value 1/2 step b2 EV steps for 1/3 step exposure...
... 3 s delay mode 2 s 1 s Off (default) d11 Flash warning On (default) Off d12 MB-D15 LR6 (AA alkaline) battery type HR6 (AA Ni-MH) (default) FR6 (AA lithium) d13 Battery order Use MB-D15 batteries first (default) Use camera battery first viii b Metering/exposure b1 ISOsensitivity 1/3 step step value 1/2 step b2 EV steps for 1/3 step exposure...

Product Manual
Page 12
... control GPS Standby timer Position Use GPS to U2 Reset user Reset U1 settings Reset U2 Monitor brightness -5 - +5 Clean image Clean now sensor Clean at battery levels of J or below. 2 Available only with optional UT-1) Eye-Fi upload 2 Choose hardware Network settings Options Slot 1 Slot 2 Firmware version - 1 Not available at startup... Hz Time zone and Time zone date Date and time Date format Daylight saving time Language See page 340. x Auto image On (default) rotation Off Battery info -
... control GPS Standby timer Position Use GPS to U2 Reset user Reset U1 settings Reset U2 Monitor brightness -5 - +5 Clean image Clean now sensor Clean at battery levels of J or below. 2 Available only with optional UT-1) Eye-Fi upload 2 Choose hardware Network settings Options Slot 1 Slot 2 Firmware version - 1 Not available at startup... Hz Time zone and Time zone date Date and time Date format Daylight saving time Language See page 340. x Auto image On (default) rotation Off Battery info -

Product Manual
Page 14
Table of Contents Q&A Index ...ii Quick Start Guide...iv Menu Options ...vi For Your Safety ...xxi Notices ...xxiii Introduction 1 Overview...1 Getting to Know the Camera 2 The Camera Body ...2 The Mode Dial...6 The Release Mode Dial ...7 The Control Panel...8 The Viewfinder...9 The Information Display...10 The Command Dials ...13 The P button ...18 Camera Menus...19 Using Camera Menus ...20 First Steps ...22 Charge the Battery ...22 Insert the Battery ...24 Attach a Lens...26 Basic Setup...28 Insert a Memory Card...30 Format the Memory Card ...32 Adjust Viewfinder Focus ...33 xii
Table of Contents Q&A Index ...ii Quick Start Guide...iv Menu Options ...vi For Your Safety ...xxi Notices ...xxiii Introduction 1 Overview...1 Getting to Know the Camera 2 The Camera Body ...2 The Mode Dial...6 The Release Mode Dial ...7 The Control Panel...8 The Viewfinder...9 The Information Display...10 The Command Dials ...13 The P button ...18 Camera Menus...19 Using Camera Menus ...20 First Steps ...22 Charge the Battery ...22 Insert the Battery ...24 Attach a Lens...26 Basic Setup...28 Insert a Memory Card...30 Format the Memory Card ...32 Adjust Viewfinder Focus ...33 xii

Product Manual
Page 15
Basic Photography and Playback 35 Battery Level and Card Capacity 35 "Point-and-Shoot" Photography (i and j Modes 36 Basic Playback ...39 Deleting Unwanted Photographs 40 Creative Photography (Scene Modes 41 k Portrait......
Basic Photography and Playback 35 Battery Level and Card Capacity 35 "Point-and-Shoot" Photography (i and j Modes 36 Basic Playback ...39 Deleting Unwanted Photographs 40 Creative Photography (Scene Modes 41 k Portrait......

Product Manual
Page 20
...: File Number Sequence 240 d8: Information Display 241 d9: LCD Illumination ...241 d10: Exposure Delay Mode 241 d11: Flash Warning...241 d12: MB-D15 Battery Type 242 d13: Battery Order ...243 e: Bracketing/Flash...244 e1: Flash Sync Speed...244 e2: Flash Shutter Speed 245 e3: Flash Cntrl for Flash 250 e5: Modeling...
...: File Number Sequence 240 d8: Information Display 241 d9: LCD Illumination ...241 d10: Exposure Delay Mode 241 d11: Flash Warning...241 d12: MB-D15 Battery Type 242 d13: Battery Order ...243 e: Bracketing/Flash...244 e1: Flash Sync Speed...244 e2: Flash Shutter Speed 245 e3: Flash Cntrl for Flash 250 e5: Modeling...

Product Manual
Page 21
... Card...262 Monitor Brightness ...262 Image Dust Off Ref Photo 263 Flicker Reduction...264 Time Zone and Date...265 Language ...265 Auto Image Rotation...265 Battery Info ...266 Image Comment...266 Copyright Information 267 Save/Load Settings ...268 Virtual Horizon...269 AF Fine-tune...270 Wireless Mobile Adapter 271 Eye-Fi...
... Card...262 Monitor Brightness ...262 Image Dust Off Ref Photo 263 Flicker Reduction...264 Time Zone and Date...265 Language ...265 Auto Image Rotation...265 Battery Info ...266 Image Comment...266 Copyright Information 267 Save/Load Settings ...268 Virtual Horizon...269 AF Fine-tune...270 Wireless Mobile Adapter 271 Eye-Fi...

Product Manual
Page 22
...Nikon Creative Lighting System (CLS 304 Other Accessories...308 Attaching a Power Connector and AC Adapter 311 Caring for the Camera...312 Storage ...312 Cleaning ...312 Image Sensor Cleaning...313 "Clean Now" ...313 "Clean at Startup/Shutdown 314 Manual Cleaning ...315 Caring for the Camera and Battery...: Cautions 318 Available Settings...321 Defaults ...324 Exposure Program (Mode P 327 Troubleshooting ...328 Battery/Display ...328 Shooting (All Modes)...328 Shooting (P, S, A, M) ...330 Playback ...
...Nikon Creative Lighting System (CLS 304 Other Accessories...308 Attaching a Power Connector and AC Adapter 311 Caring for the Camera...312 Storage ...312 Cleaning ...312 Image Sensor Cleaning...313 "Clean Now" ...313 "Clean at Startup/Shutdown 314 Manual Cleaning ...315 Caring for the Camera and Battery...: Cautions 318 Available Settings...321 Defaults ...324 Exposure Program (Mode P 327 Troubleshooting ...328 Battery/Display ...328 Shooting (All Modes)...328 Shooting (P, S, A, M) ...330 Playback ...

Product Manual
Page 23
... failure to observe the precautions listed in contact with your eye to a Nikon-authorized service center for extended periods may result in explosion or fire. In addition, note that could cause a fire. After removing the battery, take the product to the viewfinder, care should be repaired only by...of a fall or other strong light source through the viewfinder Viewing the sun or other accident, remove the battery and/or AC adapter and then take the equipment to observe this Nikon product. ❚❚ WARNINGS A Keep the sun out of the frame Keep the sun well out of...
... failure to observe the precautions listed in contact with your eye to a Nikon-authorized service center for extended periods may result in explosion or fire. In addition, note that could cause a fire. After removing the battery, take the product to the viewfinder, care should be repaired only by...of a fall or other strong light source through the viewfinder Viewing the sun or other accident, remove the battery and/or AC adapter and then take the equipment to observe this Nikon product. ❚❚ WARNINGS A Keep the sun out of the frame Keep the sun well out of...

Product Manual
Page 24
.... • Do not expose the battery to flame or to heat or flame. Failure to the subject's eyes could cause temporary visual impairment. A Use appropriate cables When connecting cables to the input and output jacks, use immediately should you are prone to a Nikon-authorized service representative for an extended period...cause overheating or fire. Do not place it under heavy objects or expose it is off and allow the battery to cool. • Discontinue use only the cables provided or sold by Nikon for use could result in fire. • Do not handle the power cable or go near the ...
.... • Do not expose the battery to flame or to heat or flame. Failure to the subject's eyes could cause temporary visual impairment. A Use appropriate cables When connecting cables to the input and output jacks, use immediately should you are prone to a Nikon-authorized service representative for an extended period...cause overheating or fire. Do not place it under heavy objects or expose it is off and allow the battery to cool. • Discontinue use only the cables provided or sold by Nikon for use could result in fire. • Do not handle the power cable or go near the ...

Product Manual
Page 25
... prior notice. • Nikon will not be held liable for Customers in Europe CAUTION RISK OF EXPLOSION IF BATTERY IS REPLACED BY AN INCORRECT TYPE. This symbol indicates that the battery is to be collected separately. This symbol on the battery indicates that electrical and electronic..., transcribed, stored in a retrieval system, or translated into any language in any form, by any means, without Nikon's prior written permission. • Nikon reserves the right to change the specifications of the hardware and software described in these manuals is designated for separate collection...
... prior notice. • Nikon will not be held liable for Customers in Europe CAUTION RISK OF EXPLOSION IF BATTERY IS REPLACED BY AN INCORRECT TYPE. This symbol indicates that the battery is to be collected separately. This symbol on the battery indicates that electrical and electronic..., transcribed, stored in a retrieval system, or translated into any language in any form, by any means, without Nikon's prior written permission. • Nikon reserves the right to change the specifications of the hardware and software described in these manuals is designated for separate collection...
Product Manual
Page 28
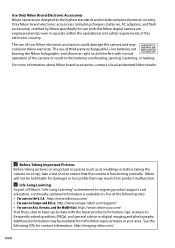
... of third-party rechargeable Li-ion batteries not bearing the Nikon holographic seal shown at right could damage the camera and may result from the Nikon representative in the batteries overheating, igniting, rupturing, or leaking. Only Nikon brand electronic accessories (including chargers, batteries, AC adapters, and flash accessories) certified by Nikon specifically for contact information: http://imaging...
... of third-party rechargeable Li-ion batteries not bearing the Nikon holographic seal shown at right could damage the camera and may result from the Nikon representative in the batteries overheating, igniting, rupturing, or leaking. Only Nikon brand electronic accessories (including chargers, batteries, AC adapters, and flash accessories) certified by Nikon specifically for contact information: http://imaging...

Product Manual
Page 32
... 13, 257 3 Depth-of-field preview button......... 50, 255, 260 4 Fn (function) button .......... 65, 125, 151, 253, 259 5 Battery-chamber cover 24 6 Battery-chamber cover latch 24 7 Contact cover for optional MB-D15 battery pack 308 8 Power connector cover 311 9 CPU contacts 10 Lens mount 27, 78 11 AF coupling 12 Tripod socket...
... 13, 257 3 Depth-of-field preview button......... 50, 255, 260 4 Fn (function) button .......... 65, 125, 151, 253, 259 5 Battery-chamber cover 24 6 Battery-chamber cover latch 24 7 Contact cover for optional MB-D15 battery pack 308 8 Power connector cover 311 9 CPU contacts 10 Lens mount 27, 78 11 AF coupling 12 Tripod socket...
Product Manual
Page 36
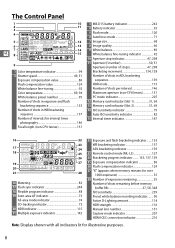
... Number of shots in WB bracketing sequence 137 Number of intervals for interval timer photography 146 Focal length (non-CPU lenses 151 3 MB-D15 battery indicator 243 4 Battery indicator 35 5 Flash mode 120 6 Autofocus mode 71 7 Image size 68 8 Image quality 66 9 White balance 89 White balance fine-tuning indicator 92 10...
... Number of shots in WB bracketing sequence 137 Number of intervals for interval timer photography 146 Focal length (non-CPU lenses 151 3 MB-D15 battery indicator 243 4 Battery indicator 35 5 Flash mode 120 6 Autofocus mode 71 7 Image size 68 8 Image quality 66 9 White balance 89 White balance fine-tuning indicator 92 10...

Product Manual
Page 37
...when On is inserted, the display in the viewfinder will return to normal when a fully-charged battery is normal and does not indicate a malfunction. D No Battery When the battery is totally exhausted or no battery is selected for Custom Setting d2 239 7 1.3× DX crop indicator 64 8 Roll indicator...84 13 Shutter speed 49, 51 Autofocus mode 71 14 Aperture (f-number 50, 51 Aperture (number of stops 47, 298 15 Low battery warning 35 16 Exposure and flash bracketing indicator .......133 WB bracketing indicator 137 ADL bracketing indicator 139 17 ISO sensitivity indicator 79 18 "K" ...
...when On is inserted, the display in the viewfinder will return to normal when a fully-charged battery is normal and does not indicate a malfunction. D No Battery When the battery is totally exhausted or no battery is selected for Custom Setting d2 239 7 1.3× DX crop indicator 64 8 Roll indicator...84 13 Shutter speed 49, 51 Autofocus mode 71 14 Aperture (f-number 50, 51 Aperture (number of stops 47, 298 15 Low battery warning 35 16 Exposure and flash bracketing indicator .......133 WB bracketing indicator 137 ADL bracketing indicator 139 17 ISO sensitivity indicator 79 18 "K" ...
Product Manual
Page 38
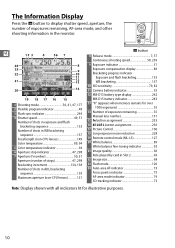
... display 86 Bracketing progress indicator Exposure and flash bracketing 133 WB bracketing 137 10 ISO sensitivity 79, 82 11 Camera battery indicator 35 12 MB-D15 battery type display 242 MB-D15 battery indicator 243 1 Shooting mode 36, 41, 47, 177 2 Flexible program indicator 48 3 Flash sync indicator 244 4 Shutter speed 49, 51...
... display 86 Bracketing progress indicator Exposure and flash bracketing 133 WB bracketing 137 10 ISO sensitivity 79, 82 11 Camera battery indicator 35 12 MB-D15 battery type display 242 MB-D15 battery indicator 243 1 Shooting mode 36, 41, 47, 177 2 Flexible program indicator 48 3 Flash sync indicator 244 4 Shutter speed 49, 51...

Product Manual
Page 50
...if its temperature is complete. To maximize shooting time, charge the battery in . Remove the terminal cover from the battery. 3 Insert the battery. About 2 hours and 35 minutes are required to fully recharge the battery when no charge remains. do not rotate. 2 Remove the terminal ...;C (41 °F-95 °F). D Charging the Battery Charge the battery indoors at right; The battery will flash slowly while the battery charges. Connect the power cable. Unplug the charger and remove the battery. 22 Place the battery in the battery bay as shown in the illustration on the charger....
...if its temperature is complete. To maximize shooting time, charge the battery in . Remove the terminal cover from the battery. 3 Insert the battery. About 2 hours and 35 minutes are required to fully recharge the battery when no charge remains. do not rotate. 2 Remove the terminal ...;C (41 °F-95 °F). D Charging the Battery Charge the battery indoors at right; The battery will flash slowly while the battery charges. Connect the power cable. Unplug the charger and remove the battery. 22 Place the battery in the battery bay as shown in the illustration on the charger....

Product Manual
Page 52
... orientation shown (q), using the battery to keep the orange battery latch pressed to OFF. The latch locks the battery in place when the battery is fully inserted (w). 3 Close the battery-chamber cover. Battery latch A Removing the Battery Turn the camera off before inserting or removing batteries. 1 Open the battery-chamber cover. D Inserting and Removing Batteries Always turn the camera off...
... orientation shown (q), using the battery to keep the orange battery latch pressed to OFF. The latch locks the battery in place when the battery is fully inserted (w). 3 Close the battery-chamber cover. Battery latch A Removing the Battery Turn the camera off before inserting or removing batteries. 1 Open the battery-chamber cover. D Inserting and Removing Batteries Always turn the camera off...

Product Manual
Page 53
... and follow the warnings and cautions on pages xxi-xxii and 318-320 of pictures taken since the battery was charged. Do not use immediately and take battery and X charger to your retailer or a Nikon-authorized service representative. failure to observe this precaution could result in the correct range and then unplug the...
... and follow the warnings and cautions on pages xxi-xxii and 318-320 of pictures taken since the battery was charged. Do not use immediately and take battery and X charger to your retailer or a Nikon-authorized service representative. failure to observe this precaution could result in the correct range and then unplug the...


