D7000 User's Manual
Page 2
...details. See page 18 for help on menu items and other topics. Find the solution here. 0 299-304 A For Your Safety Before using the camera for from: i The Table of "watch and learn" manuals in "For Your Safety" (0 xii-xvii). Digitutor "Digitutor", a series of Contents... ➜ 0 iv-xi Find items by key word. ➜ 0 322-325 i Error Messages ➜ If the camera displays a warning, find the solution here. 0 305-308 i Troubleshooting ➜ Camera behaving unexpectedly? i The Q&A Index ➜ 0 ii-iii Know what you want to do but don't know the function...
...details. See page 18 for help on menu items and other topics. Find the solution here. 0 299-304 A For Your Safety Before using the camera for from: i The Table of "watch and learn" manuals in "For Your Safety" (0 xii-xvii). Digitutor "Digitutor", a series of Contents... ➜ 0 iv-xi Find items by key word. ➜ 0 322-325 i Error Messages ➜ If the camera displays a warning, find the solution here. 0 305-308 i Troubleshooting ➜ Camera behaving unexpectedly? i The Q&A Index ➜ 0 ii-iii Know what you want to do but don't know the function...
D7000 User's Manual
Page 4
... I preserve details in quiet surroundings? How do I take photos one at large sizes? Can I choose a shutter speed (mode S)? i Exposure Can I view more pictures on the camera? How do I make long ("time") exposures (mode M)? Can I view photographs on the memory card? i Image Quality and Size How do I protect photos from firing? How... 0 46, 163 165-170 201 191-194 174 47, 175-177 ii i Deletion How do I keep the flash from accidental deletion? Can I choose how the camera focuses? How do I make photos brighter or darker?
... I preserve details in quiet surroundings? How do I take photos one at large sizes? Can I choose a shutter speed (mode S)? i Exposure Can I view more pictures on the camera? How do I make long ("time") exposures (mode M)? Can I view photographs on the memory card? i Image Quality and Size How do I protect photos from firing? How... 0 46, 163 165-170 201 191-194 174 47, 175-177 ii i Deletion How do I keep the flash from accidental deletion? Can I choose how the camera focuses? How do I make photos brighter or darker?
D7000 User's Manual
Page 5
... I remove "red-eye"? Can I use? What lenses can I print the date of photos? What other accessories are available for my camera? What do I take my camera for a menu or message? Where should I do with the supplied eyepiece cap? What software is level? Retouching Photographs How do I make... I use the command dials? How do I focus the viewfinder? How do I format memory cards? How do I print photos? How do I clean the camera? How do I keep the displays from turning off? How do I use ? Can I display menus in the viewfinder or the monitor? Connections How do I...
... I remove "red-eye"? Can I use? What lenses can I print the date of photos? What other accessories are available for my camera? What do I take my camera for a menu or message? Where should I do with the supplied eyepiece cap? What software is level? Retouching Photographs How do I make... I use the command dials? How do I focus the viewfinder? How do I format memory cards? How do I print photos? How do I clean the camera? How do I keep the displays from turning off? How do I use ? Can I display menus in the viewfinder or the monitor? Connections How do I...

D7000 User's Manual
Page 6
......6 The Release-Mode Dial ...7 The Control Panel...8 The Viewfinder...9 The Information Display...10 The Command Dials ...13 The BM-11 Monitor Cover 17 Camera Menus...18 Using Camera Menus ...19 First Steps ...21 Charge the Battery ...21 Insert the Battery ...24 Attach a Lens...25 Basic Setup...27 Insert a Memory Card... the Memory Card ...32 Adjust Viewfinder Focus ...34 Basic Photography and Playback 35 "Point-and-Shoot" Photography (i and j Modes 35 Step 1: Turn the Camera On 35 Step 2: Select i or j Mode 36 Step 3: Frame the Photograph 37 Step 4: Focus ...38 Step 5: Shoot ...38 iv
......6 The Release-Mode Dial ...7 The Control Panel...8 The Viewfinder...9 The Information Display...10 The Command Dials ...13 The BM-11 Monitor Cover 17 Camera Menus...18 Using Camera Menus ...19 First Steps ...21 Charge the Battery ...21 Insert the Battery ...24 Attach a Lens...25 Basic Setup...27 Insert a Memory Card... the Memory Card ...32 Adjust Viewfinder Focus ...34 Basic Photography and Playback 35 "Point-and-Shoot" Photography (i and j Modes 35 Step 1: Turn the Camera On 35 Step 2: Select i or j Mode 36 Step 3: Frame the Photograph 37 Step 4: Focus ...38 Step 5: Shoot ...38 iv
D7000 User's Manual
Page 10
Connections 179 Connecting to a Computer 179 Before Connecting the Camera 179 Connecting the Camera ...180 Wireless and Ethernet Networks 181 Printing Photographs...182 Connecting the Printer...182 Printing Pictures One at a Time 183 Printing Multiple Pictures 185 ...Folder...203 File Naming ...204 Auto Distortion Control 205 Long Exp. NR (Long Exposure Noise Reduction 205 High ISO NR...205 A Custom Settings: Fine-Tuning Camera Settings 206 A: Reset Custom Settings 207 a: Autofocus...208 a1: AF-C Priority Selection 208 a2: AF-S Priority Selection 208 a3: Focus Tracking with Lock-On...
Connections 179 Connecting to a Computer 179 Before Connecting the Camera 179 Connecting the Camera ...180 Wireless and Ethernet Networks 181 Printing Photographs...182 Connecting the Printer...182 Printing Pictures One at a Time 183 Printing Multiple Pictures 185 ...Folder...203 File Naming ...204 Auto Distortion Control 205 Long Exp. NR (Long Exposure Noise Reduction 205 High ISO NR...205 A Custom Settings: Fine-Tuning Camera Settings 206 A: Reset Custom Settings 207 a: Autofocus...208 a1: AF-C Priority Selection 208 a2: AF-S Priority Selection 208 a3: Focus Tracking with Lock-On...
D7000 User's Manual
Page 12
B The Setup Menu: Camera Setup 236 Format Memory Card ...236 LCD Brightness...237 Video Mode...237 Flicker Reduction...237 Time Zone and Date ...237 Language ...238 Image Comment ...238 ...
B The Setup Menu: Camera Setup 236 Format Memory Card ...236 LCD Brightness...237 Video Mode...237 Flicker Reduction...237 Time Zone and Date ...237 Language ...238 Image Comment ...238 ...
D7000 User's Manual
Page 13
Technical Notes 269 Compatible Lenses...269 Optional Flash Units (Speedlights 275 The Nikon Creative Lighting System (CLS 276 Other Accessories ...280 Attaching a Power Connector and AC Adapter 282 Caring for the Camera...283 Storage...283 Cleaning ...283 The Low-Pass Filter...284 "Clean Now" ......284 "Clean at Startup/Shutdown 285 "Manual Cleaning" ...286 Caring for the Camera and Battery: Cautions 289 Available Settings ...292 Defaults ...295 Exposure Program (Mode P 298 Troubleshooting ...299 Display ...299 Shooting (All Modes) ...
Technical Notes 269 Compatible Lenses...269 Optional Flash Units (Speedlights 275 The Nikon Creative Lighting System (CLS 276 Other Accessories ...280 Attaching a Power Connector and AC Adapter 282 Caring for the Camera...283 Storage...283 Cleaning ...283 The Low-Pass Filter...284 "Clean Now" ......284 "Clean at Startup/Shutdown 285 "Manual Cleaning" ...286 Caring for the Camera and Battery: Cautions 289 Available Settings ...292 Defaults ...295 Exposure Program (Mode P 298 Troubleshooting ...299 Display ...299 Shooting (All Modes) ...

D7000 User's Manual
Page 14
...flash • Using the camera with the skin or other strong light source through the viewfinder could cause temporary visual impairment. xii In the event of flammable gas Do not use the product will read them. For Your Safety To prevent damage to your Nikon product or injury to yourself... an infant or child could result in strangulation. A Do not place the strap around the neck of an infant or child Placing the camera strap around the neck of the frame when Touching the product's internal parts shooting backlit subjects. Continued operation could result in close contact with...
...flash • Using the camera with the skin or other strong light source through the viewfinder could cause temporary visual impairment. xii In the event of flammable gas Do not use the product will read them. For Your Safety To prevent damage to your Nikon product or injury to yourself... an infant or child could result in strangulation. A Do not place the strap around the neck of an infant or child Placing the camera strap around the neck of the frame when Touching the product's internal parts shooting backlit subjects. Continued operation could result in close contact with...

D7000 User's Manual
Page 15
... input and output jacks, use immediately should you are prone to leakage when fully exposed, take the power cable to -AC the camera off before • Dust on an audio CD player could result in overheating and damage to observe this improperly handled. Failure to ...hearing loss or damage the equipment. Failure to the • Do not short or disassemble the battery. To avoid damage to the Nikon-authorized service representative product, be objects such as discoloration or deformation. Failure to remove the battery for an extended adapters designed to ...
... input and output jacks, use immediately should you are prone to leakage when fully exposed, take the power cable to -AC the camera off before • Dust on an audio CD player could result in overheating and damage to observe this improperly handled. Failure to ...hearing loss or damage the equipment. Failure to the • Do not short or disassemble the battery. To avoid damage to the Nikon-authorized service representative product, be objects such as discoloration or deformation. Failure to remove the battery for an extended adapters designed to ...
D7000 User's Manual
Page 18
... when a minimum of The copying or reproduction of Data Storage Devices Please note that has been digitally copied or reproduced by means of a scanner, digital camera, or other data storage devices does not completely erase the original image data. Care should be provided for preset manual (0 123). Disposing of paper money...
... when a minimum of The copying or reproduction of Data Storage Devices Please note that has been digitally copied or reproduced by means of a scanner, digital camera, or other data storage devices does not completely erase the original image data. Care should be provided for preset manual (0 123). Disposing of paper money...

D7000 User's Manual
Page 19
.../ • For users in Europe and Africa: http://www.europe-nikon.com/support/ • For users in the batteries overheating, igniting, rupturing, or leaking. The use with this Nikon digital camera are designed to the highest standards and include complex electronic circuitry. A...to keep up-to-date with normal operation of Nikon's "Life-Long Learning" commitment to ongoing product support and education, continually-updated information is functioning normally. Use Only Nikon Brand Electronic Accessories Nikon cameras are engineered and proven to operate within the operational...
.../ • For users in Europe and Africa: http://www.europe-nikon.com/support/ • For users in the batteries overheating, igniting, rupturing, or leaking. The use with this Nikon digital camera are designed to the highest standards and include complex electronic circuitry. A...to keep up-to-date with normal operation of Nikon's "Life-Long Learning" commitment to ongoing product support and education, continually-updated information is functioning normally. Use Only Nikon Brand Electronic Accessories Nikon cameras are engineered and proven to operate within the operational...
D7000 User's Manual
Page 21
... prevent damage to other pages in this manual. THE USE OF NON-NIKON ACCESSORIES COULD DAMAGE YOUR CAMERA AND MAY VOID YOUR NIKON WARRANTY. D Servicing the Camera and Accessories The camera is inspected or serviced. Frequent inspection and servicing are engineered and proven...when the camera is a precision device and requires regular servicing. Nikon recommends that the camera be inspected by Nikon specifically for your purchase of a Nikon single-lens reflex (SLR) digital camera. To get the most from your Nikon digital camera are particularly recommended if the camera is used ...
... prevent damage to other pages in this manual. THE USE OF NON-NIKON ACCESSORIES COULD DAMAGE YOUR CAMERA AND MAY VOID YOUR NIKON WARRANTY. D Servicing the Camera and Accessories The camera is inspected or serviced. Frequent inspection and servicing are engineered and proven...when the camera is a precision device and requires regular servicing. Nikon recommends that the camera be inspected by Nikon specifically for your purchase of a Nikon single-lens reflex (SLR) digital camera. To get the most from your Nikon digital camera are particularly recommended if the camera is used ...

D7000 User's Manual
Page 22
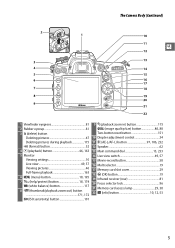
...8 Shutter-release button 38, 39 9 E (exposure compensation) button 107 Two-button reset button 151 10 Z (metering) button 105 Q (format) button 32 11 Eyelet for camera strap 12 Focal plane mark (E 100 13 Control panel 8 A The Power Switch Rotate the power switch as shown to familiarize yourself with... camera controls and displays. You may find it as shown to it helpful to bookmark this section and refer to turn the camera on. Rotate the power switch as you read through the rest of the manual.
...8 Shutter-release button 38, 39 9 E (exposure compensation) button 107 Two-button reset button 151 10 Z (metering) button 105 Q (format) button 32 11 Eyelet for camera strap 12 Focal plane mark (E 100 13 Control panel 8 A The Power Switch Rotate the power switch as shown to familiarize yourself with... camera controls and displays. You may find it as shown to it helpful to bookmark this section and refer to turn the camera on. Rotate the power switch as you read through the rest of the manual.

D7000 User's Manual
Page 23
The Camera Body (Continued) X 1 Built-in flash 143 2 M (flash mode) button 143 Y (flash compensation) button 148 3 D (bracketing) button 109, 164 4 Infrared receiver (front 81 5 Mounting mark 25 6 ...
The Camera Body (Continued) X 1 Built-in flash 143 2 M (flash mode) button 143 Y (flash compensation) button 148 3 D (bracketing) button 109, 164 4 Infrared receiver (front 81 5 Mounting mark 25 6 ...

D7000 User's Manual
Page 24
The Camera Body (Continued) X 1 AF-assist illuminator 210 Self-timer lamp 81 Red-eye reduction lamp 145 2 Sub-command dial 13, 233 3 Fn button 149, 230 4 Depth-...
The Camera Body (Continued) X 1 AF-assist illuminator 210 Self-timer lamp 81 Red-eye reduction lamp 145 2 Sub-command dial 13, 233 3 Fn button 149, 230 4 Depth-...
D7000 User's Manual
Page 25
The Camera Body (Continued) X 1 Viewfinder eyepiece 81 2 Rubber eyecup 81 3 O (delete) button Deleting pictures 47 Deleting pictures during playback 175 Q (format) button 32 4 K (playback) button 46, 163 5 ...
The Camera Body (Continued) X 1 Viewfinder eyepiece 81 2 Rubber eyecup 81 3 O (delete) button Deleting pictures 47 Deleting pictures during playback 175 Q (format) button 32 4 K (playback) button 46, 163 5 ...
D7000 User's Manual
Page 26
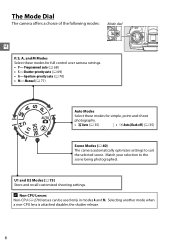
.... Selecting another mode when a non-CPU lens is attached disables the shutter release. 6 The Mode Dial The camera offers a choice of the following modes: Mode dial X P, S, A, and M Modes Select these modes for full control over camera settings. • P-Programmed auto (0 68) • S-Shutter-priority auto (0 69) • A-Aperture-priority auto (0 70) •...
.... Selecting another mode when a non-CPU lens is attached disables the shutter release. 6 The Mode Dial The camera offers a choice of the following modes: Mode dial X P, S, A, and M Modes Select these modes for full control over camera settings. • P-Programmed auto (0 68) • S-Shutter-priority auto (0 69) • A-Aperture-priority auto (0 70) •...
D7000 User's Manual
Page 27
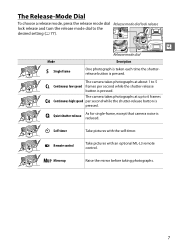
...dial Mode Description S Single frame One photograph is taken each time the shutterrelease button is reduced. The camera takes photographs at up Raise the mirror before taking photographs. 7 The camera takes photographs at about 1 to 5 CL Continuous low speed frames per second while the shutter-release...frames CH Continuous high speed per second while the shutter-release button is pressed. J Quiet shutter-release As for single-frame, except that camera noise is pressed. MUP Mirror up to the desired setting (0 77). E Self-timer Take pictures with the self-timer. 4 Remote...
...dial Mode Description S Single frame One photograph is taken each time the shutterrelease button is reduced. The camera takes photographs at up Raise the mirror before taking photographs. 7 The camera takes photographs at about 1 to 5 CL Continuous low speed frames per second while the shutter-release...frames CH Continuous high speed per second while the shutter-release button is pressed. J Quiet shutter-release As for single-frame, except that camera noise is pressed. MUP Mirror up to the desired setting (0 77). E Self-timer Take pictures with the self-timer. 4 Remote...
D7000 User's Manual
Page 31
... Exposure and flash bracketing indicator .........109 WB bracketing indicator 112 ADL bracketing indicator 114 25 ADL bracketing amount 114 26 Interval timer indicator 157 27 Camera battery indicator 35 28 MB-D11 battery type display 220 MB-D11 battery indicator 221 29 GPS connection indicator 162 30 Metering 105 31 Depth...
... Exposure and flash bracketing indicator .........109 WB bracketing indicator 112 ADL bracketing indicator 114 25 ADL bracketing amount 114 26 Interval timer indicator 157 27 Camera battery indicator 35 28 MB-D11 battery type display 220 MB-D11 battery indicator 221 29 GPS connection indicator 162 30 Metering 105 31 Depth...

D7000 User's Manual
Page 37
X To remove the cover, hold the camera firmly and pull the bottom of the cover gently outwards as shown at right. 17 To attach the cover, insert the projection on the top of the cover into place (w). The BM-11 Monitor Cover A clear plastic cover is provided with the camera to keep the monitor clean and protect it clicks into the matching indentation above the camera monitor (q) and press the bottom of the cover until it when the camera is not in use.
X To remove the cover, hold the camera firmly and pull the bottom of the cover gently outwards as shown at right. 17 To attach the cover, insert the projection on the top of the cover into place (w). The BM-11 Monitor Cover A clear plastic cover is provided with the camera to keep the monitor clean and protect it clicks into the matching indentation above the camera monitor (q) and press the bottom of the cover until it when the camera is not in use.


