

User Manual
Page 2
... The explanations in "For Your Safety" (0 xviii-xix). Digitutor "Digitutor", a series of a Nikon single-lens reflex (SLR) digital camera. Help Use the camera's on-board help feature for help on menu items and other pages in the camera monitor are used : D This icon marks cautions; Menu items, options, and messages displayed in this manual...
... The explanations in "For Your Safety" (0 xviii-xix). Digitutor "Digitutor", a series of a Nikon single-lens reflex (SLR) digital camera. Help Use the camera's on-board help feature for help on menu items and other pages in the camera monitor are used : D This icon marks cautions; Menu items, options, and messages displayed in this manual...

User Manual
Page 4
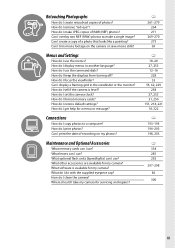
... self-timer or a remote control? 85 Can I reduce shutter noise in quiet surroundings (quiet shutter-release)? 6, 83 i Focus Can I choose how the camera focuses? 97-100 Can I choose the focus point? 101 i Exposure Can I make long ("time") exposures (mode M)? 79 Can I frame photos in quick... succession? 6, 83 How do I view photographs on a TV? i Deletion How do I view photos on the camera? Can I avoid "red-eye"? How do I view more pictures on the memory card? 93-95 Viewing Photographs i Playback How do I get more information ...
... self-timer or a remote control? 85 Can I reduce shutter noise in quiet surroundings (quiet shutter-release)? 6, 83 i Focus Can I choose how the camera focuses? 97-100 Can I choose the focus point? 101 i Exposure Can I make long ("time") exposures (mode M)? 79 Can I frame photos in quick... succession? 6, 83 How do I view photographs on a TV? i Deletion How do I view photos on the camera? Can I avoid "red-eye"? How do I view more pictures on the memory card? 93-95 Viewing Photographs i Playback How do I get more information ...
User Manual
Page 5
..., 250 151, 214, 221 18, 322 0 193-195 196-203 198, 203 0 334 285 292 297-298 86 300 iii Where should I take my camera for my camera? Can I use ? How do I print photos? Can I print the date of a photo that looks like a painting? How do I make a single image? How ...memory cards can I use ? How do I remove "red-eye"? What lenses can I use the menus? What software is level? How do I clean the camera? What optional flash units (Speedlights) can I trim movie footage on my photos? Menus and Settings How do with the supplied eyepiece cap? What do I do...
..., 250 151, 214, 221 18, 322 0 193-195 196-203 198, 203 0 334 285 292 297-298 86 300 iii Where should I take my camera for my camera? Can I use ? How do I print photos? Can I print the date of a photo that looks like a painting? How do I make a single image? How ...memory cards can I use ? How do I remove "red-eye"? What lenses can I use the menus? What software is level? How do I clean the camera? What optional flash units (Speedlights) can I trim movie footage on my photos? Menus and Settings How do with the supplied eyepiece cap? What do I do...

User Manual
Page 6
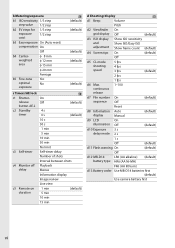
... Save settings option in Slot 2 Image quality (0 93) Image size Yes No Select folder by inserting the memory card into the camera and selecting Save/load settings > Load settings. iv C SHOOTING MENU (0 214) Reset shooting menu Storage folder File naming Role played by ...card in the camera setup menu (0 249). Preset manual Items marked with a icon can be saved to other D600 cameras by number Select folder from list File naming Overflow (default) Backup RAW Slot 1 - Playback display...
... Save settings option in Slot 2 Image quality (0 93) Image size Yes No Select folder by inserting the memory card into the camera and selecting Save/load settings > Load settings. iv C SHOOTING MENU (0 214) Reset shooting menu Storage folder File naming Role played by ...card in the camera setup menu (0 249). Preset manual Items marked with a icon can be saved to other D600 cameras by number Select folder from list File naming Overflow (default) Backup RAW Slot 1 - Playback display...
User Manual
Page 8
... MB-D14 LR6 (AA alkaline) battery type HR6 (AA Ni-MH) (default) FR6 (AA lithium) d13 Battery order Use MB-D14 batteries first (default) Use camera battery first vi
... MB-D14 LR6 (AA alkaline) battery type HR6 (AA Ni-MH) (default) FR6 (AA lithium) d13 Battery order Use MB-D14 batteries first (default) Use camera battery first vi
User Manual
Page 11
... below. 2 Available only with compatible Eye-Fi memory cards. ix Choose start/end point Save selected frame - 1 Available only when G button is pressed to set camera clock Virtual horizon - Copyright information Done Artist Copyright Save/load settings GPS Attach copyright information Save settings Load settings Standby timer Position Use GPS to...
... below. 2 Available only with compatible Eye-Fi memory cards. ix Choose start/end point Save selected frame - 1 Available only when G button is pressed to set camera clock Virtual horizon - Copyright information Done Artist Copyright Save/load settings GPS Attach copyright information Save settings Load settings Standby timer Position Use GPS to...

User Manual
Page 12
...Dial...5 The Release-Mode Dial ...6 The Control Panel...7 The Viewfinder...8 The Information Display...9 The Command Dials ...12 The BM-14 Monitor Cover 17 Camera Menus...18 Using Camera Menus ...19 First Steps ...21 Charge the Battery ...21 Insert the Battery ...23 Attach a Lens...25 Basic Setup...27 Insert a Memory Card...the Memory Card ...31 Adjust Viewfinder Focus ...33 Basic Photography and Playback 35 "Point-and-Shoot" Photography (i and j Modes 35 Step 1: Turn the Camera On 35 Step 2: Select i or j Mode 36 Step 3: Frame the Photograph 37 Step 4: Focus ...38 Step 5: Shoot ...38 x
...Dial...5 The Release-Mode Dial ...6 The Control Panel...7 The Viewfinder...8 The Information Display...9 The Command Dials ...12 The BM-14 Monitor Cover 17 Camera Menus...18 Using Camera Menus ...19 First Steps ...21 Charge the Battery ...21 Insert the Battery ...23 Attach a Lens...25 Basic Setup...27 Insert a Memory Card...the Memory Card ...31 Adjust Viewfinder Focus ...33 Basic Photography and Playback 35 "Point-and-Shoot" Photography (i and j Modes 35 Step 1: Turn the Camera On 35 Step 2: Select i or j Mode 36 Step 3: Frame the Photograph 37 Step 4: Focus ...38 Step 5: Shoot ...38 x

User Manual
Page 16
... 188 Deleting Photographs ...189 Full-Frame, Thumbnail, and Calendar Playback 189 The Playback Menu...190 Connections 193 Connecting to a Computer 193 Before Connecting the Camera 193 Connecting the Camera ...194 Printing Photographs...196 Connecting the Printer...196 Printing Pictures One at a Time 197 Printing Multiple Pictures 199 Creating a DPOF Print Order: Print...
... 188 Deleting Photographs ...189 Full-Frame, Thumbnail, and Calendar Playback 189 The Playback Menu...190 Connections 193 Connecting to a Computer 193 Before Connecting the Camera 193 Connecting the Camera ...194 Printing Photographs...196 Connecting the Printer...196 Printing Pictures One at a Time 197 Printing Multiple Pictures 199 Creating a DPOF Print Order: Print...

User Manual
Page 17
A Custom Settings: Fine-Tuning Camera Settings 219 Reset Custom Settings 221 a: Autofocus ...221 a1: AF-C Priority Selection 221 a2: AF-S Priority Selection 221 a3: Focus Tracking with Lock-On 222 ...
A Custom Settings: Fine-Tuning Camera Settings 219 Reset Custom Settings 221 a: Autofocus ...221 a1: AF-C Priority Selection 221 a2: AF-S Priority Selection 221 a3: Focus Tracking with Lock-On 222 ...
User Manual
Page 18
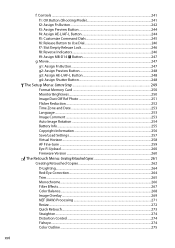
......247 g1: Assign Fn Button...247 g2: Assign Preview Button 248 g3: Assign AE-L/AF-L Button 248 g4: Assign Shutter Button 248 B The Setup Menu: Camera Setup 249 Format Memory Card ...250 Monitor Brightness...250 Image Dust Off Ref Photo 251 Flicker Reduction...252 Time Zone and Date ...253 Language ...253...
......247 g1: Assign Fn Button...247 g2: Assign Preview Button 248 g3: Assign AE-L/AF-L Button 248 g4: Assign Shutter Button 248 B The Setup Menu: Camera Setup 249 Format Memory Card ...250 Monitor Brightness...250 Image Dust Off Ref Photo 251 Flicker Reduction...252 Time Zone and Date ...253 Language ...253...

User Manual
Page 19
...Technical Notes 285 Compatible Lenses...285 Optional Flash Units (Speedlights 292 The Nikon Creative Lighting System (CLS 293 Other Accessories ...297 Attaching a Power Connector and AC Adapter 299 Caring for the Camera...300 Storage...300 Cleaning ...300 The Low-Pass Filter...301 "Clean ...Now" ...301 "Clean at Startup/Shutdown 302 Manual Cleaning...303 Caring for the Camera and Battery: Cautions 306 Available Settings ...309 Defaults ...312 Exposure Program (Mode P 315 Troubleshooting ...316 Display ...316 Shooting (All Modes)...
...Technical Notes 285 Compatible Lenses...285 Optional Flash Units (Speedlights 292 The Nikon Creative Lighting System (CLS 293 Other Accessories ...297 Attaching a Power Connector and AC Adapter 299 Caring for the Camera...300 Storage...300 Cleaning ...300 The Low-Pass Filter...301 "Clean ...Now" ...301 "Clean at Startup/Shutdown 302 Manual Cleaning...303 Caring for the Camera and Battery: Cautions 306 Available Settings ...309 Defaults ...312 Exposure Program (Mode P 315 Troubleshooting ...316 Display ...316 Shooting (All Modes)...

User Manual
Page 20
...event of malfunction, the product should be repaired only by the following safety precautions in your eye accidentally. A Avoid contact with the camera, battery, or charger for inspection. Keep these safety instructions where all warnings before using this section are on or in use electronic ... through the viewfinder Viewing the sun or other accident, remove the battery and/or AC adapter and then take the equipment to a Nikon-authorized service center for extended periods while the devices are indicated by a qualified technician. A Do not remain in the presence of ...
...event of malfunction, the product should be repaired only by the following safety precautions in your eye accidentally. A Avoid contact with the camera, battery, or charger for inspection. Keep these safety instructions where all warnings before using this section are on or in use electronic ... through the viewfinder Viewing the sun or other accident, remove the battery and/or AC adapter and then take the equipment to a Nikon-authorized service center for extended periods while the devices are indicated by a qualified technician. A Do not remain in the presence of ...
User Manual
Page 21
...-AC inverters. Do not transport or store the battery with metal objects such as discoloration or deformation. Before removing the battery turn the camera off and allow the battery to cool. • Discontinue use in the battery, such as necklaces or hairpins. • Batteries are ...using the flash • Using the camera with the flash in close contact with the skin or other objects could cause burns. • Using the flash close to a Nikon-authorized service representative for inspection. xix
...-AC inverters. Do not transport or store the battery with metal objects such as discoloration or deformation. Before removing the battery turn the camera off and allow the battery to cool. • Discontinue use in the battery, such as necklaces or hairpins. • Batteries are ...using the flash • Using the camera with the flash in close contact with the skin or other objects could cause burns. • Using the flash close to a Nikon-authorized service representative for inspection. xix
User Manual
Page 24
Do not use by a company. Be sure to be punishable by law. • Items prohibited by means of a scanner, digital camera, or other data storage devices does not completely erase the original image data. NO LICENSE IS GRANTED OR SHALL BE IMPLIED FOR ANY OTHER USE. ...
Do not use by a company. Be sure to be punishable by law. • Items prohibited by means of a scanner, digital camera, or other data storage devices does not completely erase the original image data. NO LICENSE IS GRANTED OR SHALL BE IMPLIED FOR ANY OTHER USE. ...

User Manual
Page 25
... education, continually-updated information is functioning normally. Additional information may result from the Nikon representative in Asia, Oceania, and the Middle East: http://www.nikon-asia.com/ Visit these services). D Servicing the Camera and Accessories The camera is used with this Nikon digital camera are designed to the highest standards and include complex electronic circuitry. A Life...
... education, continually-updated information is functioning normally. Additional information may result from the Nikon representative in Asia, Oceania, and the Middle East: http://www.nikon-asia.com/ Visit these services). D Servicing the Camera and Accessories The camera is used with this Nikon digital camera are designed to the highest standards and include complex electronic circuitry. A Life...
User Manual
Page 26
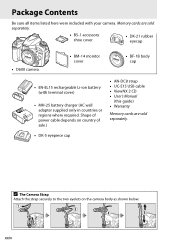
...; ViewNX 2 CD • User's Manual (this guide) • Warranty Memory cards are sold separately. • DK-5 eyepiece cap A The Camera Strap Attach the strap securely to the two eyelets on the camera body as shown below. Memory cards are sold separately. • BS-1 accessory shoe cover • DK-21 rubber eyecup •...
...; ViewNX 2 CD • User's Manual (this guide) • Warranty Memory cards are sold separately. • DK-5 eyepiece cap A The Camera Strap Attach the strap securely to the two eyelets on the camera body as shown below. Memory cards are sold separately. • BS-1 accessory shoe cover • DK-21 rubber eyecup •...

User Manual
Page 27
.... Rotate the power switch as you read through the rest of the manual. X The Camera Body 1 Release mode dial 6, 83 2 Mode dial 5 3 Mode dial lock release 5 4 Eyelet for camera strap 5 Release mode dial lock release 6, 83 6 Accessory shoe (for optional flash unit).........292 7 Accessory shoe cover 292 8 Power switch 1 9 Shutter-release button...
.... Rotate the power switch as you read through the rest of the manual. X The Camera Body 1 Release mode dial 6, 83 2 Mode dial 5 3 Mode dial lock release 5 4 Eyelet for camera strap 5 Release mode dial lock release 6, 83 6 Accessory shoe (for optional flash unit).........292 7 Accessory shoe cover 292 8 Power switch 1 9 Shutter-release button...

User Manual
Page 28
... position, the illuminators will remain lit for external microphone 61 17 USB connector Connecting to a computer 194 Connecting to be read in the dark. The Camera Body (Continued) X 1 Built-in flash 143 2 Mirror 88, 303 3 Meter coupling lever 328 4 Lens mounting mark 26 5 M/Y button Flash mode 143 Flash compensation 148 6 D button...
... position, the illuminators will remain lit for external microphone 61 17 USB connector Connecting to a computer 194 Connecting to be read in the dark. The Camera Body (Continued) X 1 Built-in flash 143 2 Mirror 88, 303 3 Meter coupling lever 328 4 Lens mounting mark 26 5 M/Y button Flash mode 143 Flash compensation 148 6 D button...

User Manual
Page 29
The Camera Body (Continued) X 1 AF-assist illuminator 223 Self-timer lamp 86 Red-eye reduction lamp 145 2 Sub-command dial 12, 245 3 Depth-of-field preview button......
The Camera Body (Continued) X 1 AF-assist illuminator 223 Self-timer lamp 86 Red-eye reduction lamp 145 2 Sub-command dial 12, 245 3 Depth-of-field preview button......

User Manual
Page 30
The Camera Body (Continued) X 1 Viewfinder eyepiece 33 2 Rubber eyecup 86 3 O/Q button Delete 47, 189 Formatting memory cards 31 4 K button Playback 46, 177 5 Monitor Viewing settings 9 Live view ...
The Camera Body (Continued) X 1 Viewfinder eyepiece 33 2 Rubber eyecup 86 3 O/Q button Delete 47, 189 Formatting memory cards 31 4 K button Playback 46, 177 5 Monitor Viewing settings 9 Live view ...


