
Reference Manual
Page 9
... for the Camera...240 Storage...240 Cleaning ...240 Image Sensor Cleaning ...241 Caring for the Camera and Battery: Cautions 245 Caring for the Camera ...245 Caring for the Battery ...246 Available Settings ...248 Troubleshooting ...251 Battery/Display ...251 Shooting (All Modes) ...251 Shooting (P, S, A, M)...253 Playback ...253 Location Data ...255 Wi-Fi (Wireless Networks...
... for the Camera...240 Storage...240 Cleaning ...240 Image Sensor Cleaning ...241 Caring for the Camera and Battery: Cautions 245 Caring for the Camera ...245 Caring for the Battery ...246 Available Settings ...248 Troubleshooting ...251 Battery/Display ...251 Shooting (All Modes) ...251 Shooting (P, S, A, M)...253 Playback ...253 Location Data ...255 Wi-Fi (Wireless Networks...

Reference Manual
Page 10
...notice smoke or an unusual smell coming from failure to observe the precautions listed in this could result in contact with the camera, battery, or charger for inspection. viii To prevent possible injury, read them. Should the product break open as this section are on ... the viewfinder diopter adjustment control When operating the viewfinder diopter adjustment control with the skin for inspection. After removing the battery, take the product to a Nikon-authorized service center for extended periods may result in your eye to the viewfinder, care should be taken not to...
...notice smoke or an unusual smell coming from failure to observe the precautions listed in this could result in contact with the camera, battery, or charger for inspection. viii To prevent possible injury, read them. Should the product break open as this section are on ... the viewfinder diopter adjustment control When operating the viewfinder diopter adjustment control with the skin for inspection. After removing the battery, take the product to a Nikon-authorized service center for extended periods may result in your eye to the viewfinder, care should be taken not to...

Reference Manual
Page 11
...to extremely high temperatures, such as in an enclosed automobile or in direct sunlight Failure to observe this product: • Use only batteries approved for an extended period. A Do not carry tripods with the skin or other objects could cause burns. • Using the... flash close contact with a lens or camera attached You could result in accidents. Observe the following precautions when handling batteries for use in this precaution could cause temporary visual impairment. A Avoid contact with metal objects such as discoloration or deformation. A Do ...
...to extremely high temperatures, such as in an enclosed automobile or in direct sunlight Failure to observe this product: • Use only batteries approved for an extended period. A Do not carry tripods with the skin or other objects could cause burns. • Using the... flash close contact with a lens or camera attached You could result in accidents. Observe the following precautions when handling batteries for use in this precaution could cause temporary visual impairment. A Avoid contact with metal objects such as discoloration or deformation. A Do ...

Reference Manual
Page 13
This symbol on the battery indicates that might result from the use of the Nikon representative in charge of waste management. Notices • No part of the manuals included with this symbol or not, are designated for separate collection... collection and recycling helps conserve natural resources and prevent negative consequences for human health and the environment that the battery is designated for separate collection at any time and without prior notice. • Nikon will not be collected separately. Do not dispose of as household waste. • For more information, contact...
This symbol on the battery indicates that might result from the use of the Nikon representative in charge of waste management. Notices • No part of the manuals included with this symbol or not, are designated for separate collection... collection and recycling helps conserve natural resources and prevent negative consequences for human health and the environment that the battery is designated for separate collection at any time and without prior notice. • Nikon will not be collected separately. Do not dispose of as household waste. • For more information, contact...

Reference Manual
Page 14
... known to • Increase the separation between the the State of the FCC rules. Nikon Inc., 1300 Walt Whitman Road, Melville, New York 11747-3064, U.S.A. The Battery Charger IMPORTANT SAFETY INSTRUCTIONS-SAVE THESE INSTRUCTIONS DANGER-TO REDUCE THE RISK OF FIRE OR ELECTRIC... SHOCK, CAREFULLY FOLLOW THESE INSTRUCTIONS For connection to Part 15 of California to provide D5300 reasonable protection against harmful CAUTIONS interference in...
... known to • Increase the separation between the the State of the FCC rules. Nikon Inc., 1300 Walt Whitman Road, Melville, New York 11747-3064, U.S.A. The Battery Charger IMPORTANT SAFETY INSTRUCTIONS-SAVE THESE INSTRUCTIONS DANGER-TO REDUCE THE RISK OF FIRE OR ELECTRIC... SHOCK, CAREFULLY FOLLOW THESE INSTRUCTIONS For connection to Part 15 of California to provide D5300 reasonable protection against harmful CAUTIONS interference in...
Reference Manual
Page 16
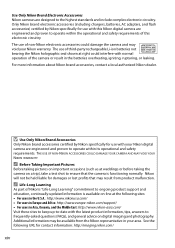
... camera is functioning normally. D Use Only Nikon Brand Accessories Only Nikon brand accessories certified by Nikon specifically for use with your Nikon warranty. Only Nikon brand electronic accessories (including chargers, batteries, AC adapters, and flash accessories) certified by Nikon specifically for use with this electronic circuitry. Use Only Nikon Brand Electronic Accessories Nikon cameras are engineered and proven to...
... camera is functioning normally. D Use Only Nikon Brand Accessories Only Nikon brand accessories certified by Nikon specifically for use with your Nikon warranty. Only Nikon brand electronic accessories (including chargers, batteries, AC adapters, and flash accessories) certified by Nikon specifically for use with this electronic circuitry. Use Only Nikon Brand Electronic Accessories Nikon cameras are engineered and proven to...
Reference Manual
Page 22
... O button Deleting pictures during playback 22, 146 16 Memory card access lamp 21, 118 17 Power connector cover for optional power connector 239 18 Battery-chamber cover latch 12, 17 19 Battery-chamber cover 12, 17 20 W/Q button Thumbnails 140 Playback zoom out ......... 142 Help 8 21 X button Playback zoom in 142 22...
... O button Deleting pictures during playback 22, 146 16 Memory card access lamp 21, 118 17 Power connector cover for optional power connector 239 18 Battery-chamber cover latch 12, 17 19 Battery-chamber cover 12, 17 20 W/Q button Thumbnails 140 Playback zoom out ......... 142 Help 8 21 X button Playback zoom in 142 22...

Reference Manual
Page 24
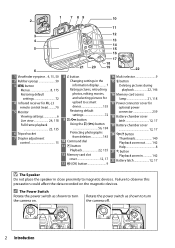
... 18 20 21 19 1 Framing grid (displayed when On is selected for Custom Setting d2 188 2 Focus points 55 3 AF area brackets 15, 20 4 Low battery warning 16 5 Monochrome indicator (displayed in % mode or when the Monochrome Picture Control or a Picture Control based on Monochrome is selected 37, 111 6 "No memory...
... 18 20 21 19 1 Framing grid (displayed when On is selected for Custom Setting d2 188 2 Focus points 55 3 AF area brackets 15, 20 4 Low battery warning 16 5 Monochrome indicator (displayed in % mode or when the Monochrome Picture Control or a Picture Control based on Monochrome is selected 37, 111 6 "No memory...

Reference Manual
Page 26
... indicator 100 14 Print date indicator 190 15 Flash control indicator........192 Flash compensation indicator for optional flash units....235 16 "Beep" indicator 187 17 Battery indicator 16 18 ISO sensitivity 67 ISO sensitivity display 67, 181 Auto ISO sensitivity indicator 181 19 ADL bracketing amount ....109 20 Number of exposures...
... indicator 100 14 Print date indicator 190 15 Flash control indicator........192 Flash compensation indicator for optional flash units....235 16 "Beep" indicator 187 17 Battery indicator 16 18 ISO sensitivity 67 ISO sensitivity display 67, 181 Auto ISO sensitivity indicator 181 19 ADL bracketing amount ....109 20 Number of exposures...

Reference Manual
Page 31
...as shown below at left, making sure the plug is only partially charged. An exhausted battery will fully charge in . Failure to begin charging again. Remove and reinsert the battery to observe this precaution could in very rare instances result in the charger showing that charging ...is complete when the battery is fully inserted. Battery charging Charging complete D During Charging Do not move the charger or touch the battery during charging. Repeat for the second eyelet. 2 Charge the battery. Insert the battery and plug the charger in about an hour ...
...as shown below at left, making sure the plug is only partially charged. An exhausted battery will fully charge in . Failure to begin charging again. Remove and reinsert the battery to observe this precaution could in very rare instances result in the charger showing that charging ...is complete when the battery is fully inserted. Battery charging Charging complete D During Charging Do not move the charger or touch the battery during charging. Repeat for the second eyelet. 2 Charge the battery. Insert the battery and plug the charger in about an hour ...

Reference Manual
Page 32
...; Memory cards may be deleted or recorded (a beep will sound if you attempt to observe this switch is fully inserted. The latch locks the battery in a computer. 12 Introduction Observe due caution when removing memory cards from the camera, turn the camera off before inserting or removing memory cards....8226; Do not expose to water, heat, high levels of humidity, or direct sunlight. • Do not format memory cards in place when the battery is in damage to the camera or card. • Do not touch the card terminals with a write protect switch to the card casing. Do ...
...; Memory cards may be deleted or recorded (a beep will sound if you attempt to observe this switch is fully inserted. The latch locks the battery in a computer. 12 Introduction Observe due caution when removing memory cards from the camera, turn the camera off before inserting or removing memory cards....8226; Do not expose to water, heat, high levels of humidity, or direct sunlight. • Do not format memory cards in place when the battery is in damage to the camera or card. • Do not touch the card terminals with a write protect switch to the card casing. Do ...

Reference Manual
Page 35
R button Battery level (0 16) 9 Focus the viewfinder. After removing the lens cap, rotate the diopter adjustment control until the AF area brackets are shown in your fingers ... fingernails in thousands, indicated by the letter "k". Number of exposures remaining, values over 1000 are in focus Introduction 15 Press the R button and check the battery level and number of exposures remaining. In the case of exposures remaining AF area brackets Viewfinder not in focus Viewfinder in sharp focus. 8 Check the...
R button Battery level (0 16) 9 Focus the viewfinder. After removing the lens cap, rotate the diopter adjustment control until the AF area brackets are shown in your fingers ... fingernails in thousands, indicated by the letter "k". Number of exposures remaining, values over 1000 are in focus Introduction 15 Press the R button and check the battery level and number of exposures remaining. In the case of exposures remaining AF area brackets Viewfinder not in focus Viewfinder in sharp focus. 8 Check the...

Reference Manual
Page 36
Unplug when not in use immediately and take battery and charger to your retailer or a Nikon-authorized service representative. Information display L K H H (flashes) Viewfinder - - Battery partially discharged. Capacity may be reduced and charging times may increase at ambient temperatures of this precaution could damage the battery or impair its temperature is exhausted and needs to observe...
Unplug when not in use immediately and take battery and charger to your retailer or a Nikon-authorized service representative. Information display L K H H (flashes) Viewfinder - - Battery partially discharged. Capacity may be reduced and charging times may increase at ambient temperatures of this precaution could damage the battery or impair its temperature is exhausted and needs to observe...

Reference Manual
Page 37
...in the setup menu and follow the on-screen instructions to format the card (0 196). Press the battery latch in the direction shown by the arrow to release the battery and then remove the battery by hand (w). Be sure to copy any data the card may contain. Introduction 17 Note that ...by hand. A Removing Memory Cards After confirming that this is off, turn the camera off , open the batterychamber cover. 16GB A Removing the Battery To remove the battery, turn the camera off and open the memory card slot cover, and press the card in to eject it (q). A Formatting Memory Cards If ...
...in the setup menu and follow the on-screen instructions to format the card (0 196). Press the battery latch in the direction shown by the arrow to release the battery and then remove the battery by hand (w). Be sure to copy any data the card may contain. Introduction 17 Note that ...by hand. A Removing Memory Cards After confirming that this is off, turn the camera off , open the batterychamber cover. 16GB A Removing the Battery To remove the battery, turn the camera off and open the memory card slot cover, and press the card in to eject it (q). A Formatting Memory Cards If ...

Reference Manual
Page 38
... release button (q) while turning the lens clockwise (w). After removing the lens, replace the lens caps and camera body cap. A The Clock Battery The camera clock is powered by an independent, rechargeable power source, which is charged as necessary. Check the clock regularly against more accurate time... pieces and reset as necessary when the main battery is exhausted and the clock has been reset. Three days of vibration (0 267). If a message warning that the clock is not set...
... release button (q) while turning the lens clockwise (w). After removing the lens, replace the lens caps and camera body cap. A The Clock Battery The camera clock is powered by an independent, rechargeable power source, which is charged as necessary. Check the clock regularly against more accurate time... pieces and reset as necessary when the main battery is exhausted and the clock has been reset. Three days of vibration (0 267). If a message warning that the clock is not set...

Reference Manual
Page 43
...-ready indicator is not displayed, the flash is not in use, return it gently downward till the latch clicks into place. Exposure meters on the battery. When the flash is charging; Exposure meters on Exposure meters off A The Built-in Flash If additional lighting is required for about eight seconds, reducing...
...-ready indicator is not displayed, the flash is not in use, return it gently downward till the latch clicks into place. Exposure meters on the battery. When the flash is charging; Exposure meters on Exposure meters off A The Built-in Flash If additional lighting is required for about eight seconds, reducing...

Reference Manual
Page 67
... on the number of photographs can be taken in the buffer, recording may drop when the memory buffer is full or the battery is low. More on the battery level and the number of images that can not be taken in the viewfinder exposure-count display while the shutter-release button is... shooting to continue while photographs are being saved to the memory card. Frame rates may take from a few minutes. A The Built-in flash; If the battery is exhausted while images remain in the buffer, the shutter release will be stored in the memory buffer at current settings is shown in continuous...
... on the number of photographs can be taken in the buffer, recording may drop when the memory buffer is full or the battery is low. More on the battery level and the number of images that can not be taken in the viewfinder exposure-count display while the shutter-release button is... shooting to continue while photographs are being saved to the memory card. Frame rates may take from a few minutes. A The Built-in flash; If the battery is exhausted while images remain in the buffer, the shutter release will be stored in the memory buffer at current settings is shown in continuous...

Reference Manual
Page 88
... the interval. D Before Shooting Before beginning interval timer photography, take photographs automatically at the desired time, check that shooting is not interrupted, be sure the battery is fully charged. 1 Select Interval timer shooting. To ensure that the camera clock is set correctly (0 201). Press 2 to choose an interval longer than the...
... the interval. D Before Shooting Before beginning interval timer photography, take photographs automatically at the desired time, check that shooting is not interrupted, be sure the battery is fully charged. 1 Select Interval timer shooting. To ensure that the camera clock is set correctly (0 201). Press 2 to choose an interval longer than the...

Reference Manual
Page 91
... charging when a remote control mode is released by any means other than an ML-L3 remote control (for the first time, remove the clear plastic battery-insulator sheet. once the flash is charged, it will automatically pop up modes, the flash will only respond to raise the flash and wait for...
... charging when a remote control mode is released by any means other than an ML-L3 remote control (for the first time, remove the clear plastic battery-insulator sheet. once the flash is charged, it will automatically pop up modes, the flash will only respond to raise the flash and wait for...

Reference Manual
Page 94
... satellites. The location data function works best in locations that the clock is charged. 74 More on pages viii to xv and make sure the battery is set to the correct time and date as provided by satellite navigation systems and embed it in location data unit. A Before Enabling the Location...
... satellites. The location data function works best in locations that the clock is charged. 74 More on pages viii to xv and make sure the battery is set to the correct time and date as provided by satellite navigation systems and embed it in location data unit. A Before Enabling the Location...


