
Reference Manual
Page 4
... 43 47-49 70 74, 76 50-53 0 123 124-128 136 146-148 132 133-135 ii Can I view photos on the memory card? i Release Modes Can I keep the flash from accidental deletion? How do I use special effects during shooting? Can I get more information about a photo? i Deletion How do I take...
... 43 47-49 70 74, 76 50-53 0 123 124-128 136 146-148 132 133-135 ii Can I view photos on the memory card? i Release Modes Can I keep the flash from accidental deletion? How do I use special effects during shooting? Can I get more information about a photo? i Deletion How do I take...

Reference Manual
Page 7
w Pet Portrait...33 x Candlelight...34 y Blossom...34 z Autumn Colors ...34 0 Food ...34 More on Photography (All Modes) 35 Release Mode ...35 Self-Timer and Remote Control Modes 37 Focus ...39 Focus Mode...39 AF-Area Mode ...42 Focus Point Selection ...43 Focus Lock ...44 ...
w Pet Portrait...33 x Candlelight...34 y Blossom...34 z Autumn Colors ...34 0 Food ...34 More on Photography (All Modes) 35 Release Mode ...35 Self-Timer and Remote Control Modes 37 Focus ...39 Focus Mode...39 AF-Area Mode ...42 Focus Point Selection ...43 Focus Lock ...44 ...
Reference Manual
Page 9
... a2: Built-in AF-assist Illuminator 158 a3: Rangefinder ...159 b: Exposure...159 b1: EV Steps for Exposure Cntrl 159 c: Timers/AE Lock ...159 c1: Shutter-Release Button AE-L 159 c2: Auto off Timers ...160 vii
... a2: Built-in AF-assist Illuminator 158 a3: Rangefinder ...159 b: Exposure...159 b1: EV Steps for Exposure Cntrl 159 c: Timers/AE Lock ...159 c1: Shutter-Release Button AE-L 159 c2: Auto off Timers ...160 vii

Reference Manual
Page 10
...: Auto Bracketing Set 165 f: Controls ...165 f1: Assign E/Fn Button 165 f2: Assign AE-L/AF-L Button 166 f3: Reverse Dial Rotation 166 f4: Slot Empty Release Lock 166 f5: Reverse Indicators...166 B The Setup Menu: Camera Setup 167 Monitor Brightness...168 Info Display Format ...168 Auto Info Display...170 Video Mode...
...: Auto Bracketing Set 165 f: Controls ...165 f1: Assign E/Fn Button 165 f2: Assign AE-L/AF-L Button 166 f3: Reverse Dial Rotation 166 f4: Slot Empty Release Lock 166 f5: Reverse Indicators...166 B The Setup Menu: Camera Setup 167 Monitor Brightness...168 Info Display Format ...168 Auto Info Display...170 Video Mode...
Reference Manual
Page 19
...R (information) button 6, 103 4 Movie-record button ......... 107 5 E (exposure compensation) button 71 N (aperture) button 65 Flash compensation button 73 6 Shutter-release button.........28 7 Power switch 2 8 AF-assist illuminator 41 Self-timer lamp 37 Red-eye reduction lamp ......52 9 Infrared receiver (front) ....... 37 10 Body ...18 Connector cover 19 E (self-timer) button 38 Fn (function) button ...... 9, 165 20 Mounting mark 17 21 Lens release button 18 22 Mirror 212 23 Lens mount 17, 46 24 Accessory shoe cover......... 202 25 Accessory shoe (for external microphone 109...
...R (information) button 6, 103 4 Movie-record button ......... 107 5 E (exposure compensation) button 71 N (aperture) button 65 Flash compensation button 73 6 Shutter-release button.........28 7 Power switch 2 8 AF-assist illuminator 41 Self-timer lamp 37 Red-eye reduction lamp ......52 9 Infrared receiver (front) ....... 37 10 Body ...18 Connector cover 19 E (self-timer) button 38 Fn (function) button ...... 9, 165 20 Mounting mark 17 21 Lens release button 18 22 Mirror 212 23 Lens mount 17, 46 24 Accessory shoe cover......... 202 25 Accessory shoe (for external microphone 109...

Reference Manual
Page 23
... 23 Exposure compensation ......70 24 Picture Control 91 25 Image quality 47 26 Image size 49 27 White balance 81 28 ISO sensitivity 54 29 Release mode 35 30 Focus mode 39, 100 31 AF-area mode 42, 101 32 Metering 68 33 Active D-Lighting 74 34 Bracketing increment ...........89 5 Highlight...
... 23 Exposure compensation ......70 24 Picture Control 91 25 Image quality 47 26 Image size 49 27 White balance 81 28 ISO sensitivity 54 29 Release mode 35 30 Focus mode 39, 100 31 AF-area mode 42, 101 32 Metering 68 33 Active D-Lighting 74 34 Bracketing increment ...........89 5 Highlight...

Reference Manual
Page 24
... For information on choosing a design for information on choosing how long the monitor stays on, see Custom Setting c2 (Auto off automatically while the shutter-release button is replaced by pressing the R button again. Note that the monitor turns off timers, 0 160)). Slow shutter speed, small aperture (large f-number). X R button Information...
... For information on choosing a design for information on choosing how long the monitor stays on, see Custom Setting c2 (Auto off automatically while the shutter-release button is replaced by pressing the R button again. Note that the monitor turns off timers, 0 160)). Slow shutter speed, small aperture (large f-number). X R button Information...

Reference Manual
Page 27
The role of the Fn button can be selected using Custom Setting f1 (Assign E/Fn button; 0 165), allowing the following settings to be adjusted by pressing the Fn + (E) button and rotating the command dial: Release mode (0 35) Fn (E) button Command dial Image quality/size (0 47) X ISO sensitivity (0 54) White balance (0 81) Active D-Lighting (0 74) Auto bracketing (0 88) 9
The role of the Fn button can be selected using Custom Setting f1 (Assign E/Fn button; 0 165), allowing the following settings to be adjusted by pressing the Fn + (E) button and rotating the command dial: Release mode (0 35) Fn (E) button Command dial Image quality/size (0 47) X ISO sensitivity (0 54) White balance (0 81) Active D-Lighting (0 74) Auto bracketing (0 88) 9

Reference Manual
Page 31
... item. Press 1 or 3 to select the highlighted item. 4 Position the cursor in the selected menu. 5 Highlight a menu item. Press 2 to shooting mode, press the shutter-release button halfway (0 28). 13 Note the following: • Menu items that are displayed in gray are not currently available. • While pressing 2 generally has the...
... item. Press 1 or 3 to select the highlighted item. 4 Position the cursor in the selected menu. 5 Highlight a menu item. Press 2 to shooting mode, press the shutter-release button halfway (0 28). 13 Note the following: • Menu items that are displayed in gray are not currently available. • While pressing 2 generally has the...
Reference Manual
Page 33
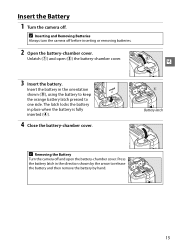
... (w) the battery-chamber cover. 3 Insert the battery. Insert the battery in the orientation shown (e), using the battery to keep the orange battery latch pressed to release the battery and then remove the battery by the arrow to e one side. Press the battery latch in place when the battery is fully inserted...
... (w) the battery-chamber cover. 3 Insert the battery. Insert the battery in the orientation shown (e), using the battery to keep the orange battery latch pressed to release the battery and then remove the battery by the arrow to e one side. Press the battery latch in place when the battery is fully inserted...

Reference Manual
Page 35
... for illustrative purposes is not available with other AF lenses (0 197). 17 Being careful not to A (autofocus; Slide the A-M mode switch to press the lens-release button, rotate the lens counterclockwise until it clicks into place (w). The lens generally used in the camera's bayonet mount (q). Autofocus is an AF-S DX NIKKOR...
... for illustrative purposes is not available with other AF lenses (0 197). 17 Being careful not to A (autofocus; Slide the A-M mode switch to press the lens-release button, rotate the lens counterclockwise until it clicks into place (w). The lens generally used in the camera's bayonet mount (q). Autofocus is an AF-S DX NIKKOR...

Reference Manual
Page 36
...before shooting. 18 A Detaching the Lens Be sure the camera is panned, allowing shutter speeds to motion that is not part of 55 mm (Nikon measurements; D Vibration Reduction Do not turn the camera off or remove the lens while vibration reduction is in flash is panned horizontally, for the ...the VR switch to the lens is cut while vibration reduction is not secured or when using a monopod. Vibration reduction is activated when the shutter-release button is pressed halfway, reducing the effects of camera shake on a tripod, but leave it much easier to pan the camera smoothly in the...
...before shooting. 18 A Detaching the Lens Be sure the camera is panned, allowing shutter speeds to motion that is not part of 55 mm (Nikon measurements; D Vibration Reduction Do not turn the camera off or remove the lens while vibration reduction is in flash is panned horizontally, for the ...the VR switch to the lens is cut while vibration reduction is not secured or when using a monopod. Vibration reduction is activated when the shutter-release button is pressed halfway, reducing the effects of camera shake on a tripod, but leave it much easier to pan the camera smoothly in the...

Reference Manual
Page 39
... camera off before inserting or removing memory cards. 2 Open the card slot cover. A Removing Memory Cards After confirming that the access lamp is in to release the shutter). The memory card access lamp will sound if you attempt to eject it (q). Front Access lamp If this switch is the first time...
... camera off before inserting or removing memory cards. 2 Open the card slot cover. A Removing Memory Cards After confirming that the access lamp is in to release the shutter). The memory card access lamp will sound if you attempt to eject it (q). Front Access lamp If this switch is the first time...
Reference Manual
Page 41
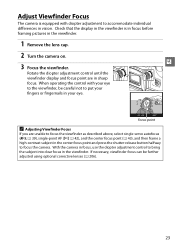
... the center focus point (0 43), and then frame a high-contrast subject in your fingers or fingernails in the center focus point and press the shutter-release button halfway to put your eye. Focus point A Adjusting Viewfinder Focus If you are in the viewfinder. 1 Remove the lens cap. 2 Turn the camera on...
... the center focus point (0 43), and then frame a high-contrast subject in your fingers or fingernails in the center focus point and press the shutter-release button halfway to put your eye. Focus point A Adjusting Viewfinder Focus If you are in the viewfinder. 1 Remove the lens cap. 2 Turn the camera on...
Reference Manual
Page 43
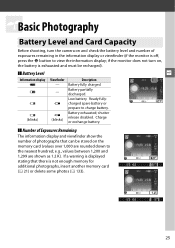
... the number of exposures remaining in the information display or viewfinder (if the monitor is off, press the P button to view the information display; shutter release disabled.
... the number of exposures remaining in the information display or viewfinder (if the monitor is off, press the P button to view the information display; shutter release disabled.
Reference Manual
Page 45
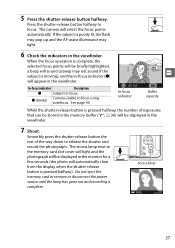
... displayed in the monitor for a few seconds (the photo will appear in the viewfinder. If the subject is pressed halfway). Smoothly press the shutter-release button the rest of exposures that can be stored in the memory buffer ("t"; 0 36) will be briefly highlighted, a beep will sound (a beep...assist illuminator may light. 6 Check the indicators in the viewfinder. Access lamp 27 The access lamp next to focus. 5 Press the shutter-release button halfway. Do not eject the memory card or remove or disconnect the power source until the lamp has gone out and recording is ...
... displayed in the monitor for a few seconds (the photo will appear in the viewfinder. If the subject is pressed halfway). Smoothly press the shutter-release button the rest of exposures that can be stored in the memory buffer ("t"; 0 36) will be briefly highlighted, a beep will sound (a beep...assist illuminator may light. 6 Check the indicators in the viewfinder. Access lamp 27 The access lamp next to focus. 5 Press the shutter-release button halfway. Do not eject the memory card or remove or disconnect the power source until the lamp has gone out and recording is ...

Reference Manual
Page 46
...; If the flashready indicator is not displayed, the flash is pressed halfway. A The Shutter-Release Button The camera has a two-stage shutter-release button. To take the photograph, press the shutter-release button the rest of the way down A Auto Meter-Off s The viewfinder and information display...use, return it gently downward till the latch clicks into place. 28 remove your finger briefly from the shutter-release button and try again. Press the shutter-release button halfway to its closed position by pressing it to reactivate the display. The auto meter-off delay can...
...; If the flashready indicator is not displayed, the flash is pressed halfway. A The Shutter-Release Button The camera has a two-stage shutter-release button. To take the photograph, press the shutter-release button the rest of the way down A Auto Meter-Off s The viewfinder and information display...use, return it gently downward till the latch clicks into place. 28 remove your finger briefly from the shutter-release button and try again. Press the shutter-release button halfway to its closed position by pressing it to reactivate the display. The auto meter-off delay can...
Reference Manual
Page 53
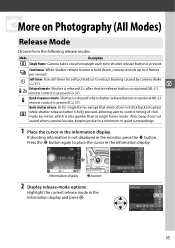
... self-portraits or to reduce blurring caused by mirror, which is also quieter than in the information display. Information display P button 2 Display release-mode options. Press the P button again to control timing of click made by camera shake (0 37). Also, beep does not sound when... camera focuses, keeping noise to 4 frames per second. I Continuous: While shutter-release button is held down, camera records up to a minimum in quiet surroundings. 1 Place the cursor in single frame mode. zMore on optional ML-L3...
... self-portraits or to reduce blurring caused by mirror, which is also quieter than in the information display. Information display P button 2 Display release-mode options. Press the P button again to control timing of click made by camera shake (0 37). Also, beep does not sound when... camera focuses, keeping noise to 4 frames per second. I Continuous: While shutter-release button is held down, camera records up to a minimum in quiet surroundings. 1 Place the cursor in single frame mode. zMore on optional ML-L3...
Reference Manual
Page 54
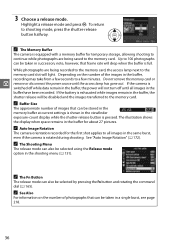
... access lamp next to the memory card slot will not turn off while data remain in the viewfinder exposure-count display while the shutter-release button is pressed. If the camera is equipped with a memory buffer for temporary storage, allowing shooting to continue while photographs are being ...saved to 100 photographs can also be taken in the shooting menu (0 151). A The Fn Button The release mode can be selected by pressing the Fn button and rotating the command dial (0 165). Up to the memory card. A Auto Image Rotation ...
... access lamp next to the memory card slot will not turn off while data remain in the viewfinder exposure-count display while the shutter-release button is pressed. If the camera is equipped with a memory buffer for temporary storage, allowing shooting to continue while photographs are being ...saved to 100 photographs can also be taken in the shooting menu (0 151). A The Fn Button The release mode can be selected by pressing the Fn button and rotating the command dial (0 165). Up to the memory card. A Auto Image Rotation ...

Reference Manual
Page 55
... photo is taken, the lamp will stop blinking and the beeping will light for self-portraits. 1 Mount the camera on a stable, level surface. 2 Select a release mode. Select E (self-timer), " (delayed remote), or # (quick- Self-Timer and Remote Control Modes The self-timer and optional ML-L3 remote control (0... 207) can not be released. Two seconds before the shutter is unable to focus or in other situations in which the shutter can be used to sound. Remote control mode...
... photo is taken, the lamp will stop blinking and the beeping will light for self-portraits. 1 Mount the camera on a stable, level surface. 2 Select a release mode. Select E (self-timer), " (delayed remote), or # (quick- Self-Timer and Remote Control Modes The self-timer and optional ML-L3 remote control (0... 207) can not be released. Two seconds before the shutter is unable to focus or in other situations in which the shutter can be used to sound. Remote control mode...


