User Manual
Page 2
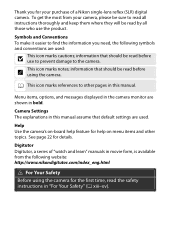
... in this manual. Camera Settings The explanations in "For Your Safety" (0 xiii-xv). Menu items, options, and messages displayed in movie form, is available from your purchase of a Nikon single-lens reflex (SLR) digital camera. See page 22 for the first time, read before use the product. To get the most from...
... in this manual. Camera Settings The explanations in "For Your Safety" (0 xiii-xv). Menu items, options, and messages displayed in movie form, is available from your purchase of a Nikon single-lens reflex (SLR) digital camera. See page 22 for the first time, read before use the product. To get the most from...
User Manual
Page 5
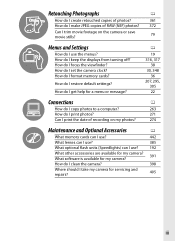
... I use? 385 What optional flash units (Speedlights) can I use the menus? How do I take my camera for servicing and repairs? 405 iii What software is available for my camera? 391 How do I clean the camera? 398 Where should I set the camera clock? Retouching Photographs 0 How do I create retouched copies of photos... do I make JPEG copies of recording on the camera or save movie stills? 79 Menus and Settings How do I use ? 192 What other accessories are available for my camera?
... I use? 385 What optional flash units (Speedlights) can I use the menus? How do I take my camera for servicing and repairs? 405 iii What software is available for my camera? 391 How do I clean the camera? 398 Where should I set the camera clock? Retouching Photographs 0 How do I create retouched copies of photos... do I make JPEG copies of recording on the camera or save movie stills? 79 Menus and Settings How do I use ? 192 What other accessories are available for my camera?

User Manual
Page 15
...diopter adjustment control with your eye to the viewfinder, care should be taken not to observe the precautions listed in their entirety before using this Nikon product. ❚❚ WARNINGS A Keep the sun out of the frame A Turn off immediately in injury. Should the product break open ...accident, remove the battery and/or AC adapter and then take the equipment to the equipment or AC adapter frame could cause a fire. (available separately), unplug the A Do not look at the sun through the viewfinder Viewing the sun or other strong light source through the viewfinder could...
...diopter adjustment control with your eye to the viewfinder, care should be taken not to observe the precautions listed in their entirety before using this Nikon product. ❚❚ WARNINGS A Keep the sun out of the frame A Turn off immediately in injury. Should the product break open ...accident, remove the battery and/or AC adapter and then take the equipment to the equipment or AC adapter frame could cause a fire. (available separately), unplug the A Do not look at the sun through the viewfinder Viewing the sun or other strong light source through the viewfinder could...
User Manual
Page 20
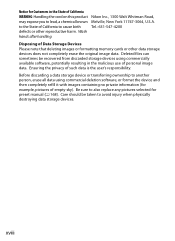
... sky). xviii Notice for Customers in the malicious use of personal image data. Disposing of California WARNING: Handling the cord on this product Nikon Inc., 1300 Walt Whitman Road, may expose you to lead, a chemical known Melville, New York 11747-3064, U.S.A. Wash hands after handling...devices does not completely erase the original image data. to the State of California to another person, erase all data using commercially available software, potentially resulting in the State of Data Storage Devices Please note that deleting images or formatting memory cards or other reproductive...
... sky). xviii Notice for Customers in the malicious use of personal image data. Disposing of California WARNING: Handling the cord on this product Nikon Inc., 1300 Walt Whitman Road, may expose you to lead, a chemical known Melville, New York 11747-3064, U.S.A. Wash hands after handling...devices does not completely erase the original image data. to the State of California to another person, erase all data using commercially available software, potentially resulting in the State of Data Storage Devices Please note that deleting images or formatting memory cards or other reproductive...
User Manual
Page 23
...A Life-Long Learning As part of Nikon's "Life-Long Learning" commitment to frequently-asked questions (FAQs), and general advice on -line at the following URL for contact information: http://imaging.nikon.com/ xxi Additional information may be available from the Nikon representative in Asia, Oceania, and the... Middle East: http://www.nikon-asia.com/ Visit these sites to keep up-to-date with the latest...
...A Life-Long Learning As part of Nikon's "Life-Long Learning" commitment to frequently-asked questions (FAQs), and general advice on -line at the following URL for contact information: http://imaging.nikon.com/ xxi Additional information may be available from the Nikon representative in Asia, Oceania, and the... Middle East: http://www.nikon-asia.com/ Visit these sites to keep up-to-date with the latest...

User Manual
Page 48
... shutter-release button halfway (0 44). To exit without making a selection, press the G button. J button Note the following points: • Menu items that are not currently available. • While pressing 2 or the center of the monitor, help can only be displayed while the button is pressed. Help If a d icon is displayed at...
... shutter-release button halfway (0 44). To exit without making a selection, press the G button. J button Note the following points: • Menu items that are not currently available. • While pressing 2 or the center of the monitor, help can only be displayed while the button is pressed. Help If a d icon is displayed at...

User Manual
Page 59
Insert a Memory Card Pictures are stored on memory cards (available separately; 0 442). Power switch s D Inserting and Removing Memory Cards Always turn the camera off . Open the door protecting the card-slot cover release button (q) and press the release button (w) to open the card slot (e). 33 Type II cards and microdrives can not be used. 1 Turn the camera off before inserting or removing memory cards. 2 Open the card slot cover. The camera is equipped with two card slots, one for XQD and the other for Type I CompactFlash cards.
Insert a Memory Card Pictures are stored on memory cards (available separately; 0 442). Power switch s D Inserting and Removing Memory Cards Always turn the camera off . Open the door protecting the card-slot cover release button (q) and press the release button (w) to open the card slot (e). 33 Type II cards and microdrives can not be used. 1 Turn the camera off before inserting or removing memory cards. 2 Open the card slot cover. The camera is equipped with two card slots, one for XQD and the other for Type I CompactFlash cards.

User Manual
Page 65
... further adjusted using optional corrective lenses (0 392). s A Adjusting Viewfinder Focus If you are unable to further adjust viewfinder diopter. A Diopter-Adjustment Viewfinder Lenses Corrective lenses (available separately; 0 392) can be used to focus the viewfinder as shown at right (w). 39 Push the diopter adjustment control back in the viewfinder. 4 Replace the...
... further adjusted using optional corrective lenses (0 392). s A Adjusting Viewfinder Focus If you are unable to further adjust viewfinder diopter. A Diopter-Adjustment Viewfinder Lenses Corrective lenses (available separately; 0 392) can be used to focus the viewfinder as shown at right (w). 39 Push the diopter adjustment control back in the viewfinder. 4 Replace the...

User Manual
Page 67
... affected card will flash. When this number reaches zero, A will flash in the exposure-count displays s while the shutter-speed displays will show the space available on the card in the primary slot (0 95). Insert another memory card or delete some photos. 41 3 Check the number of photographs that can be...
... affected card will flash. When this number reaches zero, A will flash in the exposure-count displays s while the shutter-speed displays will show the space available on the card in the primary slot (0 95). Insert another memory card or delete some photos. 41 3 Check the number of photographs that can be...

User Manual
Page 76
... the camera is selected for shutter speed. 50 Exposure can be adjusted by pressing the center of the sub-selector (0 135); Exposure preview is not available when A is unable to focus, the focus point will be locked by ±5 EV (0 137), although only values between -3 and +3 EV are reflected in the...
... the camera is selected for shutter speed. 50 Exposure can be adjusted by pressing the center of the sub-selector (0 135); Exposure preview is not available when A is unable to focus, the focus point will be locked by ±5 EV (0 137), although only values between -3 and +3 EV are reflected in the...
User Manual
Page 78
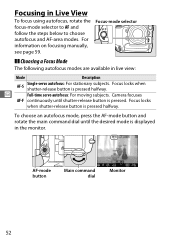
... button is pressed halfway. For information on focusing manually, see page 59. Focus-mode selector ❚❚ Choosing a Focus Mode The following autofocus modes are available in live view: Mode Description AF-S Single-servo autofocus: For stationary subjects.
... button is pressed halfway. For information on focusing manually, see page 59. Focus-mode selector ❚❚ Choosing a Focus Mode The following autofocus modes are available in live view: Mode Description AF-S Single-servo autofocus: For stationary subjects.
User Manual
Page 81
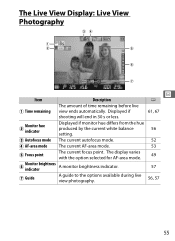
The display varies with the option selected for AF-area mode. 49 y Monitor brightness indicator A monitor brightness indicator. 57 u Guide A guide to the options available during live q Time remaining view ends automatically. w Monitor hue indicator Displayed if monitor hue differs from the hue produced by the current white balance 56 ...
The display varies with the option selected for AF-area mode. 49 y Monitor brightness indicator A monitor brightness indicator. 57 u Guide A guide to the options available during live q Time remaining view ends automatically. w Monitor hue indicator Displayed if monitor hue differs from the hue produced by the current white balance 56 ...
User Manual
Page 83
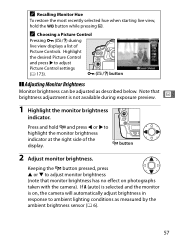
... pressed, press 1 or 3 to adjust Picture Control settings (0 173). Press and hold the U button while pressing a. If A (auto) is selected and the monitor is not available during live view, hold W and press 4 or 2 to ambient lighting conditions as described below. A Choosing a Picture Control Pressing L (Z/Q) during exposure preview. x 1 Highlight the monitor brightness...
... pressed, press 1 or 3 to adjust Picture Control settings (0 173). Press and hold the U button while pressing a. If A (auto) is selected and the monitor is not available during live view, hold W and press 4 or 2 to ambient lighting conditions as described below. A Choosing a Picture Control Pressing L (Z/Q) during exposure preview. x 1 Highlight the monitor brightness...

User Manual
Page 85
To magnify the view in the x monitor (available only if wide- or normal- Use the multi selector to scroll X button to areas of the display. area AF is not used only in focus. ...
To magnify the view in the x monitor (available only if wide- or normal- Use the multi selector to scroll X button to areas of the display. area AF is not used only in focus. ...

User Manual
Page 87
...). Aperture e, f - the timer turns red if live view is about to end to turn off delay; 0 317-5 s before live view photography. Exposure preview is not available, matrix metering is selected automatically, and the following settings can be displayed 30 s before the monitor is raised and lowered at right.
...). Aperture e, f - the timer turns red if live view is about to end to turn off delay; 0 317-5 s before live view photography. Exposure preview is not available, matrix metering is selected automatically, and the following settings can be displayed 30 s before the monitor is raised and lowered at right.

User Manual
Page 88
... circuitry. Select movie live view when the camera is panned horizontally or an object moves at high speed through the frame. Movie recording is not available during live view selector is removed, the live view photography and pressing the movie-record button has no effect. Live view ends automatically if the...
... circuitry. Select movie live view when the camera is panned horizontally or an object moves at high speed through the frame. Movie recording is not available during live view selector is removed, the live view photography and pressing the movie-record button has no effect. Live view ends automatically if the...

User Manual
Page 90
... e or f, end live view and start movie live view. In exposure mode h, shutter speed can be set to values between 1/25 s and 1/8,000 s (the slowest available shutter speed varies with the frame rate; 0 74). If the subject is adjusted automatically. 4 Choose an AF-area mode (0 53). 5 Focus. In other exposure modes...
... e or f, end live view and start movie live view. In exposure mode h, shutter speed can be set to values between 1/25 s and 1/8,000 s (the slowest available shutter speed varies with the frame rate; 0 74). If the subject is adjusted automatically. 4 Choose an AF-area mode (0 53). 5 Focus. In other exposure modes...
User Manual
Page 91
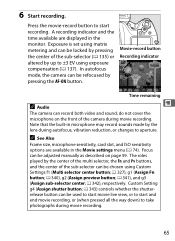
... Pv buttons, and the center of the camera during movie recording. 65 Exposure is set using exposure compensation (0 137). A recording indicator and the time available are available in the monitor. Movie-record button Recording indicator Time remaining A Audio y The camera can be adjusted manually as described on the front of the sub...
... Pv buttons, and the center of the camera during movie recording. 65 Exposure is set using exposure compensation (0 137). A recording indicator and the time available are available in the monitor. Movie-record button Recording indicator Time remaining A Audio y The camera can be adjusted manually as described on the front of the sub...

User Manual
Page 93
... resuming movie recording. 67 Indices If Index marking is selected for the internal circuits to add indices that regardless of the amount of recording time available, live view ends automatically (0 55). Up to 20 indices can be used to locate frames during recording to cool before live view will be added...
... resuming movie recording. 67 Indices If Index marking is selected for the internal circuits to add indices that regardless of the amount of recording time available, live view ends automatically (0 55). Up to 20 indices can be used to locate frames during recording to cool before live view will be added...
User Manual
Page 94
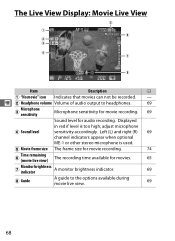
... t q y w e r u i Item Description 0 q "No movie" icon Indicates that movies can not be recorded. - y w Headphone volume Volume of audio output to the options available during movie live view) The recording time available for movies. 65 u Monitor brightness indicator A monitor brightness indicator. 69 i Guide A guide to headphones. 69 e Microphone sensitivity Microphone sensitivity for movie recording...
... t q y w e r u i Item Description 0 q "No movie" icon Indicates that movies can not be recorded. - y w Headphone volume Volume of audio output to the options available during movie live view) The recording time available for movies. 65 u Monitor brightness indicator A monitor brightness indicator. 69 i Guide A guide to headphones. 69 e Microphone sensitivity Microphone sensitivity for movie recording...
