User Manual
Page 2
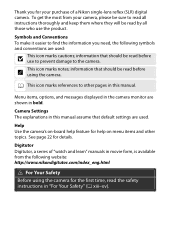
...thoroughly and keep them where they will be read by all those who use to prevent damage to other topics. Digitutor Digitutor, a series of a Nikon single-lens reflex (SLR) digital camera. See page 22 for help feature for details. To get the most from your purchase of "watch and... learn" manuals in movie form, is available from the following symbols and conventions are used . Camera Settings The explanations in "For Your Safety" (0 xiii-xv). Thank you need, the following ...
...thoroughly and keep them where they will be read by all those who use to prevent damage to other topics. Digitutor Digitutor, a series of a Nikon single-lens reflex (SLR) digital camera. See page 22 for help feature for details. To get the most from your purchase of "watch and... learn" manuals in movie form, is available from the following symbols and conventions are used . Camera Settings The explanations in "For Your Safety" (0 xiii-xv). Thank you need, the following ...
User Manual
Page 5
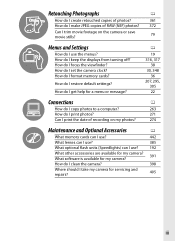
How do I restore default settings? How do I keep the displays from turning off? How do I focus the viewfinder? What software is available for my camera? 391 How do I clean the camera? 398 Where should I take my camera for my camera? How do I format memory cards? Retouching Photographs 0... do I make JPEG copies of recording on the camera or save movie stills? 79 Menus and Settings How do I use ? 192 What other accessories are available for servicing and repairs? 405 iii How do I set the camera clock? How do I get help for a menu or message? 0 19 316, 317 38 ...
How do I restore default settings? How do I keep the displays from turning off? How do I focus the viewfinder? What software is available for my camera? 391 How do I clean the camera? 398 Where should I take my camera for my camera? How do I format memory cards? Retouching Photographs 0... do I make JPEG copies of recording on the camera or save movie stills? 79 Menus and Settings How do I use ? 192 What other accessories are available for servicing and repairs? 405 iii How do I set the camera clock? How do I get help for a menu or message? 0 19 316, 317 38 ...

User Manual
Page 15
...service center for inspection. For Your Safety To prevent damage to your eye accidentally. After removing the battery, take the product to a Nikon-authorized service center for inspection. Should the product break open as the result of malfunction, the product should be repaired only by the ... operation could result from the when the sun is in or close to the equipment or AC adapter frame could cause a fire. (available separately), unplug the A Do not look at the sun through the viewfinder could result in injury. Keep these safety instructions where all ...
...service center for inspection. For Your Safety To prevent damage to your eye accidentally. After removing the battery, take the product to a Nikon-authorized service center for inspection. Should the product break open as the result of malfunction, the product should be repaired only by the ... operation could result from the when the sun is in or close to the equipment or AC adapter frame could cause a fire. (available separately), unplug the A Do not look at the sun through the viewfinder could result in injury. Keep these safety instructions where all ...
User Manual
Page 20
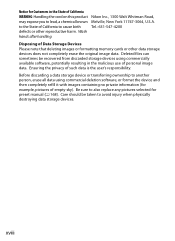
Disposing of personal image data. Ensuring the privacy of California WARNING: Handling the cord on this product Nikon Inc., 1300 Walt Whitman Road, may expose you to another person, erase all data using commercially available software, potentially resulting in the State of such data is the user's responsibility. Before discarding a data storage device...
Disposing of personal image data. Ensuring the privacy of California WARNING: Handling the cord on this product Nikon Inc., 1300 Walt Whitman Road, may expose you to another person, erase all data using commercially available software, potentially resulting in the State of such data is the user's responsibility. Before discarding a data storage device...
User Manual
Page 23
...://www.nikonusa.com/ • For users in Europe and Africa: http://www.europe-nikon.com/support/ • For users in your area. Additional information may be available from the Nikon representative in Asia, Oceania, and the Middle East: http://www.nikon-asia.com/ Visit these sites to keep up-to-date with the latest...
...://www.nikonusa.com/ • For users in Europe and Africa: http://www.europe-nikon.com/support/ • For users in your area. Additional information may be available from the Nikon representative in Asia, Oceania, and the Middle East: http://www.nikon-asia.com/ Visit these sites to keep up-to-date with the latest...

User Manual
Page 48
... and return to scroll through the display. L (Z/Q) button 22 J button Note the following points: • Menu items that are displayed in gray are not currently available. • While pressing 2 or the center of the multi selector generally has the same effect as pressing J, there are some cases in which selection can...
... and return to scroll through the display. L (Z/Q) button 22 J button Note the following points: • Menu items that are displayed in gray are not currently available. • While pressing 2 or the center of the multi selector generally has the same effect as pressing J, there are some cases in which selection can...

User Manual
Page 59
Type II cards and microdrives can not be used. 1 Turn the camera off before inserting or removing memory cards. 2 Open the card slot cover. Open the door protecting the card-slot cover release button (q) and press the release button (w) to open the card slot (e). 33 Power switch s D Inserting and Removing Memory Cards Always turn the camera off . Insert a Memory Card Pictures are stored on memory cards (available separately; 0 442). The camera is equipped with two card slots, one for XQD and the other for Type I CompactFlash cards.
Type II cards and microdrives can not be used. 1 Turn the camera off before inserting or removing memory cards. 2 Open the card slot cover. Open the door protecting the card-slot cover release button (q) and press the release button (w) to open the card slot (e). 33 Power switch s D Inserting and Removing Memory Cards Always turn the camera off . Insert a Memory Card Pictures are stored on memory cards (available separately; 0 442). The camera is equipped with two card slots, one for XQD and the other for Type I CompactFlash cards.

User Manual
Page 65
...-adjustment viewfinder lens, remove the DK-17 viewfinder eyepiece by closing the viewfinder shutter to further adjust viewfinder diopter. A Diopter-Adjustment Viewfinder Lenses Corrective lenses (available separately; 0 392) can be used to release the eyepiece lock (q) and then unscrewing the eyepiece as described above, select single-servo autofocus (AF-S; 0 97), single...
...-adjustment viewfinder lens, remove the DK-17 viewfinder eyepiece by closing the viewfinder shutter to further adjust viewfinder diopter. A Diopter-Adjustment Viewfinder Lenses Corrective lenses (available separately; 0 392) can be used to release the eyepiece lock (q) and then unscrewing the eyepiece as described above, select single-servo autofocus (AF-S; 0 97), single...

User Manual
Page 67
If two memory cards are shown as 2.9 K). e.g., values between 2,900 and 2,999 are inserted, the displays show the space available on the card in the exposure-count displays s while the shutter-speed displays will show a flashing n or j and the icon for the affected card will ...
If two memory cards are shown as 2.9 K). e.g., values between 2,900 and 2,999 are inserted, the displays show the space available on the card in the exposure-count displays s while the shutter-speed displays will show a flashing n or j and the icon for the affected card will ...

User Manual
Page 76
... live view photography, you can be locked by ±5 EV (0 137), although only values between -3 and +3 EV are reflected in green; Exposure preview is not available when A is pressed halfway. If the camera is unable to warn that the preview may not accurately reflect exposure. B button The focus point will flash...
... live view photography, you can be locked by ±5 EV (0 137), although only values between -3 and +3 EV are reflected in green; Exposure preview is not available when A is pressed halfway. If the camera is unable to warn that the preview may not accurately reflect exposure. B button The focus point will flash...
User Manual
Page 78
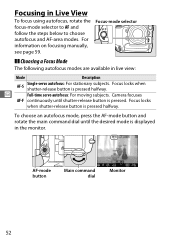
... main command dial until shutter-release button is displayed in the monitor. Focus-mode selector ❚❚ Choosing a Focus Mode The following autofocus modes are available in Live View To focus using autofocus, rotate the focus-mode selector to AF and follow the steps below to choose autofocus and AF-area...
... main command dial until shutter-release button is displayed in the monitor. Focus-mode selector ❚❚ Choosing a Focus Mode The following autofocus modes are available in Live View To focus using autofocus, rotate the focus-mode selector to AF and follow the steps below to choose autofocus and AF-area...
User Manual
Page 81
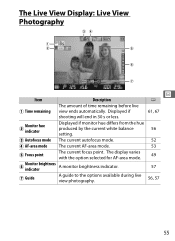
... setting. The display varies with the option selected for AF-area mode. 49 y Monitor brightness indicator A monitor brightness indicator. 57 u Guide A guide to the options available during live q Time remaining view ends automatically. The Live View Display: Live View Photography er q w t y u x Item Description 0 The amount of time remaining before live view...
... setting. The display varies with the option selected for AF-area mode. 49 y Monitor brightness indicator A monitor brightness indicator. 57 u Guide A guide to the options available during live q Time remaining view ends automatically. The Live View Display: Live View Photography er q w t y u x Item Description 0 The amount of time remaining before live view...
User Manual
Page 83
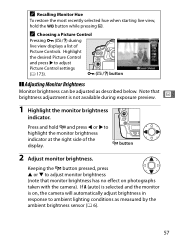
... brightness indicator at the right side of Picture Controls. A Choosing a Picture Control Pressing L (Z/Q) during exposure preview. If A (auto) is selected and the monitor is not available during live view, hold W and press 4 or 2 to adjust monitor brightness (note that brightness adjustment is on photographs taken with the camera). Highlight the desired...
... brightness indicator at the right side of Picture Controls. A Choosing a Picture Control Pressing L (Z/Q) during exposure preview. If A (auto) is selected and the monitor is not available during live view, hold W and press 4 or 2 to adjust monitor brightness (note that brightness adjustment is on photographs taken with the camera). Highlight the desired...

User Manual
Page 85
... the monitor. 59 Use the multi selector to scroll X button to suit the live view is zoomed in, a navigation window will appear in the x monitor (available only if wide- Navigation window A Non-CPU Lenses When using the lens aperture ring. aperture can be adjusted using non-CPU lenses, be obtained when...
... the monitor. 59 Use the multi selector to scroll X button to suit the live view is zoomed in, a navigation window will appear in the x monitor (available only if wide- Navigation window A Non-CPU Lenses When using the lens aperture ring. aperture can be adjusted using non-CPU lenses, be obtained when...

User Manual
Page 87
... is connected to turn the histogram display on shooting conditions, the timer may appear immediately when live view ends automatically (0 55; Exposure preview is not available, matrix metering is selected. A See Also For information on choosing the roles played by the center of live view photography, the camera monitor will remain...
... is connected to turn the histogram display on shooting conditions, the timer may appear immediately when live view ends automatically (0 55; Exposure preview is not available, matrix metering is selected. A See Also For information on choosing the roles played by the center of live view photography, the camera monitor will remain...

User Manual
Page 88
... the monitor under fluorescent, mercury vapor, or sodium lamps can be displayed in the following instances (the camera may occur if the camera is not available during live view selector is rotated to the camera's internal circuits; When shooting x in damage to cool and then try again. Live view may appear...
... the monitor under fluorescent, mercury vapor, or sodium lamps can be displayed in the following instances (the camera may occur if the camera is not available during live view selector is rotated to the camera's internal circuits; When shooting x in damage to cool and then try again. Live view may appear...

User Manual
Page 90
...; h ✔ ✔ ✔ - If the subject is adjusted automatically. In exposure mode h, shutter speed can be set to values between 1/25 s and 1/8,000 s (the slowest available shutter speed varies with the frame rate; 0 74). In other exposure modes, shutter speed is over- B button Frame the opening shot and focus as described...
...; h ✔ ✔ ✔ - If the subject is adjusted automatically. In exposure mode h, shutter speed can be set to values between 1/25 s and 1/8,000 s (the slowest available shutter speed varies with the frame rate; 0 74). In other exposure modes, shutter speed is over- B button Frame the opening shot and focus as described...
User Manual
Page 91
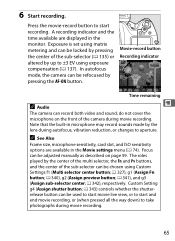
.... Press the movie-record button to start and end movie recording, or (when pressed all the way down) to aperture. A recording indicator and the time available are available in the monitor.
.... Press the movie-record button to start and end movie recording, or (when pressed all the way down) to aperture. A recording indicator and the time available are available in the monitor.

User Manual
Page 93
... shooting conditions, the timer may appear immediately when movie recording begins. Press the a button to add indices that regardless of the amount of recording time available, live view mode. Up to 20 indices can be used to locate frames during recording to exit live view will be displayed 30 s before resuming...
... shooting conditions, the timer may appear immediately when movie recording begins. Press the a button to add indices that regardless of the amount of recording time available, live view mode. Up to 20 indices can be used to locate frames during recording to exit live view will be displayed 30 s before resuming...
User Manual
Page 94
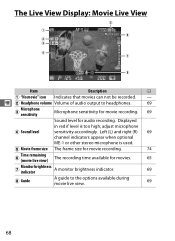
... channel indicators appear when optional ME-1 or other stereo microphone is too high; y w Headphone volume Volume of audio output to the options available during movie live view) The recording time available for movies. 65 u Monitor brightness indicator A monitor brightness indicator. 69 i Guide A guide to headphones. 69 e Microphone sensitivity Microphone sensitivity for movie...
... channel indicators appear when optional ME-1 or other stereo microphone is too high; y w Headphone volume Volume of audio output to the options available during movie live view) The recording time available for movies. 65 u Monitor brightness indicator A monitor brightness indicator. 69 i Guide A guide to headphones. 69 e Microphone sensitivity Microphone sensitivity for movie...
