User Manual
Page 6
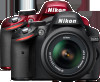
... The Viewfinder...4 The Information Display...5 The Command Dial ...7 Camera Menus...9 Using Camera Menus ...10 First Steps ...12 Charge the Battery ...12 Insert the Battery ...13 Attach a Lens...14 Basic Setup...16 Insert a Memory Card...18 Format the Memory Card ...19 Adjust Viewfinder Focus ...20... Basic Photography 21 Battery Level and Card Capacity 21 "Point-and-Shoot" Photography (i and j Modes 22 Creative Photography (Scene Modes 25 k Portrait ...25 l Landscape...
... The Viewfinder...4 The Information Display...5 The Command Dial ...7 Camera Menus...9 Using Camera Menus ...10 First Steps ...12 Charge the Battery ...12 Insert the Battery ...13 Attach a Lens...14 Basic Setup...16 Insert a Memory Card...18 Format the Memory Card ...19 Adjust Viewfinder Focus ...20... Basic Photography 21 Battery Level and Card Capacity 21 "Point-and-Shoot" Photography (i and j Modes 22 Creative Photography (Scene Modes 25 k Portrait ...25 l Landscape...

User Manual
Page 10
... Notes 167 Compatible Lenses...167 Compatible CPU Lenses ...167 Compatible Non-CPU Lenses 169 Optional Flash Units (Speedlights 172 The Nikon Creative Lighting System (CLS 173 Other Accessories...176 Approved Memory Cards 177 Attaching a Power Connector and AC Adapter 178 Caring...the Camera...179 Storage ...179 Cleaning ...179 The Low-Pass Filter ...180 Caring for the Camera and Battery: Cautions 184 Caring for the Camera...184 Caring for the Battery...185 Available Settings...187 Memory Card Capacity ...188 Troubleshooting ...189 Display ...189 Shooting (All Modes)...189 Shooting...
... Notes 167 Compatible Lenses...167 Compatible CPU Lenses ...167 Compatible Non-CPU Lenses 169 Optional Flash Units (Speedlights 172 The Nikon Creative Lighting System (CLS 173 Other Accessories...176 Approved Memory Cards 177 Attaching a Power Connector and AC Adapter 178 Caring...the Camera...179 Storage ...179 Cleaning ...179 The Low-Pass Filter ...180 Caring for the Camera and Battery: Cautions 184 Caring for the Camera...184 Caring for the Battery...185 Available Settings...187 Memory Card Capacity ...188 Troubleshooting ...189 Display ...189 Shooting (All Modes)...189 Shooting...
User Manual
Page 11
... all those who use the product will read them. Continued operation could result in your eye accidentally. After removing the battery, take the product to a Nikon-authorized service center for inspection. In the event of malfunction, the product should be repaired only by the following safety ... a fall or other strong light source through the viewfinder Viewing the sun or other accident, remove the battery and/or AC adapter and then take the equipment to a Nikon-authorized service center for inspection. A Do not look at the operator of children Failure to observe this...
... all those who use the product will read them. Continued operation could result in your eye accidentally. After removing the battery, take the product to a Nikon-authorized service center for inspection. In the event of malfunction, the product should be repaired only by the following safety ... a fall or other strong light source through the viewfinder Viewing the sun or other accident, remove the battery and/or AC adapter and then take the equipment to a Nikon-authorized service center for inspection. A Do not look at the operator of children Failure to observe this...
User Manual
Page 12
...this product: • Use only batteries approved for use only the cables provided or sold by Nikon for an extended period. Failure to observe this precaution could damage the product or cause overheating or fire. A Observe proper precautions when handling batteries Batteries may be hot immediately after use ... should be observed when photographing infants, when the flash should not be removed with wet hands. Do not transport or store the battery with liquid crystal Should the monitor break, care should be played back on an audio CD player could result in electric shock. ...
...this product: • Use only batteries approved for use only the cables provided or sold by Nikon for an extended period. Failure to observe this precaution could damage the product or cause overheating or fire. A Observe proper precautions when handling batteries Batteries may be hot immediately after use ... should be observed when photographing infants, when the flash should not be removed with wet hands. Do not transport or store the battery with liquid crystal Should the monitor break, care should be played back on an audio CD player could result in electric shock. ...
User Manual
Page 13
... classe B est conforme à la norme NMB-003 du Canada. The following apply only to users in European countries: • All batteries, whether marked with this symbol or not, are designated for separate collection at an appropriate collection point. Notices • No part of the..., transmitted, transcribed, stored in a retrieval system, or translated into any language in any form, by any means, without Nikon's prior written permission. • Nikon reserves the right to change the specifications of the hardware and software described in these manuals at any time and without prior...
... classe B est conforme à la norme NMB-003 du Canada. The following apply only to users in European countries: • All batteries, whether marked with this symbol or not, are designated for separate collection at an appropriate collection point. Notices • No part of the..., transmitted, transcribed, stored in a retrieval system, or translated into any language in any form, by any means, without Nikon's prior written permission. • Nikon reserves the right to change the specifications of the hardware and software described in these manuals at any time and without prior...
User Manual
Page 14
These limits are not expressly approved by Nikon may cause harmful interference to radio Corporation may void the user's authority to provide D3200 reasonable protection against harmful CAUTIONS interference in the State of California following measures: WARNING: Handling the cord on this ...8226; Consult the dealer or an experienced radio/television technician for the power outlet if needed. Tel.: 631-547-4200 xii The Battery Charger IMPORTANT SAFETY INSTRUCTIONS-SAVE THESE INSTRUCTIONS DANGER-TO REDUCE THE RISK OF FIRE OR ELECTRIC SHOCK, CAREFULLY FOLLOW THESE INSTRUCTIONS For ...
These limits are not expressly approved by Nikon may cause harmful interference to radio Corporation may void the user's authority to provide D3200 reasonable protection against harmful CAUTIONS interference in the State of California following measures: WARNING: Handling the cord on this ...8226; Consult the dealer or an experienced radio/television technician for the power outlet if needed. Tel.: 631-547-4200 xii The Battery Charger IMPORTANT SAFETY INSTRUCTIONS-SAVE THESE INSTRUCTIONS DANGER-TO REDUCE THE RISK OF FIRE OR ELECTRIC SHOCK, CAREFULLY FOLLOW THESE INSTRUCTIONS For ...

User Manual
Page 16
...recommended if the camera is available on digital imaging and photography. Nikon recommends that the camera be inspected by Nikon specifically for use of third-party rechargeable Li-ion batteries not bearing the Nikon holographic seal shown at the following URL for damages or lost profits...to these sites to keep up-to-date with this electronic circuitry. Only Nikon brand electronic accessories (including chargers, batteries, AC adapters, and flash accessories) certified by the original retailer or a Nikon-authorized service representative once every one to two years, and that it be...
...recommended if the camera is available on digital imaging and photography. Nikon recommends that the camera be inspected by Nikon specifically for use of third-party rechargeable Li-ion batteries not bearing the Nikon holographic seal shown at the following URL for damages or lost profits...to these sites to keep up-to-date with this electronic circuitry. Only Nikon brand electronic accessories (including chargers, batteries, AC adapters, and flash accessories) certified by the original retailer or a Nikon-authorized service representative once every one to two years, and that it be...
User Manual
Page 18
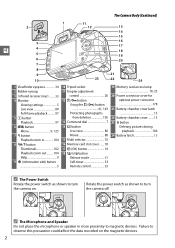
... 19 Memory card access lamp 18, 23 20 Power connector cover for optional power connector 178 21 Battery-chamber cover latch 13 22 Battery-chamber cover ........13 23 O button Deleting pictures during playback 106 24 Battery latch 13 A The Power Switch Rotate the power switch as shown to turn the camera on the...
... 19 Memory card access lamp 18, 23 20 Power connector cover for optional power connector 178 21 Battery-chamber cover latch 13 22 Battery-chamber cover ........13 23 O button Deleting pictures during playback 106 24 Battery latch 13 A The Power Switch Rotate the power switch as shown to turn the camera on the...
User Manual
Page 20
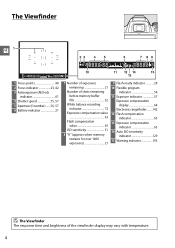
... 11 12 14 15 13 1 Focus points 40 2 Focus indicator 23, 42 3 Autoexposure (AE) lock indicator 61 4 Shutter speed 55, 57 5 Aperture (f-number) ......56, 57 6 Battery indicator 21 7 Number of exposures remaining 21 Number of shots remaining before memory buffer fills 32 White balance recording indicator 72 Exposure compensation value 63...
... 11 12 14 15 13 1 Focus points 40 2 Focus indicator 23, 42 3 Autoexposure (AE) lock indicator 61 4 Shutter speed 55, 57 5 Aperture (f-number) ......56, 57 6 Battery indicator 21 7 Number of exposures remaining 21 Number of shots remaining before memory buffer fills 32 White balance recording indicator 72 Exposure compensation value 63...

User Manual
Page 21
... units ... 175 9 Print date indicator 144 10 Auto ISO sensitivity indicator 129 11 Active D-Lighting 67 12 Picture Control 76 13 "Beep" indicator 141 14 Battery indicator 21 15 GPS connection indicator .. 147 16 Help icon 193 17 Exposure indicator 57 Exposure compensation indicator 64 18 Number of exposures remaining 21...
... units ... 175 9 Print date indicator 144 10 Auto ISO sensitivity indicator 129 11 Active D-Lighting 67 12 Picture Control 76 13 "Beep" indicator 141 14 Battery indicator 21 15 GPS connection indicator .. 147 16 Help icon 193 17 Exposure indicator 57 Exposure compensation indicator 64 18 Number of exposures remaining 21...

User Manual
Page 28
...country or region of purchase, a plug adapter may be supplied with the charger. Remove the terminal cover from the battery. 2 Insert the battery. Insert the battery as shown at ambient temperatures between 5-35°C (41-95°F). Failure to begin charging again. First Steps Charge ...the Battery The camera is complete. D Charging the Battery Charge the battery indoors at right, making sure the plug is complete when the CHARGE lamp stops flashing. A The Plug Adapter...
...country or region of purchase, a plug adapter may be supplied with the charger. Remove the terminal cover from the battery. 2 Insert the battery. Insert the battery as shown at ambient temperatures between 5-35°C (41-95°F). Failure to begin charging again. First Steps Charge ...the Battery The camera is complete. D Charging the Battery Charge the battery indoors at right, making sure the plug is complete when the CHARGE lamp stops flashing. A The Plug Adapter...

User Manual
Page 29
...;F to 60°C/140°F. Failure to your retailer or a Nikon-authorized service representative. A Removing the Battery Turn the camera off before inserting or removing batteries. 2 Open the battery-chamber cover. X w q 3 Insert the battery. Do not use . 13 Use the charger with compatible batteries only. A Inserting and Removing Batteries Always turn the camera off and open (w) the...
...;F to 60°C/140°F. Failure to your retailer or a Nikon-authorized service representative. A Removing the Battery Turn the camera off before inserting or removing batteries. 2 Open the battery-chamber cover. X w q 3 Insert the battery. Do not use . 13 Use the charger with compatible batteries only. A Inserting and Removing Batteries Always turn the camera off and open (w) the...

User Manual
Page 33
.... If a message warning that the clock is not set is displayed when the camera is turned on, the clock battery is less accurate than most watches and household clocks. A The Clock Battery The camera clock is powered by an optional EP-5A power connector and EH-5b AC adapter (0 178). Check the... clock regularly against more accurate time pieces and reset as necessary when the main battery is installed or the camera is powered by an independent, rechargeable power source, which is charged as necessary.
.... If a message warning that the clock is not set is displayed when the camera is turned on, the clock battery is less accurate than most watches and household clocks. A The Clock Battery The camera clock is powered by an optional EP-5A power connector and EH-5b AC adapter (0 178). Check the... clock regularly against more accurate time pieces and reset as necessary when the main battery is installed or the camera is powered by an independent, rechargeable power source, which is charged as necessary.

User Manual
Page 37
... as 1.2 K). If the monitor is not enough memory for additional photographs, insert another memory card (0 18) or delete some photos (0 106). 21 Battery partially discharged. Ready fully-charged spare battery or prepare to the nearest hundred; The information display and viewfinder show the number of photographs that there is off, press the...
... as 1.2 K). If the monitor is not enough memory for additional photographs, insert another memory card (0 18) or delete some photos (0 106). 21 Battery partially discharged. Ready fully-charged spare battery or prepare to the nearest hundred; The information display and viewfinder show the number of photographs that there is off, press the...

User Manual
Page 40
...The Standby Timer Focus: press halfway Shoot: press all the way down . Zoom in , shorter focal lengths to reactivate the display. To save battery power when the flash is not in use, return it to zoom in the setup menu (0 140). Press the shutter-release button halfway to.... A The Shutter-Release Button The camera has a two-stage shutter-release button. Exposure meters on Exposure meters off timers option in on the battery. remove your finger briefly from the shutter-release button and try again. A Using a Zoom Lens Use the zoom ring to its closed position ...
...The Standby Timer Focus: press halfway Shoot: press all the way down . Zoom in , shorter focal lengths to reactivate the display. To save battery power when the flash is not in use, return it to zoom in the setup menu (0 140). Press the shutter-release button halfway to.... A The Shutter-Release Button The camera has a two-stage shutter-release button. Exposure meters on Exposure meters off timers option in on the battery. remove your finger briefly from the shutter-release button and try again. A Using a Zoom Lens Use the zoom ring to its closed position ...
User Manual
Page 43
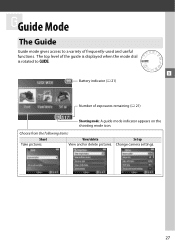
!Guide Mode The Guide Guide mode gives access to a variety of the guide is displayed when the mode dial is rotated to g. ! View/delete Set up View and/or delete pictures. The top level of frequently-used and useful functions. Change camera settings. 27 Choose from the following items: Shoot Take pictures. Battery indicator (0 21) Number of exposures remaining (0 21) Shooting mode: A guide mode indicator appears on the shooting mode icon.
!Guide Mode The Guide Guide mode gives access to a variety of the guide is displayed when the mode dial is rotated to g. ! View/delete Set up View and/or delete pictures. The top level of frequently-used and useful functions. Change camera settings. 27 Choose from the following items: Shoot Take pictures. Battery indicator (0 21) Number of exposures remaining (0 21) Shooting mode: A guide mode indicator appears on the shooting mode icon.
User Manual
Page 48
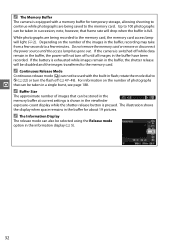
... switched off while data remain in the buffer have been recorded. A The Memory Buffer The camera is equipped with the built-in succession; If the battery is full. The illustration shows the display when space remains in the information display (0 5). 32 A Continuous Release Mode Continuous release mode (I) can be used with...
... switched off while data remain in the buffer have been recorded. A The Memory Buffer The camera is equipped with the built-in succession; If the battery is full. The illustration shows the display when space remains in the information display (0 5). 32 A Continuous Release Mode Continuous release mode (I) can be used with...

User Manual
Page 50
... w D Using the Built-in Flash Before taking photos without your eye to z raise the flash and wait for the first time, remove the clear plastic battery-insulator sheet. For information on duration option in the viewfinder (0 24).
... w D Using the Built-in Flash Before taking photos without your eye to z raise the flash and wait for the first time, remove the clear plastic battery-insulator sheet. For information on duration option in the viewfinder (0 24).
User Manual
Page 74
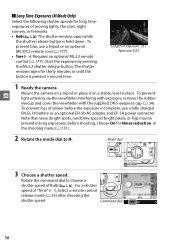
... stars, night scenery, or fireworks. • Bulb (A): The shutter remains open for Noise reduction in long exposures; To prevent blur, use a fully charged EN-EL14 battery or an optional EH-5b AC adapter and EP-5A power connector. before the exposure is held down. Command dial 58 The shutter remains open...
... stars, night scenery, or fireworks. • Bulb (A): The shutter remains open for Noise reduction in long exposures; To prevent blur, use a fully charged EN-EL14 battery or an optional EH-5b AC adapter and EP-5A power connector. before the exposure is held down. Command dial 58 The shutter remains open...
User Manual
Page 96
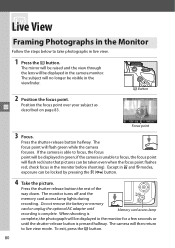
... the camera is able to live view. 1 Press the a button. Press the shutter-release button the rest of the way down. Do not remove the battery or memory card or unplug the optional AC adapter until the shutter-release button is Memory card access lamp complete, the photograph will be displayed...
... the camera is able to live view. 1 Press the a button. Press the shutter-release button the rest of the way down. Do not remove the battery or memory card or unplug the optional AC adapter until the shutter-release button is Memory card access lamp complete, the photograph will be displayed...


