
Product Manual
Page 3
...and "Getting to Know the Camera" to familiarize yourself with the conventions used in this chapter for information on camera menus and custom settings... ...on connecting your camera as described in "First Steps." Once you have mastered the basics of digital photography, you are ready ......and on when and how to use camera controls. Overview Getting to Know the Camera First Steps Basic Photography Basic Playback Choosing a Shooting Mode Image Quality and Size Sensitivity (ISO Equivalency) White Balance Image Adjustment Focus Exposure Flash Photography Self-Timer Mode More About Playback...
...and "Getting to Know the Camera" to familiarize yourself with the conventions used in this chapter for information on camera menus and custom settings... ...on connecting your camera as described in "First Steps." Once you have mastered the basics of digital photography, you are ready ......and on when and how to use camera controls. Overview Getting to Know the Camera First Steps Basic Photography Basic Playback Choosing a Shooting Mode Image Quality and Size Sensitivity (ISO Equivalency) White Balance Image Adjustment Focus Exposure Flash Photography Self-Timer Mode More About Playback...
Product Manual
Page 5
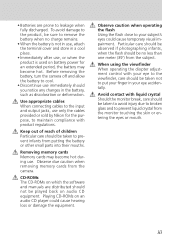
Before removing the battery, turn the camera off and allow the battery to cool. • Discontinue use only the cables provided or sold by Nikon for an extended period, the battery may become hot. Observe due caution when removing memory cards from the monitor touching the skin ... immediately should be taken to avoid injury due to broken glass and to put your eye accidentally. Observe caution when operating the flash Using the flash close to leakage when fully discharged. Keep out of reach of children Particular care should be taken not to prevent liquid crystal from...
Before removing the battery, turn the camera off and allow the battery to cool. • Discontinue use only the cables provided or sold by Nikon for an extended period, the battery may become hot. Observe due caution when removing memory cards from the monitor touching the skin ... immediately should be taken to avoid injury due to broken glass and to put your eye accidentally. Observe caution when operating the flash Using the flash close to leakage when fully discharged. Keep out of reach of children Particular care should be taken not to prevent liquid crystal from...

Product Manual
Page 7
...skin or entering the eyes or mouth. • Replace the monitor cover when transporting the camera or leaving it unattended. Once warmed, a cold battery may be replaced when the battery-level indicator is flashing. • Ready a spare battery and keep it difficult to another while the AC ...adapter is fully charged before use. • After removing the battery from the camera, be taken to avoid injury due to broken glass and...
...skin or entering the eyes or mouth. • Replace the monitor cover when transporting the camera or leaving it unattended. Once warmed, a cold battery may be replaced when the battery-level indicator is flashing. • Ready a spare battery and keep it difficult to another while the AC ...adapter is fully charged before use. • After removing the battery from the camera, be taken to avoid injury due to broken glass and...

Product Manual
Page 11
... Controlling How the Camera Sets Exposure 75 Metering ...75 Exposure Mode 76 Autoexposure Lock 84 Exposure Compensation 86 Bracketing ...87 Flash Photography: Using Built-in and Optional Speedlights 94 Flash Sync Modes 96 Using the Built-in Speedlight 98 Flash Exposure Compensation 102 Using...: Playback Zoom 118 Protecting Photographs from Deletion 119 Deleting Individual Photographs 120 Menu Guide: Index to Menu Options 121 Using Camera Menus: Basic Menu Operations 122 The Playback Menu: Managing Images 124 Deleting Photographs: Delete 124 Folder Options: Folder Designate 126...
... Controlling How the Camera Sets Exposure 75 Metering ...75 Exposure Mode 76 Autoexposure Lock 84 Exposure Compensation 86 Bracketing ...87 Flash Photography: Using Built-in and Optional Speedlights 94 Flash Sync Modes 96 Using the Built-in Speedlight 98 Flash Exposure Compensation 102 Using...: Playback Zoom 118 Protecting Photographs from Deletion 119 Deleting Individual Photographs 120 Menu Guide: Index to Menu Options 121 Using Camera Menus: Basic Menu Operations 122 The Playback Menu: Managing Images 124 Deleting Photographs: Delete 124 Folder Options: Folder Designate 126...

Product Manual
Page 16
... 97 7 Power switch 27 4 8 Release terminal 182 9 Shutter-release button ...... 31-34, 72 10 Exposure compensation ( ) button 86 11 Flash sync mode ( ) button ..... 98 12 LCD illuminator ( ) button (press to illuminate control panel 155 Format ( ) button 23 13 Control...panel 8 14 Focal plane mark 74 Camera Body Introduction-Getting to familiarize yourself with camera controls and displays. Getting to Know the Camera Camera Controls and Displays Take a few moments to Know the Camera 5 6 7 8 9 1 10 2 11 3 1 4 12 13 14 1 Eyelet for camera strap 15 2 Shooting-mode dial ...
... 97 7 Power switch 27 4 8 Release terminal 182 9 Shutter-release button ...... 31-34, 72 10 Exposure compensation ( ) button 86 11 Flash sync mode ( ) button ..... 98 12 LCD illuminator ( ) button (press to illuminate control panel 155 Format ( ) button 23 13 Control...panel 8 14 Focal plane mark 74 Camera Body Introduction-Getting to familiarize yourself with camera controls and displays. Getting to Know the Camera Camera Controls and Displays Take a few moments to Know the Camera 5 6 7 8 9 1 10 2 11 3 1 4 12 13 14 1 Eyelet for camera strap 15 2 Shooting-mode dial ...

Product Manual
Page 18
Introduction-Getting to Know the Camera Getting to Know the Camera Camera Body (continued) 30 22 31 32 23 24 33 25 34 35 26 36 27 37 28 38 29 39 22 Viewfinder eyepiece 30 23 Flash exposure compensation ( ) button 102 Format ( ) button 23 24 Bracketing ( ) button 88 25 Monitor ( ) button 35, 112 26...
Introduction-Getting to Know the Camera Getting to Know the Camera Camera Body (continued) 30 22 31 32 23 24 33 25 34 35 26 36 27 37 28 38 29 39 22 Viewfinder eyepiece 30 23 Flash exposure compensation ( ) button 102 Format ( ) button 23 24 Bracketing ( ) button 88 25 Monitor ( ) button 35, 112 26...

Product Manual
Page 21
... the Camera Camera Controls and Displays 1 Shutter speed 79-80 Sensitivity 48 Exposure compensation value ....... 86 Flash compensation value 102 Number of shots in bracketing sequence 88 White balance adjustment 90 2 Battery indicator 17 3 Image size 46 4 Image quality 44 5 Flash compensation ...indicator ..... 102 6 Exposure compensation indicator .. 86 7 Flexible program indicator 78 8 Flash sync mode 96 9 Aperture 81 Bracketing increment 88 Image transfer mode indicator .... ...
... the Camera Camera Controls and Displays 1 Shutter speed 79-80 Sensitivity 48 Exposure compensation value ....... 86 Flash compensation value 102 Number of shots in bracketing sequence 88 White balance adjustment 90 2 Battery indicator 17 3 Image size 46 4 Image quality 44 5 Flash compensation ...indicator ..... 102 6 Exposure compensation indicator .. 86 7 Flexible program indicator 78 8 Flash sync mode 96 9 Aperture 81 Bracketing increment 88 Image transfer mode indicator .... ...

Product Manual
Page 23
... equipped with the background ("Vari-Brite" focus areas), making it easier to identify the selected focus area. Introduction-Getting to Know the Camera Camera Controls and Displays 1 12-mm (0.47˝) reference circle for center-weighted metering 75 2 Focus brackets (focus areas) ... 64...ON is selected for Custom Setting 19) .. 157 4 Focus indicator 31, 70 5 Metering 75 6 Auto-exposure lock 84 7 Exposure mode 76 8 Flash compensation indicator ..... 102 9 Exposure compensation indicator .. 86 10 "K" (appears when memory remains for Custom Setting 19 (Grid Display; 157), a reference grid...
... equipped with the background ("Vari-Brite" focus areas), making it easier to identify the selected focus area. Introduction-Getting to Know the Camera Camera Controls and Displays 1 12-mm (0.47˝) reference circle for center-weighted metering 75 2 Focus brackets (focus areas) ... 64...ON is selected for Custom Setting 19) .. 157 4 Focus indicator 31, 70 5 Metering 75 6 Auto-exposure lock 84 7 Exposure mode 76 8 Flash compensation indicator ..... 102 9 Exposure compensation indicator .. 86 10 "K" (appears when memory remains for Custom Setting 19 (Grid Display; 157), a reference grid...

Product Manual
Page 24
and sub-command dials are used alone or in combination with other controls to Know the Camera The Command Dials The main- Flash sync mode button Function dial Sub-command Bracketing button dial Exposure compensation button Flash exposure compensation button Main command dial Image quality and size + Set image quality ( 46) + Choose an image... balance ( 53-54)/mea- + sure a value for preset white balance ( 56) Sensitivity (ISO equivalency) + Set sensitivity (ISO equivalency; 49) 12 Introduction-Getting to Know the Camera Getting to adjust a variety of settings.
and sub-command dials are used alone or in combination with other controls to Know the Camera The Command Dials The main- Flash sync mode button Function dial Sub-command Bracketing button dial Exposure compensation button Flash exposure compensation button Main command dial Image quality and size + Set image quality ( 46) + Choose an image... balance ( 53-54)/mea- + sure a value for preset white balance ( 56) Sensitivity (ISO equivalency) + Set sensitivity (ISO equivalency; 49) 12 Introduction-Getting to Know the Camera Getting to adjust a variety of settings.

Product Manual
Page 25
AF-area mode + Exposure + + + + + + Flash settings + + Camera Controls and Displays Choose a setting for AF-area mode ( 65) Choose a combination of aperture and shutter speed (exposure mode P 78) Choose a shutter speed (exposure mode S ... to P, S, A, or M; 86) Activate or cancel bracketing (when function dial set to P, S, A, or M; 88) Change bracketing settings (when function dial set to P, S, A, or M; 88) Choose a flash sync mode (when function dial set to P, S, A, or M; 98) Set flash compensation (when function dial set to P, S, A, or M; 102) 13 Introduction-Getting to Know the...
AF-area mode + Exposure + + + + + + Flash settings + + Camera Controls and Displays Choose a setting for AF-area mode ( 65) Choose a combination of aperture and shutter speed (exposure mode P 78) Choose a shutter speed (exposure mode S ... to P, S, A, or M; 86) Activate or cancel bracketing (when function dial set to P, S, A, or M; 88) Change bracketing settings (when function dial set to P, S, A, or M; 88) Choose a flash sync mode (when function dial set to P, S, A, or M; 98) Set flash compensation (when function dial set to P, S, A, or M; 102) 13 Introduction-Getting to Know the...

Product Manual
Page 29
... for Use 2.6 Check the battery level Turn the camera on and check the battery level in viewfinder turn the camera off ). Low battery Ready a fully-charged spare battery. (Flashes) (Flashes) Battery exhausted Shutter-release disabled. Introduction-First Steps Icon* Control ViewPanel finder Status Notes - Battery fully ...show only the number of the auto meter off delay can be taken until battery has been replaced. * No icon displayed when camera powered by an optional EH-5 AC adapter, the control panel will be adjusted using Custom Setting 7. 17 No pictures can be displayed...
... for Use 2.6 Check the battery level Turn the camera on and check the battery level in viewfinder turn the camera off ). Low battery Ready a fully-charged spare battery. (Flashes) (Flashes) Battery exhausted Shutter-release disabled. Introduction-First Steps Icon* Control ViewPanel finder Status Notes - Battery fully ...show only the number of the auto meter off delay can be taken until battery has been replaced. * No icon displayed when camera powered by an optional EH-5 AC adapter, the control panel will be adjusted using Custom Setting 7. 17 No pictures can be displayed...

Product Manual
Page 31
...- Repeat Steps 4.3- 4.4 to 2002.01.01 00:00:00. O OFF NTSC - - En OFF Save changes to settings and return to SET UP menu • The camera clock is included with the correct time and date, display the setup menu as described opposite, then set Month, Day, Hour, Minute, and Second 4.5 SET... Mirror Lock-up Video Output Date Language Image Comment - - 4 Getting the Camera Ready for Use Introduction-First Steps Step 4-Set the Time and Date The time and date of back-up power. If the icon in the control panel flashes, the clock battery is sufficient to the correct date and time as...
...- Repeat Steps 4.3- 4.4 to 2002.01.01 00:00:00. O OFF NTSC - - En OFF Save changes to settings and return to SET UP menu • The camera clock is included with the correct time and date, display the setup menu as described opposite, then set Month, Day, Hour, Minute, and Second 4.5 SET... Mirror Lock-up Video Output Date Language Image Comment - - 4 Getting the Camera Ready for Use Introduction-First Steps Step 4-Set the Time and Date The time and date of back-up power. If the icon in the control panel flashes, the clock battery is sufficient to the correct date and time as...

Product Manual
Page 38
... Taking Your First Photographs There are six basic steps to taking photographs: STEP 1 STEP 2 STEP 3 STEP 4 STEP 5 STEP 6 Ready the Camera 27 To learn more about the battery level display, see: • Introduction: First Steps 16-17 To learn how to restore settings to their... how to change the composition after setting exposure, see: • Taking Photographs: Exposure 75-93 To learn more about flash photography, see: • Taking Photographs: Flash Photography 94-106 Take the Photograph To learn how to delay shutter release, see: • Taking Photographs: Self-Timer ...
... Taking Your First Photographs There are six basic steps to taking photographs: STEP 1 STEP 2 STEP 3 STEP 4 STEP 5 STEP 6 Ready the Camera 27 To learn more about the battery level display, see: • Introduction: First Steps 16-17 To learn how to restore settings to their... how to change the composition after setting exposure, see: • Taking Photographs: Exposure 75-93 To learn more about flash photography, see: • Taking Photographs: Flash Photography 94-106 Take the Photograph To learn how to delay shutter release, see: • Taking Photographs: Self-Timer ...

Product Manual
Page 39
... shutter-speed display, . Tutorial-Basic Photography 1.2 Check the battery level If the low-battery icon ( ) appears in the control panel or flashes in the viewfinder, recharge the battery or replace it with a fullycharged spare battery before proceeding. 1.3 Check the number of photographs that can be... taken at current settings. 1 Step 1-Ready the Camera Before taking photographs, ready the camera as described below. 1.1 Turn the camera on The control panel will turn on and the display in the viewfinder will be able to delete ...
... shutter-speed display, . Tutorial-Basic Photography 1.2 Check the battery level If the low-battery icon ( ) appears in the control panel or flashes in the viewfinder, recharge the battery or replace it with a fullycharged spare battery before proceeding. 1.3 Check the number of photographs that can be... taken at current settings. 1 Step 1-Ready the Camera Before taking photographs, ready the camera as described below. 1.1 Turn the camera on The control panel will turn on and the display in the viewfinder will be able to delete ...
Product Manual
Page 41
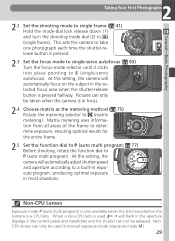
...(single frame). Non- CPU lenses can only be taken when the camera is in manual exposure mode (exposure mode M). 29 Pictures can not be released. At this setting, the camera will automatically focus on the camera is only available when the lens mounted on the subject in most ...the mode-dial lock release down (1) and turn the shooting mode dial (2) to P (auto multi program). At this setting, the camera will flash in the aperture displays in the control panel and viewfinder and the shutter can only be used , will automatically adjust shutter-speed and aperture...
...(single frame). Non- CPU lenses can only be taken when the camera is in manual exposure mode (exposure mode M). 29 Pictures can not be released. At this setting, the camera will automatically focus on the camera is only available when the lens mounted on the subject in most ...the mode-dial lock release down (1) and turn the shooting mode dial (2) to P (auto multi program). At this setting, the camera will flash in the aperture displays in the control panel and viewfinder and the shutter can only be used , will automatically adjust shutter-speed and aperture...

Product Manual
Page 43
...focus in focus brackets using the multi selector. Tutorial-Basic Photography 4 Taking Your First Photographs Step 4-Focus In single-servo AF, the camera focuses on the subject in the selected focus area when the shutterrelease button is set to P, S, A, or M. The Function Dial ...the shutter release will light automatically to focus on your subject using autofocus. Viewfinder Display Meaning ● Subject in focus. ● (flashes) Camera unable to assist with the autofocus operation. If the subject is dark, the AF-assist illuminator will be taken when the function dial...
...focus in focus brackets using the multi selector. Tutorial-Basic Photography 4 Taking Your First Photographs Step 4-Focus In single-servo AF, the camera focuses on the subject in the selected focus area when the shutterrelease button is set to P, S, A, or M. The Function Dial ...the shutter release will light automatically to focus on your subject using autofocus. Viewfinder Display Meaning ● Subject in focus. ● (flashes) Camera unable to assist with the autofocus operation. If the subject is dark, the AF-assist illuminator will be taken when the function dial...
Product Manual
Page 45
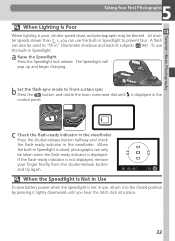
...the closed position by pressing it lightly downward until is displayed in the viewfinder. c Check the flash-ready indicator in the viewfinder Press the shutter-release button halfway and check the flash-ready indicator in the control panel. When the Speedlight Is Not in Use To save battery ...power when the Speedlight is not in Speedlight is displayed. If the flash-ready indicator is poor, shutter speed slows and photographs may be taken when the flash-ready indicator is raised, photographs can use the built-in " (illuminate) shadows and back-lit subjects ...
...the closed position by pressing it lightly downward until is displayed in the viewfinder. c Check the flash-ready indicator in the viewfinder Press the shutter-release button halfway and check the flash-ready indicator in the control panel. When the Speedlight Is Not in Use To save battery ...power when the Speedlight is not in Speedlight is displayed. If the flash-ready indicator is poor, shutter speed slows and photographs may be taken when the flash-ready indicator is raised, photographs can use the built-in " (illuminate) shadows and back-lit subjects ...
Product Manual
Page 49
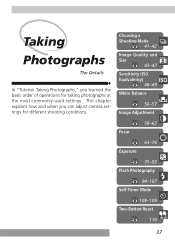
Choosing a Shooting Mode 41-42 Image Quality and Size 43-47 Sensitivity (ISO Equivalency) 48-49 White Balance 50-57 Image Adjustment Focus 58-62 63-74 Exposure 75-93 Flash Photography 94-107 Self-Timer Mode 108-109 Two-Button Reset 110 37 Taking Photographs The Details In "Tutorial: Taking Photographs," you can adjust camera settings for taking photographs at the most commonly-used settings. This chapter explains how and when you learned the basic order of operations for different shooting conditions.
Choosing a Shooting Mode 41-42 Image Quality and Size 43-47 Sensitivity (ISO Equivalency) 48-49 White Balance 50-57 Image Adjustment Focus 58-62 63-74 Exposure 75-93 Flash Photography 94-107 Self-Timer Mode 108-109 Two-Button Reset 110 37 Taking Photographs The Details In "Tutorial: Taking Photographs," you can adjust camera settings for taking photographs at the most commonly-used settings. This chapter explains how and when you learned the basic order of operations for different shooting conditions.

Product Manual
Page 50
...; Image Quality and Size Image Adjustment What lighting is available? ➡ Sensitivity (ISO Equivalency White Balance What is my subject, and how will I need the flash? ➡ Flash Photography Do I compose the photograph? ➡ Focus How important is background lighting to my photograph? ➡ Exposure: Metering What is my priority for adjusting...
...; Image Quality and Size Image Adjustment What lighting is available? ➡ Sensitivity (ISO Equivalency White Balance What is my subject, and how will I need the flash? ➡ Flash Photography Do I compose the photograph? ➡ Focus How important is background lighting to my photograph? ➡ Exposure: Metering What is my priority for adjusting...

Product Manual
Page 51
...left of menu is displayed to right of menu. The Details Taking Photographs The Shooting Menu Changes to some camera settings (shooting mode, focus, metering, exposure mode, exposure compensation, flash sync mode, and flash exposure compensation) are made from the shooting menu, while still others (image quality and size, sensitivity, ...-RGB JPEG Fine JPEG Normal OK JPEG Basic Display options 39 Active menu will be made using the buttons and dials on the camera body. Position cursor in monitor. To make a selection from the shooting menu or using the buttons and dials on the...
...left of menu is displayed to right of menu. The Details Taking Photographs The Shooting Menu Changes to some camera settings (shooting mode, focus, metering, exposure mode, exposure compensation, flash sync mode, and flash exposure compensation) are made from the shooting menu, while still others (image quality and size, sensitivity, ...-RGB JPEG Fine JPEG Normal OK JPEG Basic Display options 39 Active menu will be made using the buttons and dials on the camera body. Position cursor in monitor. To make a selection from the shooting menu or using the buttons and dials on the...

