Product Manual
Page 10
... 4 First Steps: Getting the Camera Ready for Use 14 Step 1-Attach the Camera Strap 15 Step 2-Insert the Battery 16 Step 3-Choose a Language 18 Step 4-Set the Time and Date 19 Step 5-Attach a Lens 20 Step 6-Insert a Memory Card 22 Tutorial: Basic Photography and Playback 25 Basic... Photography: Taking Your First Photographs 26 Step 1-Ready the Camera 27 Step 2-Adjust Camera Settings 28 Step 3-Frame a Photograph 30 Step 4-Focus 31 Step 5-Check Exposure 32 Step...
... 4 First Steps: Getting the Camera Ready for Use 14 Step 1-Attach the Camera Strap 15 Step 2-Insert the Battery 16 Step 3-Choose a Language 18 Step 4-Set the Time and Date 19 Step 5-Attach a Lens 20 Step 6-Insert a Memory Card 22 Tutorial: Basic Photography and Playback 25 Basic... Photography: Taking Your First Photographs 26 Step 1-Ready the Camera 27 Step 2-Adjust Camera Settings 28 Step 3-Frame a Photograph 30 Step 4-Focus 31 Step 5-Check Exposure 32 Step...

Product Manual
Page 14
... as high-quality RAW data. • The optional MB-D100 multi function battery pack can be found in "Connections," which describes how to connect your camera's potential with the advanced Nikon D100 single-lens reflex (SLR) digital camera. Once you have mastered the basics, detailed information on the...2 First-time users who can't wait to experience the simplicity and immediacy of digital photography can follow the step-by-step instructions in the Quick Start Guide or read "First Steps" and "Tutorial" in this manual, referring to "Getting to a television, video-cassette recorder,...
... as high-quality RAW data. • The optional MB-D100 multi function battery pack can be found in "Connections," which describes how to connect your camera's potential with the advanced Nikon D100 single-lens reflex (SLR) digital camera. Once you have mastered the basics, detailed information on the...2 First-time users who can't wait to experience the simplicity and immediacy of digital photography can follow the step-by-step instructions in the Quick Start Guide or read "First Steps" and "Tutorial" in this manual, referring to "Getting to a television, video-cassette recorder,...
Product Manual
Page 37
Basic Playback Read this section for simple, "pointand-shoot" photography that will produce optimal results in the monitor. 35-36 25 Basic Photography This section describes how to use autofocus and auto multi program autoexposure for information on viewing photographs in most situations. Tutorial Basic Photography and Playback Basic Photography 26-34 Basic Playback This chapter takes you step-by-step through the process of taking your first photographs and playing them back.
Basic Playback Read this section for simple, "pointand-shoot" photography that will produce optimal results in the monitor. 35-36 25 Basic Photography This section describes how to use autofocus and auto multi program autoexposure for information on viewing photographs in most situations. Tutorial Basic Photography and Playback Basic Photography 26-34 Basic Playback This chapter takes you step-by-step through the process of taking your first photographs and playing them back.

Product Manual
Page 38
Tutorial-Basic Photography Basic Photography Taking Your First Photographs There are six basic steps to taking photographs: STEP 1 STEP 2 STEP 3 STEP 4 STEP 5 STEP 6 Ready the Camera 27 To learn more about the battery level display, see: • Introduction: First Steps 16-17...see: • Taking Photographs: Two-Button Reset 110 • Menu Guide: The Custom Settings Menu 144-160 Adjust Camera Settings To learn more about the following camera settings, see: • Taking Photographs: Choosing a Shooting Mode Taking Photographs: Image Quality and Size Taking Photographs: ...
Tutorial-Basic Photography Basic Photography Taking Your First Photographs There are six basic steps to taking photographs: STEP 1 STEP 2 STEP 3 STEP 4 STEP 5 STEP 6 Ready the Camera 27 To learn more about the battery level display, see: • Introduction: First Steps 16-17...see: • Taking Photographs: Two-Button Reset 110 • Menu Guide: The Custom Settings Menu 144-160 Adjust Camera Settings To learn more about the following camera settings, see: • Taking Photographs: Choosing a Shooting Mode Taking Photographs: Image Quality and Size Taking Photographs: ...

Product Manual
Page 39
fore you will show a blinking , the viewfinder shutter-speed display, . Tutorial-Basic Photography 1.2 Check the battery level If the low-battery icon ( ) appears in the control panel or flashes in the viewfinder, recharge the battery or ... exposures remaining The exposure-count displays in the control panel will be - tographs. 27 You will light. 1 Step 1-Ready the Camera Before taking photographs, ready the camera as described below. 1.1 Turn the camera on The control panel will turn on and the display in the viewfinder will need to delete pictures, insert a new...
fore you will show a blinking , the viewfinder shutter-speed display, . Tutorial-Basic Photography 1.2 Check the battery level If the low-battery icon ( ) appears in the control panel or flashes in the viewfinder, recharge the battery or ... exposures remaining The exposure-count displays in the control panel will be - tographs. 27 You will light. 1 Step 1-Ready the Camera Before taking photographs, ready the camera as described below. 1.1 Turn the camera on The control panel will turn on and the display in the viewfinder will need to delete pictures, insert a new...
Product Manual
Page 40
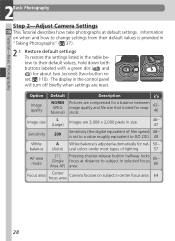
...White balance is adjusted automatically for nat- 50- (Auto) ural colors under most types of film speed) 48- Tutorial-Basic Photography 2Basic Photography Step 2-Adjust Camera Settings This Tutorial describes how take photographs at distance to their default values, hold down both buttons labeled with a green dot ( ... table below to subject in selected focus area. 65- 66 Focus area Center focus area Camera focuses on subject in size. 46- 47 Sensitivity 200 Sensitivity (the digital equivalent of lighting. 57 AF-area mode (Single Area AF) Pressing shutter-release button halfway...
...White balance is adjusted automatically for nat- 50- (Auto) ural colors under most types of film speed) 48- Tutorial-Basic Photography 2Basic Photography Step 2-Adjust Camera Settings This Tutorial describes how take photographs at distance to their default values, hold down both buttons labeled with a green dot ( ... table below to subject in selected focus area. 65- 66 Focus area Center focus area Camera focuses on subject in size. 46- 47 Sensitivity 200 Sensitivity (the digital equivalent of lighting. 57 AF-area mode (Single Area AF) Pressing shutter-release button halfway...
Product Manual
Page 41
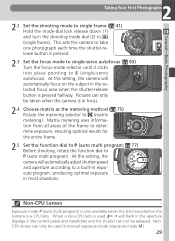
... the metering method ( 75) Rotate the metering selector to (matrix metering). CPU lenses can only be released. Non- This sets the camera to take one photograph each time the shutter-re- 2 lease button is a CPU lens. Matrix metering uses information from all areas of...the function dial to P (auto multi program; 77) Before shooting, rotate the function dial to S (single-servo autofocus). 2 Taking Your First Photographs Tutorial-Basic Photography 2.2 Set the shooting mode to single frame ( 41) Hold the mode-dial lock release down (1) and turn the shooting mode dial (2)...
... the metering method ( 75) Rotate the metering selector to (matrix metering). CPU lenses can only be released. Non- This sets the camera to take one photograph each time the shutter-re- 2 lease button is a CPU lens. Matrix metering uses information from all areas of...the function dial to P (auto multi program; 77) Before shooting, rotate the function dial to S (single-servo autofocus). 2 Taking Your First Photographs Tutorial-Basic Photography 2.2 Set the shooting mode to single frame ( 41) Hold the mode-dial lock release down (1) and turn the shooting mode dial (2)...
Product Manual
Page 42
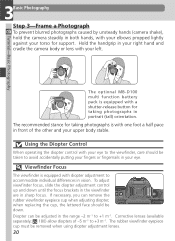
... putting your fingers or fingernails in your left. Viewfinder Focus The viewfinder is equipped with diopter adjustment to +3 m-1. The optional MB-D100 multi function battery pack is with one foot a half pace in front of -5 m-1 to accommodate individual differences in portrait (tall... Diopter can remove the rubber viewfinder eyepiece cup when adjusting diopter; Tutorial-Basic Photography 3Basic Photography Step 3-Frame a Photograph To prevent blurred photographs caused by unsteady hands (camera shake), hold the camera steadily in both hands, with your elbows propped lightly against your...
... putting your fingers or fingernails in your left. Viewfinder Focus The viewfinder is equipped with diopter adjustment to +3 m-1. The optional MB-D100 multi function battery pack is with one foot a half pace in front of -5 m-1 to accommodate individual differences in portrait (tall... Diopter can remove the rubber viewfinder eyepiece cup when adjusting diopter; Tutorial-Basic Photography 3Basic Photography Step 3-Frame a Photograph To prevent blurred photographs caused by unsteady hands (camera shake), hold the camera steadily in both hands, with your elbows propped lightly against your...

Product Manual
Page 43
... than appears in the viewfinder. The view through the viewfinder. Viewfinder Display Meaning ● Subject in focus. ● (flashes) Camera unable to focus on another subject at the same distance, then recompose your subject using autofocus. At other settings, the shutter release ... M. Viewfinder Frame Coverage Approximately 95% of the image exposed on the CCD is pressed halfway. Tutorial-Basic Photography 4 Taking Your First Photographs Step 4-Focus In single-servo AF, the camera focuses on the subject in focus brackets using the multi selector. If the subject is set to...
... than appears in the viewfinder. The view through the viewfinder. Viewfinder Display Meaning ● Subject in focus. ● (flashes) Camera unable to focus on another subject at the same distance, then recompose your subject using autofocus. At other settings, the shutter release ... M. Viewfinder Frame Coverage Approximately 95% of the image exposed on the CCD is pressed halfway. Tutorial-Basic Photography 4 Taking Your First Photographs Step 4-Focus In single-servo AF, the camera focuses on the subject in focus brackets using the multi selector. If the subject is set to...
Product Manual
Page 44
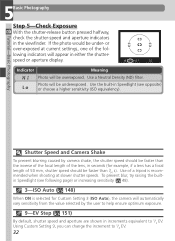
... 32 If the photo would be faster than 1/50 s). or over-exposed at slower shutter speeds. Tutorial-Basic Photography Indicator Meaning Photo will automatically vary sensitivity from the value selected by camera shake, the shutter speed should be faster than the inverse of the focal length of 50 mm, ...shutter speed should be under- Shutter Speed and Camera Shake To prevent blurring caused by the user to help ensure optimum exposure. 9-EV Step ( 151) By default, shutter speed and aperture...
... 32 If the photo would be faster than 1/50 s). or over-exposed at slower shutter speeds. Tutorial-Basic Photography Indicator Meaning Photo will automatically vary sensitivity from the value selected by camera shake, the shutter speed should be faster than the inverse of the focal length of 50 mm, ...shutter speed should be under- Shutter Speed and Camera Shake To prevent blurring caused by the user to help ensure optimum exposure. 9-EV Step ( 151) By default, shutter speed and aperture...
Product Manual
Page 45
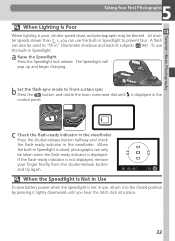
... taken when the flash-ready indicator is displayed. A flash can use the built-in the control panel. The Speedlight will pop up and begin charging. Tutorial-Basic Photography 5 Taking Your First Photographs When Lighting Is Poor When lighting is poor, shutter speed slows and photographs may be used to "fill in...
... taken when the flash-ready indicator is displayed. A flash can use the built-in the control panel. The Speedlight will pop up and begin charging. Tutorial-Basic Photography 5 Taking Your First Photographs When Lighting Is Poor When lighting is poor, shutter speed slows and photographs may be used to "fill in...

Product Manual
Page 46
...in place of film. It may cause deterioration in the charge-coupled device (CCD) that the camera uses in loss of the way down. Do Not Photograph Strong Light Sources Avoid taking pictures with the camera focused on the sun or other strong light source. When ON is being recorded to the... access lamp next to the card slot cover will light. Do not eject the memory card, turn the camera off, or remove or disconnect the power source until the lamp has gone out. Tutorial-Basic Photography 6Basic Photography Step 6-Take the Photograph Smoothly press the shutter-release button the rest of data...
...in place of film. It may cause deterioration in the charge-coupled device (CCD) that the camera uses in loss of the way down. Do Not Photograph Strong Light Sources Avoid taking pictures with the camera focused on the sun or other strong light source. When ON is being recorded to the... access lamp next to the card slot cover will light. Do not eject the memory card, turn the camera off, or remove or disconnect the power source until the lamp has gone out. Tutorial-Basic Photography 6Basic Photography Step 6-Take the Photograph Smoothly press the shutter-release button the rest of data...
Product Manual
Page 47
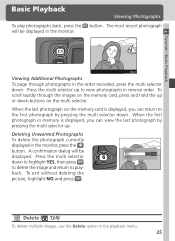
... deleting the picture, highlight NO and press . Basic Playback To play photographs back, press the will be displayed in the monitor. The most recent photograph Tutorial-Basic Playback 100-1 Viewing Additional Photographs To page through the images on the multi selector. Viewing Photographs button. Press the multi selector down buttons on...
... deleting the picture, highlight NO and press . Basic Playback To play photographs back, press the will be displayed in the monitor. The most recent photograph Tutorial-Basic Playback 100-1 Viewing Additional Photographs To page through the images on the multi selector. Viewing Photographs button. Press the multi selector down buttons on...
Product Manual
Page 48
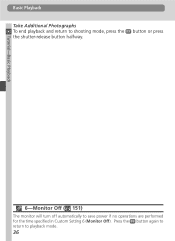
Basic Playback Take Additional Photographs To end playback and return to save power if no operations are performed for the time specified in Custom Setting 6 (Monitor Off). button or press Tutorial-Basic Playback 6-Monitor Off ( 151) The monitor will turn off automatically to shooting mode, press the the shutter-release button halfway. Press the button again to return to playback mode. 36
Basic Playback Take Additional Photographs To end playback and return to save power if no operations are performed for the time specified in Custom Setting 6 (Monitor Off). button or press Tutorial-Basic Playback 6-Monitor Off ( 151) The monitor will turn off automatically to shooting mode, press the the shutter-release button halfway. Press the button again to return to playback mode. 36
Product Manual
Page 49
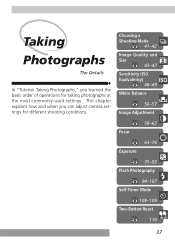
Taking Photographs The Details In "Tutorial: Taking Photographs," you can adjust camera settings for taking photographs at the most commonly-used settings. This chapter explains how and when you learned the basic order of operations for different shooting conditions. Choosing a Shooting Mode 41-42 Image Quality and Size 43-47 Sensitivity (ISO Equivalency) 48-49 White Balance 50-57 Image Adjustment Focus 58-62 63-74 Exposure 75-93 Flash Photography 94-107 Self-Timer Mode 108-109 Two-Button Reset 110 37
Taking Photographs The Details In "Tutorial: Taking Photographs," you can adjust camera settings for taking photographs at the most commonly-used settings. This chapter explains how and when you learned the basic order of operations for different shooting conditions. Choosing a Shooting Mode 41-42 Image Quality and Size 43-47 Sensitivity (ISO Equivalency) 48-49 White Balance 50-57 Image Adjustment Focus 58-62 63-74 Exposure 75-93 Flash Photography 94-107 Self-Timer Mode 108-109 Two-Button Reset 110 37
