
User Manual
Page 3
Introduction Tutorial Photography and Playback More on Photography (All Modes) Reference P, S, A, and M Modes More on Playback Connecting to a Computer, Printer, or TV Playback Options: The Playback Menu Shooting Options: The Shooting Menu Menu Guide Custom Settings Basic Camera Settings: The Setup Menu Creating Retouched Copies: The Retouch Menu Technical Notes i
Introduction Tutorial Photography and Playback More on Photography (All Modes) Reference P, S, A, and M Modes More on Playback Connecting to a Computer, Printer, or TV Playback Options: The Playback Menu Shooting Options: The Shooting Menu Menu Guide Custom Settings Basic Camera Settings: The Setup Menu Creating Retouched Copies: The Retouch Menu Technical Notes i

User Manual
Page 7
...Camera 2 First Steps 8 Attaching a Lens 8 Charging and Inserting the Battery 9 Basic Setup 11 Inserting Memory Cards 12 Adjusting Viewfinder Focus 14 Tutorial 15 "Point-and-Shoot" Photography ( Mode 15 Creative Photography (Digital...ISO Sensitivity 37 Two-Button Reset 38 P, S, A, and M Modes 39 Mode P (Programmed Auto 40 Mode S (Shutter-Priority Auto 41 Mode A (Aperture-Priority Auto 42 Mode M (Manual 43 Exposure...Printing Via Direct USB Connection 57 Viewing Photographs on TV 62 Menu Guide 63 Using Camera Menus 63 Playback Options: The Playback Menu 65 Delete...65 Playback ...
...Camera 2 First Steps 8 Attaching a Lens 8 Charging and Inserting the Battery 9 Basic Setup 11 Inserting Memory Cards 12 Adjusting Viewfinder Focus 14 Tutorial 15 "Point-and-Shoot" Photography ( Mode 15 Creative Photography (Digital...ISO Sensitivity 37 Two-Button Reset 38 P, S, A, and M Modes 39 Mode P (Programmed Auto 40 Mode S (Shutter-Priority Auto 41 Mode A (Aperture-Priority Auto 42 Mode M (Manual 43 Exposure...Printing Via Direct USB Connection 57 Viewing Photographs on TV 62 Menu Guide 63 Using Camera Menus 63 Playback Options: The Playback Menu 65 Delete...65 Playback ...
User Manual
Page 13
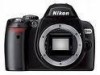
... 8, 28 9. Focal length scale index 5. Lens cap Introduction 1 Introduction Thank you enjoy taking pictures with your purchase of a Nikon D40 single-lens reflex (SLR) digital camera with AF-S and AF-I lenses only. Lens Autofocus is used : This icon marks cautions, information that can be read before... you need, the following symbols and conventions are used in the Quick Start Guide. This icon marks settings that should be finetuned from the Custom Settings menu. Read this manual for your Nikon digital camera. Zoom ring ¾ º¶ ²´ ¿ 2. ...
... 8, 28 9. Focal length scale index 5. Lens cap Introduction 1 Introduction Thank you enjoy taking pictures with your purchase of a Nikon D40 single-lens reflex (SLR) digital camera with AF-S and AF-I lenses only. Lens Autofocus is used : This icon marks cautions, information that can be read before... you need, the following symbols and conventions are used in the Quick Start Guide. This icon marks settings that should be finetuned from the Custom Settings menu. Read this manual for your Nikon digital camera. Zoom ring ¾ º¶ ²´ ¿ 2. ...
User Manual
Page 23
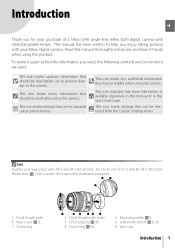
...11 Follow the steps below to change. Using Camera Menus The language menu is only displayed automatically the first time the camera is turned on normal menu operation. See the Menu Guide ( 63) for information on . Basic Setup The first time the camera is turned on, the language selection dialog shown... in Step 1 will be taken until the camera clock has been set the time...
...11 Follow the steps below to change. Using Camera Menus The language menu is only displayed automatically the first time the camera is turned on normal menu operation. See the Menu Guide ( 63) for information on . Basic Setup The first time the camera is turned on, the language selection dialog shown... in Step 1 will be taken until the camera clock has been set the time...
User Manual
Page 33
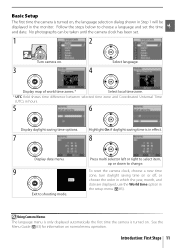
...Built-in Flash: 34 ISO Sensitivity: 37 Two-Button Reset: 38 P, S, A, and M Modes: 39 Let the camera choose shutter speed and aperture Mode P (Programmed Auto): 40 Freeze or blur motion Mode S (Shutter-Priority Auto): 41 Choose whether to cover more advanced shooting and playback options....and flash level Exposure: 45 Make colors look natural Take photos under unusual lighting White Balance: 49 See the Menu Guide for information on the Camera: 50 See the Menu Guide for other operations that can only be performed in P, S, A, and M modes, including customizing sharpening, contrast, ...
...Built-in Flash: 34 ISO Sensitivity: 37 Two-Button Reset: 38 P, S, A, and M Modes: 39 Let the camera choose shutter speed and aperture Mode P (Programmed Auto): 40 Freeze or blur motion Mode S (Shutter-Priority Auto): 41 Choose whether to cover more advanced shooting and playback options....and flash level Exposure: 45 Make colors look natural Take photos under unusual lighting White Balance: 49 See the Menu Guide for information on the Camera: 50 See the Menu Guide for other operations that can only be performed in P, S, A, and M modes, including customizing sharpening, contrast, ...

User Manual
Page 64
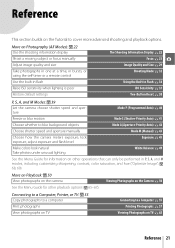
... button in the image. Display shooting information Display shooting information ( 22). 52 Reference: More on Playback/Viewing Photographs on the Camera Display fewer Decrease number of images displayed from nine to four or from four to nine. Protect photo ( ) Protect highlighted ... 54). The vertical axis shows the number of pixels of each brightness in full-frame playback. Highlights Highlights are intended as a guide only and may be performed while thumbnails are overexposed. 1 Protect status...54 2 Retouch indicator 89 3 Highlights (indicated by flashing ...
... button in the image. Display shooting information Display shooting information ( 22). 52 Reference: More on Playback/Viewing Photographs on the Camera Display fewer Decrease number of images displayed from nine to four or from four to nine. Protect photo ( ) Protect highlighted ... 54). The vertical axis shows the number of pixels of each brightness in full-frame playback. Highlights Highlights are intended as a guide only and may be performed while thumbnails are overexposed. 1 Protect status...54 2 Retouch indicator 89 3 Highlights (indicated by flashing ...

User Manual
Page 75
... Press down Make selection Move cursor down Decrease number Menu Guide/Using Camera Menus 63 Move cursor up Increase number Press up Return to navigate the camera menus. Format memory cards and perform basic camera setup ( 80). icon is displayed, help for the ... Adjust playback settings and manage photos ( 65). Create retouched copies of existing photographs ( 89). Adjust shooting settings ( 68). Menu Guide Using Camera Menus Most shooting, playback, and setup options can be accessed from playback, shooting, Custom Settings, setup, and retouch menus (see below...
... Press down Make selection Move cursor down Decrease number Menu Guide/Using Camera Menus 63 Move cursor up Increase number Press up Return to navigate the camera menus. Format memory cards and perform basic camera setup ( 80). icon is displayed, help for the ... Adjust playback settings and manage photos ( 65). Create retouched copies of existing photographs ( 89). Adjust shooting settings ( 68). Menu Guide Using Camera Menus Most shooting, playback, and setup options can be accessed from playback, shooting, Custom Settings, setup, and retouch menus (see below...

User Manual
Page 76
To modify menu settings: 1 2 Display menus. 3 Highlight icon for current menu. Display options. 8 Highlight option. Press the shutter-release button halfway to exit the menus and return to shooting mode. Select menu. 4 5 Position cursor in gray are not currently available. The monitor will turn off. 64 Menu Guide/Using Camera Menus Menu items that are displayed in selected menu. 6 7 Highlight menu item. Make selection.
To modify menu settings: 1 2 Display menus. 3 Highlight icon for current menu. Display options. 8 Highlight option. Press the shutter-release button halfway to exit the menus and return to shooting mode. Select menu. 4 5 Position cursor in gray are not currently available. The monitor will turn off. 64 Menu Guide/Using Camera Menus Menu items that are displayed in selected menu. 6 7 Highlight menu item. Make selection.

User Manual
Page 77
... following options (options displayed may differ if My menu is selected for the CSM/Setup menu option in the setup menu; 80). Complete operation. Menu Guide/Playback Options: The Playback Menu 65 To view highlighted picture full frame, press button. 3 4 Repeat steps 1-2 to select additional pictures. Playback Options: The ...Playback Menu The playback menu contains the following options: Option Selected All Description Delete selected photographs (see below). See "Using Camera Menus" ( 63) for deletion: 1 2 Highlight picture. Selection shown by icon.
... following options (options displayed may differ if My menu is selected for the CSM/Setup menu option in the setup menu; 80). Complete operation. Menu Guide/Playback Options: The Playback Menu 65 To view highlighted picture full frame, press button. 3 4 Repeat steps 1-2 to select additional pictures. Playback Options: The ...Playback Menu The playback menu contains the following options: Option Selected All Description Delete selected photographs (see below). See "Using Camera Menus" ( 63) for deletion: 1 2 Highlight picture. Selection shown by icon.

User Manual
Page 78
... for playback: Option Description Only photos in the folder currently selected for Folders in "wide" (landscape) orientation. 66 Menu Guide/Playback Options: The Playback Menu All Play back photos in the camera monitor. This option is Current selected automatically when a photo is inserted and this option selected before photos have been taken...
... for playback: Option Description Only photos in the folder currently selected for Folders in "wide" (landscape) orientation. 66 Menu Guide/Playback Options: The Playback Menu All Play back photos in the camera monitor. This option is Current selected automatically when a photo is inserted and this option selected before photos have been taken...

User Manual
Page 79
... of the pictures in the current playback folder. Exit to shooting mode Shutter release Press shutter-release button halfway to return to pause playback. Menu Guide/Playback Options: The Playback Menu 67
... of the pictures in the current playback folder. Exit to shooting mode Shutter release Press shutter-release button halfway to return to pause playback. Menu Guide/Playback Options: The Playback Menu 67

User Manual
Page 80
... available for general use the sRGB color space. Noise reduction Reduce noise. * Available in publishing and commercial printing. 68 Menu Guide/Shooting Options: The Shooting Menu SO Softer Softens outlines, producing natural results suitable for more information on a computer. PO Portrait...vary with vibrant reds, greens, and blues. Custom Customize image optimization settings ( 69). Image quality Choose image quality. See "Using Camera Menus" ( 63) for portraits or retouching on using the menus. Settings other than Custom use , while Adobe RGB is used ...
... available for general use the sRGB color space. Noise reduction Reduce noise. * Available in publishing and commercial printing. 68 Menu Guide/Shooting Options: The Shooting Menu SO Softer Softens outlines, producing natural results suitable for more information on a computer. PO Portrait...vary with vibrant reds, greens, and blues. Custom Customize image optimization settings ( 69). Image quality Choose image quality. See "Using Camera Menus" ( 63) for portraits or retouching on using the menus. Settings other than Custom use , while Adobe RGB is used ...

User Manual
Page 81
..., greens more blue, and blues more purple. Choose Custom to +9° in modes Ia and IIIa are sharpened dur- Menu Guide/Shooting Options: The Shooting Menu 69 Lower settings prevent loss of colors. Choose Ia for portrait shots and IIIa for details. See the...high settings for sharp outlines, low settings for photos that will be adjusted between -9° to select a user-defined tone curve created using Camera Control Pro (available separately; 103). If the application supports color management, choose the Adobe RGB color space when opening photos taken in direct sunlight...
..., greens more blue, and blues more purple. Choose Custom to +9° in modes Ia and IIIa are sharpened dur- Menu Guide/Shooting Options: The Shooting Menu 69 Lower settings prevent loss of colors. Choose Ia for portrait shots and IIIa for details. See the...high settings for sharp outlines, low settings for photos that will be adjusted between -9° to select a user-defined tone curve created using Camera Control Pro (available separately; 103). If the application supports color management, choose the Adobe RGB color space when opening photos taken in direct sunlight...

User Manual
Page 82
...right. Selecting an option other than preset in final photograph and white balance is placed under lighting that will be "fine tuned" by camera ( 71). Choose lower values to make photographs appear slightly more yellow or red, higher values to select a value for color temperature ... Two methods are available for setting preset white balance: Method Direct measurement Copy from photo on memory card ( 72). 70 Menu Guide/Shooting Options: The Shooting Menu Image Quality Select image quality ( 30). White Balance (P, S, A, and M Modes) Nine options are available for...
...right. Selecting an option other than preset in final photograph and white balance is placed under lighting that will be "fine tuned" by camera ( 71). Choose lower values to make photographs appear slightly more yellow or red, higher values to select a value for color temperature ... Two methods are available for setting preset white balance: Method Direct measurement Copy from photo on memory card ( 72). 70 Menu Guide/Shooting Options: The Shooting Menu Image Quality Select image quality ( 30). White Balance (P, S, A, and M Modes) Nine options are available for...

User Manual
Page 83
...shown at right will flash as a reference in Steps 5-6. when shooting in the final photograph. The menu shown at right. Menu Guide/Shooting Options: The Shooting Menu 71 Do alter exposure from the display, the viewfinder and shooting information white balance displays will be displayed.... Measure a value for about 2s when preset white balance is displayed, the camera was able to measure white balance. no photograph will automatically be recorded. White balance will be set white balance to the last ...
...shown at right will flash as a reference in Steps 5-6. when shooting in the final photograph. The menu shown at right. Menu Guide/Shooting Options: The Shooting Menu 71 Do alter exposure from the display, the viewfinder and shooting information white balance displays will be displayed.... Measure a value for about 2s when preset white balance is displayed, the camera was able to measure white balance. no photograph will automatically be recorded. White balance will be set white balance to the last ...

User Manual
Page 84
...To use current source photo, highlight This image and press OK. 5 6 Highlight folder. 7 Display images in the preset white balance menu. 72 Menu Guide/Shooting Options: The Shooting Menu Note that if a new value is currently selected in selected folder. •8 Highlight photograph. ‡ To view highlighted ...balance>White balance preset in Step 1 will be set to shooting menu. ‡ Images displayed may include those created with other cameras, but only photographs created with D40 can be used as source for preset white balance. The menu shown in the shooting menu.
...To use current source photo, highlight This image and press OK. 5 6 Highlight folder. 7 Display images in the preset white balance menu. 72 Menu Guide/Shooting Options: The Shooting Menu Note that if a new value is currently selected in selected folder. •8 Highlight photograph. ‡ To view highlighted ...balance>White balance preset in Step 1 will be set to shooting menu. ‡ Images displayed may include those created with other cameras, but only photographs created with D40 can be used as source for preset white balance. The menu shown in the shooting menu.

User Manual
Page 85
Menu Guide/Shooting Options: The Shooting Menu 73 plete. Photographs taken at ISO sensitivities over ISO 800 or at shutter speeds of 1s or slower can be performed if the camera is turned off reduction at the bottom of memory buffer may drop). Noise Reduction Photographs taken at high sensitivities or at shutter...
Menu Guide/Shooting Options: The Shooting Menu 73 plete. Photographs taken at ISO sensitivities over ISO 800 or at shutter speeds of 1s or slower can be performed if the camera is turned off reduction at the bottom of memory buffer may drop). Noise Reduction Photographs taken at high sensitivities or at shutter...

User Manual
Page 86
... auto 76 16 Self-timer 79 11 /Fn button 77 17 Remote on , when it is off ( 6). 74 Menu Guide/Custom Settings The following options are used to customize camera settings to their default values. Custom Settings Custom Settings are available when Simple (the default option) is selected for CSM/Setup... of default settings. 1: Beep At the default setting of On, a beep will not sound when Off is selected. The beep will sound when the camera focuses in single-servo AF (AF-S or when shooting stationary subjects in AF-A autofocus mode), while the release timer is counting down in self-timer...
... auto 76 16 Self-timer 79 11 /Fn button 77 17 Remote on , when it is off ( 6). 74 Menu Guide/Custom Settings The following options are used to customize camera settings to their default values. Custom Settings Custom Settings are available when Simple (the default option) is selected for CSM/Setup... of default settings. 1: Beep At the default setting of On, a beep will not sound when Off is selected. The beep will sound when the camera focuses in single-servo AF (AF-S or when shooting stationary subjects in AF-A autofocus mode), while the release timer is counting down in self-timer...

User Manual
Page 87
... Mode Select from single-frame, continuous, self-timer, and remote control mode ( 32). 5: Metering (P, S, A, and M Modes Only) Choose how the camera meters exposure ( 45). 6: No Memory Card? If Release locked (the default setting) is selected, the shutterrelease is disabled when no memory card is inserted...., photographs will automatically be displayed in the monitor by pressing the button. Menu Guide/Custom Settings 75 2: Focus Mode Select a focus mode ( 23). 3: AF-Area Mode Choose how the camera selects the focus area in the monitor after shooting (the length of time photographs...
... Mode Select from single-frame, continuous, self-timer, and remote control mode ( 32). 5: Metering (P, S, A, and M Modes Only) Choose how the camera meters exposure ( 45). 6: No Memory Card? If Release locked (the default setting) is selected, the shutterrelease is disabled when no memory card is inserted...., photographs will automatically be displayed in the monitor by pressing the button. Menu Guide/Custom Settings 75 2: Focus Mode Select a focus mode ( 23). 3: AF-Area Mode Choose how the camera selects the focus area in the monitor after shooting (the length of time photographs...

User Manual
Page 88
If On is off, the camera may not be able to focus on poorly-lit subjects using the Max. shutter speed (slower shutter speeds may be achieved at the value selected ... be achieved at an ISO sensitivity of HI 1. Choose a flash mode other than slow sync or select mode A or M and choose a larger aperture. 76 Menu Guide/Custom Settings ISO Auto Auto ISO control is not available at the selected value (flash level is altered from the value selected by the user...
If On is off, the camera may not be able to focus on poorly-lit subjects using the Max. shutter speed (slower shutter speeds may be achieved at the value selected ... be achieved at an ISO sensitivity of HI 1. Choose a flash mode other than slow sync or select mode A or M and choose a larger aperture. 76 Menu Guide/Custom Settings ISO Auto Auto ISO control is not available at the selected value (flash level is altered from the value selected by the user...