Product Manual
Page 5
... from the actual product. These icons indicate other pages containing relevant information; E: "Reference Section", F: "Technical Notes and Index." • SD and SDHC/SDXC memory cards are referred to as "memory cards" in the camera monitor, and the names of Shooting and Playback" (A20). Other Information • Symbols and Conventions To make it easier to...
... from the actual product. These icons indicate other pages containing relevant information; E: "Reference Section", F: "Technical Notes and Index." • SD and SDHC/SDXC memory cards are referred to as "memory cards" in the camera monitor, and the names of Shooting and Playback" (A20). Other Information • Symbols and Conventions To make it easier to...

Product Manual
Page 8
... to also replace any pictures selected for example, pictures of Data Storage Devices Please note that deleting images or formatting data storage devices such as memory cards or built-in the malicious use of such data is the user's responsibility. vi Deleted files can clear the Wi-Fi settings using commercially available...
... to also replace any pictures selected for example, pictures of Data Storage Devices Please note that deleting images or formatting data storage devices such as memory cards or built-in the malicious use of such data is the user's responsibility. vi Deleted files can clear the Wi-Fi settings using commercially available...

Product Manual
Page 17
... The Monitor ...14 The Basics of Shooting and Playback 20 Preparation 1 Insert the Battery 20 Preparation 2 Charge the Battery 22 Preparation 3 Insert a Memory Card 24 Internal Memory and Memory Cards 25 Approved Memory Cards...25 Step 1 Turn the Camera On 26 Setting the Display Language, Date, and Time 28 Step 2 Select a Shooting Mode 30 Available Shooting Modes...
... The Monitor ...14 The Basics of Shooting and Playback 20 Preparation 1 Insert the Battery 20 Preparation 2 Charge the Battery 22 Preparation 3 Insert a Memory Card 24 Internal Memory and Memory Cards 25 Approved Memory Cards...25 Step 1 Turn the Camera On 26 Setting the Display Language, Date, and Time 28 Step 2 Select a Shooting Mode 30 Available Shooting Modes...

Product Manual
Page 20
... Print Order E47 b Slide Show ...E49 d Protect...E50 f Rotate Image ...E50 E Voice Memo...E51 h Copy (Copy Between Internal Memory and Memory Card E52 C Sequence Display Options E53 x Choose Key Picture ...E53 The Movie Menu ...E54 Movie Options...E54 Autofocus Mode...E57 Frame Rate ...... Menu (j, k, l or m Mode E21 Image Quality ...E21 Image Size...E22 Picture Control (COOLPIX Picture Control) (Changing the Settings for Image Recording E23 Custom Picture Control (COOLPIX Custom Picture Control E27 White Balance (Adjusting Hue E28 Metering ...E31 Continuous Shooting ...E32 ISO Sensitivity...
... Print Order E47 b Slide Show ...E49 d Protect...E50 f Rotate Image ...E50 E Voice Memo...E51 h Copy (Copy Between Internal Memory and Memory Card E52 C Sequence Display Options E53 x Choose Key Picture ...E53 The Movie Menu ...E54 Movie Options...E54 Autofocus Mode...E57 Frame Rate ...... Menu (j, k, l or m Mode E21 Image Quality ...E21 Image Size...E22 Picture Control (COOLPIX Picture Control) (Changing the Settings for Image Recording E23 Custom Picture Control (COOLPIX Custom Picture Control E27 White Balance (Adjusting Hue E28 Metering ...E31 Continuous Shooting ...E32 ISO Sensitivity...

Product Manual
Page 21
...Reduction...E65 Motion Detection...E66 AF Assist ...E66 Digital Zoom ...E67 Assign Side Zoom Control...E68 Sound Settings ...E69 Auto Off ...E69 Format Memory/Format Card E70 Language ...E70 TV Settings...E71 Charge by Computer...E72 Toggle Av/Tv Selection ...E73 Reset File Numbering ...E73 Blink Warning...E74 Eye-Fi... Optional Accessories ...E82 Technical Notes and Index F1 Caring for the Products...F2 The Camera...F2 The Battery ...F3 Charging AC Adapter ...F4 Memory Cards...F5 Caring for the Camera...F6 Cleaning...F6 Storage ...F7 Troubleshooting ...F8 Specifications ...F16 Index...F23 xix
...Reduction...E65 Motion Detection...E66 AF Assist ...E66 Digital Zoom ...E67 Assign Side Zoom Control...E68 Sound Settings ...E69 Auto Off ...E69 Format Memory/Format Card E70 Language ...E70 TV Settings...E71 Charge by Computer...E72 Toggle Av/Tv Selection ...E73 Reset File Numbering ...E73 Blink Warning...E74 Eye-Fi... Optional Accessories ...E82 Technical Notes and Index F1 Caring for the Products...F2 The Camera...F2 The Battery ...F3 Charging AC Adapter ...F4 Memory Cards...F5 Caring for the Camera...F6 Cleaning...F6 Storage ...F7 Troubleshooting ...F8 Specifications ...F16 Index...F23 xix

Product Manual
Page 24
..., 93, 95 13 l (delete) button 37, 94 14 k (apply selection) button 3, 5, 12 15 Rotary multi selector (multi selector 3, 5, 59 16 Tripod socket 17 Battery-chamber/memory card slot cover 20, 24 * Also referred to as the "multi selector" in this manual. 2
..., 93, 95 13 l (delete) button 37, 94 14 k (apply selection) button 3, 5, 12 15 Rotary multi selector (multi selector 3, 5, 59 16 Tripod socket 17 Battery-chamber/memory card slot cover 20, 24 * Also referred to as the "multi selector" in this manual. 2

Product Manual
Page 42
Battery latch 20 B Be Careful to Insert the Battery in the direction indicated by the arrow (1), and fully insert the battery (2). • The battery locks into place when inserted correctly. The Basics of Shooting and Playback The Basics of Shooting and Playback Preparation 1 Insert the Battery 1 Open the battery-chamber/ memory card slot cover. 2 Insert the battery. • Push the orange battery latch in Correct Direction Inserting the battery upside down or backwards could damage the camera. 3 Close the battery-chamber/ memory card slot cover.
Battery latch 20 B Be Careful to Insert the Battery in the direction indicated by the arrow (1), and fully insert the battery (2). • The battery locks into place when inserted correctly. The Basics of Shooting and Playback The Basics of Shooting and Playback Preparation 1 Insert the Battery 1 Open the battery-chamber/ memory card slot cover. 2 Insert the battery. • Push the orange battery latch in Correct Direction Inserting the battery upside down or backwards could damage the camera. 3 Close the battery-chamber/ memory card slot cover.

Product Manual
Page 43
B High Temperature Caution The camera, battery, and memory card may be hot immediately after using the camera. 21 Move the battery latch in the direction indicated by the arrow (1) to eject the battery (2). The Basics of Shooting and Playback Removing the Battery Turn the camera off and make sure that the power-on lamp and the monitor have turned off, and then open the battery-chamber/memory card slot cover.
B High Temperature Caution The camera, battery, and memory card may be hot immediately after using the camera. 21 Move the battery latch in the direction indicated by the arrow (1) to eject the battery (2). The Basics of Shooting and Playback Removing the Battery Turn the camera off and make sure that the power-on lamp and the monitor have turned off, and then open the battery-chamber/memory card slot cover.

Product Manual
Page 46
... battery-chamber/memory card slot cover. 2 Insert the memory card. • Slide the memory card in until it with this camera, make sure to Insert the Memory Card in Correct Direction Inserting the memory card upside down or backwards could damage the camera and the memory card. 3 Close the battery-chamber/ memory card slot cover. Memory card slot B Formatting Memory Cards The first time you insert a memory card that has...
... battery-chamber/memory card slot cover. 2 Insert the memory card. • Slide the memory card in until it with this camera, make sure to Insert the Memory Card in Correct Direction Inserting the memory card upside down or backwards could damage the camera and the memory card. 3 Close the battery-chamber/ memory card slot cover. Memory card slot B Formatting Memory Cards The first time you insert a memory card that has...
Product Manual
Page 47
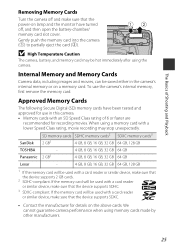
...or similar device, make sure that the device supports SDXC. • Contact the manufacturer for use the camera's internal memory, first remove the memory card. SanDisk SD memory cards SDHC memory cards2 SDXC memory cards3 2 GB1 4 GB, 8 GB, 16 GB, 32 GB 64 GB, 128 GB TOSHIBA - Panasonic 2 GB1... have been tested and approved for details on a memory card. Approved Memory Cards The following Secure Digital (SD) memory cards have turned off and make sure that the device supports 2 GB cards. 2 SDHC-compliant. If the memory card will be used with an SD Speed Class rating...
...or similar device, make sure that the device supports SDXC. • Contact the manufacturer for use the camera's internal memory, first remove the memory card. SanDisk SD memory cards SDHC memory cards2 SDXC memory cards3 2 GB1 4 GB, 8 GB, 16 GB, 32 GB 64 GB, 128 GB TOSHIBA - Panasonic 2 GB1... have been tested and approved for details on a memory card. Approved Memory Cards The following Secure Digital (SD) memory cards have turned off and make sure that the device supports 2 GB cards. 2 SDHC-compliant. If the memory card will be used with an SD Speed Class rating...

Product Manual
Page 48
... battery level is low. Number of Exposures Remaining The number of images that can be taken is displayed. • C is displayed when no memory card is inserted in the internal memory. 26 Step 1 Turn the Camera On 1 Open the monitor and remove the lens cap. • See "Opening and Adjusting the Angle of...
... battery level is low. Number of Exposures Remaining The number of images that can be taken is displayed. • C is displayed when no memory card is inserted in the internal memory. 26 Step 1 Turn the Camera On 1 Open the monitor and remove the lens cap. • See "Opening and Adjusting the Angle of...

Product Manual
Page 57
...saved or while a movie is being recorded. Press all the way Press the shutter-release button all the way to the camera or the memory card. Press the button gently. B Notes About Saving Images and Recording Movies The indicator showing the number of Shooting and Playback 35 Do not ... this could result in loss of data, or in camera shake and blurred images. Do not open the battery-chamber/memory card slot cover or remove the battery or memory card while an indicator is pressed halfway. The Shutter-release Button Press halfway To set focus and exposure (shutter speed and ...
...saved or while a movie is being recorded. Press all the way Press the shutter-release button all the way to the camera or the memory card. Press the button gently. B Notes About Saving Images and Recording Movies The indicator showing the number of Shooting and Playback 35 Do not ... this could result in loss of data, or in camera shake and blurred images. Do not open the battery-chamber/memory card slot cover or remove the battery or memory card while an indicator is pressed halfway. The Shutter-release Button Press halfway To set focus and exposure (shutter speed and ...

Product Manual
Page 65
...-up j Backlighting (shooting non-human subjects) d Backlighting (shooting human subjects) d Other shooting scenes • Depending upon the current image quality setting, image size setting, the memory card used, or shooting condition. • Focus, exposure, and hue are fixed at the subject, the camera automatically selects the optimum scene mode from the list...
...-up j Backlighting (shooting non-human subjects) d Backlighting (shooting human subjects) d Other shooting scenes • Depending upon the current image quality setting, image size setting, the memory card used, or shooting condition. • Focus, exposure, and hue are fixed at the subject, the camera automatically selects the optimum scene mode from the list...

Product Manual
Page 109
... is displayed for more information. See "Using the Screen for Selecting Images" (A88) for a sequence, press the k button to copy images between the internal memory and a memory card. E53 x Choose key picture2 Allows you to change the key picture for images captured in the sequence. C Sequence display options Allows you to select whether...
... is displayed for more information. See "Using the Screen for Selecting Images" (A88) for a sequence, press the k button to copy images between the internal memory and a memory card. E53 x Choose key picture2 Allows you to change the key picture for images captured in the sequence. C Sequence display options Allows you to select whether...

Product Manual
Page 112
... movie is displayed on the shooting screen. • Recording may end before either limit is flashing. B Notes About Movie Recording • Memory cards with an SD Speed Class rating of the image sensor interfere with repeating patterns (fabrics, lattice windows, etc.) may occur in the monitor... while recording movies. The entire movie image may appear skewed. - it from one side of memory card. B Notes About Saving Images and Recording Movies The indicator showing the number of zoom applied, subjects with each other , such as a ...
... movie is displayed on the shooting screen. • Recording may end before either limit is flashing. B Notes About Movie Recording • Memory cards with an SD Speed Class rating of the image sensor interfere with repeating patterns (fabrics, lattice windows, etc.) may occur in the monitor... while recording movies. The entire movie image may appear skewed. - it from one side of memory card. B Notes About Saving Images and Recording Movies The indicator showing the number of zoom applied, subjects with each other , such as a ...
Product Manual
Page 118
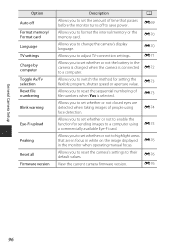
... Allows you to set whether or not to highlight areas that passes E69 before the monitor turns off Format memory/ Format card Language TV settings Charge by computer Toggle Av/Tv selection Reset file numbering Blink warning Eye-Fi upload Peaking Reset all Firmware version Description A Allows ... focus in white on the image displayed E76 in the camera is charged when the camera is selected. Allows you to format the internal memory or the memory card. E70 E71 Allows you to set the amount of time that are detected when taking images of E73 file numbers when Yes is connected...
... Allows you to set whether or not to highlight areas that passes E69 before the monitor turns off Format memory/ Format card Language TV settings Charge by computer Toggle Av/Tv selection Reset file numbering Blink warning Eye-Fi upload Peaking Reset all Firmware version Description A Allows ... focus in white on the image displayed E76 in the camera is charged when the camera is selected. Allows you to format the internal memory or the memory card. E70 E71 Allows you to set the amount of time that are detected when taking images of E73 file numbers when Yes is connected...

Product Manual
Page 119
...) Function Using the Wi-Fi (Wireless LAN) Function Functions That Can Be Performed Using Wi-Fi You can copy the images saved in the camera's memory card and display them on your smart device. Installing the Software on the camera during remote control operation. • The shooting mode is set to A (auto...
...) Function Using the Wi-Fi (Wireless LAN) Function Functions That Can Be Performed Using Wi-Fi You can copy the images saved in the camera's memory card and display them on your smart device. Installing the Software on the camera during remote control operation. • The shooting mode is set to A (auto...

Product Manual
Page 121
C Notes About Security Settings If the camera is inserted in the camera. - When an Eye-Fi card (E75) is installed with the Wi-Fi function without proper security settings (encryption and password), unauthorized third parties may take some time until the SSID ... is disabled. • When Wi-Fi is connected, the battery drains faster than normal. • It may access the network and cause harm. When no memory card is connected to smart device is performed. Use Options of radio waves is prohibited. • When Wi-Fi is connected, Auto off the camera. •...
C Notes About Security Settings If the camera is inserted in the camera. - When an Eye-Fi card (E75) is installed with the Wi-Fi function without proper security settings (encryption and password), unauthorized third parties may take some time until the SSID ... is disabled. • When Wi-Fi is connected, the battery drains faster than normal. • It may access the network and cause harm. When no memory card is connected to smart device is performed. Use Options of radio waves is prohibited. • When Wi-Fi is connected, Auto off the camera. •...

Product Manual
Page 123
... (A102). • If any USB devices that draw power from the computer are connected, disconnect them from the computer, which could damage the camera or memory card. Connection method: Connect a commercially available HDMI cable to the printer's USB port with the included USB cable. 101 Printing images without using a computer E14 If...
... (A102). • If any USB devices that draw power from the computer are connected, disconnect them from the computer, which could damage the camera or memory card. Connection method: Connect a commercially available HDMI cable to the printer's USB port with the included USB cable. 101 Printing images without using a computer E14 If...

Product Manual
Page 125
... 2 starts. B Connecting the USB Cable The connection may not be inserted directly in the camera's internal memory, remove the memory card from third-party suppliers) to select Nikon Transfer 2. 1 Under Import pictures and videos, click Change program. A program selection dialog will be displayed; Connecting the Camera to a TV, Computer, or Printer Transferring Images ...
... 2 starts. B Connecting the USB Cable The connection may not be inserted directly in the camera's internal memory, remove the memory card from third-party suppliers) to select Nikon Transfer 2. 1 Under Import pictures and videos, click Change program. A program selection dialog will be displayed; Connecting the Camera to a TV, Computer, or Printer Transferring Images ...

