L22 / L21 User's Manual
Page 5
...precaution could result in contact with clothing or skin, rinse immediately with wet hands. To avoid damage to the product, be removed with COOLPIX L22/L21. Observe the following precautions when handling batteries for inspection. Observe the following precautions when handling the Battery Chargers (available separately) •... Keep Dry. iii Do not combine old and new batteries or batteries of different makes or types. • If Nikon rechargeable Ni-MH batteries EN-MH2 (EN-MH2-B2 or EN-MH2-B4) are purchased separately, charge and use each of water. ...
...precaution could result in contact with clothing or skin, rinse immediately with wet hands. To avoid damage to the product, be removed with COOLPIX L22/L21. Observe the following precautions when handling batteries for inspection. Observe the following precautions when handling the Battery Chargers (available separately) •... Keep Dry. iii Do not combine old and new batteries or batteries of different makes or types. • If Nikon rechargeable Ni-MH batteries EN-MH2 (EN-MH2-B2 or EN-MH2-B4) are purchased separately, charge and use each of water. ...
L22 / L21 User's Manual
Page 13
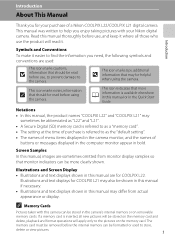
... it. If a memory card is available elsewhere in the camera monitor, and the names of a Nikon COOLPIX L22/COOLPIX L21 digital camera. Illustrations and text displays for COOLPIX L22. The memory card must be shown in this manual if necessary. • Illustrations and text displays ...the camera. Illustrations and Screen Display • Illustrations and text displays shown in this manual, the product names "COOLPIX L22" and "COOLPIX L21" may sometimes be abbreviated as "L22" and "L21". • A Secure Digital (SD) memory card is referred to as a "memory card". • ...
... it. If a memory card is available elsewhere in the camera monitor, and the names of a Nikon COOLPIX L22/COOLPIX L21 digital camera. Illustrations and text displays for COOLPIX L22. The memory card must be shown in this manual if necessary. • Illustrations and text displays ...the camera. Illustrations and Screen Display • Illustrations and text displays shown in this manual, the product names "COOLPIX L22" and "COOLPIX L21" may sometimes be abbreviated as "L22" and "L21". • A Secure Digital (SD) memory card is referred to as a "memory card". • ...
L22 / L21 User's Manual
Page 18
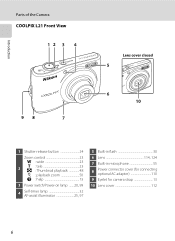
Introduction Parts of the Camera COOLPIX L21 Front View 12 3 4 98 7 Lens cover closed 5 6 10 1 Shutter-release button 24 Zoom control 23 f : wide 23 2 g : tele 23 h : Thumbnail playback 48 i : playback zoom 50 j : help 13 3 Power switch/Power-on lamp ....... 20, 99 4 Self-timer lamp 32 AF-assist illuminator 25, 97 5 Built-in flash 30 6 Lens 114, 124 7 Built-in microphone 55 8 Power connector cover (for connecting optional AC adapter 110 9 Eyelet for camera strap 13 10 Lens cover 112 6
Introduction Parts of the Camera COOLPIX L21 Front View 12 3 4 98 7 Lens cover closed 5 6 10 1 Shutter-release button 24 Zoom control 23 f : wide 23 2 g : tele 23 h : Thumbnail playback 48 i : playback zoom 50 j : help 13 3 Power switch/Power-on lamp ....... 20, 99 4 Self-timer lamp 32 AF-assist illuminator 25, 97 5 Built-in flash 30 6 Lens 114, 124 7 Built-in microphone 55 8 Power connector cover (for connecting optional AC adapter 110 9 Eyelet for camera strap 13 10 Lens cover 112 6
L22 / L21 User's Manual
Page 19
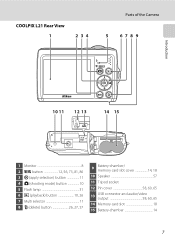
COOLPIX L21 Rear View 1 2 34 Parts of the Camera 5 67 8 9 Introduction 10 11 12 13 14 15 1 Monitor 8 2 d button 12, 56, 73, 81, 86 3 k (apply selection) button 11 4 A (shooting mode) button 10 5 Flash lamp 31 6 c (playback) button 10, 26 7 Multi selector 11 8 l (delete) button 26, 27, 57 9 Battery-chamber/ memory card slot cover 14, 18 10 Speaker 57 11 Tripod socket 12 Pin cover 58, 60, 65 13 USB connector and audio/video output 58, 60, 65 14 Memory card slot 18 15 Battery-chamber 14 7
COOLPIX L21 Rear View 1 2 34 Parts of the Camera 5 67 8 9 Introduction 10 11 12 13 14 15 1 Monitor 8 2 d button 12, 56, 73, 81, 86 3 k (apply selection) button 11 4 A (shooting mode) button 10 5 Flash lamp 31 6 c (playback) button 10, 26 7 Multi selector 11 8 l (delete) button 26, 27, 57 9 Battery-chamber/ memory card slot cover 14, 18 10 Speaker 57 11 Tripod socket 12 Pin cover 58, 60, 65 13 USB connector and audio/video output 58, 60, 65 14 Memory card slot 18 15 Battery-chamber 14 7

L22 / L21 User's Manual
Page 25
... zoom control to set focus and exposure, press the shutter-release button halfway, stopping when you feel resistance. To release the shutter and take picture. COOLPIX L22 COOLPIX L21 Continuous Choose single frame, continuous mode, BSS (camera chooses sharpest shot in camera shake and blurred pictures. Do not use force when pressing the shutter...
... zoom control to set focus and exposure, press the shutter-release button halfway, stopping when you feel resistance. To release the shutter and take picture. COOLPIX L22 COOLPIX L21 Continuous Choose single frame, continuous mode, BSS (camera chooses sharpest shot in camera shake and blurred pictures. Do not use force when pressing the shutter...
L22 / L21 User's Manual
Page 26
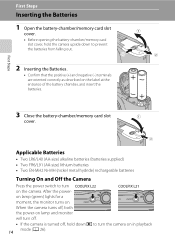
...) lithium batteries • Two EN-MH2 Ni-MH (nickel metal hydride) rechargeable batteries Turning On and Off the Camera Press the power switch to turn COOLPIX L22 COOLPIX L21 on the camera. First Steps Inserting the Batteries 1 Open the battery-chamber/memory card slot 3 cover. • Before opening the battery-chamber/memory card slot...
...) lithium batteries • Two EN-MH2 Ni-MH (nickel metal hydride) rechargeable batteries Turning On and Off the Camera Press the power switch to turn COOLPIX L22 COOLPIX L21 on the camera. First Steps Inserting the Batteries 1 Open the battery-chamber/memory card slot 3 cover. • Before opening the battery-chamber/memory card slot...
L22 / L21 User's Manual
Page 28
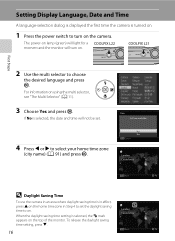
When the daylight saving time setting is turned on. 1 Press the power switch to turn on lamp (green) will light for a COOLPIX L22 moment and the monitor will not be set the daylight saving time to set . To release the daylight saving time setting, press I. 16 London Casablanca ... D Daylight Saving Time To use the camera in an area where daylight saving time is selected, the date and time will turn on the camera. COOLPIX L21 First Steps 2 Use the multi selector to select your home time zone (city name) (A 91) and press k. If No is in effect, press H on the...
When the daylight saving time setting is turned on. 1 Press the power switch to turn on lamp (green) will light for a COOLPIX L22 moment and the monitor will not be set the daylight saving time to set . To release the daylight saving time setting, press I. 16 London Casablanca ... D Daylight Saving Time To use the camera in an area where daylight saving time is selected, the date and time will turn on the camera. COOLPIX L21 First Steps 2 Use the multi selector to select your home time zone (city name) (A 91) and press k. If No is in effect, press H on the...

L22 / L21 User's Manual
Page 32
... that can be stored depends on . Batteries low. Prepare to choose G and press k. • The camera enters G (easy auto) mode. COOLPIX L21 Basic Photography and Playback: Easy Auto Mode 3 Press the multi selector HI to replace batteries. Description The battery level is set at this time. The... lens will turn on lamp (green) will light COOLPIX L22 for a moment and the monitor will extend at the time of purchase. Replace with new batteries. 4 Number of exposures remaining Number ...
... that can be stored depends on . Batteries low. Prepare to choose G and press k. • The camera enters G (easy auto) mode. COOLPIX L21 Basic Photography and Playback: Easy Auto Mode 3 Press the multi selector HI to replace batteries. Description The battery level is set at this time. The... lens will turn on lamp (green) will light COOLPIX L22 for a moment and the monitor will extend at the time of purchase. Replace with new batteries. 4 Number of exposures remaining Number ...
L22 / L21 User's Manual
Page 35
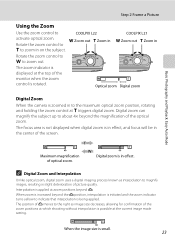
... confirmation of optical zoom. When the image size is in slight deterioration of the optical zoom. f Zoom out g Zoom in on the subject. COOLPIX L21 f Zoom out g Zoom in Rotate the zoom control to f to zoom in Rotate the zoom control to g to zoom out. The focus area... the maximum optical zoom position, rotating and holding the zoom control at the top of the screen. The position of V moves to COOLPIX L22 activate optical zoom. Maximum magnification of the zoom positions at which shooting without interpolation is applied at the current image mode setting. Basic...
... confirmation of optical zoom. When the image size is in slight deterioration of the optical zoom. f Zoom out g Zoom in on the subject. COOLPIX L21 f Zoom out g Zoom in Rotate the zoom control to f to zoom in Rotate the zoom control to g to zoom out. The focus area... the maximum optical zoom position, rotating and holding the zoom control at the top of the screen. The position of V moves to COOLPIX L22 activate optical zoom. Maximum magnification of the zoom positions at which shooting without interpolation is applied at the current image mode setting. Basic...

L22 / L21 User's Manual
Page 44
... remains lit until the shutter is released is released. The self-timer menu is not applied by pressing k within a few seconds, the selection will blink. COOLPIX L22 COOLPIX L21 32
... remains lit until the shutter is released is released. The self-timer menu is not applied by pressing k within a few seconds, the selection will blink. COOLPIX L22 COOLPIX L21 32
L22 / L21 User's Manual
Page 63
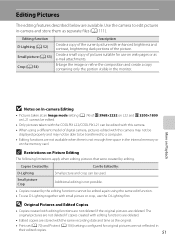
... the editing functions cannot be used. Copies Created By: D-Lighting Can Be Edited By: Small picture and crop can be edited with the COOLPIX L22/COOLPIX L21 can be edited again using a different model of the picture. Editing Pictures The editing features described below are deleted. Editing function D-Lighting ... More on Playback B Notes on In-camera Editing • Pictures taken at an Image mode setting (A 74) of P 3968×2232 on L22 and P 3200×1800 on web pages or as the original. • Print set (A 70) and Protect (A 106) settings configured for original...
... the editing functions cannot be used. Copies Created By: D-Lighting Can Be Edited By: Small picture and crop can be edited with the COOLPIX L22/COOLPIX L21 can be edited again using a different model of the picture. Editing Pictures The editing features described below are deleted. Editing function D-Lighting ... More on Playback B Notes on In-camera Editing • Pictures taken at an Image mode setting (A 74) of P 3968×2232 on L22 and P 3200×1800 on web pages or as the original. • Print set (A 70) and Protect (A 106) settings configured for original...
L22 / L21 User's Manual
Page 66
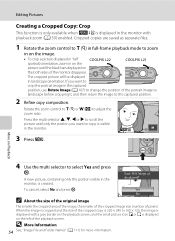
...border on the playback screen, and the small picture icon l or m is displayed on the image. • To crop a picture displayed in "tall" COOLPIX L22 (portrait) orientation, zoom in landscape orientation. Save this image as separate files. 1 Rotate the zoom control to g (i) in full-frame playback mode to ...u is displayed in the monitor, is created. Cropped copies are saved as displayed? The cropped picture will be displayed in on the COOLPIX L21 picture until only the portion you want to adjust the zoom ratio. When the image is cropped and the size of the cropped copy...
...border on the playback screen, and the small picture icon l or m is displayed on the image. • To crop a picture displayed in "tall" COOLPIX L22 (portrait) orientation, zoom in landscape orientation. Save this image as separate files. 1 Rotate the zoom control to g (i) in full-frame playback mode to ...u is displayed in the monitor, is created. Cropped copies are saved as displayed? The cropped picture will be displayed in on the COOLPIX L21 picture until only the portion you want to adjust the zoom ratio. When the image is cropped and the size of the cropped copy...

L22 / L21 User's Manual
Page 70
... the connector at an angle. Connecting to Televisions, Computers and Printers Connecting to a TV Connect the camera to a television using the supplied audio video cable. COOLPIX L22 COOLPIX L21 Connecting to Televisions, Computers and Printers 2 Connect the camera to the TV using an optional audio video cable (AV cable) (A 110) to the video-in...
... the connector at an angle. Connecting to Televisions, Computers and Printers Connecting to a TV Connect the camera to a television using the supplied audio video cable. COOLPIX L22 COOLPIX L21 Connecting to Televisions, Computers and Printers 2 Connect the camera to the TV using an optional audio video cable (AV cable) (A 110) to the video-in...
L22 / L21 User's Manual
Page 71
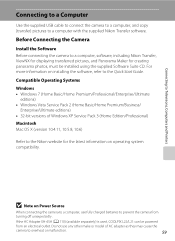
... Pack 3 (Home Edition/Professional) Macintosh Mac OS X (version 10.4.11, 10.5.8, 10.6) Refer to a computer, software, including Nikon Transfer, ViewNX for displaying transferred pictures, and Panorama Maker for the latest information on installing the software, refer to prevent the camera from...and copy (transfer) pictures to overheat or malfunction. 59 If the AC Adapter EH-65A (A 110) (available separately) is used, COOLPIX L22/L21 can be installed using the supplied Software Suite CD. Do not use fully charged batteries to the Quick Start Guide. Compatible Operating Systems...
... Pack 3 (Home Edition/Professional) Macintosh Mac OS X (version 10.4.11, 10.5.8, 10.6) Refer to a computer, software, including Nikon Transfer, ViewNX for displaying transferred pictures, and Panorama Maker for the latest information on installing the software, refer to prevent the camera from...and copy (transfer) pictures to overheat or malfunction. 59 If the AC Adapter EH-65A (A 110) (available separately) is used, COOLPIX L22/L21 can be installed using the supplied Software Suite CD. Do not use fully charged batteries to the Quick Start Guide. Compatible Operating Systems...
L22 / L21 User's Manual
Page 72
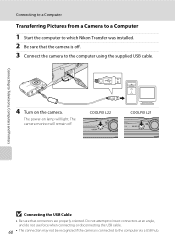
..., Computers and Printers Connecting to a Computer Transferring Pictures from a Camera to a Computer 1 Start the computer to which Nikon Transfer was installed. 2 Be sure that connectors are properly oriented. The camera monitor will light. COOLPIX L22 COOLPIX L21 B Connecting the USB Cable • Be sure that the camera is connected to the computer using the supplied...
..., Computers and Printers Connecting to a Computer Transferring Pictures from a Camera to a Computer 1 Start the computer to which Nikon Transfer was installed. 2 Be sure that connectors are properly oriented. The camera monitor will light. COOLPIX L22 COOLPIX L21 B Connecting the USB Cable • Be sure that the camera is connected to the computer using the supplied...

L22 / L21 User's Manual
Page 77
...Televisions, Computers and Printers 4 Turn on the printer. When disconnecting the USB cable, do not pull the connector at an angle. 65 COOLPIX L22 COOLPIX L21 2 Turn on the camera. • When connected correctly, the PictBridge startup screen (1) is displayed in the camera monitor, then the ...Print selection screen (2) is displayed. 1 COOLPIX L22 2 Print selection COOLPIX L21 15/05 2010 NO. 12 [ 12] B Connecting the Audio Video/USB Cable When connecting the USB cable, be sure that ...
...Televisions, Computers and Printers 4 Turn on the printer. When disconnecting the USB cable, do not pull the connector at an angle. 65 COOLPIX L22 COOLPIX L21 2 Turn on the camera. • When connected correctly, the PictBridge startup screen (1) is displayed in the camera monitor, then the ...Print selection screen (2) is displayed. 1 COOLPIX L22 2 Print selection COOLPIX L21 15/05 2010 NO. 12 [ 12] B Connecting the Audio Video/USB Cable When connecting the USB cable, be sure that ...
L22 / L21 User's Manual
Page 100
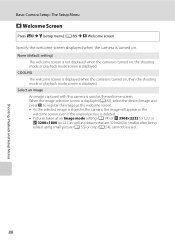
... deleted. • Pictures taken at an Image mode setting (A 74) of P 3968×2232 for L22 or P 3200×1800 for L21, as well as the welcome screen. the shooting mode or playback mode screen is displayed. COOLPIX The welcome screen is displayed when the camera is turned on, then the shooting mode...
... deleted. • Pictures taken at an Image mode setting (A 74) of P 3968×2232 for L22 or P 3200×1800 for L21, as well as the welcome screen. the shooting mode or playback mode screen is displayed. COOLPIX The welcome screen is displayed when the camera is turned on, then the shooting mode...

L22 / L21 User's Manual
Page 136
...145mm lens in 35mm [135] format f/3.1-6.7 7 elements in 6 groups Up to 4× COOLPIX L22: angle of view equivalent to that of approx. 536mm lens in 35mm [135] format COOLPIX L21: angle of view equivalent to that of approx. 580mm lens in ., approx.230k-dot, ...98% horizontal and 98% vertical (Compared to actual picture) Approx. 100% horizontal and 100% vertical (Compared to ∞ (W); Specifications Nikon COOLPIX L22/COOLPIX L21 Digital Camera Type Effective pixels Image sensor Lens Focal length f/-number Construction Digital zoom Vibration reduction Autofocus (AF) Focus range (from lens) ...
...145mm lens in 35mm [135] format f/3.1-6.7 7 elements in 6 groups Up to 4× COOLPIX L22: angle of view equivalent to that of approx. 536mm lens in 35mm [135] format COOLPIX L21: angle of view equivalent to that of approx. 580mm lens in ., approx.230k-dot, ...98% horizontal and 98% vertical (Compared to actual picture) Approx. 100% horizontal and 100% vertical (Compared to ∞ (W); Specifications Nikon COOLPIX L22/COOLPIX L21 Digital Camera Type Effective pixels Image sensor Lens Focal length f/-number Construction Digital zoom Vibration reduction Autofocus (AF) Focus range (from lens) ...

L22 / L21 User's Manual
Page 137
...) Shutter Speed Internal memory (Approx. 19 MB), Secure Digital (SD) memory cards DCF, Exif 2.2, and DPOF compliant Still images: JPEG Movies: AVI (Motion-JPEG compliant) COOLPIX L22: • 12M (High) [4000 × 3000P] • 12M [4000 × 3000] • 8M [3264 × 2448] • 5M [2592 × ...1944] • 3M [2048 × 1536] • PC [1024 × 768] • VGA [640 × 480] • 16:9 [3968 × 2232] COOLPIX L21: • 8M (High) [3264 × 2448P] • 8M [3264 × 2448] • 5M [2592 × 1944] • 3M [2048 × 1536] • PC ...
...) Shutter Speed Internal memory (Approx. 19 MB), Secure Digital (SD) memory cards DCF, Exif 2.2, and DPOF compliant Still images: JPEG Movies: AVI (Motion-JPEG compliant) COOLPIX L22: • 12M (High) [4000 × 3000P] • 12M [4000 × 3000] • 8M [3264 × 2448] • 5M [2592 × ...1944] • 3M [2048 × 1536] • PC [1024 × 768] • VGA [640 × 480] • 16:9 [3968 × 2232] COOLPIX L21: • 8M (High) [3264 × 2448P] • 8M [3264 × 2448] • 5M [2592 × 1944] • 3M [2048 × 1536] • PC ...

L22 / L21 User's Manual
Page 138
... when using EN-MH2 batteries Dimensions (W × H × D) COOLPIX L22: Approx. 97.7 × 60.5 × 28.3 mm (3.9 × 2.4 × 1.2 in.) (excluding projections) COOLPIX L21: Approx. 92 × 61.1 × 28.3 mm (3.7 × 2.4 × 1.2 in.) (excluding projections) Weight COOLPIX L22: Approx. 183 g (6.5 oz.) (including battery and SD memory card) COOLPIX L21: Approx. 169 g (6.0 oz.) (including battery and SD memory...
... when using EN-MH2 batteries Dimensions (W × H × D) COOLPIX L22: Approx. 97.7 × 60.5 × 28.3 mm (3.9 × 2.4 × 1.2 in.) (excluding projections) COOLPIX L21: Approx. 92 × 61.1 × 28.3 mm (3.7 × 2.4 × 1.2 in.) (excluding projections) Weight COOLPIX L22: Approx. 183 g (6.5 oz.) (including battery and SD memory card) COOLPIX L21: Approx. 169 g (6.0 oz.) (including battery and SD memory...


