Instruction Manual
Page 1
(E) INSTRUCTION MANUAL E
(E) INSTRUCTION MANUAL E
Instruction Manual
Page 2
...a natural looking flash result. Indicates pages for complete details on getting the most from your new Nikon FM3A camera, and would like to use during Aperture-Priority Auto Exposure operation. Your new Nikon FM3A features a Manual Exposure mode for the desired depth of exposure, as well as requirements and... restrictions. Symbols used in this Nikon FM3A camera. Aperture Priority mode lets you adjust the aperture for total control of field while the shutter speed is fully exhausted, all...
...a natural looking flash result. Indicates pages for complete details on getting the most from your new Nikon FM3A camera, and would like to use during Aperture-Priority Auto Exposure operation. Your new Nikon FM3A features a Manual Exposure mode for the desired depth of exposure, as well as requirements and... restrictions. Symbols used in this Nikon FM3A camera. Aperture Priority mode lets you adjust the aperture for total control of field while the shutter speed is fully exhausted, all...
Instruction Manual
Page 3
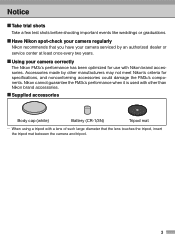
... the FM3A's performance when it is used with a lens of such large diameter that you have your camera correctly The Nikon FM3A's performance has been optimized for specifications, and nonconforming accessories could damage the FM3A's components. Accessories made by an... authorized dealer or service center at least once every two years. Using your camera serviced by other than Nikon brand accessories. When using a tripod with other manufacturers may not meet Nikon's criteria for use with Nikon brand accessories. Supplied accessories Body cap (white) Battery (CR-1/3N) Tripod mat...
... the FM3A's performance when it is used with a lens of such large diameter that you have your camera correctly The Nikon FM3A's performance has been optimized for specifications, and nonconforming accessories could damage the FM3A's components. Accessories made by an... authorized dealer or service center at least once every two years. Using your camera serviced by other than Nikon brand accessories. When using a tripod with other manufacturers may not meet Nikon's criteria for use with Nikon brand accessories. Supplied accessories Body cap (white) Battery (CR-1/3N) Tripod mat...
Instruction Manual
Page 4
Contents 1 Prior to Use Getting Started 2 Symbols used in this manual 2 Notice 3 Camera Parts (Body, Viewfinder indications 6 2 Basic Operations for Shooting 9 Installing Batteries 10 Checking the Battery Power 11 Attaching/Detaching a Lens 12 Loading Film 13 Setting the Film Speed (DX-Coded Film 15 Holding the Camera (How to press the shutter-release button) ------- 16 Focusing 17 Shooting 18 Aperture-Priority Auto Exposure Mode 18 Manual Exposure Mode 20 Rewinding the Film 22 4
Contents 1 Prior to Use Getting Started 2 Symbols used in this manual 2 Notice 3 Camera Parts (Body, Viewfinder indications 6 2 Basic Operations for Shooting 9 Installing Batteries 10 Checking the Battery Power 11 Attaching/Detaching a Lens 12 Loading Film 13 Setting the Film Speed (DX-Coded Film 15 Holding the Camera (How to press the shutter-release button) ------- 16 Focusing 17 Shooting 18 Aperture-Priority Auto Exposure Mode 18 Manual Exposure Mode 20 Rewinding the Film 22 4
Instruction Manual
Page 5
... Setting 40 Depth of Field 41 Light-Metering Methods 41 Lens Compatibility 42 Optional Accessories 44 Changing the Focusing Screen 46 Tips on Handling the Camera and Batteries 48 Glossary 50 Specifications 54 5
... Setting 40 Depth of Field 41 Light-Metering Methods 41 Lens Compatibility 42 Optional Accessories 44 Changing the Focusing Screen 46 Tips on Handling the Camera and Batteries 48 Glossary 50 Specifications 54 5
Instruction Manual
Page 6
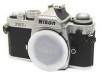
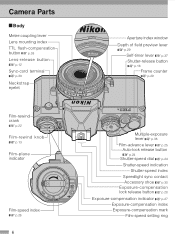
Camera Parts Body Meter-coupling lever Lens mounting index TTL flash-compensation button p.33 Nikon Lens-release button p.12 Sync-cord terminal p.30 R O K 45mm 1 NIK 1 m Nikon Neckstrap eyelet KO :2.8P Aperture index window Depth of field preview lever p.29 Self-timer lever p.37 Shutter-release button p.16 Frame counter p.29 R 45m ...
Camera Parts Body Meter-coupling lever Lens mounting index TTL flash-compensation button p.33 Nikon Lens-release button p.12 Sync-cord terminal p.30 R O K 45mm 1 NIK 1 m Nikon Neckstrap eyelet KO :2.8P Aperture index window Depth of field preview lever p.29 Self-timer lever p.37 Shutter-release button p.16 Frame counter p.29 R 45m ...
Instruction Manual
Page 7
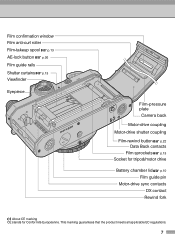
Film confirmation window Film anti-curl roller Film-takeup spool p.13 AE-lock button p.36 Film guide rails Shutter curtains p.13 Viewfinder Eyepiece Film-pressure plate Camera back Motor-drive coupling Motor-drive shutter coupling Film-rewind button p.22 Data Back contacts Film sprockets p.13 Socket for tripod/motor drive Battery chamber lid p.10 Film guide pin Motor-drive sync contacts DX contact Rewind fork About CE marking CE stands for Conformité Européenne. This marking guarantees that the product meets all applicable EC regulations. 7
Film confirmation window Film anti-curl roller Film-takeup spool p.13 AE-lock button p.36 Film guide rails Shutter curtains p.13 Viewfinder Eyepiece Film-pressure plate Camera back Motor-drive coupling Motor-drive shutter coupling Film-rewind button p.22 Data Back contacts Film sprockets p.13 Socket for tripod/motor drive Battery chamber lid p.10 Film guide pin Motor-drive sync contacts DX contact Rewind fork About CE marking CE stands for Conformité Européenne. This marking guarantees that the product meets all applicable EC regulations. 7
Instruction Manual
Page 8
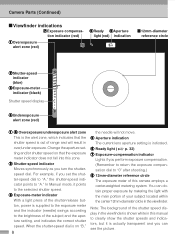
... (Remember to return the exposure compensation dial to "0" after shooting.) 8 12mm-diameter reference circle The exposure meter of this camera employs a center-weighted metering system. In Manual mode, it is actually transparent and you can obtain proper exposure by metering the..., and indicates the correct shutter speed. When the shutter-speed dial is on "B," 8 the needle will result in the viewfinder. Camera Parts (Continued) Viewfinder indications 7Exposure compensation indicator (red) 1Overexposure alert zone (red) 6Ready 5Aperture light (red) indication 812mm-diameter reference...
... (Remember to return the exposure compensation dial to "0" after shooting.) 8 12mm-diameter reference circle The exposure meter of this camera employs a center-weighted metering system. In Manual mode, it is actually transparent and you can obtain proper exposure by metering the..., and indicates the correct shutter speed. When the shutter-speed dial is on "B," 8 the needle will result in the viewfinder. Camera Parts (Continued) Viewfinder indications 7Exposure compensation indicator (red) 1Overexposure alert zone (red) 6Ready 5Aperture light (red) indication 812mm-diameter reference...
Instruction Manual
Page 9
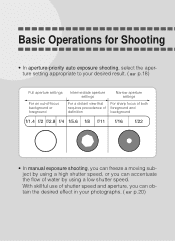
Basic Operations for Shooting • In aperture-priority auto exposure shooting, select the aperture setting appropriate to your photographs. ( p.20) With skillful use of shutter speed and aperture, you can obtain the desired effect in your desired result. ( p.18) Full aperture settings For an out-of-focus background or foreground Intermediate aperture settings Narrow aperture settings For a distant view that For sharp focus of both requires precedence of foreground and definition background • In manual exposure shooting, you can freeze a moving subject by using a high ...
Basic Operations for Shooting • In aperture-priority auto exposure shooting, select the aperture setting appropriate to your photographs. ( p.20) With skillful use of shutter speed and aperture, you can obtain the desired effect in your desired result. ( p.18) Full aperture settings For an out-of-focus background or foreground Intermediate aperture settings Narrow aperture settings For a distant view that For sharp focus of both requires precedence of foreground and definition background • In manual exposure shooting, you can freeze a moving subject by using a high ...
Instruction Manual
Page 10
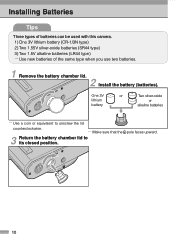
... that the + pole faces upward. 3 Return the battery chamber lid to unscrew the lid counterclockwise. ... Use new batteries of batteries can be used with this camera. 1) One 3V lithium battery (CR-1/3N type) 2) Two 1.55V silver-oxide batteries (SR44 type) 3) Two 1.5V alkaline batteries (LR44 type) ... One 3V lithium battery or...
... that the + pole faces upward. 3 Return the battery chamber lid to unscrew the lid counterclockwise. ... Use new batteries of batteries can be used with this camera. 1) One 3V lithium battery (CR-1/3N type) 2) Two 1.55V silver-oxide batteries (SR44 type) 3) Two 1.5V alkaline batteries (LR44 type) ... One 3V lithium battery or...
Instruction Manual
Page 11
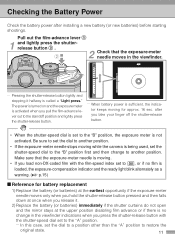
... press the shutter-release button with the shutter-speed dial set to the "B" position, the exposure meter is sufficient, the indicator keeps moving while the camera is set to the "A" position. ... Make sure that the exposure-meter needle moves in the viewfinder indications when you release it halfway is called a "Light...
... press the shutter-release button with the shutter-speed dial set to the "B" position, the exposure meter is sufficient, the indicator keeps moving while the camera is set to the "A" position. ... Make sure that the exposure-meter needle moves in the viewfinder indications when you release it halfway is called a "Light...
Instruction Manual
Page 12
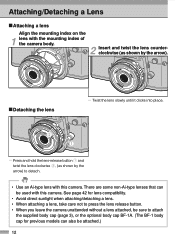
Attaching/Detaching a Lens Attaching a lens Align the mounting index on the 1 lens with the mounting index of the camera body. 2 Insert and twist the lens counterclockwise (as shown by the arrow). 51 Detaching the lens 5 1.2 ... Press and hold the lens-release button 1 and twist ...; Avoid direct sunlight when attaching/detaching a lens. • When attaching a lens, take care not to press the lens release button. • When you leave the camera unattended without a lens attached, be sure to detach. • Use an Ai-type lens with this...
Attaching/Detaching a Lens Attaching a lens Align the mounting index on the 1 lens with the mounting index of the camera body. 2 Insert and twist the lens counterclockwise (as shown by the arrow). 51 Detaching the lens 5 1.2 ... Press and hold the lens-release button 1 and twist ...; Avoid direct sunlight when attaching/detaching a lens. • When attaching a lens, take care not to press the lens release button. • When you leave the camera unattended without a lens attached, be sure to detach. • Use an Ai-type lens with this...

Instruction Manual
Page 13
...-takeup spool inward with your fingers or the film leader. 13 When loading/un- Loading Film Tips When you lift the film-rewind knob, the camera back will open. 3 Insert the film leader into one of the slots of the film-takeup spool. 4 Fit the film sprocket holes of the film... the latch is in the slot such that the film sprocket holes of the film are very thin. When you use DX-coded film, the camera automatically detects the film speed and makes the appropriate setting. 1 Open the camera back. 2 Insert a roll of film 1 and push the rewind knob 2 back down. ...
...-takeup spool inward with your fingers or the film leader. 13 When loading/un- Loading Film Tips When you lift the film-rewind knob, the camera back will open. 3 Insert the film leader into one of the slots of the film-takeup spool. 4 Fit the film sprocket holes of the film... the latch is in the slot such that the film sprocket holes of the film are very thin. When you use DX-coded film, the camera automatically detects the film speed and makes the appropriate setting. 1 Open the camera back. 2 Insert a roll of film 1 and push the rewind knob 2 back down. ...
Instruction Manual
Page 14
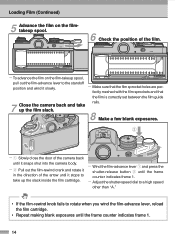
... the film sprockets and that the film sprocket holes are per- Make sure that the film is correctly set between the film guide 7 Close the camera back and take up the film slack. Adjust the shutter-speed dial to a high speed other than "A." • If the film-rewind knob... blank exposures until the frame counter indicates frame 1. ... rails. 8 Make a few blank exposures. ... 1 Slowly close the door of the camera back until it snaps shut into the camera body. ... 2 Pull out the film-rewind crank and rotate it in the direction of the film. ... Wind the film-advance lever 1 and...
... the film sprockets and that the film sprocket holes are per- Make sure that the film is correctly set between the film guide 7 Close the camera back and take up the film slack. Adjust the shutter-speed dial to a high speed other than "A." • If the film-rewind knob... blank exposures until the frame counter indicates frame 1. ... rails. 8 Make a few blank exposures. ... 1 Slowly close the door of the camera back until it snaps shut into the camera body. ... 2 Pull out the film-rewind crank and rotate it in the direction of the film. ... Wind the film-advance lever 1 and...
Instruction Manual
Page 15
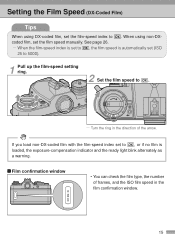
Turn the ring in the film confirmation window. 15 When the film-speed index is set to , the film speed is automatically set to . ... If you load non-DX-coded film with the film-speed index set (ISO 25 to 5000). 1 Pull up the film-speed setting ring. 2 Set the film speed to , or if no film is loaded, the exposure-compensation indicator and the ready light blink alternately as a warning. Film confirmation window • You can check the film type, the number of frames, and the ISO film speed in the direction of the arrow. Setting the Film Speed (DX-Coded Film) Tips When ...
Turn the ring in the film confirmation window. 15 When the film-speed index is set to , the film speed is automatically set to . ... If you load non-DX-coded film with the film-speed index set (ISO 25 to 5000). 1 Pull up the film-speed setting ring. 2 Set the film speed to , or if no film is loaded, the exposure-compensation indicator and the ready light blink alternately as a warning. Film confirmation window • You can check the film type, the number of frames, and the ISO film speed in the direction of the arrow. Setting the Film Speed (DX-Coded Film) Tips When ...
Instruction Manual
Page 16
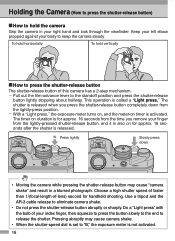
...the meter-on for approx. 16 seconds from the time you press the shutter-release button completely down • Moving the camera while pressing the shutter-release button may cause camera shake. • When the shutter-speed dial is set to "B," the exposure meter is activated. Use a tripod and the... elbow propped against your right hand and look through the viewfinder. Choose a high shutter speed of faster than 1/(focal-length-of this camera has a 2-step mechanism. ... The timer on duration is for approx. 16 seconds after the shutter is released. Pressing abruptly may cause...
...the meter-on for approx. 16 seconds from the time you press the shutter-release button completely down • Moving the camera while pressing the shutter-release button may cause camera shake. • When the shutter-speed dial is set to "B," the exposure meter is activated. Use a tripod and the... elbow propped against your right hand and look through the viewfinder. Choose a high shutter speed of faster than 1/(focal-length-of this camera has a 2-step mechanism. ... The timer on duration is for approx. 16 seconds after the shutter is released. Pressing abruptly may cause...
Instruction Manual
Page 17
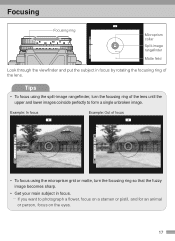
Focusing Focusing ring 4000 2000 1000 500 250 125 60 30 15 8 4 2 1 B Microprism collar Split-image rangefinder Matte field Look through the viewfinder and put the subject in focus by rotating the focusing ring of focus • To focus using the split-image rangefinder, turn the focusing ring so that the fuzzy image becomes sharp. • Get your main subject in focus. ... Example: In focus Example: Out of the lens. If you want to form a single unbroken image. Tips • To focus using the microprism grid or matte, turn the focusing ring of the lens until the upper and ...
Focusing Focusing ring 4000 2000 1000 500 250 125 60 30 15 8 4 2 1 B Microprism collar Split-image rangefinder Matte field Look through the viewfinder and put the subject in focus by rotating the focusing ring of focus • To focus using the split-image rangefinder, turn the focusing ring so that the fuzzy image becomes sharp. • Get your main subject in focus. ... Example: In focus Example: Out of the lens. If you want to form a single unbroken image. Tips • To focus using the microprism grid or matte, turn the focusing ring of the lens until the upper and ...
Instruction Manual
Page 18
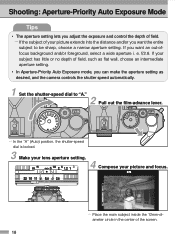
... shutter-speed dial is locked. 3 Make your lens aperture setting. 4 Compose your subject has little or no depth of field, such as desired, and the camera controls the shutter speed automatically. 1 Set the shutter-speed dial to be sharp, choose a narrow aperture setting. If you want an out-offocus background and...
... shutter-speed dial is locked. 3 Make your lens aperture setting. 4 Compose your subject has little or no depth of field, such as desired, and the camera controls the shutter speed automatically. 1 Set the shutter-speed dial to be sharp, choose a narrow aperture setting. If you want an out-offocus background and...
Instruction Manual
Page 19
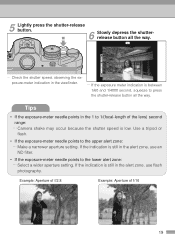
... to 1/(focal-length of f/16 19 If the indication is low. Example: Aperture of f/2.8 Example: Aperture of the lens) second range: ... Select a wider aperture setting. Camera shake may occur because the shutter speed is still in the 1 to the upper alert zone: ... If the indication is between 1/60 and 1/4000 second...
... to 1/(focal-length of f/16 19 If the indication is low. Example: Aperture of f/2.8 Example: Aperture of the lens) second range: ... Select a wider aperture setting. Camera shake may occur because the shutter speed is still in the 1 to the upper alert zone: ... If the indication is between 1/60 and 1/4000 second...
Instruction Manual
Page 20
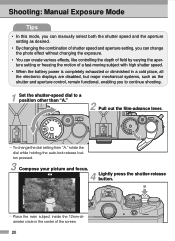
Place the main subject inside the 12mm-diameter circle in the center of a fast-moving subject with high shutter speed. • When the battery power is completely exhausted or diminished in a cold place, all the electronic displays are disabled, but major mechanical systems, such as the shutter and aperture control, remain functional, enabling you can change the dial setting from "A," rotate the dial while holding the auto-lock release button pressed. 3 Compose your picture and focus. 4 Lightly press the shutter-release button. ... Shooting: Manual Exposure Mode Tips • In this ...
Place the main subject inside the 12mm-diameter circle in the center of a fast-moving subject with high shutter speed. • When the battery power is completely exhausted or diminished in a cold place, all the electronic displays are disabled, but major mechanical systems, such as the shutter and aperture control, remain functional, enabling you can change the dial setting from "A," rotate the dial while holding the auto-lock release button pressed. 3 Compose your picture and focus. 4 Lightly press the shutter-release button. ... Shooting: Manual Exposure Mode Tips • In this ...