N7T-106 Quick Start Quide
Page 1
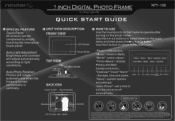
...'',button to operate after turning on the photo frame. In no event will Nextar be liable for any indirect, incidental, special or consequential damages to you for any digital media-based storage device, data should be completed by you . Some countries/states do not allow the limitations or exclusion of such damages. 7 INCH DIGITAL PHOTO FRAME ,et t4emAtti; Photo Music Movie Calendar Clock "Photo+Music"-display Photo+Music Setup Alarm Auto-Power Photos with any lost profits, lost savings...
...'',button to operate after turning on the photo frame. In no event will Nextar be liable for any indirect, incidental, special or consequential damages to you for any digital media-based storage device, data should be completed by you . Some countries/states do not allow the limitations or exclusion of such damages. 7 INCH DIGITAL PHOTO FRAME ,et t4emAtti; Photo Music Movie Calendar Clock "Photo+Music"-display Photo+Music Setup Alarm Auto-Power Photos with any lost profits, lost savings...

N7T-106 User Manual
Page 2
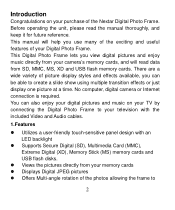
Content Introduction 2 1.Features 2 2.Packaging Check List 3 3.Specifications 3 Getting Started 4 How to Use 7 1.Viewing Photos 7 2.Listening to MP3s 8 3.Displaying Photos with MP3 Background Music 9 4.Watching Videos 9 5.Setting the Time 10 5.1 Calendar 10 5.2 Clock 11 5.3 Alarm 11 5.4 Auto-Power 11 6.Setup 12 6.1 Photo Setting 12 6.2 Auto Play 13 6.3 Display Setup 14 6.4 Custom Setup 15 6.5 Exit 16 Care and Maintenance 17 1
Content Introduction 2 1.Features 2 2.Packaging Check List 3 3.Specifications 3 Getting Started 4 How to Use 7 1.Viewing Photos 7 2.Listening to MP3s 8 3.Displaying Photos with MP3 Background Music 9 4.Watching Videos 9 5.Setting the Time 10 5.1 Calendar 10 5.2 Clock 11 5.3 Alarm 11 5.4 Auto-Power 11 6.Setup 12 6.1 Photo Setting 12 6.2 Auto Play 13 6.3 Display Setup 14 6.4 Custom Setup 15 6.5 Exit 16 Care and Maintenance 17 1
N7T-106 User Manual
Page 3
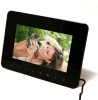
... included Video and Audio cables. 1.Features Utilizes a user-friendly touch-sensitive panel design with an LED backlight Supports Secure Digital (SD), Multimedia Card (MMC), Extreme Digital (XD), Memory Stick (MS) memory cards and USB flash disks. Views the pictures directly from your camera's memory cards, and will help you view digital pictures and enjoy music directly from your memory cards Displays Digital JPEG pictures Offers Multi-angle rotation of your Digital Photo Frame. There are a wide variety of the Nextar Digital Photo Frame...
... included Video and Audio cables. 1.Features Utilizes a user-friendly touch-sensitive panel design with an LED backlight Supports Secure Digital (SD), Multimedia Card (MMC), Extreme Digital (XD), Memory Stick (MS) memory cards and USB flash disks. Views the pictures directly from your camera's memory cards, and will help you view digital pictures and enjoy music directly from your memory cards Displays Digital JPEG pictures Offers Multi-angle rotation of your Digital Photo Frame. There are a wide variety of the Nextar Digital Photo Frame...
N7T-106 User Manual
Page 4
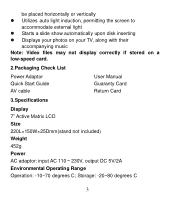
... vertically Utilizes auto light induction, permitting the screen to accommodate external light Starts a slide show automatically upon disk inserting Displays your photos on your TV, along with their accompanying music Note: Video files may not display correctly if stored on a low-speed card. 2.Packaging Check List Power Adaptor Quick Start Guide AV cable User Manual Guaranty Card Return Card 3.Specifications Display 7" Active Matrix LCD Size 220L×150W×25Dmm(stand not included) Weight...
... vertically Utilizes auto light induction, permitting the screen to accommodate external light Starts a slide show automatically upon disk inserting Displays your photos on your TV, along with their accompanying music Note: Video files may not display correctly if stored on a low-speed card. 2.Packaging Check List Power Adaptor Quick Start Guide AV cable User Manual Guaranty Card Return Card 3.Specifications Display 7" Active Matrix LCD Size 220L×150W×25Dmm(stand not included) Weight...
N7T-106 User Manual
Page 5
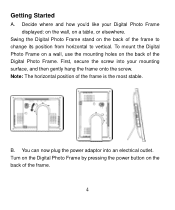
... the Digital Photo Frame stand on the back of the Digital Photo Frame. Note: The horizontal position of the frame to change its position from horizontal to vertical. You can now plug the power adaptor into your Digital Photo Frame displayed: on the wall, on the back of the frame. 4 Turn on the Digital Photo Frame by pressing the power button on the back of the frame is the most stable. Getting Started...
... the Digital Photo Frame stand on the back of the Digital Photo Frame. Note: The horizontal position of the frame to change its position from horizontal to vertical. You can now plug the power adaptor into your Digital Photo Frame displayed: on the wall, on the back of the frame. 4 Turn on the Digital Photo Frame by pressing the power button on the back of the frame is the most stable. Getting Started...
N7T-106 User Manual
Page 6
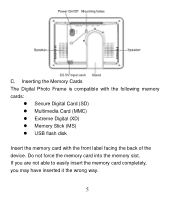
Do not force the memory card into the memory slot. Inserting the Memory Cards The Digital Photo Frame is compatible with the following memory cards: Secure Digital Card (SD) Multimedia Card (MMC) Extreme Digital (XD) Memory Stick (MS) USB flash disk Insert the memory card with the front label facing the back of the device. If you are not able to easily insert the memory card completely, you may have inserted it the wrong way. 5 C.
Do not force the memory card into the memory slot. Inserting the Memory Cards The Digital Photo Frame is compatible with the following memory cards: Secure Digital Card (SD) Multimedia Card (MMC) Extreme Digital (XD) Memory Stick (MS) USB flash disk Insert the memory card with the front label facing the back of the device. If you are not able to easily insert the memory card completely, you may have inserted it the wrong way. 5 C.
N7T-106 User Manual
Page 7
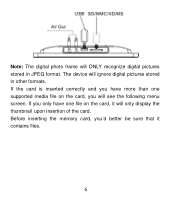
Before inserting the memory card, you'd better be sure that it will only display the thumbnail upon insertion of the card. If the card is inserted correctly and you will see the following menu screen. The device will ignore digital pictures stored in JPEG format. If you only have more than one file on the card, you have one supported media file on the card, it contains files. 6 Note: The digital photo frame will ONLY recognize digital pictures stored in other formats.
Before inserting the memory card, you'd better be sure that it will only display the thumbnail upon insertion of the card. If the card is inserted correctly and you will see the following menu screen. The device will ignore digital pictures stored in JPEG format. If you only have more than one file on the card, you have one supported media file on the card, it contains files. 6 Note: The digital photo frame will ONLY recognize digital pictures stored in other formats.
N7T-106 User Manual
Page 8
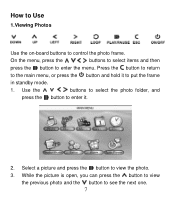
Select a picture and press the button to control the photo frame. How to Use 1.Viewing Photos Use the on-board buttons to view the photo. 3. While the picture is open, you can press the button to view the previous photo and the button to enter it to enter the menu. Use the buttons to select the photo folder, and press the button to see the next one. 7 Press the button to return to the main menu, or press the button and hold it . 2. On the menu, press the buttons to select items and then press the button to put the frame in standby mode. 1.
Select a picture and press the button to control the photo frame. How to Use 1.Viewing Photos Use the on-board buttons to view the photo. 3. While the picture is open, you can press the button to view the previous photo and the button to enter it to enter the menu. Use the buttons to select the photo folder, and press the button to see the next one. 7 Press the button to return to the main menu, or press the button and hold it . 2. On the menu, press the buttons to select items and then press the button to put the frame in standby mode. 1.
N7T-106 User Manual
Page 9
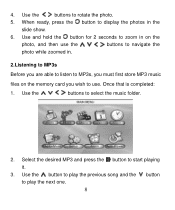
... the button to start playing it. 3. Select the desired MP3 and press the button to play the next one. 8 When ready, press the button to display the photos in . 2.Listening to MP3s Before you are able to listen to MP3s, you must first store MP3 music files on the photo, and then use the buttons to use. 4. Use the buttons to select the music folder. 2. Use the buttons to rotate the photo. 5.
... the button to start playing it. 3. Select the desired MP3 and press the button to play the next one. 8 When ready, press the button to display the photos in . 2.Listening to MP3s Before you are able to listen to MP3s, you must first store MP3 music files on the photo, and then use the buttons to use. 4. Use the buttons to select the music folder. 2. Use the buttons to rotate the photo. 5.
N7T-106 User Manual
Page 10
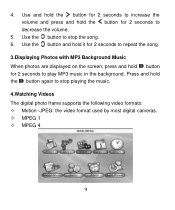
... button again to stop playing the music. 4.Watching Videos The digital photo frame supports the following video formats: Motion -JPEG: the video format used by most digital cameras. MPEG 1 MPEG 4 9 Use and hold the button for 2 seconds to increase the volume and press and hold button for 2 seconds to play MP3 music in the background. Use the button and hold it for 2 seconds to repeat the song. 3.Displaying Photos with MP3 Background Music When photos are displayed on the screen...
... button again to stop playing the music. 4.Watching Videos The digital photo frame supports the following video formats: Motion -JPEG: the video format used by most digital cameras. MPEG 1 MPEG 4 9 Use and hold the button for 2 seconds to increase the volume and press and hold button for 2 seconds to play MP3 music in the background. Use the button and hold it for 2 seconds to repeat the song. 3.Displaying Photos with MP3 Background Music When photos are displayed on the screen...
N7T-106 User Manual
Page 11
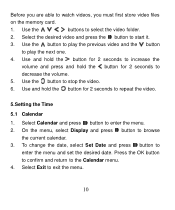
... play the previous video and the button to exit the menu. 10 Use the buttons to stop the video. 6. Use the button to select the video folder. 2. Select Calendar and press button to watch videos, you are able to enter the menu. 2. Before you must first store video files on the memory card. 1. Use and hold the button for 2 seconds to increase the volume and press and hold the button for 2 seconds to repeat the video. 5.Setting the Time 5.1 Calendar...
... play the previous video and the button to exit the menu. 10 Use the buttons to stop the video. 6. Use the button to select the video folder. 2. Select Calendar and press button to watch videos, you are able to enter the menu. 2. Before you must first store video files on the memory card. 1. Use and hold the button for 2 seconds to increase the volume and press and hold the button for 2 seconds to repeat the video. 5.Setting the Time 5.1 Calendar...
N7T-106 User Manual
Page 12
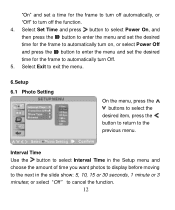
... menu. 5.3 Alarm 1. On the menu, select Power On Enable and press the button to select "On" and set the time for the frame to turn on the alarm function or "Off" to turn off the function. 3. Select Clock and press the button to select 11 Select Auto- Select Power Off Enable and press the button to enter the menu. 2. Power 1. 5.2 Clock 1. On the menu, select Display, press the button to select Clock or Clock & Calendar...
... menu. 5.3 Alarm 1. On the menu, select Power On Enable and press the button to select "On" and set the time for the frame to turn on the alarm function or "Off" to turn off the function. 3. Select Clock and press the button to select 11 Select Auto- Select Power Off Enable and press the button to enter the menu. 2. Power 1. 5.2 Clock 1. On the menu, select Display, press the button to select Clock or Clock & Calendar...
N7T-106 User Manual
Page 13
... select Power Off and press the button to enter the menu and set a time for the frame to automatically turn off the function. 4. Interval Time Use the button to select Interval Time in the slide show: 5, 10, 15 or 30 seconds, 1 minute or 3 minutes; or select "Off" to the next in the Setup menu and choose the amount of time you want photos to display before...
... select Power Off and press the button to enter the menu and set a time for the frame to automatically turn off the function. 4. Interval Time Use the button to select Interval Time in the slide show: 5, 10, 15 or 30 seconds, 1 minute or 3 minutes; or select "Off" to the next in the Setup menu and choose the amount of time you want photos to display before...

N7T-106 User Manual
Page 14
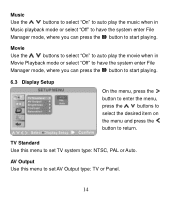
... photo in Photo view; Show Type Use the buttons to select Show Type, and then press the button to enter the menu and set the transition style between the photos of the slide show . Photo Use the buttons to select "On" to auto play the photo when in Thumbnail mode. 13 Transition Effect Use the buttons to select Transition Effect, and then press the button to enter the menu and set...
... photo in Photo view; Show Type Use the buttons to select Show Type, and then press the button to enter the menu and set the transition style between the photos of the slide show . Photo Use the buttons to select "On" to auto play the photo when in Thumbnail mode. 13 Transition Effect Use the buttons to select Transition Effect, and then press the button to enter the menu and set...
N7T-106 User Manual
Page 15
... TV Standard Use this menu to set TV system type: NTSC, PAL or Auto. AV Output Use this menu to start playing. Movie Use the buttons to select "On" to auto play the music when in Movie Playback mode or select "Off" to have the system enter File Manager mode, where you can press the button to start playing. 6.3 Display Setup On the menu, press the button to enter the menu, press the buttons to select...
... TV Standard Use this menu to set TV system type: NTSC, PAL or Auto. AV Output Use this menu to start playing. Movie Use the buttons to select "On" to auto play the music when in Movie Playback mode or select "Off" to have the system enter File Manager mode, where you can press the button to start playing. 6.3 Display Setup On the menu, press the button to enter the menu, press the buttons to select...
N7T-106 User Manual
Page 16
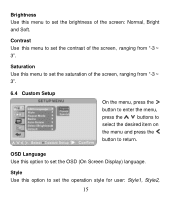
...; 3". 6.4 Custom Setup On the menu, press the button to enter the menu, press the buttons to select the desired item on the menu and press the button to return. Style Use this menu to set the saturation of the screen: Normal, Bright and Soft. Contrast Use this option to set the brightness of the screen, ranging from "-3~ 3". Brightness Use this menu to set the operation style for user: Style1...
...; 3". 6.4 Custom Setup On the menu, press the button to enter the menu, press the buttons to select the desired item on the menu and press the button to return. Style Use this menu to set the saturation of the screen: Normal, Bright and Soft. Contrast Use this option to set the brightness of the screen, ranging from "-3~ 3". Brightness Use this menu to set the operation style for user: Style1...
N7T-106 User Manual
Page 17
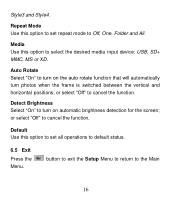
... Style4. Auto Rotate Select "On" to the Main 16 or select "Off" to Off, One, Folder and All. Repeat Mode Use this option to set all operations to select the desired media input device: USB, SD+ MMC, MS or XD. Default Use this option to default status. 6.5 Exit Press the Menu. Media Use this option to set repeat mode to cancel the function. or select "Off" to turn photos when the frame is...
... Style4. Auto Rotate Select "On" to the Main 16 or select "Off" to Off, One, Folder and All. Repeat Mode Use this option to set all operations to select the desired media input device: USB, SD+ MMC, MS or XD. Default Use this option to default status. 6.5 Exit Press the Menu. Media Use this option to set repeat mode to cancel the function. or select "Off" to turn photos when the frame is...
N7T-106 User Manual
Page 18
... compatible with this device's supports? Answer: The Frame will display digital photos that are eager to jarring or strong vibrations. 2. Some cameras allow images to be easily damaged. The panel is made of high humidity or where it . 4. Question/Troubleshooting Guide This chapter presents some troubleshooting for nearly all the digital cameras. If the following guide fails to solve your problem, please do not disassemble the device, make use...
... compatible with this device's supports? Answer: The Frame will display digital photos that are eager to jarring or strong vibrations. 2. Some cameras allow images to be easily damaged. The panel is made of high humidity or where it . 4. Question/Troubleshooting Guide This chapter presents some troubleshooting for nearly all the digital cameras. If the following guide fails to solve your problem, please do not disassemble the device, make use...
N7T-106 User Manual
Page 19
... instructions, may cause undesired operation. These limits are designed to provide reasonable protection against harmful interference in the right direction. This device complies with the limits for a Class B digital device, pursuant to part 15 of the FCC Rules. Operation is the memory card not recognized? Answer: The memory card might be inserted backwards or not be read, please turn off the unit and then turn...
... instructions, may cause undesired operation. These limits are designed to provide reasonable protection against harmful interference in the right direction. This device complies with the limits for a Class B digital device, pursuant to part 15 of the FCC Rules. Operation is the memory card not recognized? Answer: The memory card might be inserted backwards or not be read, please turn off the unit and then turn...

N7T-106 User Manual
Page 21
... otherwise change without any time, without notice. © NEXTAR, INC. All other brand names, product names and trademarks are seriously concerned about environmental protection, and we hope that you share our concern as well. Nextar may reserve the right to change or update this at 1-888-849-0846. 20 All specifications and features are subject to do this manual...
... otherwise change without any time, without notice. © NEXTAR, INC. All other brand names, product names and trademarks are seriously concerned about environmental protection, and we hope that you share our concern as well. Nextar may reserve the right to change or update this at 1-888-849-0846. 20 All specifications and features are subject to do this manual...


