WAG302v2 Reference Manual
Page 10
NETGEAR ProSafe Dual Band Wireless Access Point WAG302v2 Reference Manual VLAN ID ...2-18 SSID and Wireless Security Settings Form 2-19 Configuring the RADIUS Server Settings 2-20 Restricting Wireless Access by MAC Address 2-21 Chapter 3 Management and Information Changing the Administrator Password 3-1 Remote Management ...3-2 Using the Secure Telnet Interface 3-3 Accessing the CLI by Using the Console Port 3-3 CLI Commands ...3-4 Upgrading the Wireless Access Point Firmware 3-4 Configuration File Management...
NETGEAR ProSafe Dual Band Wireless Access Point WAG302v2 Reference Manual VLAN ID ...2-18 SSID and Wireless Security Settings Form 2-19 Configuring the RADIUS Server Settings 2-20 Restricting Wireless Access by MAC Address 2-21 Chapter 3 Management and Information Changing the Administrator Password 3-1 Remote Management ...3-2 Using the Secure Telnet Interface 3-3 Accessing the CLI by Using the Console Port 3-3 CLI Commands ...3-4 Upgrading the Wireless Access Point Firmware 3-4 Configuration File Management...
WAG302v2 Reference Manual
Page 26
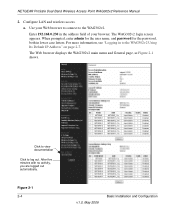
NETGEAR ProSafe Dual Band Wireless Access Point WAG302v2 Reference Manual 2. a. The WAG302v2 login screen appears. For more information, see "Logging in to the WAG302v2. The Web browser displays the WAG302v2 main menu and General page, as Figure 2-1 shows. Enter 192.168.0.230 in lower case letters. Use your browser. Configure LAN and wireless access. Figure 2-1 2-4 v1.0, May 2006 Basic Installation and Configuration When prompted...
NETGEAR ProSafe Dual Band Wireless Access Point WAG302v2 Reference Manual 2. a. The WAG302v2 login screen appears. For more information, see "Logging in to the WAG302v2. The Web browser displays the WAG302v2 main menu and General page, as Figure 2-1 shows. Enter 192.168.0.230 in lower case letters. Use your browser. Configure LAN and wireless access. Figure 2-1 2-4 v1.0, May 2006 Basic Installation and Configuration When prompted...

WAG302v2 Reference Manual
Page 30
... using the default user name of admin and default password of the WAG302v2 main menu. Connect to the WAG302v2 and click Basic Settings in Figure 2-1 on , the Web browser displays the General Information page as shown in the Setup section of password. Enter the Basic Default Settings. NETGEAR ProSafe Dual Band Wireless Access Point WAG302v2 Reference Manual 4. After you log on page 2-4.
... using the default user name of admin and default password of the WAG302v2 main menu. Connect to the WAG302v2 and click Basic Settings in Figure 2-1 on , the Web browser displays the General Information page as shown in the Setup section of password. Enter the Basic Default Settings. NETGEAR ProSafe Dual Band Wireless Access Point WAG302v2 Reference Manual 4. After you log on page 2-4.
WAG302v2 Reference Manual
Page 36
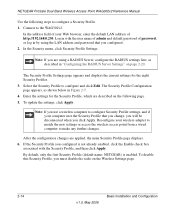
... LAN address and password that you change, you will be disconnected when you must disable the radio on the following steps to make any further changes. Reconfigure your wireless adapter to match the new settings or access the wireless access point from a wired ...Profile Settings. The Security Profile Configuration page appears, as described in with the Security Profile, and then click Apply. NETGEAR ProSafe Dual Band Wireless Access Point WAG302v2 Reference Manual Use the following page. 5. To disable this Security Profile, you click Apply. The Security Profile Settings page...
... LAN address and password that you change, you will be disconnected when you must disable the radio on the following steps to make any further changes. Reconfigure your wireless adapter to match the new settings or access the wireless access point from a wired ...Profile Settings. The Security Profile Configuration page appears, as described in with the Security Profile, and then click Apply. NETGEAR ProSafe Dual Band Wireless Access Point WAG302v2 Reference Manual Use the following page. 5. To disable this Security Profile, you click Apply. The Security Profile Settings page...
WAG302v2 Reference Manual
Page 42
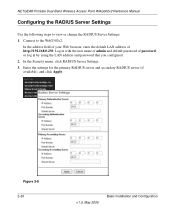
... Security menu, click RADIUS Server Settings. 3. NETGEAR ProSafe Dual Band Wireless Access Point WAG302v2 Reference Manual Configuring the RADIUS Server Settings Use the following steps to the WAG302v2. Log in by using the LAN address and password that you configured. 2. In the address field of your Web browser, enter the default LAN address of password, or log in with the user...
... Security menu, click RADIUS Server Settings. 3. NETGEAR ProSafe Dual Band Wireless Access Point WAG302v2 Reference Manual Configuring the RADIUS Server Settings Use the following steps to the WAG302v2. Log in by using the LAN address and password that you configured. 2. In the address field of your Web browser, enter the default LAN address of password, or log in with the user...

WAG302v2 Reference Manual
Page 47
... menu shown below. 2. Changing the Administrator Password The default password is password. From the WAG302v2 main menu, click Change Password to go to the WAG302v2 Using Its Default IP Address" on page 2-7. Click Apply to save your change this password to use the management and information features of your ProSafe 802.11a/g Dual Band Wireless Access Point WAG302v2. NETGEAR recommends that you change . Figure 3-1 Management...
... menu shown below. 2. Changing the Administrator Password The default password is password. From the WAG302v2 main menu, click Change Password to go to the WAG302v2 Using Its Default IP Address" on page 2-7. Click Apply to save your change this password to use the management and information features of your ProSafe 802.11a/g Dual Band Wireless Access Point WAG302v2. NETGEAR recommends that you change . Figure 3-1 Management...

WAG302v2 Reference Manual
Page 49
... use a secure Telnet client such as the host name. The login name is admin and password is the default password. NETGEAR ProSafe Dual Band Wireless Access Point WAG302v2 Reference Manual Using the Secure Telnet Interface The WAG302v2 includes a secure Telnet command line interface (CLI). You can access the CLI from a secure Telnet client over the Ethernet port or over the Ethernet port...
... use a secure Telnet client such as the host name. The login name is admin and password is the default password. NETGEAR ProSafe Dual Band Wireless Access Point WAG302v2 Reference Manual Using the Secure Telnet Interface The WAG302v2 includes a secure Telnet command line interface (CLI). You can access the CLI from a secure Telnet client over the Ethernet port or over the Ethernet port...
WAG302v2 Reference Manual
Page 52
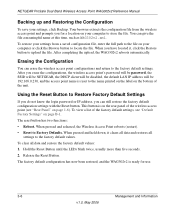
...wireless access point's password will be password, the SSID will be NETGEAR, the DHCP client will be disabled, the default LAN IP address will be 192.168.0.230, and the access point name is reset to the name printed on the label on the bottom of the wireless access point... (see "Default Factory Settings" on your computer to store the file. When pressed and released, the Wireless Access Point reboots (restart). • Reset to the factory default settings. NETGEAR ProSafe Dual Band Wireless Access Point WAG302v2 Reference Manual Backing up and ...
...wireless access point's password will be password, the SSID will be NETGEAR, the DHCP client will be disabled, the default LAN IP address will be 192.168.0.230, and the access point name is reset to the name printed on the label on the bottom of the wireless access point... (see "Default Factory Settings" on your computer to store the file. When pressed and released, the Wireless Access Point reboots (restart). • Reset to the factory default settings. NETGEAR ProSafe Dual Band Wireless Access Point WAG302v2 Reference Manual Backing up and ...
WAG302v2 Reference Manual
Page 75
... sure you diagnose and solve the problem. It takes a few seconds for the power indicator to "Installing the WAG302v2 Wireless Access Point" on page 2-3. • I connected the wireless access point correctly? If it is connected to the section indicated. • Is the WAG302v2 on page 1-5. • Have I cannot remember the wireless access point's configuration password. Go to light up your ProSafe 802.11a/g Dual Band Wireless Access Point WAG302v2.
... sure you diagnose and solve the problem. It takes a few seconds for the power indicator to "Installing the WAG302v2 Wireless Access Point" on page 2-3. • I connected the wireless access point correctly? If it is connected to the section indicated. • Is the WAG302v2 on page 1-5. • Have I cannot remember the wireless access point's configuration password. Go to light up your ProSafe 802.11a/g Dual Band Wireless Access Point WAG302v2.

WAG302v2 Reference Manual
Page 81
... return to their factory defaults. To perform a hard reset, push and hold the reset button for the ProSafe 802.11a/g Dual Band Wireless Access Point WAG302v2. Table B-1 Access Point Default Configuration Settings Feature AP Login User Login URL User Name (case sensitive) Login Password (case sensitive) Ethernet Connection Ethernet MAC Address Port Speed Basic Settings AP Name Country / Region IP...
... return to their factory defaults. To perform a hard reset, push and hold the reset button for the ProSafe 802.11a/g Dual Band Wireless Access Point WAG302v2. Table B-1 Access Point Default Configuration Settings Feature AP Login User Login URL User Name (case sensitive) Login Password (case sensitive) Ethernet Connection Ethernet MAC Address Port Speed Basic Settings AP Name Country / Region IP...
WAG302v2 Reference Manual
Page 98
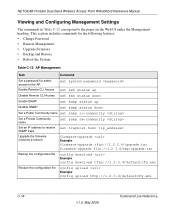
NETGEAR ProSafe Dual Band Wireless Access Point WAG302v2 Reference Manual Viewing and Configuring Management Settings The commands in Table C-12 correspond to the AP. Table C-12 AP Management Task Command Set a password for the following features: • Change Password • Remote Management • Upgrade Firmware • Backup and Restore • Reboot the System. Enable Remote CLI Access set system password... set ssh status up Disable Remote CLI Access set ssh status down Enable SNMP set snmp ...
NETGEAR ProSafe Dual Band Wireless Access Point WAG302v2 Reference Manual Viewing and Configuring Management Settings The commands in Table C-12 correspond to the AP. Table C-12 AP Management Task Command Set a password for the following features: • Change Password • Remote Management • Upgrade Firmware • Backup and Restore • Reboot the System. Enable Remote CLI Access set system password... set ssh status up Disable Remote CLI Access set ssh status down Enable SNMP set snmp ...


