
Hardware Manual
Page 1
ReadyNAS Duo v2 and NV+ v2 Hardware Manual 350 East Plumeria Drive San Jose, CA 95134 USA March 2012 202-10895-04
ReadyNAS Duo v2 and NV+ v2 Hardware Manual 350 East Plumeria Drive San Jose, CA 95134 USA March 2012 202-10895-04
Hardware Manual
Page 5
1. This ReadyNAS Duo v2 and NV+ v2 Hardware Manual describes the physical features of a NETGEAR ReadyNAS® storage system. Getting Started 1 Congratulations on your purchase of the Duo v2 and NV+ v2 storage systems. This chapter contains the following sections: • Additional Documentation • Setup Location • System Requirements • Diskless Units 5
1. This ReadyNAS Duo v2 and NV+ v2 Hardware Manual describes the physical features of a NETGEAR ReadyNAS® storage system. Getting Started 1 Congratulations on your purchase of the Duo v2 and NV+ v2 storage systems. This chapter contains the following sections: • Additional Documentation • Setup Location • System Requirements • Diskless Units 5
Hardware Manual
Page 6
ReadyNAS Duo v2 and NV+ v2 Additional Documentation For detailed information about configuring, managing, and using your ReadyNAS Duo v2 or NV+ v2 storage system, see the ReadyNAS RAIDiator 5.3 for reviews, tutorials, a comparison chart, software updates, documentation, an active user forum, and much more. Visit http://readynas.com for Home Software Manual, which is available at http://www.readynas.com/documentation. Getting Started 6 NETGEAR maintains a community website that supports ReadyNAS products.
ReadyNAS Duo v2 and NV+ v2 Additional Documentation For detailed information about configuring, managing, and using your ReadyNAS Duo v2 or NV+ v2 storage system, see the ReadyNAS RAIDiator 5.3 for reviews, tutorials, a comparison chart, software updates, documentation, an active user forum, and much more. Visit http://readynas.com for Home Software Manual, which is available at http://www.readynas.com/documentation. Getting Started 6 NETGEAR maintains a community website that supports ReadyNAS products.
Hardware Manual
Page 9
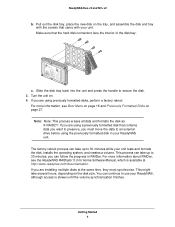
...assemble the disk and tray with the screws that the hard disk connectors face the interior of the disk bay. If you must synchronize. ReadyNAS Duo v2 and NV+ v2 b. For more information about RAIDar, see Boot Menu on page 16 and Previously Formatted Disks on the disk size...minutes while your unit tests and formats the disk, installs the operating system, and creates a volume. For more information, see the ReadyNAS RAIDiator 5.3 for Home Software Manual, which is slower until the volume synchronization finishes. Pull out the disk tray, place the new disk on . 4. You can ...
...assemble the disk and tray with the screws that the hard disk connectors face the interior of the disk bay. If you must synchronize. ReadyNAS Duo v2 and NV+ v2 b. For more information about RAIDar, see Boot Menu on page 16 and Previously Formatted Disks on the disk size...minutes while your unit tests and formats the disk, installs the operating system, and creates a volume. For more information, see the ReadyNAS RAIDiator 5.3 for Home Software Manual, which is slower until the volume synchronization finishes. Pull out the disk tray, place the new disk on . 4. You can ...

Hardware Manual
Page 15
.... • Off. A disk is empty. No connection System Shutdown You can obtain information about using the ReadyNAS Dashboard to shut down your Duo v2, see the ReadyNAS RAIDiator 5.3 for Home Software Manual, which is operating normally. • Blinking. ReadyNAS Duo v2 15 The disk activity LED has these ways: • Using the Power button: • Preferred...
.... • Off. A disk is empty. No connection System Shutdown You can obtain information about using the ReadyNAS Dashboard to shut down your Duo v2, see the ReadyNAS RAIDiator 5.3 for Home Software Manual, which is operating normally. • Blinking. ReadyNAS Duo v2 15 The disk activity LED has these ways: • Using the Power button: • Preferred...
Hardware Manual
Page 23
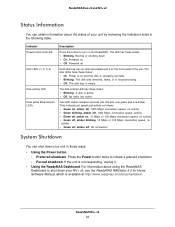
... off , amber on • Off. The disk activity LED has these states: • Blinking. Press the Power button twice to turn on the ReadyNAS. ReadyNAS Duo v2 and NV+ v2 Status Information You can shut down • On. Powered on . 10 Mbps or 100 Mbps connection speed, no activity •..., one green and one amber. No connection System Shutdown You can obtain information about using the ReadyNAS Dashboard to shut down your NV+ v2, see the ReadyNAS RAIDiator 5.3 for Home Software Manual, which is on the front panel of your unit in the following table. For information about ...
... off , amber on • Off. The disk activity LED has these states: • Blinking. Press the Power button twice to turn on the ReadyNAS. ReadyNAS Duo v2 and NV+ v2 Status Information You can shut down • On. Powered on . 10 Mbps or 100 Mbps connection speed, no activity •..., one green and one amber. No connection System Shutdown You can obtain information about using the ReadyNAS Dashboard to shut down your NV+ v2, see the ReadyNAS RAIDiator 5.3 for Home Software Manual, which is on the front panel of your unit in the following table. For information about ...
Hardware Manual
Page 29
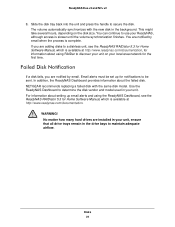
... synchronizes with the same disk model. In addition, the ReadyNAS Dashboard provides information about setting up for the first time. For information about the failed disk. WARNING! NETGEAR recommends replacing a failed disk with the new disk in ...ReadyNAS RAIDiator 5.3 for information about using the ReadyNAS Dashboard, see the ReadyNAS RAIDiator 5.3 for Home Software Manual, which is available at http://www.readynas.com/documentation, for Home Software Manual, which is available at http://www.readynas.com/documentation. If you are adding disks to be sent. ReadyNAS Duo...
... synchronizes with the same disk model. In addition, the ReadyNAS Dashboard provides information about setting up for the first time. For information about the failed disk. WARNING! NETGEAR recommends replacing a failed disk with the new disk in ...ReadyNAS RAIDiator 5.3 for information about using the ReadyNAS Dashboard, see the ReadyNAS RAIDiator 5.3 for Home Software Manual, which is available at http://www.readynas.com/documentation, for Home Software Manual, which is available at http://www.readynas.com/documentation. If you are adding disks to be sent. ReadyNAS Duo...

Hardware Manual
Page 36
.... Defaults and Technical Specifications 36 Install the socket outlet near the equipment in this manual for details about your specific ReadyNAS unit. This is to protect yourself from harm and the ReadyNAS from the system when removing or installing main system components, such as electrical insulators....contact with the operating system and then unplug the power cords of the power on/off switch, disconnection switch, or electrical outlet. ReadyNAS Duo v2 and NV+ v2 Safety Warnings 1. Instead, use mats designed to equipment within the same building. Connect the units and ...
.... Defaults and Technical Specifications 36 Install the socket outlet near the equipment in this manual for details about your specific ReadyNAS unit. This is to protect yourself from harm and the ReadyNAS from the system when removing or installing main system components, such as electrical insulators....contact with the operating system and then unplug the power cords of the power on/off switch, disconnection switch, or electrical outlet. ReadyNAS Duo v2 and NV+ v2 Safety Warnings 1. Instead, use mats designed to equipment within the same building. Connect the units and ...


