
ReadyNAS 3200 Hardware Manual
Page 1
ReadyNAS 3200 Hardware Manual NETGEAR, Inc. 350 East Plumeria Drive San Jose, CA 95134 USA 202-10541-01 v1.1 July 2009
ReadyNAS 3200 Hardware Manual NETGEAR, Inc. 350 East Plumeria Drive San Jose, CA 95134 USA 202-10541-01 v1.1 July 2009
ReadyNAS 3200 Hardware Manual
Page 2
...Please refer to http://kbserver.netgear.com for correct handling. When used near a radio or TV receiver, it may occur due to certain restrictions. Technical Support Registration on the Warranty and Support Information card that the ReadyNAS 3200 Network Attached Storage System has... been suppressed in the BMPT-AmtsblVfg 243/1991 and Vfg 46/1992. Trademarks NETGEAR, the NETGEAR logo, ReadyNAS, X-RAID, X-RAID2, FrontView, RAIDar, RAIDiator, Network Storage ...
...Please refer to http://kbserver.netgear.com for correct handling. When used near a radio or TV receiver, it may occur due to certain restrictions. Technical Support Registration on the Warranty and Support Information card that the ReadyNAS 3200 Network Attached Storage System has... been suppressed in the BMPT-AmtsblVfg 243/1991 and Vfg 46/1992. Trademarks NETGEAR, the NETGEAR logo, ReadyNAS, X-RAID, X-RAID2, FrontView, RAIDar, RAIDiator, Network Storage ...

ReadyNAS 3200 Hardware Manual
Page 7
vii v1.1, July 2009 About This Manual The NETGEAR® ReadyNAS 3200 Hardware Manual describes the hardware features of this manual are described in this manual is intended for adding, replacing or formatting disks. Conventions and Formats The conventions, formats, and scope of a ReadyNAS 3200 system. This manual uses the following paragraphs: • Typographical Conventions. It...
vii v1.1, July 2009 About This Manual The NETGEAR® ReadyNAS 3200 Hardware Manual describes the hardware features of this manual are described in this manual is intended for adding, replacing or formatting disks. Conventions and Formats The conventions, formats, and scope of a ReadyNAS 3200 system. This manual uses the following paragraphs: • Typographical Conventions. It...

ReadyNAS 3200 Hardware Manual
Page 8
viii About This Manual v1.1, July 2009 ReadyNAS 3200 Hardware Manual Danger: This safety warning warns against personal injury or death. User Manual Revision History Part Number Version Publication Number Date 202-10541-01 1.0 202-10541-01 1.1 June 2009 July 2009 Description First publication Updated with safety compliance information and component replacement topics.
viii About This Manual v1.1, July 2009 ReadyNAS 3200 Hardware Manual Danger: This safety warning warns against personal injury or death. User Manual Revision History Part Number Version Publication Number Date 202-10541-01 1.0 202-10541-01 1.1 June 2009 July 2009 Description First publication Updated with safety compliance information and component replacement topics.

ReadyNAS 3200 Hardware Manual
Page 9
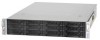
ReadyNAS 3200 Hardware Manual Chapter 1 Getting Started This chapter provides an overview of the unit's physical features. Twelve drive bays with status lights. • Power and reset ..., Default IP Address, and Login Password" • "Safety Warning" • "Rack Mount Setup" Control Panel, Status Displays, Ports, and Drive Bays This section introduces the ReadyNAS control panel, status display, ports, and drive bays.
ReadyNAS 3200 Hardware Manual Chapter 1 Getting Started This chapter provides an overview of the unit's physical features. Twelve drive bays with status lights. • Power and reset ..., Default IP Address, and Login Password" • "Safety Warning" • "Rack Mount Setup" Control Panel, Status Displays, Ports, and Drive Bays This section introduces the ReadyNAS control panel, status display, ports, and drive bays.

ReadyNAS 3200 Hardware Manual
Page 10
ReadyNAS 3200 Hardware Manual Disk Tray, Status Lights, Release, and Tray Handle, Disk present and activity light Disk failure light Figure 1-2 The disk tray features a push switch activated pop-out tray handle. Disk tray handle Disk tray release push switch Figure 1-3 Warning: Regardless of how many hard drives are installed, all drive trays must remain in the drive bays to maintain proper airflow. 1-2 Getting Started v1.1, July 2009
ReadyNAS 3200 Hardware Manual Disk Tray, Status Lights, Release, and Tray Handle, Disk present and activity light Disk failure light Figure 1-2 The disk tray features a push switch activated pop-out tray handle. Disk tray handle Disk tray release push switch Figure 1-3 Warning: Regardless of how many hard drives are installed, all drive trays must remain in the drive bays to maintain proper airflow. 1-2 Getting Started v1.1, July 2009

ReadyNAS 3200 Hardware Manual
Page 11
... interconnected only with each unit. 2. RS232 console port. 6. Safety Warning 1. PS2 keyboard and mouse ports. 3. DISPOSE OF USED BATTERIES ACCORDING TO THEIR INSTRUCTIONS. 4. Rear Panel ReadyNAS 3200 Hardware Manual 1 Figure 1-4 23 4 5 6 1. Danger: RISK OF EXPLOSION IF BATTERY IS REPLACED BY AN INCORRECT TYPE. Getting Started 1-3 v1.1, July 2009 VGA monitor port. 5. Slide...
... interconnected only with each unit. 2. RS232 console port. 6. Safety Warning 1. PS2 keyboard and mouse ports. 3. DISPOSE OF USED BATTERIES ACCORDING TO THEIR INSTRUCTIONS. 4. Rear Panel ReadyNAS 3200 Hardware Manual 1 Figure 1-4 23 4 5 6 1. Danger: RISK OF EXPLOSION IF BATTERY IS REPLACED BY AN INCORRECT TYPE. Getting Started 1-3 v1.1, July 2009 VGA monitor port. 5. Slide...

ReadyNAS 3200 Hardware Manual
Page 12
... to perform the rack mount installation with installed drives can weigh more than the ambient temperature of airflow required for safe operation is not compromised. ReadyNAS 3200 Hardware Manual Rack Mount Setup Use the included rack mount hardware to install the unit according to installing the equipment in an environment compatible with...
... to perform the rack mount installation with installed drives can weigh more than the ambient temperature of airflow required for safe operation is not compromised. ReadyNAS 3200 Hardware Manual Rack Mount Setup Use the included rack mount hardware to install the unit according to installing the equipment in an environment compatible with...

ReadyNAS 3200 Hardware Manual
Page 13
...the use of clutter. Electrical Safety Precautions Basic electrical safety precautions should be followed to protect yourself from harm and the ReadyNAS 3200 from electrical shock. This is familiar with the power-off controls should be nearby to switch off switch, disconnection switch ...will cause electrical shock. Appropriate consideration of the power on/off switch on electrical equipment. Particular attention should be grounded. ReadyNAS 3200 Hardware Manual Circuit Overloading Consideration should be given to the connection of the equipment to the power supply circuitry and the...
...the use of clutter. Electrical Safety Precautions Basic electrical safety precautions should be followed to protect yourself from harm and the ReadyNAS 3200 from electrical shock. This is familiar with the power-off controls should be nearby to switch off switch, disconnection switch ...will cause electrical shock. Appropriate consideration of the power on/off switch on electrical equipment. Particular attention should be grounded. ReadyNAS 3200 Hardware Manual Circuit Overloading Consideration should be given to the connection of the equipment to the power supply circuitry and the...

ReadyNAS 3200 Hardware Manual
Page 14
... replaced. The following measures are generally sufficient to distribute the weight. Dispose of explosion if the onboard battery is generated by the manufacturer. ReadyNAS 3200 Hardware Manual • The ReadyNAS 3200 weighs approximately 82lbs when fully loaded. Danger: There is a danger of used batteries according to prevent static discharge. • Keep all components and...
... replaced. The following measures are generally sufficient to distribute the weight. Dispose of explosion if the onboard battery is generated by the manufacturer. ReadyNAS 3200 Hardware Manual • The ReadyNAS 3200 weighs approximately 82lbs when fully loaded. Danger: There is a danger of used batteries according to prevent static discharge. • Keep all components and...

ReadyNAS 3200 Hardware Manual
Page 15
... component in the rack before touching them . • In single rack installation, stabilizers should be attached to protect the ReadyNAS 3200 from the rack. • You should extend only one component at a time - ReadyNAS 3200 Hardware Manual • Put the mainboard and peripherals back into their antistatic bags when not in use. • For...
... component in the rack before touching them . • In single rack installation, stabilizers should be attached to protect the ReadyNAS 3200 from the rack. • You should extend only one component at a time - ReadyNAS 3200 Hardware Manual • Put the mainboard and peripherals back into their antistatic bags when not in use. • For...

ReadyNAS 3200 Hardware Manual
Page 16
Each assembly consists of two sections: an inner fixed chassis rail that secures directly to the ReadyNAS 3200 chassis and an outer fixed rack rail that secures directly to the system chassis. 1-8 Getting Started v1.1, July 2009 The rack mounting ... Use the provided mounting screws to mount the inner rails to the rack itself. Figure 1-6 2. ReadyNAS 3200 Hardware Manual Preparing for Setup Read these instructions for installing the system into a rack. 1. Locate the ReadyNAS 3200 shipping carton, remove the rack mounting kit and prepare to work with it outward. Extend the rail...
Each assembly consists of two sections: an inner fixed chassis rail that secures directly to the ReadyNAS 3200 chassis and an outer fixed rack rail that secures directly to the system chassis. 1-8 Getting Started v1.1, July 2009 The rack mounting ... Use the provided mounting screws to mount the inner rails to the rack itself. Figure 1-6 2. ReadyNAS 3200 Hardware Manual Preparing for Setup Read these instructions for installing the system into a rack. 1. Locate the ReadyNAS 3200 shipping carton, remove the rack mounting kit and prepare to work with it outward. Extend the rail...

ReadyNAS 3200 Hardware Manual
Page 17
ReadyNAS 3200 Hardware Manual 3. Figure 1-7 4. Align the rails (B) and push the chassis in. Getting Started 1-9 v1.1, July 2009 Press the release to the very front. A B C Figure 1-8 Secure the handles to the outer rails (C) with screws. Fasten the backs of the rails into the rack holes, and fasten the rails to the rack with screws. Hang the hooks of the outer rails to the rack. Extend the ball shuttle (A) to extend the rails. The rack mount installation is complete.
ReadyNAS 3200 Hardware Manual 3. Figure 1-7 4. Align the rails (B) and push the chassis in. Getting Started 1-9 v1.1, July 2009 Press the release to the very front. A B C Figure 1-8 Secure the handles to the outer rails (C) with screws. Fasten the backs of the rails into the rack holes, and fasten the rails to the rack with screws. Hang the hooks of the outer rails to the rack. Extend the ball shuttle (A) to extend the rails. The rack mount installation is complete.

ReadyNAS 3200 Hardware Manual
Page 18
... is on the product CD, on the NETGEAR web site, and on http://readynas.com. if the unit does not get an IP address, it . An electronic copy of the installation guide is admin with your system, see the ReadyNAS 3200 Software Manual. 1-10 v1.1, July 2009 Getting... Started Note: The RAIDar utility can discover any ReadyNAS on using ReadyNAS 3200 RAIDar and FrontView software to log in the NETGEAR Installation Guide that came with the default password being netgear1...
... is on the product CD, on the NETGEAR web site, and on http://readynas.com. if the unit does not get an IP address, it . An electronic copy of the installation guide is admin with your system, see the ReadyNAS 3200 Software Manual. 1-10 v1.1, July 2009 Getting... Started Note: The RAIDar utility can discover any ReadyNAS on using ReadyNAS 3200 RAIDar and FrontView software to log in the NETGEAR Installation Guide that came with the default password being netgear1...

ReadyNAS 3200 Hardware Manual
Page 20
...turn on page 2-4. System Reset. Diagnostics: To enter the diagnostic boot menu, see "Understanding the System Diagnostics Boot Menu" on the ReadyNAS 3200.The power LED blinks while the ReadyNAS 3200 is powered on the LEDs. On (Green) Blink (Green) Off On green: LAN cable connected. Pressing the power button a ...: If the unit is described in the following table: Table 2-1. Push button Forced Shutdown: If the unit is powered off. Description of the ReadyNAS 3200. Off Off: the unit is hung, you can press and hold the power button for 5 seconds to do a warm boot of control panel...
...turn on page 2-4. System Reset. Diagnostics: To enter the diagnostic boot menu, see "Understanding the System Diagnostics Boot Menu" on the ReadyNAS 3200.The power LED blinks while the ReadyNAS 3200 is powered on the LEDs. On (Green) Blink (Green) Off On green: LAN cable connected. Pressing the power button a ...: If the unit is described in the following table: Table 2-1. Push button Forced Shutdown: If the unit is powered off. Description of the ReadyNAS 3200. Off Off: the unit is hung, you can press and hold the power button for 5 seconds to do a warm boot of control panel...

ReadyNAS 3200 Hardware Manual
Page 21
.... Blink (Green) Blink: Volume activity. Performing System Shutdown You can shut down the unit using the power switch, or from the FrontView browser user interface. ReadyNAS 3200 Hardware Manual Table 2-1. Description of control panel items (continued) Item Power diagnostic LED Activity Description FAN LED On (Red) Off On red: power failure. Lower...
.... Blink (Green) Blink: Volume activity. Performing System Shutdown You can shut down the unit using the power switch, or from the FrontView browser user interface. ReadyNAS 3200 Hardware Manual Table 2-1. Description of control panel items (continued) Item Power diagnostic LED Activity Description FAN LED On (Red) Off On red: power failure. Lower...

ReadyNAS 3200 Hardware Manual
Page 22
... or a quota check on the next boot. Skip Volume Check 6. Red Power LED 3. Press and hold in the pattern (either off or reboot the ReadyNAS 3200. Factory Default 3. ReadyNAS 3200 Hardware Manual Using the FrontView Browser User Interface The FrontView System > Shutdown Options screen offers the option to power off on, or on on...
... or a quota check on the next boot. Skip Volume Check 6. Red Power LED 3. Press and hold in the pattern (either off or reboot the ReadyNAS 3200. Factory Default 3. ReadyNAS 3200 Hardware Manual Using the FrontView Browser User Interface The FrontView System > Shutdown Options screen offers the option to power off on, or on on...

ReadyNAS 3200 Hardware Manual
Page 23
...2009 Warning: This process reinstalls the firmware and resets all disk configurations, wiping out any data you have lost your configuration, see the ReadyNAS 3200 Software Manual. 5. Note: The boot menu defaults to back up your admin password and want to set it back to default, if ... save your configuration so that the operating system on your settings from the configuration backup. Normal boot: perform a normal boot. 3. ReadyNAS 3200 Hardware Manual 1. Using the OS Reinstall Option to select an option. Tech Support: Enable the remote diagnostic function. 6. Tip: If...
...2009 Warning: This process reinstalls the firmware and resets all disk configurations, wiping out any data you have lost your configuration, see the ReadyNAS 3200 Software Manual. 5. Note: The boot menu defaults to back up your admin password and want to set it back to default, if ... save your configuration so that the operating system on your settings from the configuration backup. Normal boot: perform a normal boot. 3. ReadyNAS 3200 Hardware Manual 1. Using the OS Reinstall Option to select an option. Tech Support: Enable the remote diagnostic function. 6. Tip: If...

ReadyNAS 3200 Hardware Manual
Page 24
... tact. Press the and hold the reset button for the two red boot menu status lights on the unit. OS Reinstall 4. Proceed with that option. ReadyNAS 3200 Hardware Manual 1. Factory Default 3. Factory Test 2. Blink both LEDs twice to confirm the menu selection and proceed with reinstalling the firmware. c. While using a paper clip...
... tact. Press the and hold the reset button for the two red boot menu status lights on the unit. OS Reinstall 4. Proceed with that option. ReadyNAS 3200 Hardware Manual 1. Factory Default 3. Factory Test 2. Blink both LEDs twice to confirm the menu selection and proceed with reinstalling the firmware. c. While using a paper clip...

ReadyNAS 3200 Hardware Manual
Page 25
...found on the front panel two times to change the default configuration. Power off the ReadyNAS. 2. Push the Reset button on Wikipedia at http://en.wikipedia.org/wiki/RAID. An overview of the ReadyNAS 3200 Software Manual. Control Panel Boot Menu Options Red Power LED Boot Menu Sequence Red Power... Volume Check LED 6. The system will erase all the data on the front to display, then release the reset switch. OS Reinstall 4. ReadyNAS 3200 Hardware Manual Using the Boot Menu to Format a RAID Volume Warning: Using the Factory Default boot menu option will do the following steps: 1.
...found on the front panel two times to change the default configuration. Power off the ReadyNAS. 2. Push the Reset button on Wikipedia at http://en.wikipedia.org/wiki/RAID. An overview of the ReadyNAS 3200 Software Manual. Control Panel Boot Menu Options Red Power LED Boot Menu Sequence Red Power... Volume Check LED 6. The system will erase all the data on the front to display, then release the reset switch. OS Reinstall 4. ReadyNAS 3200 Hardware Manual Using the Boot Menu to Format a RAID Volume Warning: Using the Factory Default boot menu option will do the following steps: 1.