Installation Guide
Page 1
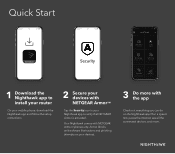
Your Nighthawk comes with NETGEAR Armor cybersecurity. Armor blocks online threats like hackers and phishing attempts on the Nighthawk app! Run a speed test, pause the Internet, see all the connected devices, and more with the app Check out everything you can do on your Nighthawk app to verify that NETGEAR Armor is activated. Quick Start 1 Download the Nighthawk app to install your router On your mobile phone, download the Nighthawk app and follow the setup instructions. 2 Secure your devices with NETGEAR Armor™ Tap the Security icon in your devices. 3 Do more .
Your Nighthawk comes with NETGEAR Armor cybersecurity. Armor blocks online threats like hackers and phishing attempts on the Nighthawk app! Run a speed test, pause the Internet, see all the connected devices, and more with the app Check out everything you can do on your Nighthawk app to verify that NETGEAR Armor is activated. Quick Start 1 Download the Nighthawk app to install your router On your mobile phone, download the Nighthawk app and follow the setup instructions. 2 Secure your devices with NETGEAR Armor™ Tap the Security icon in your devices. 3 Do more .

Installation Guide
Page 2
... for reference purposes only. Visit http://www.routerlogin.net to your place of Conformity, visit https://www.netgear.com/about/regulatory/. Reboot your modem and router and disconnect them. Regulatory and Legal Si ce produit est vendu au Canada, vous pouvez accé...If this product is sold in Canadian French at https://www.netgear.com/about /privacy-policy. Reconnect your router to get your return period. If you do not agree, return the device to access the router web interface. NETGEAR INTERNATIONAL LTD Floor 1, Building 3, University Technology Centre Curraheen Road,...
... for reference purposes only. Visit http://www.routerlogin.net to your place of Conformity, visit https://www.netgear.com/about/regulatory/. Reboot your modem and router and disconnect them. Regulatory and Legal Si ce produit est vendu au Canada, vous pouvez accé...If this product is sold in Canadian French at https://www.netgear.com/about /privacy-policy. Reconnect your router to get your return period. If you do not agree, return the device to access the router web interface. NETGEAR INTERNATIONAL LTD Floor 1, Building 3, University Technology Centre Curraheen Road,...
User Manual
Page 1
Plumeria Drive San Jose, CA 95134, USA User Manual Nighthawk AX6 6-Stream AX5400 WiFi Router Model RAX50 August 2020 202-12030-03 NETGEAR, Inc. 350 E.
Plumeria Drive San Jose, CA 95134, USA User Manual Nighthawk AX6 6-Stream AX5400 WiFi Router Model RAX50 August 2020 202-12030-03 NETGEAR, Inc. 350 E.
User Manual
Page 2
Trademarks ©NETGEAR, Inc. For NETGEAR's Privacy Policy, visit https://www.netgear.com/about /terms-and-conditions. NETGEAR and the NETGEAR Logo are used for helpful advice at https://www.netgear.com/about /privacy-policy. Nighthawk AX6 6-Stream AX5400 WiFi Router Support and Community Visit netgear.com/support to your place of purchase within your questions answered and access...
Trademarks ©NETGEAR, Inc. For NETGEAR's Privacy Policy, visit https://www.netgear.com/about /terms-and-conditions. NETGEAR and the NETGEAR Logo are used for helpful advice at https://www.netgear.com/about /privacy-policy. Nighthawk AX6 6-Stream AX5400 WiFi Router Support and Community Visit netgear.com/support to your place of purchase within your questions answered and access...
User Manual
Page 3
... Chapter 1 Hardware Setup Unpack your router 9 Top panel LEDs and buttons 10 Rear panel 12 Router label 13 Attach and position the antennas 13 Position your router 14 Wall-Mount Your Router 15 Cable your router 16 Chapter 2 Connect to the network and access the router Connect to the network 18 Connect to... 18 WiFi connection using WPS 18 Types of logins 19 Use a web browser to access the router 19 Automatic Internet Setup 19 Log in to the router 21 Install and manage your router with the Nighthawk app 21 Change the language 22 Chapter 3 Specify Your Internet Settings Use the ...
... Chapter 1 Hardware Setup Unpack your router 9 Top panel LEDs and buttons 10 Rear panel 12 Router label 13 Attach and position the antennas 13 Position your router 14 Wall-Mount Your Router 15 Cable your router 16 Chapter 2 Connect to the network and access the router Connect to the network 18 Connect to... 18 WiFi connection using WPS 18 Types of logins 19 Use a web browser to access the router 19 Automatic Internet Setup 19 Log in to the router 21 Install and manage your router with the Nighthawk app 21 Change the language 22 Chapter 3 Specify Your Internet Settings Use the ...
User Manual
Page 4
Nighthawk AX6 6-Stream AX5400 WiFi Router Set up an IPv6 6rd Internet connection 37 Manage the MTU size 39 MTU concepts 39 ... Name 55 Change the LAN TCP/IP settings 55 Specify the IP addresses that the router assigns 57 Disable the DHCP server feature in the router 58 Manage reserved LAN IP addresses 59 Reserve an IP address 59 Edit a reserved IP address 60...guest WiFi network 68 Enable or disable the WiFi radios 70 Set up a WiFi schedule 71 Specify WPS settings 72 Set up the router as a WiFi access point 73 Set up a bridge for a port group or VLAN tag group 74 Set up a bridge for...
Nighthawk AX6 6-Stream AX5400 WiFi Router Set up an IPv6 6rd Internet connection 37 Manage the MTU size 39 MTU concepts 39 ... Name 55 Change the LAN TCP/IP settings 55 Specify the IP addresses that the router assigns 57 Disable the DHCP server feature in the router 58 Manage reserved LAN IP addresses 59 Reserve an IP address 59 Edit a reserved IP address 60...guest WiFi network 68 Enable or disable the WiFi radios 70 Set up a WiFi schedule 71 Specify WPS settings 72 Set up the router as a WiFi access point 73 Set up a bridge for a port group or VLAN tag group 74 Set up a bridge for...
User Manual
Page 5
...Multimedia Quality of Service 89 Enable or disable AX WiFi 90 Chapter 7 Manage Your Router Update the router firmware 93 Check for new firmware and update the router 93 Manually upload firmware to the router 94 Change the admin password 95 Enable admin password recovery 95 Recover the admin ... the Internet port 98 Check the Internet connection status 99 View and manage logs of router activity 100 View devices currently on the network 101 Monitor Internet traffic 101 Manage the router configuration file 103 Back up the settings 103 Erase the settings 103 Restore the settings...
...Multimedia Quality of Service 89 Enable or disable AX WiFi 90 Chapter 7 Manage Your Router Update the router firmware 93 Check for new firmware and update the router 93 Manually upload firmware to the router 94 Change the admin password 95 Enable admin password recovery 95 Recover the admin ... the Internet port 98 Check the Internet connection status 99 View and manage logs of router activity 100 View devices currently on the network 101 Monitor Internet traffic 101 Manage the router configuration file 103 Back up the settings 103 Erase the settings 103 Restore the settings...
User Manual
Page 6
...storage devices through the Internet 126 Chapter 10 Use VPN to Access Your Network Set up a VPN connection 128 Specify VPN service in the router 128 Install OpenVPN software 129 Install OpenVPN Software on Your Windows Computer.......129 Install OpenVPN software on your Mac computer 132 Install OpenVPN software on...and media 136 Use VPN to access your Internet service at home 136 Set up VPN client Internet access in the router 137 Block VPN client Internet access in the router 137 Use a VPN tunnel to access your Internet service at home....138 Chapter 11 Manage port forwarding and port ...
...storage devices through the Internet 126 Chapter 10 Use VPN to Access Your Network Set up a VPN connection 128 Specify VPN service in the router 128 Install OpenVPN software 129 Install OpenVPN Software on Your Windows Computer.......129 Install OpenVPN software on your Mac computer 132 Install OpenVPN software on...and media 136 Use VPN to access your Internet service at home 136 Set up VPN client Internet access in the router 137 Block VPN client Internet access in the router 137 Use a VPN tunnel to access your Internet service at home....138 Chapter 11 Manage port forwarding and port ...
User Manual
Page 7
... 142 Edit a port forwarding service 143 Delete a port forwarding entry 144 Application xxample: Make a local web server public...........144 How the router implements the port forwarding rule 145 Port triggering 145 Add a port triggering service 146 Enable port triggering 147 Application example: Port triggering for ...blinking 152 Internet or Ethernet LAN port LEDs are off 152 WiFi LED is off 152 You cannot log in to the router 153 You cannot access the Internet 154 Troubleshoot Internet browsing 155 Changes are not saved 156 Troubleshoot WiFi connectivity 156 Troubleshoot your...
... 142 Edit a port forwarding service 143 Delete a port forwarding entry 144 Application xxample: Make a local web server public...........144 How the router implements the port forwarding rule 145 Port triggering 145 Add a port triggering service 146 Enable port triggering 147 Application example: Port triggering for ...blinking 152 Internet or Ethernet LAN port LEDs are off 152 WiFi LED is off 152 You cannot log in to the router 153 You cannot access the Internet 154 Troubleshoot Internet browsing 155 Changes are not saved 156 Troubleshoot WiFi connectivity 156 Troubleshoot your...

User Manual
Page 8
1 Hardware Setup This chapter contains the following sections: • Unpack your router • Top panel LEDs and buttons • Rear panel • Router label • Attach and position the antennas • Position your router • Wall-Mount Your Router • Cable your router For more information about the topics covered in this manual, visit the support website at netgear.com/support. 8
1 Hardware Setup This chapter contains the following sections: • Unpack your router • Top panel LEDs and buttons • Rear panel • Router label • Attach and position the antennas • Position your router • Wall-Mount Your Router • Cable your router For more information about the topics covered in this manual, visit the support website at netgear.com/support. 8
User Manual
Page 9
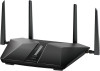
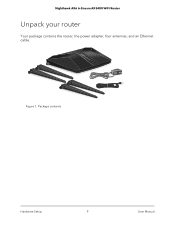
Package contents Hardware Setup 9 User Manual Figure 1. Nighthawk AX6 6-Stream AX5400 WiFi Router Unpack your router Your package contains the router, the power adapter, four antennas, and an Ethernet cable.
Package contents Hardware Setup 9 User Manual Figure 1. Nighthawk AX6 6-Stream AX5400 WiFi Router Unpack your router Your package contains the router, the power adapter, four antennas, and an Ethernet cable.

User Manual
Page 10
...port is ready. • Blinking white. Nighthawk AX6 6-Stream AX5400 WiFi Router Top panel LEDs and buttons The status LEDs and two buttons are located on the top panel of the router. The router is connected between the router and the modem. No Ethernet cable is ready. • Blinking white.... Hardware Setup 10 User Manual Figure 2. Internet LED • Solid white. The router is not ready, firmware is not supplied to...
...port is ready. • Blinking white. Nighthawk AX6 6-Stream AX5400 WiFi Router Top panel LEDs and buttons The status LEDs and two buttons are located on the top panel of the router. The router is connected between the router and the modem. No Ethernet cable is ready. • Blinking white.... Hardware Setup 10 User Manual Figure 2. Internet LED • Solid white. The router is not ready, firmware is not supplied to...

User Manual
Page 11
...port is sending or receiving traffic at 1 Gbps. • Solid amber. WPS LED Pressing the WPS button lets your WPS-enabled device join your router's WiFi network. USB 3.0 port LED • Solid white. The port is sending or receiving traffic at 100 Mbps or 10 Mbps. •...on and off and you cannot use WiFi to connect to this Ethernet port. Hardware Setup 11 User Manual Nighthawk AX6 6-Stream AX5400 WiFi Router Table 1. LED descriptions (Continued) LED and Button Description Ethernet LEDs for ports 1-4 The LED color indicates the speed: white for Gigabit Ethernet...
...port is sending or receiving traffic at 1 Gbps. • Solid amber. WPS LED Pressing the WPS button lets your WPS-enabled device join your router's WiFi network. USB 3.0 port LED • Solid white. The port is sending or receiving traffic at 100 Mbps or 10 Mbps. •...on and off and you cannot use WiFi to connect to this Ethernet port. Hardware Setup 11 User Manual Nighthawk AX6 6-Stream AX5400 WiFi Router Table 1. LED descriptions (Continued) LED and Button Description Ethernet LEDs for ports 1-4 The LED color indicates the speed: white for Gigabit Ethernet...

User Manual
Page 12
...Hardware Setup 12 User Manual USB 3.0 port. Four Gigabit Ethernet RJ-45 LAN ports. One Gigabit Ethernet RJ-45 WAN port to connect the router to the router. Press the Power On/Off button to provide power to an Internet modem such as a cable modem or DSL modem. 5. Use the USB ...ports to connect LAN devices to the DC power connector. 6. DC power connector. Connect the power adapter that came in the product package to the router. 4. Rear panel The rear panel contains the following figure shows the rear panel connectors and buttons. 12 3 4 56 Figure 3. Pressing the Reset...
...Hardware Setup 12 User Manual USB 3.0 port. Four Gigabit Ethernet RJ-45 LAN ports. One Gigabit Ethernet RJ-45 WAN port to connect the router to the router. Press the Power On/Off button to provide power to an Internet modem such as a cable modem or DSL modem. 5. Use the USB ...ports to connect LAN devices to the DC power connector. 6. DC power connector. Connect the power adapter that came in the product package to the router. 4. Rear panel The rear panel contains the following figure shows the rear panel connectors and buttons. 12 3 4 56 Figure 3. Pressing the Reset...

User Manual
Page 13
... position the antennas Hardware Setup 13 User Manual The antennas must be attached to match the labels on the antennas with the labels on the router. Router label Attach and position the antennas Before you are done attaching the antennas, position the antennas as shown. Figure 4. Nighthawk AX6 6-Stream AX5400 WiFi...
... position the antennas Hardware Setup 13 User Manual The antennas must be attached to match the labels on the antennas with the labels on the router. Router label Attach and position the antennas Before you are done attaching the antennas, position the antennas as shown. Figure 4. Nighthawk AX6 6-Stream AX5400 WiFi...

User Manual
Page 14
... connection can limit the range. • Other WiFi access points in an elevated location, minimizing the number walls and ceilings between the router and your other devices operate, and within the operating range of your WiFi network. Ceiling fans - Base of a cordless phone - ...tanks - Mirrors - Hardware Setup 14 User Manual Home security systems - Brick - Solid metal door - Nighthawk AX6 6-Stream AX5400 WiFi Router Position your router The router lets you access your network anywhere within line of sight to your WiFi devices. • Make sure that emit a WiFi signal for...
... connection can limit the range. • Other WiFi access points in an elevated location, minimizing the number walls and ceilings between the router and your other devices operate, and within the operating range of your WiFi network. Ceiling fans - Base of a cordless phone - ...tanks - Mirrors - Hardware Setup 14 User Manual Home security systems - Brick - Solid metal door - Nighthawk AX6 6-Stream AX5400 WiFi Router Position your router The router lets you access your network anywhere within line of sight to your WiFi devices. • Make sure that emit a WiFi signal for...

User Manual
Page 15
Bottom of the router To wall-mount your router. Align the router's wall-mounting holes with the screws and mount your router: 1. Insert screws into the wall anchors, leaving 3/16 inch (0.5 cm) of your router. 2. Figure 6. Drill holes in the holes. 3. Insert wall anchors in the wall where you want to wall-mount your router. Note: We recommend using the wall-mounting holes on the bottom of each screw exposed. 4. Hardware Setup 15 User Manual Nighthawk AX6 6-Stream AX5400 WiFi Router Wall-Mount Your Router You can wall-mount your router using M3 x 20 mm screws.
Bottom of the router To wall-mount your router. Align the router's wall-mounting holes with the screws and mount your router: 1. Insert screws into the wall anchors, leaving 3/16 inch (0.5 cm) of your router. 2. Figure 6. Drill holes in the holes. 3. Insert wall anchors in the wall where you want to wall-mount your router. Note: We recommend using the wall-mounting holes on the bottom of each screw exposed. 4. Hardware Setup 15 User Manual Nighthawk AX6 6-Stream AX5400 WiFi Router Wall-Mount Your Router You can wall-mount your router using M3 x 20 mm screws.

User Manual
Page 16
... cable your modem, remove and reinsert the backup battery if it to your router and plug the power adapter into an outlet. 4. Use the Ethernet cable to connect the modem to the yellow Internet port on the router. 3. Hardware Setup 16 User Manual Note: If your Internet connection does not... require a modem, connect your main Ethernet cable to the yellow Internet port on the router. The router's Power LED lights solid white when the router is ready. Connect the power adapter to a modem. Press the Power On/Off button on the rear panel of the...
... cable your modem, remove and reinsert the backup battery if it to your router and plug the power adapter into an outlet. 4. Use the Ethernet cable to connect the modem to the yellow Internet port on the router. 3. Hardware Setup 16 User Manual Note: If your Internet connection does not... require a modem, connect your main Ethernet cable to the yellow Internet port on the router. The router's Power LED lights solid white when the router is ready. Connect the power adapter to a modem. Press the Power On/Off button on the rear panel of the...

User Manual
Page 17
2 Connect to the network and access the router You can connect and how to access the router and log in. This chapter explains the ways you can connect to access the router • Install and manage your router with the Nighthawk app • Change the language 17 The chapter contains the following sections: • Connect to the network • Types of logins • Use a web browser to the router's WiFi networks or use a wired Ethernet connection.
2 Connect to the network and access the router You can connect and how to access the router and log in. This chapter explains the ways you can connect to access the router • Install and manage your router with the Nighthawk app • Change the language 17 The chapter contains the following sections: • Connect to the network • Types of logins • Use a web browser to the router's WiFi networks or use a wired Ethernet connection.

User Manual
Page 18
... Manual The WiFi network name is on your computer. 3. WiFi connection using an Ethernet cable and join the router's local area network (LAN). To connect your computer to the router with Wi-Fi Protected Setup (WPS) or you set up your computer to use WPS to connect to the WiFi network: 1.... Connect to the WiFi network. Connect an Ethernet cable to an Ethernet port on the router label. 3. Find and connect to the WiFi network To find and select the WiFi network. Join the WiFi network and enter the WiFi password. ...
... Manual The WiFi network name is on your computer. 3. WiFi connection using an Ethernet cable and join the router's local area network (LAN). To connect your computer to the router with Wi-Fi Protected Setup (WPS) or you set up your computer to use WPS to connect to the WiFi network: 1.... Connect to the WiFi network. Connect an Ethernet cable to an Ethernet port on the router label. 3. Find and connect to the WiFi network To find and select the WiFi network. Join the WiFi network and enter the WiFi password. ...


