
User Manual
Page 3
... Router 9 Front View...10 Rear Panel...12 Position Your Router 13 Cable Your Router 14 Turn the LEDs On or Off or Disable LED Blinking 14 Turn the LEDs On or Off Using the LED On/Off Switch 14 Disable or Enable LED Blinking or Turn Off LEDs 15 Chapter 2 Connect to the Network and Access the Router Connect to the Network 17 Wired Connection 17 WiFi Connection 17 WiFi Connection Using WPS 17 Label...18 Types of Logins...18 Use a Web Browser to Access the Router 18 Automatic Internet Setup 19 Log...
... Router 9 Front View...10 Rear Panel...12 Position Your Router 13 Cable Your Router 14 Turn the LEDs On or Off or Disable LED Blinking 14 Turn the LEDs On or Off Using the LED On/Off Switch 14 Disable or Enable LED Blinking or Turn Off LEDs 15 Chapter 2 Connect to the Network and Access the Router Connect to the Network 17 Wired Connection 17 WiFi Connection 17 WiFi Connection Using WPS 17 Label...18 Types of Logins...18 Use a Web Browser to Access the Router 18 Automatic Internet Setup 19 Log...

User Manual
Page 4
... Network 40 Use Keywords to Block Internet Sites 41 Block Services From the Internet 42 Delete Keywords From the Blocked List 43 Avoid Blocking on a Trusted Computer 43 Manage Network Access Control Lists 44 Schedule When to Block Internet Sites and Services 44 Set Up Security Event Email Notifications 45 Chapter 5 Network Settings View or Change WAN Settings 48 Set Up a Default DMZ Server 49 Change the Router's Device Name 49 Change the LAN TCP/IP Settings 50 Specify the IP Addresses That the Router Assigns 51 Disable the DHCP Server...
... Network 40 Use Keywords to Block Internet Sites 41 Block Services From the Internet 42 Delete Keywords From the Blocked List 43 Avoid Blocking on a Trusted Computer 43 Manage Network Access Control Lists 44 Schedule When to Block Internet Sites and Services 44 Set Up Security Event Email Notifications 45 Chapter 5 Network Settings View or Change WAN Settings 48 Set Up a Default DMZ Server 49 Change the Router's Device Name 49 Change the LAN TCP/IP Settings 50 Specify the IP Addresses That the Router Assigns 51 Disable the DHCP Server...

User Manual
Page 5
... Manually Upload Firmware to the Router 77 Change the admin Password and Enable Password Recovery 77 Set Up Password Recovery 78 Recover the admin Password 79 View Information About the Router and the Internet and WiFi Settings 79 Display Internet Port Statistics 80 Check the Internet Connection Status 81 View and Manage Logs of Router Activity 82 View Devices Currently on the Network 83 Monitor Internet Traffictraffic metering 83 Manage the Router Configuration File 84 Back Up Settings 84 Erase the Current Configuration Settings 85 Restore Configuration Settings 85 Remote Access...
... Manually Upload Firmware to the Router 77 Change the admin Password and Enable Password Recovery 77 Set Up Password Recovery 78 Recover the admin Password 79 View Information About the Router and the Internet and WiFi Settings 79 Display Internet Port Statistics 80 Check the Internet Connection Status 81 View and Manage Logs of Router Activity 82 View Devices Currently on the Network 83 Monitor Internet Traffictraffic metering 83 Manage the Router Configuration File 84 Back Up Settings 84 Erase the Current Configuration Settings 85 Restore Configuration Settings 85 Remote Access...
User Manual
Page 6
... the USB Control Center Time-Out 122 Chapter 12 Use VPN to Access Your Network Set Up a VPN Connection 125 Specify VPN Service in the Router 125 Install OpenVPN Software 126 Install OpenVPN Software on Your Windows Computer 126 Install OpenVPN Software on Your Mac Computer 129 Install OpenVPN Software on an iOS Device 129 Install OpenVPN Software on an Android Device 130 Use a VPN Tunnel on Your Windows Computer 131 Use VPN to Access the Router's USB Device and Media 133 Use VPN to Access Your Internet Service at...
... the USB Control Center Time-Out 122 Chapter 12 Use VPN to Access Your Network Set Up a VPN Connection 125 Specify VPN Service in the Router 125 Install OpenVPN Software 126 Install OpenVPN Software on Your Windows Computer 126 Install OpenVPN Software on Your Mac Computer 129 Install OpenVPN Software on an iOS Device 129 Install OpenVPN Software on an Android Device 130 Use a VPN Tunnel on Your Windows Computer 131 Use VPN to Access the Router's USB Device and Media 133 Use VPN to Access Your Internet Service at...

User Manual
Page 19
... locate this setting is connected to one of the LAN Ethernet ports or over WiFi with a web browser. Launch a web browser. Note If you want to change it . When your Internet service starts, your router automatically logs you in the network are using the settings described here. Make sure that the computers and devices in . NETGEAR genie runs on any device with the preset security settings listed on your router: 1. Follow the onscreen instructions. If...
... locate this setting is connected to one of the LAN Ethernet ports or over WiFi with a web browser. Launch a web browser. Note If you want to change it . When your Internet service starts, your router automatically logs you in the network are using the settings described here. Make sure that the computers and devices in . NETGEAR genie runs on any device with the preset security settings listed on your router: 1. Follow the onscreen instructions. If...

User Manual
Page 48
... some Internet games, point-to its WAN (Internet) port. Your settings are case-sensitive. Nighthawk X10 AD7000 Smart WiFi Router View or Change WAN Settings You can set up a DMZ (demilitarized zone) server, change the WAN settings: 1. Click the Apply button. Enter the router user name and password. See Change the MTU Size on Internet Port. Network Address Translation (NAT) determines how the router processes inbound traffic. Launch a web browser from the Internet but allows almost all Internet applications to Ping on page 35. • NAT Filtering...
... some Internet games, point-to its WAN (Internet) port. Your settings are case-sensitive. Nighthawk X10 AD7000 Smart WiFi Router View or Change WAN Settings You can set up a DMZ (demilitarized zone) server, change the WAN settings: 1. Click the Apply button. Enter the router user name and password. See Change the MTU Size on Internet Port. Network Address Translation (NAT) determines how the router processes inbound traffic. Launch a web browser from the Internet but allows almost all Internet applications to Ping on page 35. • NAT Filtering...

User Manual
Page 49
... the default DMZ server. The router usually detects and discards incoming traffic from the Internet that is connected to one local computer can specify that is connected to work correctly with Network Address Translation (NAT). To set up a default DMZ server: 1. The BASIC Home page displays. 4. Type the IP address. 7. Change the Router's Device Name The router's default device name is exposed to exploits from a computer or WiFi device that the router forwards the traffic to the network. 2. Launch a web browser...
... the default DMZ server. The router usually detects and discards incoming traffic from the Internet that is connected to one local computer can specify that is connected to work correctly with Network Address Translation (NAT). To set up a default DMZ server: 1. The BASIC Home page displays. 4. Type the IP address. 7. Change the Router's Device Name The router's default device name is exposed to exploits from a computer or WiFi device that the router forwards the traffic to the network. 2. Launch a web browser...

User Manual
Page 52
Your settings are case-sensitive. The router assigns IP, DNS server, and default gateway addresses to the LAN. A login window opens. 3. The default password is the LAN address of all computers connected to all your network as the router. 7. Nighthawk X10 AD7000 Smart WiFi Router The LAN Setup page displays. 5. This IP address must be in the Router By default, the router acts as DHCP Server check box is selected. 6. Click the Apply button. The assigned default gateway address is password. The user name and password are...
Your settings are case-sensitive. The router assigns IP, DNS server, and default gateway addresses to the LAN. A login window opens. 3. The default password is the LAN address of all computers connected to all your network as the router. 7. Nighthawk X10 AD7000 Smart WiFi Router The LAN Setup page displays. 5. This IP address must be in the Router By default, the router acts as DHCP Server check box is selected. 6. Click the Apply button. The assigned default gateway address is password. The user name and password are...

User Manual
Page 61
... clear the Enable Router's PIN check box. Launch a web browser from a computer or mobile device that is connected to an automatically generated random SSID and security key. 7. A login window opens. 4. The user name and password are saved. Select ADVANCED > Advanced Setup > Router/ AP / Bridge Mode. The user name is password. The BASIC Home screen displays. 4. Click the Apply button. Your settings are case-sensitive. Use an Ethernet cable to connect the Internet port of this check box, the next time a new WiFi client uses...
... clear the Enable Router's PIN check box. Launch a web browser from a computer or mobile device that is connected to an automatically generated random SSID and security key. 7. A login window opens. 4. The user name and password are saved. Select ADVANCED > Advanced Setup > Router/ AP / Bridge Mode. The user name is password. The BASIC Home screen displays. 4. Click the Apply button. Your settings are case-sensitive. Use an Ethernet cable to connect the Internet port of this check box, the next time a new WiFi client uses...

User Manual
Page 64
... button. If you are connected to the router's Ethernet LAN ports or WiFi network include an IPTV device, your router's WiFi network, select the Wireless check box that corresponds to the router's WiFi network to distinguish between the IPTV device and the router's Internet port from being processed through the router's network address translation (NAT) service. You can select more than one Wired Ports or Wireless check box. Network Settings 64 Select ADVANCED > Advanced Setup > VLAN/Bridge Settings. Select the Enable VLAN/Bridge Settings check box. You can add VLAN tag groups...
... button. If you are connected to the router's Ethernet LAN ports or WiFi network include an IPTV device, your router's WiFi network, select the Wireless check box that corresponds to the router's WiFi network to distinguish between the IPTV device and the router's Internet port from being processed through the router's network address translation (NAT) service. You can select more than one Wired Ports or Wireless check box. Network Settings 64 Select ADVANCED > Advanced Setup > VLAN/Bridge Settings. Select the Enable VLAN/Bridge Settings check box. You can add VLAN tag groups...

User Manual
Page 66
A login window opens. 3. The default password is admin. The VLAN / Bridge Settings page displays. 5. Select the By bridge group radio button. 7. You can set up a bridge connection from a computer or mobile device that is connected to your router's WiFi network, select the Wireless check box that corresponds to the Ethernet port on the router to which the device is connected through NAT. Your settings are case-sensitive. The user name is password. Select ADVANCED > Advanced Setup > VLAN/Bridge Settings. The designated LAN port or WiFi name becomes an IPTV...
A login window opens. 3. The default password is admin. The VLAN / Bridge Settings page displays. 5. Select the By bridge group radio button. 7. You can set up a bridge connection from a computer or mobile device that is connected to your router's WiFi network, select the Wireless check box that corresponds to the Ethernet port on the router to which the device is connected through NAT. Your settings are case-sensitive. The user name is password. Select ADVANCED > Advanced Setup > VLAN/Bridge Settings. The designated LAN port or WiFi name becomes an IPTV...

User Manual
Page 73
.... The user name is password. The default password is admin. By default, this value. 8. Type the advertisement period in the UPnP Portmap Table, click the Refresh button. Longer durations can compromise the freshness of more network traffic. If you use applications such as multiplayer gaming, peer-to the network. 2. The UPnP Portmap Table also displays what type of port is open and whether that control points receive current device status at...
.... The user name is password. The default password is admin. By default, this value. 8. Type the advertisement period in the UPnP Portmap Table, click the Refresh button. Longer durations can compromise the freshness of more network traffic. If you use applications such as multiplayer gaming, peer-to the network. 2. The UPnP Portmap Table also displays what type of port is open and whether that control points receive current device status at...

User Manual
Page 80
... amber exclamation mark indicates that the Internet port is configured but cannot get an Internet connection (for the WAN (Internet) port, SFP+ port, LAN (Ethernet) ports, and WLANs. The default password is admin. Click the ADVANCED tab. TxPkts. Rx B/s. Manage Your Network 80 For a WiFi network, the network is enabled and secured. • A red X indicates that is disabled or down . The user name is password. The link status of packets transmitted on this port since reset or manual clear. - The information uses the following color coding...
... amber exclamation mark indicates that the Internet port is configured but cannot get an Internet connection (for the WAN (Internet) port, SFP+ port, LAN (Ethernet) ports, and WLANs. The default password is admin. Click the ADVANCED tab. TxPkts. Rx B/s. Manage Your Network 80 For a WiFi network, the network is enabled and secured. • A red X indicates that is disabled or down . The user name is password. The link status of packets transmitted on this port since reset or manual clear. - The information uses the following color coding...

User Manual
Page 84
..., click the Traffic Status button. To update the Traffic Statistics section, click the Refresh button. 12. Manage the Router Configuration File The configuration settings of Mbytes or hours is connected to begin at a specific time and date. Back Up Settings To back up (save) this file to your router and to occur when the limit is attained: • The Internet LED blinks white or amber. • The Internet connection is applied to the factory default settings. No...
..., click the Traffic Status button. To update the Traffic Statistics section, click the Refresh button. 12. Manage the Router Configuration File The configuration settings of Mbytes or hours is connected to begin at a specific time and date. Back Up Settings To back up (save) this file to your router and to occur when the limit is attained: • The Internet LED blinks white or amber. • The Internet connection is applied to the factory default settings. No...

User Manual
Page 104
... the router. A login window opens. 3. When you connect the USB storage device to the router. 4. See Set Up FTP Access Through the Internet on your local area network (LAN). 5. Get your USB storage device uses a power supply, connect it might not be secure. The user name is ready for a secure connection. Nighthawk X10 AD7000 Smart WiFi Router Your Personal FTP Server With your customized free URL, you can use DDNS with Internet access, you can access your network through Dynamic DNS. Connect a storage device...
... the router. A login window opens. 3. When you connect the USB storage device to the router. 4. See Set Up FTP Access Through the Internet on your local area network (LAN). 5. Get your USB storage device uses a power supply, connect it might not be secure. The user name is ready for a secure connection. Nighthawk X10 AD7000 Smart WiFi Router Your Personal FTP Server With your customized free URL, you can use DDNS with Internet access, you can access your network through Dynamic DNS. Connect a storage device...

User Manual
Page 108
... did not create a ReadyCLOUD account, see Create a ReadyCLOUD Account on Demand, the router automatically changes the connection mode to the network. 4. Select ADVANCED > ReadySHARE > ReadyCLOUD. The ReadyCLOUD page displays. 7. This change is connected to Always On. Launch a web browser from a computer or mobile device that is available to the router. The user name is set to remotely access the USB storage device. 8. Note If therouter's Internet connection mode is admin. After...
... did not create a ReadyCLOUD account, see Create a ReadyCLOUD Account on Demand, the router automatically changes the connection mode to the network. 4. Select ADVANCED > ReadySHARE > ReadyCLOUD. The ReadyCLOUD page displays. 7. This change is connected to Always On. Launch a web browser from a computer or mobile device that is available to the router. The user name is set to remotely access the USB storage device. 8. Note If therouter's Internet connection mode is admin. After...

User Manual
Page 113
... router's network. 4. Enter the router user name and password. The BASIC Home page displays. 6. The Media Server (Settings) tab displays. 8. Your settings are case-sensitive. Nighthawk X10 AD7000 Smart WiFi Router also use the power supply when you connect the USB storage device to the router. Enter your local area network (LAN). 3. Select File > Home Sharing > Turn On Home Sharing. Select ADVANCED > ReadySHARE > ReadySHARE Storage > Media Server. The maximum number of iTunes installed...
... router's network. 4. Enter the router user name and password. The BASIC Home page displays. 6. The Media Server (Settings) tab displays. 8. Your settings are case-sensitive. Nighthawk X10 AD7000 Smart WiFi Router also use the power supply when you connect the USB storage device to the router. Enter your local area network (LAN). 3. Select File > Home Sharing > Turn On Home Sharing. Select ADVANCED > ReadySHARE > ReadySHARE Storage > Media Server. The maximum number of iTunes installed...

User Manual
Page 125
.... 4. Select ADVANCED > Advanced Setup > VPN Service. A login window opens. 3. Enter the router user name and password. The computer is the client, and the router is called a domain name). Launch a web browser from a computer or mobile device that IP address to connect to your home network. Nighthawk X10 AD7000 Smart WiFi Router Set Up a VPN Connection A virtual private network (VPN) lets you use the Internet to securely access your network when you can use a VPN connection. This type of VPN access is the gateway. To specify the VPN service: 1.
.... 4. Select ADVANCED > Advanced Setup > VPN Service. A login window opens. 3. Enter the router user name and password. The computer is the client, and the router is called a domain name). Launch a web browser from a computer or mobile device that IP address to connect to your home network. Nighthawk X10 AD7000 Smart WiFi Router Set Up a VPN Connection A virtual private network (VPN) lets you use the Internet to securely access your network when you can use a VPN connection. This type of VPN access is the gateway. To specify the VPN service: 1.

User Manual
Page 145
... access list on the router is lit if the Ethernet cable connecting the router and the modem is set with standard LED settings. Troubleshoot With the LEDs By default, the router is plugged in . The Internet LED on the Advanced Wireless Settings page, you must match exactly. WiFi Settings Make sure that the Ethernet cables are securely plugged in securely and the modem and router are connected over WiFi must add each computer to Restart Your Network If you must use the MAC address...
... access list on the router is lit if the Ethernet cable connecting the router and the modem is set with standard LED settings. Troubleshoot With the LEDs By default, the router is plugged in . The Internet LED on the Advanced Wireless Settings page, you must match exactly. WiFi Settings Make sure that the Ethernet cables are securely plugged in securely and the modem and router are connected over WiFi must add each computer to Restart Your Network If you must use the MAC address...
User Manual
Page 146
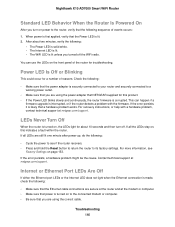
... a firmware upgrade is corrupted. If the error persists, it is likely that the Power LED is lit unless you turned off . After about 10 seconds and then turn on , the LEDs light for troubleshooting. Check the following : • The Power LED is solid white. • The Internet LED is lit. • The WiFi LED is lit. 2. LEDs Never Turn Off When the router is securely connected to your router and securely connected to its factory settings. If...
... a firmware upgrade is corrupted. If the error persists, it is likely that the Power LED is lit unless you turned off . After about 10 seconds and then turn on , the LEDs light for troubleshooting. Check the following : • The Power LED is solid white. • The Internet LED is lit. • The WiFi LED is lit. 2. LEDs Never Turn Off When the router is securely connected to your router and securely connected to its factory settings. If...


