Genie Apps User Manual
Page 7
... view or change its settings. Locate your home network and join it starts automatically. A login prompt displays. Connect your computer to your NETGEAR router with WiFi or with genie app, you can use the genie app to log in your home network. Getting Started 7 Note: To manage your router settings with an Ethernet cable. 2. Click the appropriate Download button. Select Settings. 3. If you are using a smartphone or tablet, you download and install the genie app, it . 3. Clear...
... view or change its settings. Locate your home network and join it starts automatically. A login prompt displays. Connect your computer to your NETGEAR router with WiFi or with genie app, you can use the genie app to log in your home network. Getting Started 7 Note: To manage your router settings with an Ethernet cable. 2. Click the appropriate Download button. Select Settings. 3. If you are using a smartphone or tablet, you download and install the genie app, it . 3. Clear...
Genie Apps User Manual
Page 24
... guest access for a specific length of the screen. The Router Settings screen displays with the Wireless Settings tab selected. 6. Follow the wizard steps to export your WiFi router to manage your desktop or in a file named GenieWirelessConfig.Exe. Open the app that you use to your WiFi network. To export your WiFi connections. 2. Select Router Settings. 5. Click the Export button at the bottom of time. If prompted, enter the router user...
... guest access for a specific length of the screen. The Router Settings screen displays with the Wireless Settings tab selected. 6. Follow the wizard steps to export your WiFi router to manage your desktop or in a file named GenieWirelessConfig.Exe. Open the app that you use to your WiFi network. To export your WiFi connections. 2. Select Router Settings. 5. Click the Export button at the bottom of time. If prompted, enter the router user...
Genie Apps User Manual
Page 51
... router and update the router to manage your WiFi connections. 2. The Home screen displays. 4. The Router Settings screen displays with the Wireless Settings tab selected. 6. Open the app that a newer firmware version is available, click the Next button. 9. If a newer firmware version is available. 8. Select Router Settings. 5. Administration and Troubleshooting 51 If prompted, enter the router user name and password. Click the Register button. The genie app checks for firmware updates: 1. Follow the onscreen instructions to download the firmware...
... router and update the router to manage your WiFi connections. 2. The Home screen displays. 4. The Router Settings screen displays with the Wireless Settings tab selected. 6. Open the app that a newer firmware version is available, click the Next button. 9. If a newer firmware version is available. 8. Select Router Settings. 5. Administration and Troubleshooting 51 If prompted, enter the router user name and password. Click the Register button. The genie app checks for firmware updates: 1. Follow the onscreen instructions to download the firmware...
Installation Guide
Page 1
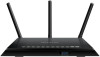
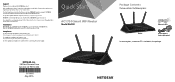
.../. See the regulatory compliance document before you can get the user manual online at https://my.netgear.com. Trademarks © NETGEAR, Inc., NETGEAR and the NETGEAR Logo are used for purchasing this NETGEAR product. Quick Start AC1750 Smart WiFi Router Model R6400 NETGEAR, Inc. 350 East Plumeria Drive San Jose, CA 95134 USA May 2015 Package Contents The box contains the following items. Ethernet cable Router Power adapter (varies by region) In...
.../. See the regulatory compliance document before you can get the user manual online at https://my.netgear.com. Trademarks © NETGEAR, Inc., NETGEAR and the NETGEAR Logo are used for purchasing this NETGEAR product. Quick Start AC1750 Smart WiFi Router Model R6400 NETGEAR, Inc. 350 East Plumeria Drive San Jose, CA 95134 USA May 2015 Package Contents The box contains the following items. Ethernet cable Router Power adapter (varies by region) In...

User Manual
Page 5
... Printer 102 View or Change the Status of a Printer 103 Use the Scan Feature of a Multifunction USB Printer 104 Change NETGEAR USB Control Center Settings 104 Chapter 10 Specify Network Settings Disable LED Blinking or Turn Off LEDs 107 View the WAN Settings 107 Set Up a Default DMZ Server 109 Change the Router's Device Name 110 Change the LAN TCP/IP Settings 110 Specify the IP Addresses That the Router Assigns 112 Disable the DHCP Server Feature in the Router 113 Manage Reserves LAN IP Addresses 114...
... Printer 102 View or Change the Status of a Printer 103 Use the Scan Feature of a Multifunction USB Printer 104 Change NETGEAR USB Control Center Settings 104 Chapter 10 Specify Network Settings Disable LED Blinking or Turn Off LEDs 107 View the WAN Settings 107 Set Up a Default DMZ Server 109 Change the Router's Device Name 110 Change the LAN TCP/IP Settings 110 Specify the IP Addresses That the Router Assigns 112 Disable the DHCP Server Feature in the Router 113 Manage Reserves LAN IP Addresses 114...
User Manual
Page 6
... Change the admin Password 134 Recover the admin Password 135 View Router Status 137 Display Internet Port Statistics 137 Check the Internet Connection Status 138 View and Manage Logs of Router Activity 140 Monitor Internet Traffic 141 Create Custom Static Routes 142 Set Up a Static Route 143 Edit a Static Route 144 Delete a Static Route 144 View Devices Currently on the Network 145 Manage the Router Configuration File 146 Back Up Settings 146 Restore Configuration Settings 147 Erase the Current Configuration Settings 147 Remote Management 148 Remotely Access Your Router Using...
... Change the admin Password 134 Recover the admin Password 135 View Router Status 137 Display Internet Port Statistics 137 Check the Internet Connection Status 138 View and Manage Logs of Router Activity 140 Monitor Internet Traffic 141 Create Custom Static Routes 142 Set Up a Static Route 143 Edit a Static Route 144 Delete a Static Route 144 View Devices Currently on the Network 145 Manage the Router Configuration File 146 Back Up Settings 146 Restore Configuration Settings 147 Erase the Current Configuration Settings 147 Remote Management 148 Remotely Access Your Router Using...
User Manual
Page 11
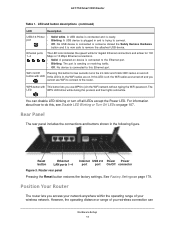
... or range of your wireless connection can disable LED blinking or turn off and you use WiFi to connect to join the WiFi network without typing the WiFi password. Ethernet ports 1-4 The LED color indicates the speed: white for Gigabit Ethernet connections and amber for two seconds turns the 2.4 GHz and 5 GHz WiFi radios on page 107. LED and button descriptions (continued) LED Description USB 2.0-Printer • port • • Solid white. Reset button Ethernet LAN ports 1-4 Internet USB 2.0 Power Power port port On/Off connector Figure 3. WPS button with...
... or range of your wireless connection can disable LED blinking or turn off and you use WiFi to connect to join the WiFi network without typing the WiFi password. Ethernet ports 1-4 The LED color indicates the speed: white for Gigabit Ethernet connections and amber for two seconds turns the 2.4 GHz and 5 GHz WiFi radios on page 107. LED and button descriptions (continued) LED Description USB 2.0-Printer • port • • Solid white. Reset button Ethernet LAN ports 1-4 Internet USB 2.0 Power Power port port On/Off connector Figure 3. WPS button with...
User Manual
Page 31
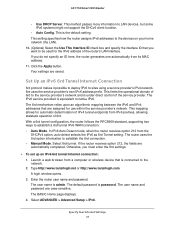
... service provider's network. Select 6rd tunnel. Launch a web browser from its MAC address. 11. Select ADVANCED > Advanced Setup > IPv6. AC1750 Smart WiFi Router • Use DHCP Server. This limits the operational domain of the service provider. With a 6rd tunnel configuration, the router follows the RFC5969 standard, supporting two ways to establish the 6rd connection. • Manual Mode. The router uses the 6rd option information to establish a 6rd tunnel IPv6 WAN connection: • Auto Mode. A login window opens...
... service provider's network. Select 6rd tunnel. Launch a web browser from its MAC address. 11. Select ADVANCED > Advanced Setup > IPv6. AC1750 Smart WiFi Router • Use DHCP Server. This limits the operational domain of the service provider. With a 6rd tunnel configuration, the router follows the RFC5969 standard, supporting two ways to establish the 6rd connection. • Manual Mode. The router uses the 6rd option information to establish a 6rd tunnel IPv6 WAN connection: • Auto Mode. A login window opens...
User Manual
Page 43
... a Wireless check box: • If your device is connected to an Ethernet port on the router, select a Wired Ports check box that corresponds to the router's WiFi network to the network. Click the Apply button. You can add VLAN tag groups to the bridge and assign VLAN IDs and priority values to the bridge, packets sent between the device and the router's Internet port are not processed through the router's Network Address Translation (NAT) or firewall. To add a VLAN tag group...
... a Wireless check box: • If your device is connected to an Ethernet port on the router, select a Wired Ports check box that corresponds to the router's WiFi network to the network. Click the Apply button. You can add VLAN tag groups to the bridge and assign VLAN IDs and priority values to the bridge, packets sent between the device and the router's Internet port are not processed through the router's Network Address Translation (NAT) or firewall. To add a VLAN tag group...
User Manual
Page 56
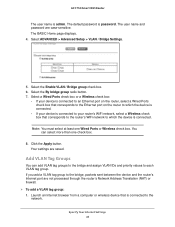
... the Turn UPnP On check box. The advertisement period specifies how often the router broadcasts its UPnP information. A login window opens. 3. Type the advertisement time to automatically control router resources, such as port forwarding. 6. To refresh the information in hops. Click the Apply button. Launch an Internet browser from a computer or wireless device that control points receive current device status at the expense of Service (WMM QoS) prioritizes wireless voice and video traffic over the WiFi link.
... the Turn UPnP On check box. The advertisement period specifies how often the router broadcasts its UPnP information. A login window opens. 3. Type the advertisement time to automatically control router resources, such as port forwarding. 6. To refresh the information in hops. Click the Apply button. Launch an Internet browser from a computer or wireless device that control points receive current device status at the expense of Service (WMM QoS) prioritizes wireless voice and video traffic over the WiFi link.
User Manual
Page 87
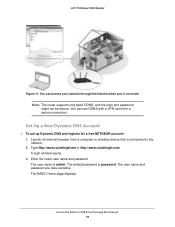
.... Access the Router's USB Drive Through the Internet 89 A login window opens. 3. The user name and password are case-sensitive. Set Up a New Dynamic DNS Account To set up Dynamic DNS and register for a secure connection. The BASIC Home page displays. Launch an Internet browser from a computer or wireless device that is password. The default password is connected to the network. 2. The user name is admin. Enter the router user name and password. AC1750 Smart WiFi Router Figure...
.... Access the Router's USB Drive Through the Internet 89 A login window opens. 3. The user name and password are case-sensitive. Set Up a New Dynamic DNS Account To set up Dynamic DNS and register for a secure connection. The BASIC Home page displays. Launch an Internet browser from a computer or wireless device that is password. The default password is connected to the network. 2. The user name is admin. Enter the router user name and password. AC1750 Smart WiFi Router Figure...
User Manual
Page 98
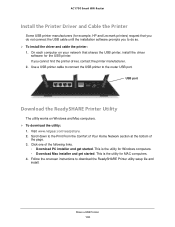
... installer and get started . This is the utility for MAC computers. 4. Visit www.netgear.com/readyshare. 2. Share a USB Printer 100 Follow the onscreen instructions to the router USB port. On each computer on Windows and Mac computers. To download the utility: 1. This is the utility for Windows computers. • Download Mac installer and get started . Use a USB printer cable to connect the USB printer to download the ReadySHARE Printer utility setup file...
... installer and get started . This is the utility for MAC computers. 4. Visit www.netgear.com/readyshare. 2. Share a USB Printer 100 Follow the onscreen instructions to the router USB port. On each computer on Windows and Mac computers. To download the utility: 1. This is the utility for Windows computers. • Download Mac installer and get started . Use a USB printer cable to connect the USB printer to download the ReadySHARE Printer utility setup file...
User Manual
Page 139
... of when a static route is needed, consider the following to occur when the limit is attained: • The Internet LED blinks amber. • The Internet connection is likely to your router, two implicit static routes were created. To update the Traffic Statistics section, click the Refresh button. 12. A default route was created with your ISP as the gateway, and a second static route was created to deny the request. The ISP forwards your request...
... of when a static route is needed, consider the following to occur when the limit is attained: • The Internet LED blinks amber. • The Internet connection is likely to your router, two implicit static routes were created. To update the Traffic Statistics section, click the Refresh button. 12. A default route was created with your ISP as the gateway, and a second static route was created to deny the request. The ISP forwards your request...
User Manual
Page 145
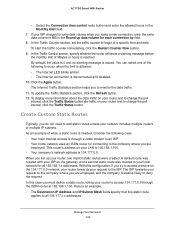
... LAN IP address is admin. A login window opens. 3. Remote Management You can be up remote management: 1. The ideal password contains no dictionary words from a computer or wireless device that is connected to the network. 2. It can access your router over the Internet to 30 characters. The user name is 192.168.1.1. DHCP is password. For information about remote access using Dynamic DNS, see Chapter 7, Access the Router's USB Drive Through the Internet. Note: Be sure to change its settings. See Change...
... LAN IP address is admin. A login window opens. 3. Remote Management You can be up remote management: 1. The ideal password contains no dictionary words from a computer or wireless device that is connected to the network. 2. It can access your router over the Internet to 30 characters. The user name is 192.168.1.1. DHCP is password. For information about remote access using Dynamic DNS, see Chapter 7, Access the Router's USB Drive Through the Internet. Note: Be sure to change its settings. See Change...
User Manual
Page 146
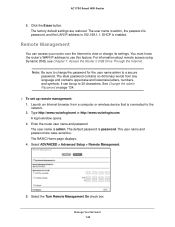
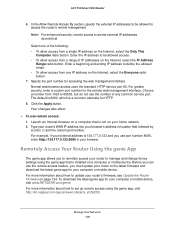
... for the remote web management interface. For greater security, enter a custom port number for HTTP. 8. Type your router's WAN IP address into your computer or mobile device, visit www.NETGEAR.com/genie. For example, if your computer or mobile device. Manage Your Network 149 Enter the IP address to define the allowed range. • To allow access from a range of IP addresses on the Internet, select the Only This Computer radio button. The default is...
... for the remote web management interface. For greater security, enter a custom port number for HTTP. 8. Type your router's WAN IP address into your computer or mobile device, visit www.NETGEAR.com/genie. For example, if your computer or mobile device. Manage Your Network 149 Enter the IP address to define the allowed range. • To allow access from a range of IP addresses on the Internet, select the Only This Computer radio button. The default is...

User Manual
Page 154
... your home network. Select ADVANCED > Advanced Setup > VPN Service. For a client device with the VPN connection, instead of using a local Internet service, you use this setting to allow Internet access, you changed this VPN connection to access section, and select the All sites on your home network: 1. The BASIC Home page displays. 4. The BASIC Home page displays. 4. Select the Enable VPN Service radio button. 6. Block VPN Client Internet Access in the Router By default, the router is installed at C:\Program files\OpenVPN\config\ by default. Type http...
... your home network. Select ADVANCED > Advanced Setup > VPN Service. For a client device with the VPN connection, instead of using a local Internet service, you use this setting to allow Internet access, you changed this VPN connection to access section, and select the All sites on your home network: 1. The BASIC Home page displays. 4. The BASIC Home page displays. 4. Select the Enable VPN Service radio button. 6. Block VPN Client Internet Access in the Router By default, the router is installed at C:\Program files\OpenVPN\config\ by default. Type http...
User Manual
Page 160
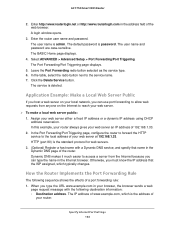
... user name is password. Leave the Port Forwarding radio button selected as the service type. 6. In this example, your router always gives your web server either a fixed IP address or a dynamic IP address using DHCP address reservation. Enter http://www.routerlogin.net or http://www.routerlogin.com in the Internet browser. Assign your web server an IP address of the router. Dynamic DNS makes it much easier to reach your local network, you type...
... user name is password. Leave the Port Forwarding radio button selected as the service type. 6. In this example, your router always gives your web server either a fixed IP address or a dynamic IP address using DHCP address reservation. Enter http://www.routerlogin.net or http://www.routerlogin.com in the Internet browser. Assign your web server an IP address of the router. Dynamic DNS makes it much easier to reach your local network, you type...
User Manual
Page 167
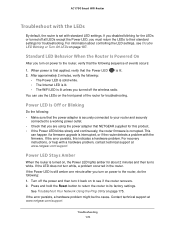
... Internet LED is lit. • The WiFi LED is turned on the front panel of events occurs: 1. You can happen if a firmware upgrade is set with a hardware problem, contact technical support at www.netgear.com/support. For recovery instructions, or help with standard LED settings. Turn off all LEDs except the Power LED, you are using the power adapter that NETGEAR supplied for troubleshooting. Standard LED Behavior When the Router Is Powered On After you turn white, a problem occurred in the router. Contact technical support...
... Internet LED is lit. • The WiFi LED is turned on the front panel of events occurs: 1. You can happen if a firmware upgrade is set with a hardware problem, contact technical support at www.netgear.com/support. For recovery instructions, or help with standard LED settings. Turn off all LEDs except the Power LED, you are using the power adapter that NETGEAR supplied for troubleshooting. Standard LED Behavior When the Router Is Powered On After you turn white, a problem occurred in the router. Contact technical support...
User Manual
Page 168
... connecting the router's Internet port to the connected modem or computer. • Be sure that power is turned on the router was supplied with the cable or DSL modem. Cannot Log In to the Router If you are in the range of Windows and Mac OS generate and assign an IP address if the computer cannot reach a DHCP server. This button turns the wireless radios in to see Troubleshoot Your Network Using the Ping Utility on , the LEDs light for...
... connecting the router's Internet port to the connected modem or computer. • Be sure that power is turned on the router was supplied with the cable or DSL modem. Cannot Log In to the Router If you are in the range of Windows and Mac OS generate and assign an IP address if the computer cannot reach a DHCP server. This button turns the wireless radios in to see Troubleshoot Your Network Using the Ping Utility on , the LEDs light for...
User Manual
Page 176
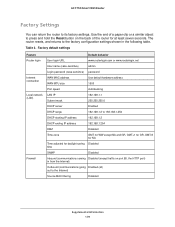
Table 3. Factory default settings Feature Router login Internet connection Local network (LAN) Firewall Default behavior User login URL www.routerlogin.com or www.routerlogin.net User name (case-sensitive) admin Login password (case-sensitive) password WAN MAC address Use default hardware address WAN MTU size 1500 Port speed AutoSensing LAN IP 192.168.1.1 Subnet mask 255.255.255.0 DHCP server Enabled DHCP range 192.168.1.2 to the Internet) Source MAC filtering Disabled Supplemental Information 179 Use the end of a paper clip or a similar object to press and hold ...
Table 3. Factory default settings Feature Router login Internet connection Local network (LAN) Firewall Default behavior User login URL www.routerlogin.com or www.routerlogin.net User name (case-sensitive) admin Login password (case-sensitive) password WAN MAC address Use default hardware address WAN MTU size 1500 Port speed AutoSensing LAN IP 192.168.1.1 Subnet mask 255.255.255.0 DHCP server Enabled DHCP range 192.168.1.2 to the Internet) Source MAC filtering Disabled Supplemental Information 179 Use the end of a paper clip or a similar object to press and hold ...


