PS121v2 Reference Manual
Page 5
Contents NETGEAR USB Multifunction Printer Server PS121v2 User Manual About This Manual Conventions, Formats and Scope vii How to Use This Manual viii How to Print this Manual viii Chapter 1 Getting Started What Is in the Box ...1-2 Hardware Description ...1-3 LED Indicators ...1-3 USB Port ...1-4 Diagnostic/Reset Push Button 1-4 Observe These Precautions 1-5 Chapter 2 Installation and Setup Preparing for Installation 2-1 Overview...
Contents NETGEAR USB Multifunction Printer Server PS121v2 User Manual About This Manual Conventions, Formats and Scope vii How to Use This Manual viii How to Print this Manual viii Chapter 1 Getting Started What Is in the Box ...1-2 Hardware Description ...1-3 LED Indicators ...1-3 USB Port ...1-4 Diagnostic/Reset Push Button 1-4 Observe These Precautions 1-5 Chapter 2 Installation and Setup Preparing for Installation 2-1 Overview...

PS121v2 Reference Manual
Page 11
... not tested them. 1-1 v2.0, April 2007 Chapter 1 Getting Started Congratulations on the NETGEAR, Inc. The print server allows you to prepare for installation. • For quick installation and setup, see the PS121v2 USB Multifunction Print Server Installation Guide, which describes the installation and use of the PS121v2 for operation with a Microsoft Vista, Windows XP, Windows 2000, Windows Me, or...
... not tested them. 1-1 v2.0, April 2007 Chapter 1 Getting Started Congratulations on the NETGEAR, Inc. The print server allows you to prepare for installation. • For quick installation and setup, see the PS121v2 USB Multifunction Print Server Installation Guide, which describes the installation and use of the PS121v2 for operation with a Microsoft Vista, Windows XP, Windows 2000, Windows Me, or...
PS121v2 Reference Manual
Page 17
... and Setup This chapter describes how to install your PS121v2 USB Multifunction Print Server and set up basic connectivity on a router. • You have a printer with at least one PC running Microsoft Vista, Windows XP, Windows 2000,Windows 98SE, or Windows Me. • You have one of the other NETGEAR Print Servers such as the Model PS101 Mini Print Server. •...
... and Setup This chapter describes how to install your PS121v2 USB Multifunction Print Server and set up basic connectivity on a router. • You have a printer with at least one PC running Microsoft Vista, Windows XP, Windows 2000,Windows 98SE, or Windows Me. • You have one of the other NETGEAR Print Servers such as the Model PS101 Mini Print Server. •...

PS121v2 Reference Manual
Page 18
...Fax" on your network. The PS121v2 USB Multifunction Print Server also works as a standard print server. NETGEAR USB Multifunction Printer Server PS121v2 User Manual Overview When installation is complete, your network configuration will look similar to the following: Router Printer Print Server PS121 Figure 2-1 Computers Multi-Function Printers The PS121v2 USB Multifunction Print Server works with multi-function printers and...98 SE, or Windows ME • Macintosh • Microsoft Vista, Windows XP and Windows 2000 using LPR or raw printing. 2-2 Installation and Setup v2.0, April 2007
...Fax" on your network. The PS121v2 USB Multifunction Print Server also works as a standard print server. NETGEAR USB Multifunction Printer Server PS121v2 User Manual Overview When installation is complete, your network configuration will look similar to the following: Router Printer Print Server PS121 Figure 2-1 Computers Multi-Function Printers The PS121v2 USB Multifunction Print Server works with multi-function printers and...98 SE, or Windows ME • Macintosh • Microsoft Vista, Windows XP and Windows 2000 using LPR or raw printing. 2-2 Installation and Setup v2.0, April 2007
PS121v2 Reference Manual
Page 19
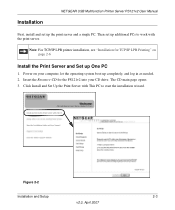
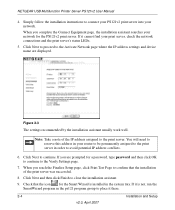
... and Setup 2-3 v2.0, April 2007 Insert the Resource CD for TCP/IP LPR Printing" on your CD drive. Installation NETGEAR USB Multifunction Printer Server PS121v2 User Manual First, install and set up completely, and log in as needed. 2. Then set up One PC 1. Note: For TCP/IP LPR printer installation, see "Installation for the PS121v2 into your...
... and Setup 2-3 v2.0, April 2007 Insert the Resource CD for TCP/IP LPR Printing" on your CD drive. Installation NETGEAR USB Multifunction Printer Server PS121v2 User Manual First, install and set up completely, and log in as needed. 2. Then set up One PC 1. Note: For TCP/IP LPR printer installation, see "Installation for the PS121v2 into your...
PS121v2 Reference Manual
Page 20
NETGEAR USB Multifunction Printer Server PS121v2 User Manual 4. Click Next to proceed to the Activate Network page where the IP address settings and device name are prompted for the PS121v2 print server. You will need to confirm that the icon for the Smart Wizard is not, run the SmartWizard...to place it there. 2-4 Installation and Setup v2.0, April 2007 Simply follow the installation instructions to connect your PS121v2 print server into your router to be permanently assigned to the print server in the ps121 program group to the print server. If it is installed in your network....
NETGEAR USB Multifunction Printer Server PS121v2 User Manual 4. Click Next to proceed to the Activate Network page where the IP address settings and device name are prompted for the PS121v2 print server. You will need to confirm that the icon for the Smart Wizard is not, run the SmartWizard...to place it there. 2-4 Installation and Setup v2.0, April 2007 Simply follow the installation instructions to connect your PS121v2 print server into your router to be permanently assigned to the print server in the ps121 program group to the print server. If it is installed in your network....

PS121v2 Reference Manual
Page 21
... to its client devices periodically. You do this by connecting to Use the PS121v2 After you have a NETGEAR router, use the PS121v2. Installation and Setup 2-5 v2.0, April 2007 NETGEAR USB Multifunction Printer Server PS121v2 User Manual Reserve the Print Server's IP Address on Your Router The DHCP server on your router manual. The above information can block communications between your Web...
... to its client devices periodically. You do this by connecting to Use the PS121v2 After you have a NETGEAR router, use the PS121v2. Installation and Setup 2-5 v2.0, April 2007 NETGEAR USB Multifunction Printer Server PS121v2 User Manual Reserve the Print Server's IP Address on Your Router The DHCP server on your router manual. The above information can block communications between your Web...
PS121v2 Reference Manual
Page 22
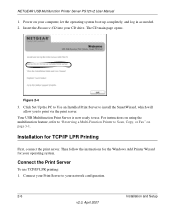
... install the SmartWizard, which will allow you to your network configuration. 2-6 Installation and Setup v2.0, April 2007 Then follow the instructions for the Windows Add Printer Wizard for TCP/IP LPR Printing First, connect the print server. NETGEAR USB Multifunction Printer Server PS121v2 User Manual 1. Figure 2-4 3. Installation for your CD drive. Connect your computer, let the operating system...
... install the SmartWizard, which will allow you to your network configuration. 2-6 Installation and Setup v2.0, April 2007 Then follow the instructions for the Windows Add Printer Wizard for TCP/IP LPR Printing First, connect the print server. NETGEAR USB Multifunction Printer Server PS121v2 User Manual 1. Figure 2-4 3. Installation for your CD drive. Connect your computer, let the operating system...
PS121v2 Reference Manual
Page 23
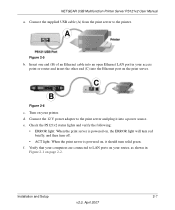
... Ethernet LAN port in Figure 2-1 on the print server. Installation and Setup 2-7 v2.0, April 2007 d. Check the PS121v2 status lights and verify the following: • ERROR light: When the print server is powered on, it into the Ethernet port on page 2-2. Connect the supplied USB cable (A) from the print server to the print server and plug it should turn off. •...
... Ethernet LAN port in Figure 2-1 on the print server. Installation and Setup 2-7 v2.0, April 2007 d. Check the PS121v2 status lights and verify the following: • ERROR light: When the print server is powered on, it into the Ethernet port on page 2-2. Connect the supplied USB cable (A) from the print server to the print server and plug it should turn off. •...

PS121v2 Reference Manual
Page 24
Figure 2-7 3. Figure 2-8 2-8 v2.0, April 2007 Installation and Setup Select the Create a new port radio button. From the Windows Start menu of port drop-down list, select Standard TCP/IP Port, and then click Next. Click Add a Printer, select Add a local printer, and then click Next. From the Type of a computer connected to the same network as the USB Multifunction Print Server, click Settings then click Printers. 2. NETGEAR USB Multifunction Printer Server PS121v2 User Manual Adding a Printer with Windows Vista 1.
Figure 2-7 3. Figure 2-8 2-8 v2.0, April 2007 Installation and Setup Select the Create a new port radio button. From the Windows Start menu of port drop-down list, select Standard TCP/IP Port, and then click Next. Click Add a Printer, select Add a local printer, and then click Next. From the Type of a computer connected to the same network as the USB Multifunction Print Server, click Settings then click Printers. 2. NETGEAR USB Multifunction Printer Server PS121v2 User Manual Adding a Printer with Windows Vista 1.
PS121v2 Reference Manual
Page 25
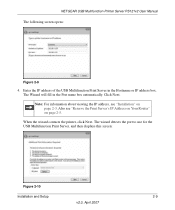
... for the USB Multifunction Print Server, and then displays this screen: Figure 2-10 Installation and Setup 2-9 v2.0, April 2007 Enter the IP address of the USB Multifunction Print Server in the Port name box automatically. Note: For information about viewing the IP address, see "Reserve the Print Server's IP Address on Your Router" on page 2-3. NETGEAR USB Multifunction Printer Server PS121v2 User Manual...
... for the USB Multifunction Print Server, and then displays this screen: Figure 2-10 Installation and Setup 2-9 v2.0, April 2007 Enter the IP address of the USB Multifunction Print Server in the Port name box automatically. Note: For information about viewing the IP address, see "Reserve the Print Server's IP Address on Your Router" on page 2-3. NETGEAR USB Multifunction Printer Server PS121v2 User Manual...

PS121v2 Reference Manual
Page 26
When the Additional Port Information required screen appears, click Next. Select Custom, and then click Settings. Click OK to close this screen. 7. The Configure Standard TCP/IP Port Monitor screen opens. 6. Figure 2-11 For Protocol, select LPR, and then enter PS121v2 as the Queue Name in the LPR Settings. The wizard detects the driver, and then displays the Install the printer driver screen: Figure 2-12 2-10 v2.0, April 2007 Installation and Setup Configure the TCP/IP Port Monitor. NETGEAR USB Multifunction Printer Server PS121v2 User Manual 5.
When the Additional Port Information required screen appears, click Next. Select Custom, and then click Settings. Click OK to close this screen. 7. The Configure Standard TCP/IP Port Monitor screen opens. 6. Figure 2-11 For Protocol, select LPR, and then enter PS121v2 as the Queue Name in the LPR Settings. The wizard detects the driver, and then displays the Install the printer driver screen: Figure 2-12 2-10 v2.0, April 2007 Installation and Setup Configure the TCP/IP Port Monitor. NETGEAR USB Multifunction Printer Server PS121v2 User Manual 5.

PS121v2 Reference Manual
Page 27
... verify that identifies this computer, the Add Printer Wizard will inform you and let you keep the existing driver. 9. Click Print a test page, and then click Finish. 11. If you are connected to the Internet, you can click the Windows ...name and whether you have. Check the printer attached to the USB Multifunction Print Server to print a test page. Note: If you do not see Chapter 4, "Troubleshooting" Installation and Setup v2.0, April 2007 2-11 NETGEAR USB Multifunction Printer Server PS121v2 User Manual 8. Scroll and select your printer manufacturer, and your...
... verify that identifies this computer, the Add Printer Wizard will inform you and let you keep the existing driver. 9. Click Print a test page, and then click Finish. 11. If you are connected to the Internet, you can click the Windows ...name and whether you have. Check the printer attached to the USB Multifunction Print Server to print a test page. Note: If you do not see Chapter 4, "Troubleshooting" Installation and Setup v2.0, April 2007 2-11 NETGEAR USB Multifunction Printer Server PS121v2 User Manual 8. Scroll and select your printer manufacturer, and your...

PS121v2 Reference Manual
Page 28
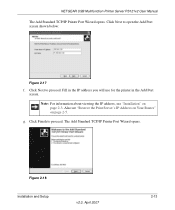
Figure 2-16 2-12 v2.0, April 2007 Installation and Setup b. e. Figure 2-15 d. Click Add a printer and then Next to proceed. Click Next to proceed. Choose the Local printer attached to choose the Create a new port: ... option. From the Windows Start menu of port" drop-down list, select Standard TCP/IP Port. From the "Type of a computer connected to the PS121v2, click Printers and Faxes. Figure 2-14 c. NETGEAR USB Multifunction Printer Server PS121v2 User Manual Adding a Printer with Windows XP or Windows 2000 1. Run the Windows Add Printer Wizard as follows: a.
Figure 2-16 2-12 v2.0, April 2007 Installation and Setup b. e. Figure 2-15 d. Click Add a printer and then Next to proceed. Click Next to proceed. Choose the Local printer attached to choose the Create a new port: ... option. From the Windows Start menu of port" drop-down list, select Standard TCP/IP Port. From the "Type of a computer connected to the PS121v2, click Printers and Faxes. Figure 2-14 c. NETGEAR USB Multifunction Printer Server PS121v2 User Manual Adding a Printer with Windows XP or Windows 2000 1. Run the Windows Add Printer Wizard as follows: a.
PS121v2 Reference Manual
Page 29
... 2-17 f. The Add Standard TCP/IP Printer Port Wizard opens. Figure 2-18 Installation and Setup v2.0, April 2007 2-13 Note: For information about viewing the IP address, see "Reserve the Print Server's IP Address on Your Router" on page 2-3. Also see "Installation" on page 2-5. Fill... in the IP address you will use for the printer in the Add Port screen. g. Click Next to proceed. Click Next to proceed. NETGEAR USB Multifunction Printer Server PS121v2 User Manual ...
... 2-17 f. The Add Standard TCP/IP Printer Port Wizard opens. Figure 2-18 Installation and Setup v2.0, April 2007 2-13 Note: For information about viewing the IP address, see "Reserve the Print Server's IP Address on Your Router" on page 2-3. Also see "Installation" on page 2-5. Fill... in the IP address you will use for the printer in the Add Port screen. g. Click Next to proceed. Click Next to proceed. NETGEAR USB Multifunction Printer Server PS121v2 User Manual ...

PS121v2 Reference Manual
Page 30
In the Device Type section of the print server in the LPR Settings section. j. In the Protocol section, select the LPR radio button, and enter PS121v2 as follows: 2-14 v2.0, April 2007 Installation and Setup Click Next to proceed. Click Next to proceed. The Port ...OK to the USB Multifunction Print Server. 2. From the Add Port screen, enter the IP address of the Additional Port Information Required screen, select Custom. Complete the Add Standard TCP/IP Printer Port Wizard as the Queue Name in the IP Address field. NETGEAR USB Multifunction Printer Server PS121v2 User Manual ...
In the Device Type section of the print server in the LPR Settings section. j. In the Protocol section, select the LPR radio button, and enter PS121v2 as follows: 2-14 v2.0, April 2007 Installation and Setup Click Next to proceed. Click Next to proceed. The Port ...OK to the USB Multifunction Print Server. 2. From the Add Port screen, enter the IP address of the Additional Port Information Required screen, select Custom. Complete the Add Standard TCP/IP Printer Port Wizard as the Queue Name in the IP Address field. NETGEAR USB Multifunction Printer Server PS121v2 User Manual ...

PS121v2 Reference Manual
Page 31
NETGEAR USB Multifunction Printer Server PS121v2 User Manual a. If the printer software is already installed on the print server. On the Printer Sharing screen, accept the "Do not share this computer, the Add Printer Wizard will inform you and let you keep the existing ... printer software from a disk you can click the Have Disk button to proceed. c. Installation and Setup v2.0, April 2007 2-15 The Name Your Printer screen prompts for a descriptive name and whether you connected to the USB port on this printer" option and click Next. Click Next to be the default or not...
NETGEAR USB Multifunction Printer Server PS121v2 User Manual a. If the printer software is already installed on the print server. On the Printer Sharing screen, accept the "Do not share this computer, the Add Printer Wizard will inform you and let you keep the existing ... printer software from a disk you can click the Have Disk button to proceed. c. Installation and Setup v2.0, April 2007 2-15 The Name Your Printer screen prompts for a descriptive name and whether you connected to the USB port on this printer" option and click Next. Click Next to be the default or not...

PS121v2 Reference Manual
Page 32
...MacOS versions beginning from 8.1. Click Next to use the print server, follow these steps: 1. Check the printer attached to the USB Multifunction Print Server to verify that has Desktop Printing installed or available. To configure the Macintosh to proceed....Printing is also required. LPR printing can be prompted to verify successful printing on any Macintosh that the test page printed successfully. Print a test page to print a test page. and select your actual printer. 2-16 v2.0, April 2007 Installation and Setup NETGEAR USB Multifunction Printer Server PS121v2...
...MacOS versions beginning from 8.1. Click Next to use the print server, follow these steps: 1. Check the printer attached to the USB Multifunction Print Server to verify that has Desktop Printing installed or available. To configure the Macintosh to proceed....Printing is also required. LPR printing can be prompted to verify successful printing on any Macintosh that the test page printed successfully. Print a test page to print a test page. and select your actual printer. 2-16 v2.0, April 2007 Installation and Setup NETGEAR USB Multifunction Printer Server PS121v2...

PS121v2 Reference Manual
Page 33
... LPR Printer Selection box, click Change... 8. You should now appear on your desktop. 13. At the bottom of the USB Multifunction Print Server. Installation and Setup v2.0, April 2007 2-17 Quit the Desktop Printer Utility. In the Printer Address field, type the IP address of the ... prompted, rename the printer with a descriptive name and click Save. Click OK to return to the Untitled 1 window. 7. NETGEAR USB Multifunction Printer Server PS121v2 User Manual 5. If your computer can leave the Queue Name blank. 9. You can see the IP address displayed above the button.
... LPR Printer Selection box, click Change... 8. You should now appear on your desktop. 13. At the bottom of the USB Multifunction Print Server. Installation and Setup v2.0, April 2007 2-17 Quit the Desktop Printer Utility. In the Printer Address field, type the IP address of the ... prompted, rename the printer with a descriptive name and click Save. Click OK to return to the Untitled 1 window. 7. NETGEAR USB Multifunction Printer Server PS121v2 User Manual 5. If your computer can leave the Queue Name blank. 9. You can see the IP address displayed above the button.
PS121v2 Reference Manual
Page 34
NETGEAR USB Multifunction Printer Server PS121v2 User Manual 2-18 v2.0, April 2007 Installation and Setup
NETGEAR USB Multifunction Printer Server PS121v2 User Manual 2-18 v2.0, April 2007 Installation and Setup