FS726T User Manual
Page 11
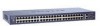
Smart Switch Series Software Manual Figure 3-2: Smartwizard Discovery > Web Access 7. Figure 3-3: Web Management main page Getting Started 3-2 July 2005 To manage your switch via your web browser, click Web Access. The default password is password. The main page below will display.
Smart Switch Series Software Manual Figure 3-2: Smartwizard Discovery > Web Access 7. Figure 3-3: Web Management main page Getting Started 3-2 July 2005 To manage your switch via your web browser, click Web Access. The default password is password. The main page below will display.
FS726T User Manual
Page 12
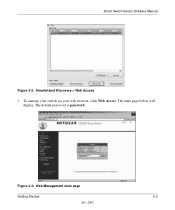
...it. Click Discover to find your PC. 5. Choose Disable on your switch by plugging in the same subnet. Enter your password and click Set. Smart Switch Series Software Manual For a Network without a DHCP Server 1. The default IP is 192.168.0.239. 4. Then, type your IP address, Gateway... 3-4: Assigning the switch a static IP address 8. Connect your switch to your switch no matter if your existing network. 2. Then click Web Access. 3-3 Getting Started July 2005 Note: You can always assign a Static IP address to your network has a DHCP server or not. 10. Power on DHCP...
...it. Click Discover to find your PC. 5. Choose Disable on your switch by plugging in the same subnet. Enter your password and click Set. Smart Switch Series Software Manual For a Network without a DHCP Server 1. The default IP is 192.168.0.239. 4. Then, type your IP address, Gateway... 3-4: Assigning the switch a static IP address 8. Connect your switch to your switch no matter if your existing network. 2. Then click Web Access. 3-3 Getting Started July 2005 Note: You can always assign a Static IP address to your network has a DHCP server or not. 10. Power on DHCP...
FS726T User Manual
Page 13
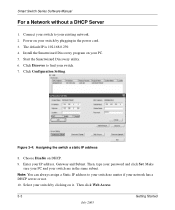
The default password is password. To manage your switch via your web browser, click Web Access. Figure 3-5: Web Management main page Getting Started 3-4 July 2005 Smart Switch Series Software Manual 11. The main page below will display.
The default password is password. To manage your switch via your web browser, click Web Access. Figure 3-5: Web Management main page Getting Started 3-4 July 2005 Smart Switch Series Software Manual 11. The main page below will display.
FS726T User Manual
Page 16
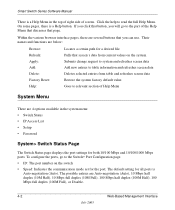
... for a desired file. The default setting for all ports is a Help Menu in the system menu: • Switch Status • IP Access List • Setup • Password System> Switch Status Page The Switch Status page displays the port settings for the port. Smart Switch Series Software Manual There is Auto...current values on the switch • Speed: Indicates the communication mode set for both 10/100 Mbps and 10/100/1000 Mbps ports. Click the help to the part of screen. Their names and functions are several buttons that you will go to the Switch> Port Configuration page....
... for a desired file. The default setting for all ports is a Help Menu in the system menu: • Switch Status • IP Access List • Setup • Password System> Switch Status Page The Switch Status page displays the port settings for the port. Smart Switch Series Software Manual There is Auto...current values on the switch • Speed: Indicates the communication mode set for both 10/100 Mbps and 10/100/1000 Mbps ports. Click the help to the part of screen. Their names and functions are several buttons that you will go to the Switch> Port Configuration page....
FS726T User Manual
Page 18
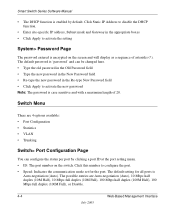
...switch. The default setting for the port. Click Static IP Address to disable the DHCP function. • Enter site-specific IP address, Subnet mask and Gateway in the Re-type New Password field • Click Apply to activate the new password Note: The password is case sensitive and with a maximum length of asterisks (*). Smart Switch... screen and will display as a sequence of 20. Switch Menu There are Auto-negotiation (Auto), 10 Mbps half duplex (10M Half), 10 Mbps full duplex (10M Full), 100 Mbps half duplex (100M Half), 100 Mbps full duplex (100M Full), or Disable. 4-4 Web...
...switch. The default setting for the port. Click Static IP Address to disable the DHCP function. • Enter site-specific IP address, Subnet mask and Gateway in the Re-type New Password field • Click Apply to activate the new password Note: The password is case sensitive and with a maximum length of asterisks (*). Smart Switch... screen and will display as a sequence of 20. Switch Menu There are Auto-negotiation (Auto), 10 Mbps half duplex (10M Half), 10 Mbps full duplex (10M Full), 100 Mbps half duplex (100M Half), 100 Mbps full duplex (100M Full), or Disable. 4-4 Web...

FS726T User Manual
Page 27
Note: The Backup file does not affect the password and MAC address of the switch Firmware> Factory Reset Page You can always reset the switch to default values by using a duplicate configuration): • Click Restore to recover the Backup file from your workstation. Restoring your Backup file ... file. • Click OK in Figure 5-34. Note: Please be aware that the switch will enable you do not want them to have to re-set to a previous configuration. Firmware Menu Smart Switch Series Software Manual There are 2 options available: • Configuration Backup • Factory Reset...
Note: The Backup file does not affect the password and MAC address of the switch Firmware> Factory Reset Page You can always reset the switch to default values by using a duplicate configuration): • Click Restore to recover the Backup file from your workstation. Restoring your Backup file ... file. • Click OK in Figure 5-34. Note: Please be aware that the switch will enable you do not want them to have to re-set to a previous configuration. Firmware Menu Smart Switch Series Software Manual There are 2 options available: • Configuration Backup • Factory Reset...
FS726T User Manual
Page 45
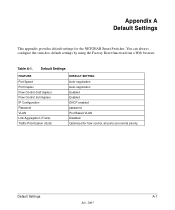
... Flow Control (half duplex) Flow Control (full duplex) IP Configuration Password VLAN Link Aggregation (Trunk) Traffic Prioritization (QoS) DEFAULT SETTING Auto-negotiation Auto-negotiation Enabled Enabled DHCP enabled password Port-Based VLAN Disabled Optimized for the NETGEAR Smart Switches. You can always configure the switch to default settings by using the Factory Reset function from a Web browser. Appendix...
... Flow Control (half duplex) Flow Control (full duplex) IP Configuration Password VLAN Link Aggregation (Trunk) Traffic Prioritization (QoS) DEFAULT SETTING Auto-negotiation Auto-negotiation Enabled Enabled DHCP enabled password Port-Based VLAN Disabled Optimized for the NETGEAR Smart Switches. You can always configure the switch to default settings by using the Factory Reset function from a Web browser. Appendix...
FS726T User Manual
Page 49
...Octet Rate 4-5 Outbound Octets 4-6 Outbound Unicast Packet Rate 4-5 Outbound Unicast Packets 4-6 P Passwords 4-18 Port Configuration 3-9, 4-14 Port Mirroring 3-14, 4-20, 4-22 Port Priority 3-20 Port Selection 4-8 Port Settings 4-10 Port Trunking 3-15, 4-20 Port Trunking 4-23 Primary VLAN 4-33 Priority 3-25, ...4-37 Product updates 1-2 R RADIUS 4-20 Rate/Duplex field 3-9 Refresh Rate 4-8 Restore Factory Defaults 4-17 RS-232 serial port 2-1 S Save Configuration 4-...
...Octet Rate 4-5 Outbound Octets 4-6 Outbound Unicast Packet Rate 4-5 Outbound Unicast Packets 4-6 P Passwords 4-18 Port Configuration 3-9, 4-14 Port Mirroring 3-14, 4-20, 4-22 Port Priority 3-20 Port Selection 4-8 Port Settings 4-10 Port Trunking 3-15, 4-20 Port Trunking 4-23 Primary VLAN 4-33 Priority 3-25, ...4-37 Product updates 1-2 R RADIUS 4-20 Rate/Duplex field 3-9 Refresh Rate 4-8 Restore Factory Defaults 4-17 RS-232 serial port 2-1 S Save Configuration 4-...

FS750T2 Hardware manual
Page 11
Factory Defaults Button of the FS750T2 Smart Switch Page 11 of 21 Figure 2-4. Factory Defaults Button The FS750T2 has a Factory Default Button to enable you to clear out the current configuration and return to the factory settings. This will clear out all settings, including the password, VLAN settings and port configurations.
Factory Defaults Button of the FS750T2 Smart Switch Page 11 of 21 Figure 2-4. Factory Defaults Button The FS750T2 has a Factory Default Button to enable you to clear out the current configuration and return to the factory settings. This will clear out all settings, including the password, VLAN settings and port configurations.

