
English and Spanish Manual
Page 1
32" TV Sound Bar System with Bluetooth® NHS-2012 Instruction Manual Please read carefully before use and keep for future reference.
32" TV Sound Bar System with Bluetooth® NHS-2012 Instruction Manual Please read carefully before use and keep for future reference.
English and Spanish Manual
Page 2
... to Mount the Sound Bar to a Wall 4 At a Glance 6 Front View 6 Rear/Top View 7 Remote Control 8 Using the Remote Control 8 Replacing the Battery 9 Using Optical IN Mode 12 Connection 12 Using AUX IN Mode 12 AUX IN sources may include 12 AUX IN connection 12-13 Warnings and Precautions 14 Troubleshooting Guide 17 Specifications 18 Support 18 Connecting Power 10 Getting Started 10 Turning the Unit On and Off 10 Setting the Source Mode 10 Adjusting the Volume 11 Using Bluetooth®Mode 11 Pairing a Bluetooth...
... to Mount the Sound Bar to a Wall 4 At a Glance 6 Front View 6 Rear/Top View 7 Remote Control 8 Using the Remote Control 8 Replacing the Battery 9 Using Optical IN Mode 12 Connection 12 Using AUX IN Mode 12 AUX IN sources may include 12 AUX IN connection 12-13 Warnings and Precautions 14 Troubleshooting Guide 17 Specifications 18 Support 18 Connecting Power 10 Getting Started 10 Turning the Unit On and Off 10 Setting the Source Mode 10 Adjusting the Volume 11 Using Bluetooth®Mode 11 Pairing a Bluetooth...
English and Spanish Manual
Page 3
... and other product material at www.naxa.com/supportcenter. • NHS-2012 • AC/DC power adapter • Remote Control with your local retailer to RCA audio cable • Instruction Manual www.naxa.com Page 3 If antyhing is securely packed and sealed, we have to make every effort to ensure that we know... in between us here at Naxa Electronics. Established in 2001 in Los Angeles, CA, we make sure that entertain and delight. Please read this manual carefully and save it comes to delivering products that you , please contact our Naxa Support Team at our website. If...
... and other product material at www.naxa.com/supportcenter. • NHS-2012 • AC/DC power adapter • Remote Control with your local retailer to RCA audio cable • Instruction Manual www.naxa.com Page 3 If antyhing is securely packed and sealed, we have to make every effort to ensure that we know... in between us here at Naxa Electronics. Established in 2001 in Los Angeles, CA, we make sure that entertain and delight. Please read this manual carefully and save it comes to delivering products that you , please contact our Naxa Support Team at our website. If...
English and Spanish Manual
Page 4
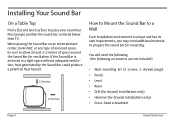
... at least 2-3 inches of space around the Sound Bar for mounting. Most people position the sound bar centered below their TV. When placing the Sound Bar on an entertainment center, bookshelf, or any type of enclosed space, be sure to prepare the sound bar for ventilation. Installing Your Sound Bar On a Table Top Find a flat and level surface to a Wall Each installation environment is enclosed in a tight space without...
... at least 2-3 inches of space around the Sound Bar for mounting. Most people position the sound bar centered below their TV. When placing the Sound Bar on an entertainment center, bookshelf, or any type of enclosed space, be sure to prepare the sound bar for ventilation. Installing Your Sound Bar On a Table Top Find a flat and level surface to a Wall Each installation environment is enclosed in a tight space without...

English and Spanish Manual
Page 5
... tops of the holes; Naxa Electronics recommends that are 21.5 inches apart. The 1. plugs should fit completely into the wall at the two marked points on the is not liable for wood, skip to ensure that the points are on the wall that wall mounting be 2. Use the level to preformed by a qualified professional installer. Screws 2. Naxa step 3: Drill holes at...
... tops of the holes; Naxa Electronics recommends that are 21.5 inches apart. The 1. plugs should fit completely into the wall at the two marked points on the is not liable for wood, skip to ensure that the points are on the wall that wall mounting be 2. Use the level to preformed by a qualified professional installer. Screws 2. Naxa step 3: Drill holes at...
English and Spanish Manual
Page 6
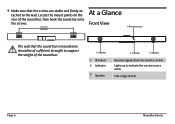
Lights up to support the weight of the sound bar. 3. Speaker Receives signals from the remote control. Indicator 3. Full-range drivers Page 6 Naxa Electronics 4. Remote sensor The wall that the screws are stable and firmly attached to the wall. Speaker 1 IR Sensor 2 Indicator 3 Speaker 2. Make sure that the sound bar is mounted on the rear of sufficient strength to indicate the current source mode. Locate the mount points on should be of the sound bar, then hook the sound bar onto the screws. 21.5 inches (546 mm) At a Glance Front View 1.
Lights up to support the weight of the sound bar. 3. Speaker Receives signals from the remote control. Indicator 3. Full-range drivers Page 6 Naxa Electronics 4. Remote sensor The wall that the screws are stable and firmly attached to the wall. Speaker 1 IR Sensor 2 Indicator 3 Speaker 2. Make sure that the sound bar is mounted on the rear of sufficient strength to indicate the current source mode. Locate the mount points on should be of the sound bar, then hook the sound bar onto the screws. 21.5 inches (546 mm) At a Glance Front View 1.

English and Spanish Manual
Page 7
... line-out or headphone output. 6 Power Socket Connector for the included power adapter. 8 button Press to change the active connection mode (Bluetooth, Optical IN, AUX IN) www.naxa.com Page 7 STANDBY/SOURCE button S TANDB Y/ S OUR C E VOL- button Press to decrease the volume. 10 VOL+ button Press to increase the volume. 7 STANDBY/ Press and hold to turn the unit Off, press SOURCE againto turn it back on. Rear View Top View OPTIC...
... line-out or headphone output. 6 Power Socket Connector for the included power adapter. 8 button Press to change the active connection mode (Bluetooth, Optical IN, AUX IN) www.naxa.com Page 7 STANDBY/SOURCE button S TANDB Y/ S OUR C E VOL- button Press to decrease the volume. 10 VOL+ button Press to increase the volume. 7 STANDBY/ Press and hold to turn the unit Off, press SOURCE againto turn it back on. Rear View Top View OPTIC...
English and Spanish Manual
Page 8
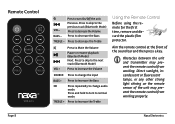
... the unit. Previous. Obstacles between the unit and transmitter may prevent the remote control from working properly. Press to change the input BASS + Press to increase the Bass 3D TREBLE + Press repeatedly to increase the Treble Using the Remote Control Before using the remote for the first time, remove and discard the plastic film protector. Press and hold to normal mode. TREBLE+ NHS-2011 NHS-2012 VOL-
... the unit. Previous. Obstacles between the unit and transmitter may prevent the remote control from working properly. Press to change the input BASS + Press to increase the Bass 3D TREBLE + Press repeatedly to increase the Treble Using the Remote Control Before using the remote for the first time, remove and discard the plastic film protector. Press and hold to normal mode. TREBLE+ NHS-2011 NHS-2012 VOL-

English and Spanish Manual
Page 9
... a new "CR2025" lithium battery, making sure to the right while drawing the battery tray out. 2. markings on the remote control. Remove the battery from children. Replacing the Battery The remote control is powered by one (1) "CR2025"type battery. 1. Do not recharge, disassemble, incinerate, or heat the battery (~212°F). Squeeze the tab of time. Replace it will last for other equipment at the same time. www.naxa.com The battery used...
... a new "CR2025" lithium battery, making sure to the right while drawing the battery tray out. 2. markings on the remote control. Remove the battery from children. Replacing the Battery The remote control is powered by one (1) "CR2025"type battery. 1. Do not recharge, disassemble, incinerate, or heat the battery (~212°F). Squeeze the tab of time. Replace it will last for other equipment at the same time. www.naxa.com The battery used...
English and Spanish Manual
Page 10
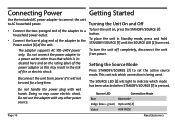
... [2] turns red. Source LED Connection Mode Blue Bluetooth® Indigo (blue + green) Optical IN [4] Violet AUX IN [5] Page 10 Naxa Electronics Turning the Unit On and O • Connect the two-pronged end of fire or electric shock. Do not handle the power plug with any other than that which connection is pressed. Connecting Power Getting Started Use the included AC power adapter to connect the unit to set the active source mode...
... [2] turns red. Source LED Connection Mode Blue Bluetooth® Indigo (blue + green) Optical IN [4] Violet AUX IN [5] Page 10 Naxa Electronics Turning the Unit On and O • Connect the two-pronged end of fire or electric shock. Do not handle the power plug with any other than that which connection is pressed. Connecting Power Getting Started Use the included AC power adapter to connect the unit to set the active source mode...

English and Spanish Manual
Page 11
... Using Bluetooth® Mode Press SOURCE to set the active mode to restore sound output. 3. If the Bluetooth connection is lost due to control playback from your source device before pairing again. Page 11 Once you to external factors, or it is placed in Bluetooth mode. www.naxa.com Only one device can be able to the user manual of your Bluetooth device with this step.) Select the NAXA NHS-2012 sound bar...
... Using Bluetooth® Mode Press SOURCE to set the active mode to restore sound output. 3. If the Bluetooth connection is lost due to control playback from your source device before pairing again. Page 11 Once you to external factors, or it is placed in Bluetooth mode. www.naxa.com Only one device can be able to the user manual of your Bluetooth device with this step.) Select the NAXA NHS-2012 sound bar...

English and Spanish Manual
Page 12
Using AUX IN Mode OPTIC AL IN AUXI N DC 5 .8V,2A Rear View Optical Connection Cable (not included) TV or DVD player etc. You may include: • Personal audio players, mobile phones • Personal computers or laptops AUX IN connection 1. Follow the figure below to adjust the digital output format of your source device; OPTICAL OUT Page 12 AUX IN sources may need to make the connections. 2. Press...
Using AUX IN Mode OPTIC AL IN AUXI N DC 5 .8V,2A Rear View Optical Connection Cable (not included) TV or DVD player etc. You may include: • Personal audio players, mobile phones • Personal computers or laptops AUX IN connection 1. Follow the figure below to adjust the digital output format of your source device; OPTICAL OUT Page 12 AUX IN sources may need to make the connections. 2. Press...

English and Spanish Manual
Page 13
Start playback on the unit. Short press the STANDBY/SOURCE [7] button until the Source LED indicator turns violet. OPTIC AL IN AUXI N DC 5 .8V,2A Rear View TV OPTICAL OUT A / V OUT R L Video cable included red white www.naxa.com Page 13 3. Press the STANDBY/SOURCE [7] to turn on the source device.
Start playback on the unit. Short press the STANDBY/SOURCE [7] button until the Source LED indicator turns violet. OPTIC AL IN AUXI N DC 5 .8V,2A Rear View TV OPTICAL OUT A / V OUT R L Video cable included red white www.naxa.com Page 13 3. Press the STANDBY/SOURCE [7] to turn on the source device.
English and Spanish Manual
Page 14
... Instructions: All the safety and operating instructions should be followed. 5. Follow Instructions: All operating and usage instructions should use a mounting accessory recommended by the manufacturer. Use only with carts, stands, tripods, brackets, or tables recommended by the manufacturer. paratus. • When discarding batteries, follow the manufacturer's instructions and should be read before cleaning. Retain Instructions: The safety and operating instruction should be retained for cleaning. 6. Attachments: Use...
... Instructions: All the safety and operating instructions should be followed. 5. Follow Instructions: All operating and usage instructions should use a mounting accessory recommended by the manufacturer. Use only with carts, stands, tripods, brackets, or tables recommended by the manufacturer. paratus. • When discarding batteries, follow the manufacturer's instructions and should be read before cleaning. Retain Instructions: The safety and operating instruction should be retained for cleaning. 6. Attachments: Use...
English and Spanish Manual
Page 15
... the cabinet are required, be operated only from battery liquid of any way; If replacement of time. Unauthorized substitutions may be routed so that has the same over- These openings should be sure service technician has used replacement parts specified load protection as the original plug as open- 11. This product uct due to the operating instructions. 17. Power Sources: This product should never...
... the cabinet are required, be operated only from battery liquid of any way; If replacement of time. Unauthorized substitutions may be routed so that has the same over- These openings should be sure service technician has used replacement parts specified load protection as the original plug as open- 11. This product uct due to the operating instructions. 17. Power Sources: This product should never...
English and Spanish Manual
Page 16
... mounted to which can radiate radio frequency energy and, if not installed and used in a particular installation. Safety Check: Upon completion of the FCC Rules. Operation is connected. • Consult the dealer or an experienced radio/TV technician for a Class B digital device, pursuant to Part 15 of any service or repairs to this device must accept any interference received, including interference that to a wall or ceiling...
... mounted to which can radiate radio frequency energy and, if not installed and used in a particular installation. Safety Check: Upon completion of the FCC Rules. Operation is connected. • Consult the dealer or an experienced radio/TV technician for a Class B digital device, pursuant to Part 15 of any service or repairs to this device must accept any interference received, including interference that to a wall or ceiling...

English and Spanish Manual
Page 17
... mode Sound output of the connected device Symptom Remote control not working AUX IN not working No response from Bluetooth source Possible Cause Possible Solution The batteries in the connected device Raise volume level of the device weak Possible Solution Connect the adapter Press STANDBY/ SOURCE on the unit or press the on remote control to this guide before requesting service. Troubleshooting Guide This guide lists common problems and their solutions. Play the music/movie in the Replace with new remote control...
... mode Sound output of the connected device Symptom Remote control not working AUX IN not working No response from Bluetooth source Possible Cause Possible Solution The batteries in the connected device Raise volume level of the device weak Possible Solution Connect the adapter Press STANDBY/ SOURCE on the unit or press the on remote control to this guide before requesting service. Troubleshooting Guide This guide lists common problems and their solutions. Play the music/movie in the Replace with new remote control...

English and Spanish Manual
Page 18
... assistance, please contact Naxa Technical Support. We reserve the right to the minute news, alerts, and documentation for your device, please consult the instructions in this manual. Effective Range Bluetooth: Up to 32 feet Remote control: Up to 16 feet Additional Features Compact Design Power Source Sound Bar: AC 100-240V (DC 5.8V, 2A) Remote Control: DC 3V (1 x CR2025 battery) NAXA Technical Support 2320 East 49th St...
... assistance, please contact Naxa Technical Support. We reserve the right to the minute news, alerts, and documentation for your device, please consult the instructions in this manual. Effective Range Bluetooth: Up to 32 feet Remote control: Up to 16 feet Additional Features Compact Design Power Source Sound Bar: AC 100-240V (DC 5.8V, 2A) Remote Control: DC 3V (1 x CR2025 battery) NAXA Technical Support 2320 East 49th St...


