NHS-2007 manual- English
Page 1
TV Sound Bar System with Bluetooth® INSTRUCTION MANUAL PLEASE READ BEFORE OPERATING THIS DEVICE
TV Sound Bar System with Bluetooth® INSTRUCTION MANUAL PLEASE READ BEFORE OPERATING THIS DEVICE
NHS-2007 manual- English
Page 2
... shock to part 15 of important operating and maintenance(servicing) instructions in a residential installation. Increase the separation between the equipment and receiver. REFER SERVICING TO QUALIFIED SERVICE PERSONNEL. The...operate the equipment. Consult the dealer or an experienced radio/TV technician for compliance could void the user's authority to correct the interference by the party responsible for help. 1 NO USER-SERVICEABLE PARTS INSIDE. FCC WARNING: To assure continued compliance, follow the attached installation instructions and use only shielded cables when connecting...
... shock to part 15 of important operating and maintenance(servicing) instructions in a residential installation. Increase the separation between the equipment and receiver. REFER SERVICING TO QUALIFIED SERVICE PERSONNEL. The...operate the equipment. Consult the dealer or an experienced radio/TV technician for compliance could void the user's authority to correct the interference by the party responsible for help. 1 NO USER-SERVICEABLE PARTS INSIDE. FCC WARNING: To assure continued compliance, follow the attached installation instructions and use only shielded cables when connecting...

NHS-2007 manual- English
Page 3
... product due to your home, consult your outlet, consult an electrician for long periods of the product and to be read all servicing to operate from the wall outlet and disconnect the antenna or cable system. IMPORTANT SAFETY INSTRUCTION Before using the unit, be located in the vicinity of overhead power lines or other electric light or power circuits, or where...
... product due to your home, consult your outlet, consult an electrician for long periods of the product and to be read all servicing to operate from the wall outlet and disconnect the antenna or cable system. IMPORTANT SAFETY INSTRUCTION Before using the unit, be located in the vicinity of overhead power lines or other electric light or power circuits, or where...
NHS-2007 manual- English
Page 4
... operational condition. 23) Wall or ceiling mounting The product should be sure the antenna system is damaged. Never spill or spray any service or repairs to this indicates a need for service. 25)Note to a wall or ceiling only as practical. Section 810 of the National Electric Code ANSI/NFPA 70 provides information with respect to proper to grounding of the mast and supporting...
... operational condition. 23) Wall or ceiling mounting The product should be sure the antenna system is damaged. Never spill or spray any service or repairs to this indicates a need for service. 25)Note to a wall or ceiling only as practical. Section 810 of the National Electric Code ANSI/NFPA 70 provides information with respect to proper to grounding of the mast and supporting...
NHS-2007 manual- English
Page 5
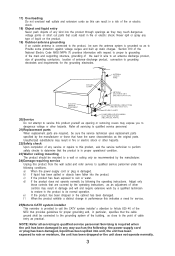
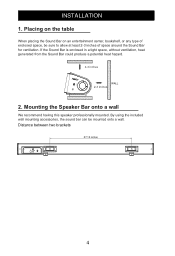
Mounting the Speaker Bar onto a wall We recommend having this speaker professionally mounted. By using the included wall mounting accessories, the sound bar can be sure to allow at least 2-3 inches of space around the Sound Bar for ventilation. Placing on the table When placing the Sound Bar on an entertainment center, bookshelf, or any type of enclosed space, be mounted onto a wall. Distance between two brackets 27.13 inches R 1.8A L OPTICAL...
Mounting the Speaker Bar onto a wall We recommend having this speaker professionally mounted. By using the included wall mounting accessories, the sound bar can be sure to allow at least 2-3 inches of space around the Sound Bar for ventilation. Placing on the table When placing the Sound Bar on an entertainment center, bookshelf, or any type of enclosed space, be mounted onto a wall. Distance between two brackets 27.13 inches R 1.8A L OPTICAL...

NHS-2007 manual- English
Page 6
... stable, then hang the sound bar from the mounting screws. 2.2:lawnedohtgiuM2.Mounting on the wall, allowing 0.3" of the screws to make 2 marks 27.13" apart for the mounting screws. 2.Drill the supplied screws directly into the drilled holes. 2.1 Mounting on wood walls You may use 27.13 inches 2 pieces screws (Included) 1.Use a pencil to make 2 marks 27.13" apart for the mounting screws. 2.Use a 7/32" bit to drill...
... stable, then hang the sound bar from the mounting screws. 2.2:lawnedohtgiuM2.Mounting on the wall, allowing 0.3" of the screws to make 2 marks 27.13" apart for the mounting screws. 2.Drill the supplied screws directly into the drilled holes. 2.1 Mounting on wood walls You may use 27.13 inches 2 pieces screws (Included) 1.Use a pencil to make 2 marks 27.13" apart for the mounting screws. 2.Use a 7/32" bit to drill...

NHS-2007 manual- English
Page 7
CONTROLS AND CONNECTIONS FRONT VIEW REAR VIEW R 1.8A L OPTICAL IN AUX 1 SOURCE INDICATOR R L OPTICAL IN AUX 1 DC IN DC 12V,1.2A CONTROL PANEL OPTICAL IN Jack AUX 1 Jack DC IN Power Jack Volume Up Button Power (Standby) Button Volume Up Button AUX 2 Jack Source Button 6
CONTROLS AND CONNECTIONS FRONT VIEW REAR VIEW R 1.8A L OPTICAL IN AUX 1 SOURCE INDICATOR R L OPTICAL IN AUX 1 DC IN DC 12V,1.2A CONTROL PANEL OPTICAL IN Jack AUX 1 Jack DC IN Power Jack Volume Up Button Power (Standby) Button Volume Up Button AUX 2 Jack Source Button 6
NHS-2007 manual- English
Page 9
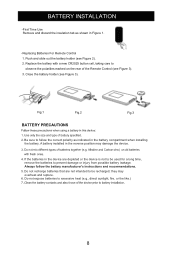
... on the rear of the Remote Control (see Figure 2). 2. Replace the battery with a new CR2025 button cell, taking care to be recharged; Fig.1 Fig.2 Fig.3 BATTERY PRECAUTIONS 2. Always follow the correct polarity as shown in Figure 1. -Replacing Batteries For Remote Control 1. Do not expose batteries to follow the battery manufacturer's instructions and recommendations. 5. Be sure to excessive heat (e.g., direct sunlight, fire, or the like.) 8 A battery installed in...
... on the rear of the Remote Control (see Figure 2). 2. Replace the battery with a new CR2025 button cell, taking care to be recharged; Fig.1 Fig.2 Fig.3 BATTERY PRECAUTIONS 2. Always follow the correct polarity as shown in Figure 1. -Replacing Batteries For Remote Control 1. Do not expose batteries to follow the battery manufacturer's instructions and recommendations. 5. Be sure to excessive heat (e.g., direct sunlight, fire, or the like.) 8 A battery installed in...
NHS-2007 manual- English
Page 10
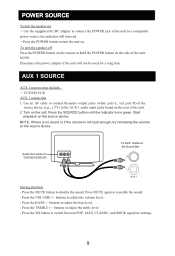
...;TV/DVD/VCR AUX 1 connection 1. To turn the speaker off· Press the POWER button on the remote or hold the POWER button on the side of the unit. 2. Use an AV cable to connect the audio output jacks (white jack=L, red jack=R) of the source device (e.g., a TV) to the AUX 1 audio input jacks found on the source device. buttons to adjust the bass level. - Press the VOLUME+/- the indicator will not...
...;TV/DVD/VCR AUX 1 connection 1. To turn the speaker off· Press the POWER button on the remote or hold the POWER button on the side of the unit. 2. Use an AV cable to connect the audio output jacks (white jack=L, red jack=R) of the source device (e.g., a TV) to the AUX 1 audio input jacks found on the source device. buttons to adjust the bass level. - Press the VOLUME+/- the indicator will not...
NHS-2007 manual- English
Page 11
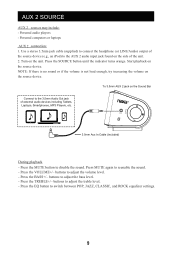
... 2 connection: 1. Use a stereo 3.5mm jack cable (supplied) to connect the headphone (or LINE/Audio) output of the source device (e.g., an iPod) to the 3.5mm Audio Out jack of the unit. 2. Start playback on the side of external audio devices including Tablets, Laptops, Smartphones, MP3 Players, etc. 3.5mm Aux In Cable (Included) During playback - Press the MUTE button to adjust the bass level. - Press the VOLUME+/- buttons to disable the sound. To...
... 2 connection: 1. Use a stereo 3.5mm jack cable (supplied) to connect the headphone (or LINE/Audio) output of the source device (e.g., an iPod) to the 3.5mm Audio Out jack of the unit. 2. Start playback on the side of external audio devices including Tablets, Laptops, Smartphones, MP3 Players, etc. 3.5mm Aux In Cable (Included) During playback - Press the MUTE button to adjust the bass level. - Press the VOLUME+/- buttons to disable the sound. To...

NHS-2007 manual- English
Page 12
... set up the same way; Press the MUTE button to adjust the treble level. - Follow the figure below is only one example of the Sound Bar During playback - Press the BASS+/- Press the VOLUME+/- buttons to disable the sound. buttons to reenable the sound. - Optical Out of TV/DVD/Etc. (referred to make the connections. 2.Turn the unit on the rear panel of how the connection...
... set up the same way; Press the MUTE button to adjust the treble level. - Follow the figure below is only one example of the Sound Bar During playback - Press the BASS+/- Press the VOLUME+/- buttons to disable the sound. buttons to reenable the sound. - Optical Out of TV/DVD/Etc. (referred to make the connections. 2.Turn the unit on the rear panel of how the connection...

NHS-2007 manual- English
Page 13
... music wirelessly from a pass code, enter "0000". 4. BLUETOOTH SOURCE Pairin g 1. If the device prompts you can pair the device to the sound bar sensor. Clear the NHS-2007 from the sound bar; NOTE: Before attempting to use NFC to set up your Bluetooth connection, make sure that Bluetooth and NFC are enabled on your device to the sound bar with the sound bar at a time. Some devices may allow you may need...
... music wirelessly from a pass code, enter "0000". 4. BLUETOOTH SOURCE Pairin g 1. If the device prompts you can pair the device to the sound bar sensor. Clear the NHS-2007 from the sound bar; NOTE: Before attempting to use NFC to set up your Bluetooth connection, make sure that Bluetooth and NFC are enabled on your device to the sound bar with the sound bar at a time. Some devices may allow you may need...
NHS-2007 manual- English
Page 14
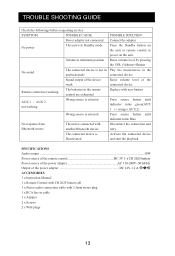
...payback mode Sound output of the power adapter DC 12V, 1.2 A ACCESSORIES 1 x Instruction Manual 1 x Remote Control with CR 2025 button cell 1 x Stereo audio connection cable with 3.5mm stereo plug 1 x RCA line in cable 1 x Adapter 2 x Screws 2 x Wall plugs 13 TROUBLE SHOOTING GUIDE Check the followings before requesting service SYMPTOM POSSIBLE CAUSE Power adapter not connected No power The unit is in Standby mode Volume in minimum position No sound Remote control not working AUX 1 / AUX 2 not working The connected device is Deactivated POSSIBLE SOULTION Connect the adapter Press...
...payback mode Sound output of the power adapter DC 12V, 1.2 A ACCESSORIES 1 x Instruction Manual 1 x Remote Control with CR 2025 button cell 1 x Stereo audio connection cable with 3.5mm stereo plug 1 x RCA line in cable 1 x Adapter 2 x Screws 2 x Wall plugs 13 TROUBLE SHOOTING GUIDE Check the followings before requesting service SYMPTOM POSSIBLE CAUSE Power adapter not connected No power The unit is in Standby mode Volume in minimum position No sound Remote control not working AUX 1 / AUX 2 not working The connected device is Deactivated POSSIBLE SOULTION Connect the adapter Press...
NHS-2007 manual- English
Page 15
... at www.naxa.com. Bluetooth® is a registered trademark of Naxa Electronics, Inc. SUPPORT If you need further assistance, please contact Naxa Technical Support. Vernon, CA 90058 http://www.naxa.com/naxa_support/ ©2014 NAXA® ELECTRONICS CORPORATION. Android™ is a trademark of their respective owners unless indicated otherwise. If you have problems with your sound bar, please consult the instructions in this manual, as well...
... at www.naxa.com. Bluetooth® is a registered trademark of Naxa Electronics, Inc. SUPPORT If you need further assistance, please contact Naxa Technical Support. Vernon, CA 90058 http://www.naxa.com/naxa_support/ ©2014 NAXA® ELECTRONICS CORPORATION. Android™ is a trademark of their respective owners unless indicated otherwise. If you have problems with your sound bar, please consult the instructions in this manual, as well...


