English and Spanish Manual
Page 2
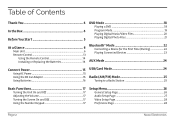
... Remote Control 14 Installing or Replacing the Batteries 14 DVD Mode 18 Playing a DVD 18 Program Mode 19 Playing Digital Music/Video Files 20 Playing Digital Photo Files 21 Bluetooth® Mode 22 Connecting a Device for the First Time (Pairing 22 Playing Connected Devices 23 AUX Mode 24 Connect Power 15 Using AC Power 15 Using the DC Car Adapter 16 Using Batteries 16 USB/Card Mode 24 Radio (AM/FM) Mode 25 Tuning to a Radio Station 25 Basic Functions 17 Turning the Unit On and Off 17 Adjusting the Volume...
... Remote Control 14 Installing or Replacing the Batteries 14 DVD Mode 18 Playing a DVD 18 Program Mode 19 Playing Digital Music/Video Files 20 Playing Digital Photo Files 21 Bluetooth® Mode 22 Connecting a Device for the First Time (Pairing 22 Playing Connected Devices 23 AUX Mode 24 Connect Power 15 Using AC Power 15 Using the DC Car Adapter 16 Using Batteries 16 USB/Card Mode 24 Radio (AM/FM) Mode 25 Tuning to a Radio Station 25 Basic Functions 17 Turning the Unit On and Off 17 Adjusting the Volume...
English and Spanish Manual
Page 5
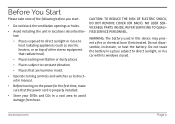
... power cord is properly installed. •• Store your DVDs and CDs in this device may present a fire or chemical burn if mistreated. Do not leave the battery in a place subject to direct sunlight, or in a car with its windows closed. •• Places subject to constant vibration. •• Places that are humid or moist. •• Operate turning controls...
... power cord is properly installed. •• Store your DVDs and CDs in this device may present a fire or chemical burn if mistreated. Do not leave the battery in a place subject to direct sunlight, or in a car with its windows closed. •• Places subject to constant vibration. •• Places that are humid or moist. •• Operate turning controls...
English and Spanish Manual
Page 7
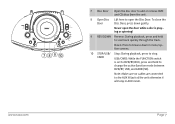
.... Note: Make sure no cables are connected to stop. CARD USB/CARD: While the FUNCTION switch is playing or spinning! 9 REV/DOWN Reverse: During playback, press and hold to change the active function mode between DVD/BT, USB, and CARD (SD). www.naxa.com 7 Disc Door Open the disc door to add or remove DVD and CD discs from the unit. 8 Open Disc Lift here to open the door while a disc is set to DVD/BT/AUX...
.... Note: Make sure no cables are connected to stop. CARD USB/CARD: While the FUNCTION switch is playing or spinning! 9 REV/DOWN Reverse: During playback, press and hold to change the active function mode between DVD/BT, USB, and CARD (SD). www.naxa.com 7 Disc Door Open the disc door to add or remove DVD and CD discs from the unit. 8 Open Disc Lift here to open the door while a disc is set to DVD/BT/AUX...

English and Spanish Manual
Page 8
... menu/option screens. 13 TUNING dial Turn to tune to scan forward quickly through the track. ENTER/PAIR ENTER: Press to select the highlighted item in BT mode and not connected to a device, press to attempt to pair with the most recently connected device. 12 FWD/UP Forward: During playback, press and hold to a radio station. 14 BAND switch When the FUNCTION switch is in menu/option screens...
... menu/option screens. 13 TUNING dial Turn to tune to scan forward quickly through the track. ENTER/PAIR ENTER: Press to select the highlighted item in BT mode and not connected to a device, press to attempt to pair with the most recently connected device. 12 FWD/UP Forward: During playback, press and hold to a radio station. 14 BAND switch When the FUNCTION switch is in menu/option screens...
English and Spanish Manual
Page 13
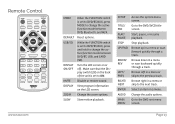
... a menu. Change the audio options. DEFAULT Reset options. Browse up in a menu or skip to the previous track. Page 13 Remote Control www.naxa.com MODE When the FUNCTION switch is set to DVD/BT/AUX, press MODE to change the active function mode between DVD, Bluetooth, and AUX. USB/SD While the FUNCTION switch is set to the next track. Go to the DVD root menu screen. Start, pause, or resume playback. Stop playback. Select an item in a menu or...
... a menu. Change the audio options. DEFAULT Reset options. Browse up in a menu or skip to the previous track. Page 13 Remote Control www.naxa.com MODE When the FUNCTION switch is set to DVD/BT/AUX, press MODE to change the active function mode between DVD, Bluetooth, and AUX. USB/SD While the FUNCTION switch is set to the next track. Go to the DVD root menu screen. Start, pause, or resume playback. Stop playback. Select an item in a menu or...
English and Spanish Manual
Page 14
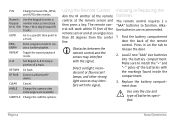
.... 1. SUBTITLE Change the subtitle options. Press in a track. GOTO Go to a specific time point in on the tab to release the door. 2. Make sure to enter a number value as necessary. P/N Change between the remote control and the sensor may interfere with the signal. Press +10 to create a custom playlist. PROGRAM Enter program mode to skip forward 10 tracks. A-B Set Repeat A-B to function. BT PAIR Connect a Bluetooth® device. Using the Remote Control Aim...
.... 1. SUBTITLE Change the subtitle options. Press in a track. GOTO Go to a specific time point in on the tab to release the door. 2. Make sure to enter a number value as necessary. P/N Change between the remote control and the sensor may interfere with the signal. Press +10 to create a custom playlist. PROGRAM Enter program mode to skip forward 10 tracks. A-B Set Repeat A-B to function. BT PAIR Connect a Bluetooth® device. Using the Remote Control Aim...
English and Spanish Manual
Page 15
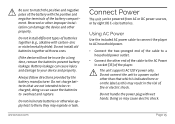
... hands. they may result in use for a long time, remove the batteries prevent battery leakage. Using AC Power Use the included AC power cable to connect the player to AC household power. •• Connect the two-pronged end of the cable to a household power outlet. •• Connect the other property. Doing so may cause electric shock. Do not install different types of batteries together (e.g., alkaline with the positive...
... hands. they may result in use for a long time, remove the batteries prevent battery leakage. Using AC Power Use the included AC power cable to connect the player to AC household power. •• Connect the two-pronged end of the cable to a household power outlet. •• Connect the other property. Doing so may cause electric shock. Do not install different types of batteries together (e.g., alkaline with the positive...
English and Spanish Manual
Page 17
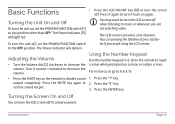
... your batteries if you are not watching video. Turn it back on the remote to disable sound 1. output completely. You can turn the LCD screen off , set the POWER/FUNCTION switch [1] to any position other than OFF. Adjusting the Volume •• Turn the Volume dial [2] clockwise to 2. restore sound output. 3. Turning the Screen On and Off You can prolong the lifetime of power. Press the "5" key. www.naxa.com Page 17 Turning the...
... your batteries if you are not watching video. Turn it back on the remote to disable sound 1. output completely. You can turn the LCD screen off , set the POWER/FUNCTION switch [1] to any position other than OFF. Adjusting the Volume •• Turn the Volume dial [2] clockwise to 2. restore sound output. 3. Turning the Screen On and Off You can prolong the lifetime of power. Press the "5" key. www.naxa.com Page 17 Turning the...

English and Spanish Manual
Page 18
... source mode to DVD, set the FUNCTION switch [1] to the next chapter. Playing a DVD Load a DVD disc in the disc compartment. The player will only work with DVDs that have been mastered with titles or chapters.) During playback: PREV/LEFT NEXT/RIGHT FWD/UP (FORWARD) REV/DOWN (REVERSE) STOP REPEAT Press to return to stop playback. Press to clear the saved timepoint from there. Press again while playback is stopped to change the...
... source mode to DVD, set the FUNCTION switch [1] to the next chapter. Playing a DVD Load a DVD disc in the disc compartment. The player will only work with DVDs that have been mastered with titles or chapters.) During playback: PREV/LEFT NEXT/RIGHT FWD/UP (FORWARD) REV/DOWN (REVERSE) STOP REPEAT Press to return to stop playback. Press to clear the saved timepoint from there. Press again while playback is stopped to change the...

English and Spanish Manual
Page 20
... change the rate of the files and folders on the LCD screen. •• Use the direction buttons to browse up the list of files. Press PLAY/PAUSE/ENTER/PAIR to repeat the current track or all of reverse playback (2x, 4x, 8x, 16x, 32x). REPEAT Using the remote, press to resume playback at normal speed (1x). Press to learn more about media file compatibility. Press to select...
... change the rate of the files and folders on the LCD screen. •• Use the direction buttons to browse up the list of files. Press PLAY/PAUSE/ENTER/PAIR to repeat the current track or all of reverse playback (2x, 4x, 8x, 16x, 32x). REPEAT Using the remote, press to resume playback at normal speed (1x). Press to learn more about media file compatibility. Press to select...

English and Spanish Manual
Page 21
... a disc is loaded that contain digital photo files instead of thumbnails. Press to viewing the slideshow. • Menu: View photo controls. • Previous: Display the previous page of thumbnails. • Next: Display the next page of DVD video. Press to skip to rotate the photo counterclockwise. Press to the next photo. Numeric Using the remote, enter a track number and Keypad (0-9, then press ENTER to skip directly...
... a disc is loaded that contain digital photo files instead of thumbnails. Press to viewing the slideshow. • Menu: View photo controls. • Previous: Display the previous page of thumbnails. • Next: Display the next page of DVD video. Press to skip to rotate the photo counterclockwise. Press to the next photo. Numeric Using the remote, enter a track number and Keypad (0-9, then press ENTER to skip directly...
English and Spanish Manual
Page 22
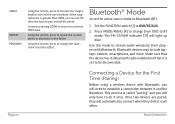
.... ZOOM REPEAT PROGRAM Using the remote, press to change from players with Bluetooth, you will only have to establish a connection between it once. Set the FUNCTION switch [1] to repeat the current photo or all photos in the folder. Use this mode to stream audio wirelessly from DVD to a normal 100% view. Once two devices are paired, they will light up blue. Using the remote, press to DVD/BT/AUX. 2. Bluetooth devices may include...
.... ZOOM REPEAT PROGRAM Using the remote, press to change from players with Bluetooth, you will only have to establish a connection between it once. Set the FUNCTION switch [1] to repeat the current photo or all photos in the folder. Use this mode to stream audio wirelessly from DVD to a normal 100% view. Once two devices are paired, they will light up blue. Using the remote, press to DVD/BT/AUX. 2. Bluetooth devices may include...

English and Spanish Manual
Page 23
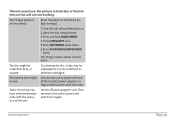
...- with Bluetooth. Playing Connected Devices Select the boombox (NAXA NDL-256) when it is set to maxi- 4. Enter 0000 as play/pause, next, previous) The boombox will automatically connect to your dicator [17] will automati- Basic playback (such as a passkey if the device asks for one. abled, is within range, and is Control playback from your Bluetooth device supports it. www.naxa.com Page 23 control if your...
...- with Bluetooth. Playing Connected Devices Select the boombox (NAXA NDL-256) when it is set to maxi- 4. Enter 0000 as play/pause, next, previous) The boombox will automatically connect to your dicator [17] will automati- Basic playback (such as a passkey if the device asks for one. abled, is within range, and is Control playback from your Bluetooth device supports it. www.naxa.com Page 23 control if your...
English and Spanish Manual
Page 24
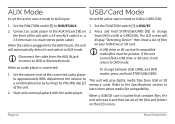
... mode. When a USB/SD card is loaded that contains files, the unit will read it will automatically detect it and switch to change between USB, CARD, and DVD modes, press and hold STOP/USB/CARD. AUX Mode To set the active source mode to AUX input: USB/Card Mode To set the active source mode to learn more about media file compatibility. Adjustment the volume to a comfortable level by turning the VOLUME dial [2] of the connected audio player to DVD mode...
... mode. When a USB/SD card is loaded that contains files, the unit will read it will automatically detect it and switch to change between USB, CARD, and DVD modes, press and hold STOP/USB/CARD. AUX Mode To set the active source mode to AUX input: USB/Card Mode To set the active source mode to learn more about media file compatibility. Adjustment the volume to a comfortable level by turning the VOLUME dial [2] of the connected audio player to DVD mode...
English and Spanish Manual
Page 26
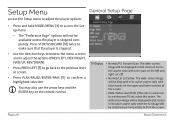
.... Setup Menu Access the Setup menu to confirm a highlighted selection. Press STOP/USB/CARD [10] twice to make sure that the player is connected to fit in its native aspect ratio with some part on the screen in its native aspect ratio with black bands on the remote control. The wide-screen image will be displayed in the screen. TV Display • Normal/PS: Pan and Scan. If the unit is stopped. •• Use the direction keys...
.... Setup Menu Access the Setup menu to confirm a highlighted selection. Press STOP/USB/CARD [10] twice to make sure that the player is connected to fit in its native aspect ratio with some part on the screen in its native aspect ratio with black bands on the remote control. The wide-screen image will be displayed in the screen. TV Display • Normal/PS: Pan and Scan. If the unit is stopped. •• Use the direction keys...

English and Spanish Manual
Page 28
... system detect the video signal of a PAL disc and output in NTSC format. It will convert the video signal of the disc and match the video signal output format to it. • NTSC: Select this mode if the unit is connected to an NTSC-format TV (used in China, Hong Kong, Europe, etc). Video Setup Page Preference Page Panel Quality Apply image correction options in varying intensities. (Press PLAY/PAUSE/ENTER/PAIR...
... system detect the video signal of a PAL disc and output in NTSC format. It will convert the video signal of the disc and match the video signal output format to it. • NTSC: Select this mode if the unit is connected to an NTSC-format TV (used in China, Hong Kong, Europe, etc). Video Setup Page Preference Page Panel Quality Apply image correction options in varying intensities. (Press PLAY/PAUSE/ENTER/PAIR...

English and Spanish Manual
Page 30
... included AV cable: 1. Connect the white plug of the cable to the red audio input (right) of the cable to display the composite video source. Turn the TV and the unit on the back of the TV. 2. Connect the yellow plug of the TV. 3. LLPlease refer to the owner's manual provided with a TV! You will need to be able to accept a composite video signal. Set the TV...
... included AV cable: 1. Connect the white plug of the cable to the red audio input (right) of the cable to display the composite video source. Turn the TV and the unit on the back of the TV. 2. Connect the yellow plug of the TV. 3. LLPlease refer to the owner's manual provided with a TV! You will need to be able to accept a composite video signal. Set the TV...

English and Spanish Manual
Page 31
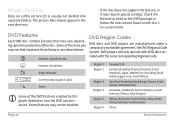
... types not listed above are divided into sections called titles, and then into sections called chapters; Video DVDs Data on an audio CD is given a title or chapter number. This unit can play back optical discs or memory cards that contain MP3 or JPEG files. Type DVD Content Type Audio + Video MP3 Audio CD Video CD (VCD) Picture CD (JPEG) Audio Audio + Video Still Picture Audio CDs Data on most DVDs are not supported...
... types not listed above are divided into sections called titles, and then into sections called chapters; Video DVDs Data on an audio CD is given a title or chapter number. This unit can play back optical discs or memory cards that contain MP3 or JPEG files. Type DVD Content Type Audio + Video MP3 Audio CD Video CD (VCD) Picture CD (JPEG) Audio Audio + Video Still Picture Audio CDs Data on most DVDs are not supported...
English and Spanish Manual
Page 32
... on how the DVD was produced. Number of subtitles Angle indicator Screen format (aspect ratio) Zoom LLSome of the icons you may see that may vary depending upon the production of audio tracks DVD Region Codes DVD discs and DVD players are shown below. DVD Features Each DVD disc contains features that represent these features are manufactured under a compulsory worldwide agreement, the DVD Regional Code System. Number of the disc. The picture files should appear...
... on how the DVD was produced. Number of subtitles Angle indicator Screen format (aspect ratio) Zoom LLSome of the icons you may see that may vary depending upon the production of audio tracks DVD Region Codes DVD discs and DVD players are shown below. DVD Features Each DVD disc contains features that represent these features are manufactured under a compulsory worldwide agreement, the DVD Regional Code System. Number of the disc. The picture files should appear...
English and Spanish Manual
Page 39
... are not working. Press and hold MODE/MENU. 4. of the included power adapters or replace the batteries with the operation of the unit. Then reconnect the unit to its factory default settings. 1. The battery level might be low. Reset the player to power and switch it is too scratched or otherwise damaged. There is no picture, the picture is set incorrectly. Open the disc compartment. 3. www.naxa.com Page 39 Turn the unit...
... are not working. Press and hold MODE/MENU. 4. of the included power adapters or replace the batteries with the operation of the unit. Then reconnect the unit to its factory default settings. 1. The battery level might be low. Reset the player to power and switch it is too scratched or otherwise damaged. There is no picture, the picture is set incorrectly. Open the disc compartment. 3. www.naxa.com Page 39 Turn the unit...


