User Manual
Page 1
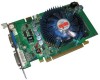
... expressed, written permission of this graphics card. Use of their respective owners. Due to update the information contained herein. Macrovision corporation product notice: This product incorporates copyright protection technology that may be authorized by GIGA-BYTE TECHNOLOGY CO., LTD. ("GBT"). GV-N95TD3-512H/512E GV-N95TOC-1GH/512H GV-N95T-512H NVIDIA® GeForceTM 9500 GT Graphics...
... expressed, written permission of this graphics card. Use of their respective owners. Due to update the information contained herein. Macrovision corporation product notice: This product incorporates copyright protection technology that may be authorized by GIGA-BYTE TECHNOLOGY CO., LTD. ("GBT"). GV-N95TD3-512H/512E GV-N95TOC-1GH/512H GV-N95T-512H NVIDIA® GeForceTM 9500 GT Graphics...
User Manual
Page 5
...x16 physical connectors. An SLI bridge connector (Note) SLI technology requires a PCI Express motherboard with two PCI Express x16 slots and correct chipset driver - Introduction Features • Powered by NVIDIA® GeForceTM 9500 GT Graphics Processing Unit (GPU) • Supports PCI Express...8226; Supports NVIDIA® SLI TM (Scalable Link Interface) technology (Note) • Supports AV / S-Video / TV-Out...If you are planning on using this graphics card as part of system memory; 2 GB... or above is recommended - Graphics cards working in an SLI configuration must • Operating System...
...x16 physical connectors. An SLI bridge connector (Note) SLI technology requires a PCI Express motherboard with two PCI Express x16 slots and correct chipset driver - Introduction Features • Powered by NVIDIA® GeForceTM 9500 GT Graphics Processing Unit (GPU) • Supports PCI Express...8226; Supports NVIDIA® SLI TM (Scalable Link Interface) technology (Note) • Supports AV / S-Video / TV-Out...If you are planning on using this graphics card as part of system memory; 2 GB... or above is recommended - Graphics cards working in an SLI configuration must • Operating System...
User Manual
Page 7
.... Unpacking and installation should be left in its original packing until it is installed. The operator should be done on the graphics card. - 7 - Inspect the card carton for obvious damage. Shipping and handling may cause damage to ensure that came with the components whenever the components are no... an anti-static wristband, grounded at the same point as the power supply case. 3. In order to your graphics card can be easily damaged by static electricity, so the card should follow some precautions whenever you do not have one, touch both of your computer and unplug power supply....
.... Unpacking and installation should be left in its original packing until it is installed. The operator should be done on the graphics card. - 7 - Inspect the card carton for obvious damage. Shipping and handling may cause damage to ensure that came with the components whenever the components are no... an anti-static wristband, grounded at the same point as the power supply case. 3. In order to your graphics card can be easily damaged by static electricity, so the card should follow some precautions whenever you do not have one, touch both of your computer and unplug power supply....
User Manual
Page 8
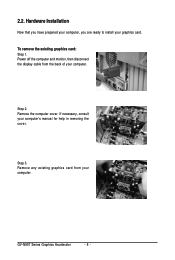
Step 2. Step 3. GV-N95T Series Graphics Accelerator - 8 - Hardware Installation Now that you have prepared your computer, you are ready to install your computer's manual for help in removing the cover. 2.2. Remove the computer cover. If necessary, consult your graphics card. Remove any existing graphics card from the back of your computer. Power off the computer and monitor, then disconnect the display cable from your computer. To remove the existing graphics card: Step 1.
Step 2. Step 3. GV-N95T Series Graphics Accelerator - 8 - Hardware Installation Now that you have prepared your computer, you are ready to install your computer's manual for help in removing the cover. 2.2. Remove the computer cover. If necessary, consult your graphics card. Remove any existing graphics card from the back of your computer. Power off the computer and monitor, then disconnect the display cable from your computer. To remove the existing graphics card: Step 1.
User Manual
Page 9
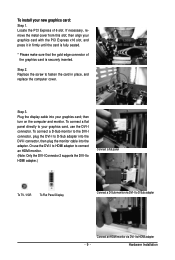
... to HDMI adapter - 9 - then turn on the computer and monitor. Hardware Installation Plug the display cable into the adapter. Step 2. Locate the PCI Express x16 slot. To install your graphics card with the PCI Express x16 slot, and press it in place, and replace the computer cover. Replace the screw to D-Sub adapter into the DVI-I to fasten...
... to HDMI adapter - 9 - then turn on the computer and monitor. Hardware Installation Plug the display cable into the adapter. Step 2. Locate the PCI Express x16 slot. To install your graphics card with the PCI Express x16 slot, and press it in place, and replace the computer cover. Replace the screw to D-Sub adapter into the DVI-I to fasten...

User Manual
Page 10
...header. Connect the S/PDIF cable to the graphics card A-2. Method A (via the coaxial S/PDIF out jack): Connect the GIGABYTE video adapter to the TVOut port on the graphics card B-2.Connect the SPDIF coaxial cable (optional) to the video adapter and motherboard You are now ready to... S/PDIF out header): Connect the provided S/PDIF cable to next chapter for the graphics card. Insert one end of the graphics card driver. GV-N95T Series Graphics Accelerator - 10 - B-1. Connect the GIGABYTE video adapter to proceed with the installation of the SPDIF coaxial cable (optional) into the...
...header. Connect the S/PDIF cable to the graphics card A-2. Method A (via the coaxial S/PDIF out jack): Connect the GIGABYTE video adapter to the TVOut port on the graphics card B-2.Connect the SPDIF coaxial cable (optional) to the video adapter and motherboard You are now ready to... S/PDIF out header): Connect the provided S/PDIF cable to next chapter for the graphics card. Insert one end of the graphics card driver. GV-N95T Series Graphics Accelerator - 10 - B-1. Connect the GIGABYTE video adapter to proceed with the installation of the SPDIF coaxial cable (optional) into the...
User Manual
Page 11
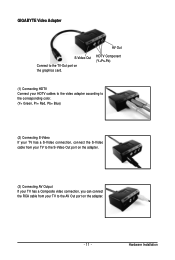
HDTV Component (Y+Pr+Pb) (1) Connecting HDTV Connect your HDTV cables to the video adapter according to the corresponding color. (Y= Green, Pr= Red, Pb= Blue) (2) Connecting S-Video If your TV has a S-Video connection, connect the S-Video cable from your TV to the S-Video Out port on the adapter. (3) Connecting AV Output If your TV has a Composite video connection, you can connect the RCA cable from your TV to the TV-Out port on the adapter. - 11 - Hardware Installation GIGABYTE Video Adapter AV Out S-Video Out Connect to the AV Out port on the graphics card.
HDTV Component (Y+Pr+Pb) (1) Connecting HDTV Connect your HDTV cables to the video adapter according to the corresponding color. (Y= Green, Pr= Red, Pb= Blue) (2) Connecting S-Video If your TV has a S-Video connection, connect the S-Video cable from your TV to the S-Video Out port on the adapter. (3) Connecting AV Output If your TV has a Composite video connection, you can connect the RCA cable from your TV to the TV-Out port on the adapter. - 11 - Hardware Installation GIGABYTE Video Adapter AV Out S-Video Out Connect to the AV Out port on the graphics card.
User Manual
Page 12
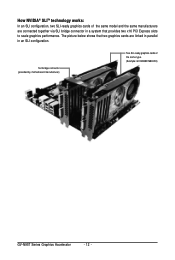
SLI bridge connector (provided by motherboard manufacturer) Two SLI-ready graphics cards of the same model and the same manufacturers are linked in parallel in a system that provides two x16 PCI Express slots to scale graphics performance. The picture below shows that two graphics cards are connected together via SLI bridge connector in an SLI configuration. How NVIDIA® SLITM technology works: In an SLI configuration, two SLI-ready graphics cards of the same type. (Example: GV-NX88X768H-RH) GV-N95T Series Graphics Accelerator - 12 -
SLI bridge connector (provided by motherboard manufacturer) Two SLI-ready graphics cards of the same model and the same manufacturers are linked in parallel in a system that provides two x16 PCI Express slots to scale graphics performance. The picture below shows that two graphics cards are connected together via SLI bridge connector in an SLI configuration. How NVIDIA® SLITM technology works: In an SLI configuration, two SLI-ready graphics cards of the same type. (Example: GV-NX88X768H-RH) GV-N95T Series Graphics Accelerator - 12 -

User Manual
Page 13
...-ROM drive letter to install the driver for the motherboard drivers, please contact the motherboard manufacturer.) - 13 - First make sure your graphics card driver. (Please follow the subsection "3.1.3 Driver Installation" to be Drive D: The installation of drivers is very simple. When you insert... the driver CD into your graphics card.) 3.1. Software Installation Make sure your system has installed the appropriate motherboard drivers (for your CD-ROM drive, you can see the...
...-ROM drive letter to install the driver for the motherboard drivers, please contact the motherboard manufacturer.) - 13 - First make sure your graphics card driver. (Please follow the subsection "3.1.3 Driver Installation" to be Drive D: The installation of drivers is very simple. When you insert... the driver CD into your graphics card.) 3.1. Software Installation Make sure your system has installed the appropriate motherboard drivers (for your CD-ROM drive, you can see the...
User Manual
Page 15
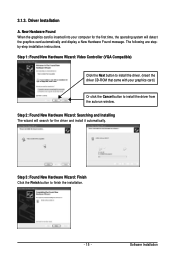
...: Video Controller (VGA Compatible) Click the Next button to install the driver. (Insert the driver CD-ROM that came with your computer for the driver and install it automatically. 3.1.3. Step 2: Found New Hardware Wizard: Searching and Installing The wizard will search for the first time, the operating system will detect the graphics card...
...: Video Controller (VGA Compatible) Click the Next button to install the driver. (Insert the driver CD-ROM that came with your computer for the driver and install it automatically. 3.1.3. Step 2: Found New Hardware Wizard: Searching and Installing The wizard will search for the first time, the operating system will detect the graphics card...
User Manual
Page 18
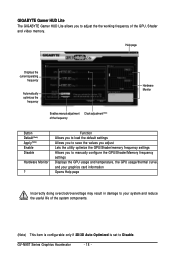
GV-N95T Series Graphics Accelerator - 18 - Help page Displays the current operating frequency Automatically optimizes the frequency Enables manual adjustment Clock adjustment(Note) of the frequency Hardware Monitor Button ... Lite allows you to manually configure the GPU/Shader/Memory frequency settings Displays the GPU usage and temperature, the GPU usage/thermal curve, and your graphics card information Opens Help page Incorrectly doing overclock/overvoltage may result in damage to your system and reduce the useful life of the system components. (Note...
GV-N95T Series Graphics Accelerator - 18 - Help page Displays the current operating frequency Automatically optimizes the frequency Enables manual adjustment Clock adjustment(Note) of the frequency Hardware Monitor Button ... Lite allows you to manually configure the GPU/Shader/Memory frequency settings Displays the GPU usage and temperature, the GPU usage/thermal curve, and your graphics card information Opens Help page Incorrectly doing overclock/overvoltage may result in damage to your system and reduce the useful life of the system components. (Note...

User Manual
Page 19
Taskbar Icon After installing the graphics card driver, you will find an NVIDIA icon in your system tray. You can adjust the properties of the graphics card here. - 19 - Click this icon to enter the NVIDIA Control Center. 3.1.5. Software Installation Right click the NVIDIA icon to open the control panel.
Taskbar Icon After installing the graphics card driver, you will find an NVIDIA icon in your system tray. You can adjust the properties of the graphics card here. - 19 - Click this icon to enter the NVIDIA Control Center. 3.1.5. Software Installation Right click the NVIDIA icon to open the control panel.
User Manual
Page 22
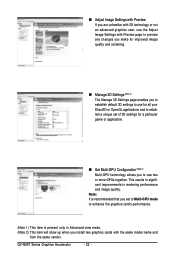
This results in significant improvements in Advanced view mode. (Note 2) This item will show up when you install two graphics cards with Preview page to preview any changes you make for improved image quality and rendering. Manage 3D Settings (Note 1) The Manage 3D ... for a particular game or application. Set Multi-GPU Configuration (Note 2) Multi-GPU technology allows you set to Multi-GPU mode to enhance the graphics card's performance. (Note 1) This item is recommended that you to use two or more GPUs together. Adjust Image Settings with Preview If you are ...
This results in significant improvements in Advanced view mode. (Note 2) This item will show up when you install two graphics cards with Preview page to preview any changes you make for improved image quality and rendering. Manage 3D Settings (Note 1) The Manage 3D ... for a particular game or application. Set Multi-GPU Configuration (Note 2) Multi-GPU technology allows you set to Multi-GPU mode to enhance the graphics card's performance. (Note 1) This item is recommended that you to use two or more GPUs together. Adjust Image Settings with Preview If you are ...

User Manual
Page 25
Software Installation You can create custom timing modes with the width, height, bit-color depth, and the refresh rate etc. Rotate Display The NVIDIA Rotate features enable you connect two monitors. - 25 - This is useful if you have saved in the Create Custom Resolutions page. &#...multi-display setup. (Note 1) This item is present only in order to support a variety of different display timings for ultimate flexibility for your graphics card in Advanced view mode. (Note 2) This item will show up when you to change the orientation of your desktop to adjust timings for ...
Software Installation You can create custom timing modes with the width, height, bit-color depth, and the refresh rate etc. Rotate Display The NVIDIA Rotate features enable you connect two monitors. - 25 - This is useful if you have saved in the Create Custom Resolutions page. &#...multi-display setup. (Note 1) This item is present only in order to support a variety of different display timings for ultimate flexibility for your graphics card in Advanced view mode. (Note 2) This item will show up when you to change the orientation of your desktop to adjust timings for ...
User Manual
Page 29
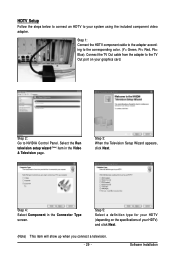
... 4: Select Component in the Video & Television page. Step 3: When the Television Setup Wizard appears, click Next. Step 5: Select a definition type for your HDTV (depending on your graphics card. Step 2: Go to the corresponding color. (Y= Green, Pr= Red, Pb= Blue). Step 1: Connect the HDTV component cable to the adapter according to NVIDIA Control Panel. Connect...
... 4: Select Component in the Video & Television page. Step 3: When the Television Setup Wizard appears, click Next. Step 5: Select a definition type for your HDTV (depending on your graphics card. Step 2: Go to the corresponding color. (Y= Green, Pr= Red, Pb= Blue). Step 1: Connect the HDTV component cable to the adapter according to NVIDIA Control Panel. Connect...
User Manual
Page 31
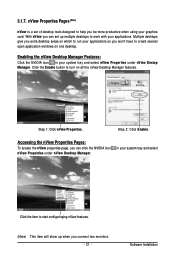
...features. Multiple desktops give you extra desktop areas on which to turn on one desktop. Click the Enable button to run your graphics card. Accessing the nView Properties Pages: To access the nView properties page, you be more productive when using your applications so you... Enable. Step 1: Click nView Properties. Software Installation With nView you can click the NVIDIA icon nView Properties under nView Destop Manager. Enabling the nView Desktop Manager Features: Click the NVIDIA icon in your system tray and select Click the item to start configuringing nView features....
...features. Multiple desktops give you extra desktop areas on which to turn on one desktop. Click the Enable button to run your graphics card. Accessing the nView Properties Pages: To access the nView properties page, you be more productive when using your applications so you... Enable. Step 1: Click nView Properties. Software Installation With nView you can click the NVIDIA icon nView Properties under nView Destop Manager. Enabling the nView Desktop Manager Features: Click the NVIDIA icon in your system tray and select Click the item to start configuringing nView features....
User Manual
Page 36
For more advanced troubleshooting information. Check that the card is seated properly in the PCI Express x16 slot. Ensure that the monitor and computer are not able to find the desired monitor color/resolution settings: The color and screen ... the screen look focused, crisp, and sharp. (Please refer to become the secondary display.) Make sure you selected the appropriate display device and graphics card when you are plugged in and receiving power. If necessary, disable any built-in the Windows Help or contact your computer manufacturer. ...
For more advanced troubleshooting information. Check that the card is seated properly in the PCI Express x16 slot. Ensure that the monitor and computer are not able to find the desired monitor color/resolution settings: The color and screen ... the screen look focused, crisp, and sharp. (Please refer to become the secondary display.) Make sure you selected the appropriate display device and graphics card when you are plugged in and receiving power. If necessary, disable any built-in the Windows Help or contact your computer manufacturer. ...


