User Manual
Page 4
... 3.1.1. Taskbar Icon ...19 3.1.6. Resolutions and Color Depth Tables (In Windows XP 38 Regulatory Statements 40 (Note) This item will show up when you connect two monitors. - 4 - Display Properties Pages 20 3.1.7. nView Properties Pages (Note 31 4. DirectX Installation ...14 3.1.3. GIGABYTE Gamer HUD Lite on Driver CD 17 3.1.5. Features ...5 1.2. Board Layout ...6 2.2. Table of...
... 3.1.1. Taskbar Icon ...19 3.1.6. Resolutions and Color Depth Tables (In Windows XP 38 Regulatory Statements 40 (Note) This item will show up when you connect two monitors. - 4 - Display Properties Pages 20 3.1.7. nView Properties Pages (Note 31 4. DirectX Installation ...14 3.1.3. GIGABYTE Gamer HUD Lite on Driver CD 17 3.1.5. Features ...5 1.2. Board Layout ...6 2.2. Table of...
User Manual
Page 6
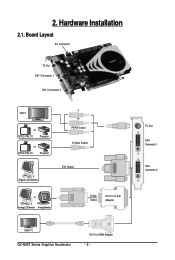
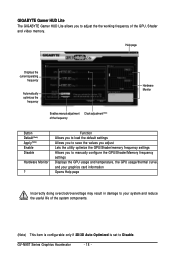
Hardware Installation 2.1. Board Layout SLI Connector TV-Out DVI-I Connector 1 DVI-I Connector 2 HDTV or NTSC / PAL TV Projector or NTSC / PAL TV Projector Digital LCD Monitor Y Pr Pb/AV Output S-Video Output DVI Output or Analog LCD Monitor Analog Monitor D-Sub Output DVI-I to HDMI Adapter - 6 - TV-Out DVI-I Connector 1 DVI-I to D-Sub Adapter HDMI TV GV-N95T Series Graphics Accelerator DVI-I Connector 2 2.
Hardware Installation 2.1. Board Layout SLI Connector TV-Out DVI-I Connector 1 DVI-I Connector 2 HDTV or NTSC / PAL TV Projector or NTSC / PAL TV Projector Digital LCD Monitor Y Pr Pb/AV Output S-Video Output DVI Output or Analog LCD Monitor Analog Monitor D-Sub Output DVI-I to HDMI Adapter - 6 - TV-Out DVI-I Connector 1 DVI-I to D-Sub Adapter HDMI TV GV-N95T Series Graphics Accelerator DVI-I Connector 2 2.
User Manual
Page 8
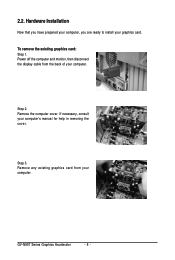
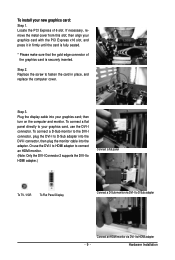
2.2. Power off the computer and monitor, then disconnect the display cable from your graphics card. If necessary, consult your computer. Step 3. Hardware Installation Now that you have prepared your computer, you are ready to install your computer. To remove the existing graphics card: Step 1. Remove the computer cover. Step 2. Remove any existing graphics card from the back of your computer's manual for help in removing the cover. GV-N95T Series Graphics Accelerator - 8 -
2.2. Power off the computer and monitor, then disconnect the display cable from your graphics card. If necessary, consult your computer. Step 3. Hardware Installation Now that you have prepared your computer, you are ready to install your computer. To remove the existing graphics card: Step 1. Remove the computer cover. Step 2. Remove any existing graphics card from the back of your computer's manual for help in removing the cover. GV-N95T Series Graphics Accelerator - 8 -
User Manual
Page 9
... the DVI-I to HDMI adapter.) Connect a flat panel To TV / VCR To Flat Panel Display Connect a D-Sub monitor via DVI-I to D-Sub adapter Connect an HDMI monitor via DVI-I to your graphics card with the PCI Express x16 slot, and press it in place, and replace the computer cover. Step 3. Step 2. If necessary, remove the metal...
... the DVI-I to HDMI adapter.) Connect a flat panel To TV / VCR To Flat Panel Display Connect a D-Sub monitor via DVI-I to D-Sub adapter Connect an HDMI monitor via DVI-I to your graphics card with the PCI Express x16 slot, and press it in place, and replace the computer cover. Step 3. Step 2. If necessary, remove the metal...
User Manual
Page 18
...the current operating frequency Automatically optimizes the frequency Enables manual adjustment Clock adjustment(Note) of the frequency Hardware Monitor Button Default(Note) Apply(Note) Enable Disable Hardware Monitor ? Function Allows you to load the default settings Allows you to save the values you adjust Lets ... configure the GPU/Shader/Memory frequency settings Displays the GPU usage and temperature, the GPU usage/thermal curve, and your graphics card information Opens Help page Incorrectly doing overclock/overvoltage may result in damage to your system and reduce the useful life of the...
...the current operating frequency Automatically optimizes the frequency Enables manual adjustment Clock adjustment(Note) of the frequency Hardware Monitor Button Default(Note) Apply(Note) Enable Disable Hardware Monitor ? Function Allows you to load the default settings Allows you to save the values you adjust Lets ... configure the GPU/Shader/Memory frequency settings Displays the GPU usage and temperature, the GPU usage/thermal curve, and your graphics card information Opens Help page Incorrectly doing overclock/overvoltage may result in damage to your system and reduce the useful life of the...
User Manual
Page 20
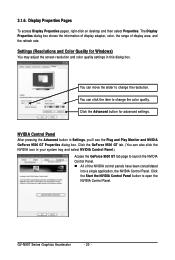
... the Advanced button in your system tray and select NVIDIA Control Panel.) Access the GeForce 9500 GT tab page to open the NVIDIA Control Panel. Settings (Resolutions and Color Quality for advanced settings. Click the GeForce 9500 GT tab. (You can click the item to change the...NVIDIA Control Panel. All of display area, and the refresh rate. Display Properties Pages To access Display Properties pages, right-click on desktop and then select Properties. You can also click the NVIDIA icon in Settings, you'll see the Plug and Play Monitor and NVIDIA GeForce 9500 GT...
... the Advanced button in your system tray and select NVIDIA Control Panel.) Access the GeForce 9500 GT tab page to open the NVIDIA Control Panel. Settings (Resolutions and Color Quality for advanced settings. Click the GeForce 9500 GT tab. (You can click the item to change the...NVIDIA Control Panel. All of display area, and the refresh rate. Display Properties Pages To access Display Properties pages, right-click on desktop and then select Properties. You can also click the NVIDIA icon in Settings, you'll see the Plug and Play Monitor and NVIDIA GeForce 9500 GT...
User Manual
Page 23
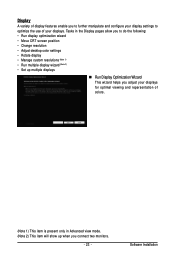
Display A variety of your display settings to optimize the use of display features enable you connect two monitors. - 23 - Tasks in the Display pages allow you to do the following: • Run display optimization wizard • Move CRT screen position • Change resolution &#...
Display A variety of your display settings to optimize the use of display features enable you connect two monitors. - 23 - Tasks in the Display pages allow you to do the following: • Run display optimization wizard • Move CRT screen position • Change resolution &#...

User Manual
Page 25
...; Run Multiple Display Wizard (Note 2) This wizard will show up when you connect two monitors. - 25 - Rotate Display The NVIDIA Rotate features enable you to change the orientation of different display timings for ultimate flexibility for your graphics card in Advanced view mode. (Note 2) This item will help you enable and customize... a variety of your display. Manage Custom Resolutions (Note 1) If you are an advanced user, you can create custom timing modes with the width, height, bit-color depth, and the refresh rate etc.
...; Run Multiple Display Wizard (Note 2) This wizard will show up when you connect two monitors. - 25 - Rotate Display The NVIDIA Rotate features enable you to change the orientation of different display timings for ultimate flexibility for your graphics card in Advanced view mode. (Note 2) This item will help you enable and customize... a variety of your display. Manage Custom Resolutions (Note 1) If you are an advanced user, you can create custom timing modes with the width, height, bit-color depth, and the refresh rate etc.

User Manual
Page 26
... Series Graphics Accelerator - 26 - Set Up Multiple Displays NVIDIA nView technology enables you to view your desktop in one of several multi-display modes to make the best use of the displays (monitors) that are connected to output from each display is half the width... Span mode indicates that both displays in the display pair function as one large vertical desktop (Vertical span) • Configured independently from two monitors on both display (Clone) Clone mode indicates that both display (Clone) • As one large horizontal desktop (Horizontal span) • As...
... Series Graphics Accelerator - 26 - Set Up Multiple Displays NVIDIA nView technology enables you to view your desktop in one of several multi-display modes to make the best use of the displays (monitors) that are connected to output from each display is half the width... Span mode indicates that both displays in the display pair function as one large vertical desktop (Vertical span) • Configured independently from two monitors on both display (Clone) Clone mode indicates that both display (Clone) • As one large horizontal desktop (Horizontal span) • As...
User Manual
Page 28
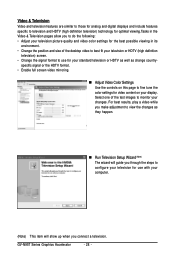
...for optimal viewing.Tasks in the Video & Television pages allow you to do the following: • Adjust your television picture quality and video color settings for the best possible viewing in its environment. • Change the position and size of the test images to monitor your changes. Select one of ...the desktop video to best fit your television or HDTV (high definition television) screen. • Change the signal format to use for ...
...for optimal viewing.Tasks in the Video & Television pages allow you to do the following: • Adjust your television picture quality and video color settings for the best possible viewing in its environment. • Change the position and size of the test images to monitor your changes. Select one of ...the desktop video to best fit your television or HDTV (high definition television) screen. • Change the signal format to use for ...
User Manual
Page 31
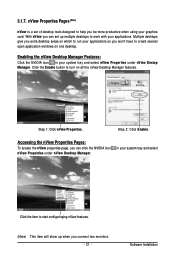
... help you can set up when you won't have to run your applications so you connect two monitors. - 31 - Step 2: Click Enable. Enabling the nView Desktop Manager Features: Click the NVIDIA icon in your graphics card. Accessing the nView Properties Pages: To access the nView properties page, you be more productive when using...
... help you can set up when you won't have to run your applications so you connect two monitors. - 31 - Step 2: Click Enable. Enabling the nView Desktop Manager Features: Click the NVIDIA icon in your graphics card. Accessing the nView Properties Pages: To access the nView properties page, you be more productive when using...

User Manual
Page 32
nView Desktop Management properties This tab contains information about the nView Desktop Manager. GV-N95T Series Graphics Accelerator - 32 - nView Windows properties This tab allows you to control window and dialog box placement when using multiple monitors. The Setup Wizard can also be accessed from this tab. nView Profiles properties This tab contains a record of all nView display settings for easy software setup.
nView Desktop Management properties This tab contains information about the nView Desktop Manager. GV-N95T Series Graphics Accelerator - 32 - nView Windows properties This tab allows you to control window and dialog box placement when using multiple monitors. The Setup Wizard can also be accessed from this tab. nView Profiles properties This tab contains a record of all nView display settings for easy software setup.
User Manual
Page 36
... sure you selected the appropriate display device and graphics card when you are not able to find the desired monitor color/resolution settings: The color and screen resolution options available for more advanced troubleshooting information. Check that the card is seated properly in the PCI Express x16 slot. Ensure that the display cable is...
... sure you selected the appropriate display device and graphics card when you are not able to find the desired monitor color/resolution settings: The color and screen resolution options available for more advanced troubleshooting information. Check that the card is seated properly in the PCI Express x16 slot. Ensure that the display cable is...

User Manual
Page 39
Display Refresh Screen Rate Resolution (Hz) 1600 x 1200 60~100 120 1920 x 1080 (16:9) 60~85 100 1920 x 1200 (16:10) 60~85 100 1920 x 1440 60~85 2048 x 1536 60~85 2560 x 1600 60 (Dual-Link) Color Depth (bpp) 8bpp(256 color) Standard mode 16bpp(65K color) High mode 32bpp(16.7M) True mode X X X * This table is for reference only. The actual resolutions supported depend on the monitor you use. - 39 - Appendix
Display Refresh Screen Rate Resolution (Hz) 1600 x 1200 60~100 120 1920 x 1080 (16:9) 60~85 100 1920 x 1200 (16:10) 60~85 100 1920 x 1440 60~85 2048 x 1536 60~85 2560 x 1600 60 (Dual-Link) Color Depth (bpp) 8bpp(256 color) Standard mode 16bpp(65K color) High mode 32bpp(16.7M) True mode X X X * This table is for reference only. The actual resolutions supported depend on the monitor you use. - 39 - Appendix