User Manual
Page 2
Windows XP/2000 9 Manual Driver Installation - Windows NT 4.0 11 Software Settings 11 Display Properties - Screen Settings 14 Display Properties - Overview 13 Display Properties - Windows XP/2000/ME/98 8 Manual Driver Installation - Contents 1 Getting Ready 1 Package Contents 2 Board Layout 2 Features 3 Hardware Installation 6 Before Driver Installation 7 Quick Driver Installation - Advanced Settings 17 nView Display Mode 22 Direct3D Settings 23 OpenGL Settings GeForce FX Series User's Manual Version A May 2004 P/N: W0500895 Windows ME/98 10 Manual Driver Installation -
Windows XP/2000 9 Manual Driver Installation - Windows NT 4.0 11 Software Settings 11 Display Properties - Screen Settings 14 Display Properties - Overview 13 Display Properties - Windows XP/2000/ME/98 8 Manual Driver Installation - Contents 1 Getting Ready 1 Package Contents 2 Board Layout 2 Features 3 Hardware Installation 6 Before Driver Installation 7 Quick Driver Installation - Advanced Settings 17 nView Display Mode 22 Direct3D Settings 23 OpenGL Settings GeForce FX Series User's Manual Version A May 2004 P/N: W0500895 Windows ME/98 10 Manual Driver Installation -

User Manual
Page 8
Before Driver Installation Note: It is highly recommended that you follow these steps: 1 Step From the Windows taskbar, click Start > Settings > Control Panel to open the Control Panel windows. 2 Step Double click the Add/Remove Programs item. 3 Step Click the NVIDIA Windows Display Drivers item from the list. 4 Step Click Change/Remove. 5 Step Click Yes to completely uninstall the NVIDIA Display Driver software before installing a new version of the software. To uninstall the NVIDIA Display Driver software, follow the steps in this section to continue. 6 Step Restart your system. 6
Before Driver Installation Note: It is highly recommended that you follow these steps: 1 Step From the Windows taskbar, click Start > Settings > Control Panel to open the Control Panel windows. 2 Step Double click the Add/Remove Programs item. 3 Step Click the NVIDIA Windows Display Drivers item from the list. 4 Step Click Change/Remove. 5 Step Click Yes to completely uninstall the NVIDIA Display Driver software before installing a new version of the software. To uninstall the NVIDIA Display Driver software, follow the steps in this section to continue. 6 Step Restart your system. 6
User Manual
Page 9
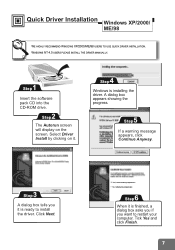
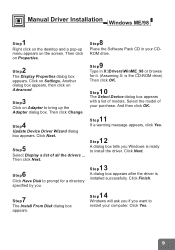
Select Driver Install by clicking on the screen. Quick Driver Installation Windows XP/2000/ ME/98 WE HIGHLY RECOMMEND WINDOWS XP/2000/ME/98 USERS TO USE QUICK DRIVER INSTALLATION. Click Next. 6 Step When it is ready to restart your computer. A dialog box appears ...the progress. 5 Step If a warning message appears, click Continue Anyway. 3 Step A dialog box tells you want to install the driver. Tick Yes and click Finish. 7 WINDOWS NT 4.0 USERS PLEASE INSTALL THE DRIVER MANUALLY. 1 Step Insert the software pack CD into the CD-ROM drive. 2 Step The Autorun screen will display on...
Select Driver Install by clicking on the screen. Quick Driver Installation Windows XP/2000/ ME/98 WE HIGHLY RECOMMEND WINDOWS XP/2000/ME/98 USERS TO USE QUICK DRIVER INSTALLATION. Click Next. 6 Step When it is ready to restart your computer. A dialog box appears ...the progress. 5 Step If a warning message appears, click Continue Anyway. 3 Step A dialog box tells you want to install the driver. Tick Yes and click Finish. 7 WINDOWS NT 4.0 USERS PLEASE INSTALL THE DRIVER MANUALLY. 1 Step Insert the software pack CD into the CD-ROM drive. 2 Step The Autorun screen will display on...
User Manual
Page 10
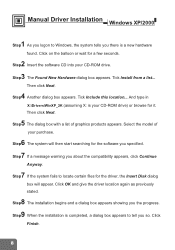
.../2000 1 Step As you logon to Windows, the system tells you so. Tick Include this location... Select the model of graphics products appears. Then click Next. 4 Step Another dialog box appears. Then ...
.../2000 1 Step As you logon to Windows, the system tells you so. Tick Include this location... Select the model of graphics products appears. Then click Next. 4 Step Another dialog box appears. Then ...
User Manual
Page 11
... Select Device dialog box appears with a list of models. Click Yes. 9 Click Finish. 7 Step The Install From Disk dialog box appears. 1 Step 4 Windows will ask you if you . 1 Step 3 A dialog box appears after the driver is ready to restart your computer. Step11 If a warning message appears, ...click Yes. 1 Step 2 A dialog box tells you Windows is installed successfully. Another dialog box appears, then click on Advanced. 3 Step Click on Settings. Manual Driver Installation Windows ME/98 1 Step Right click on the desktop and a pop-up the Adapter dialog ...
... Select Device dialog box appears with a list of models. Click Yes. 9 Click Finish. 7 Step The Install From Disk dialog box appears. 1 Step 4 Windows will ask you if you . 1 Step 3 A dialog box appears after the driver is ready to restart your computer. Step11 If a warning message appears, ...click Yes. 1 Step 2 A dialog box tells you Windows is installed successfully. Another dialog box appears, then click on Advanced. 3 Step Click on Settings. Manual Driver Installation Windows ME/98 1 Step Right click on the desktop and a pop-up the Adapter dialog ...
User Manual
Page 12
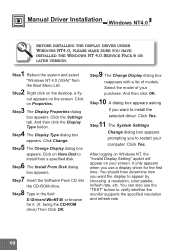
... to install the selected driver. Manual Driver Installation Windows NT4.0 BEFORE INSTALLING THE DISPLAY DRIVER UNDER WINDOWS NT4.0, PLEASE MAKE SURE YOU HAVE INSTALLED THE WINDOWS NT 4.0 SERVICE PACK 6 OR LATER VERSION. 1 Step Reboot the system and select "Windows NT 4.0 (VGA)" from a specified disk. 6 Step The Install...to verify whether the monitor supports the specified resolution and refresh rate. 10 Select the model of models. Click Yes. After logging on Windows NT, the "Invalid Display Setting" applet will appear on the desktop, a fly- You should then determine how you use the ...
... to install the selected driver. Manual Driver Installation Windows NT4.0 BEFORE INSTALLING THE DISPLAY DRIVER UNDER WINDOWS NT4.0, PLEASE MAKE SURE YOU HAVE INSTALLED THE WINDOWS NT 4.0 SERVICE PACK 6 OR LATER VERSION. 1 Step Reboot the system and select "Windows NT 4.0 (VGA)" from a specified disk. 6 Step The Install...to verify whether the monitor supports the specified resolution and refresh rate. 10 Select the model of models. Click Yes. After logging on Windows NT, the "Invalid Display Setting" applet will appear on the desktop, a fly- You should then determine how you use the ...
User Manual
Page 14
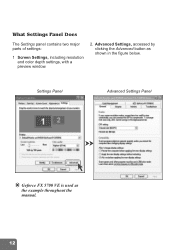
Advanced Settings, accessed by clicking the Advanced button as the example throughout the manual. 12 What Settings Panel Does The Settings panel contains two major parts of settings: 1 Screen Settings, including resolution and color depth settings, with a preview window. 2. Settings Panel Advanced Settings Panel Geforce FX 5700 VE is used as shown in the figure below.
Advanced Settings, accessed by clicking the Advanced button as the example throughout the manual. 12 What Settings Panel Does The Settings panel contains two major parts of settings: 1 Screen Settings, including resolution and color depth settings, with a preview window. 2. Settings Panel Advanced Settings Panel Geforce FX 5700 VE is used as shown in the figure below.
User Manual
Page 15
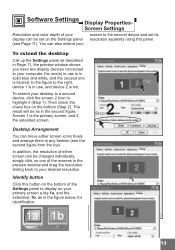
... and arrange them in use , and device 2 is the primary screen; To extend the desktop Call up the Settings panel as described in the preview window and drag the resolution sliding knob to display on your desired resolution. and 2, the extended screen. 2 Step 1 Step Desktop Arrangement You can move either ... box on the Settings panel (see the second figure from the top). simply click on the bottom of the screens in Page 11, the preview window shows you have two display devices connected to highlight it (Step 1). In the figure to the second device and set on the bottom (Step 2)....
... and arrange them in use , and device 2 is the primary screen; To extend the desktop Call up the Settings panel as described in the preview window and drag the resolution sliding knob to display on your desired resolution. and 2, the extended screen. 2 Step 1 Step Desktop Arrangement You can move either ... box on the Settings panel (see the second figure from the top). simply click on the bottom of the screens in Page 11, the preview window shows you have two display devices connected to highlight it (Step 1). In the figure to the second device and set on the bottom (Step 2)....

User Manual
Page 20
... latest GeForce series video cards. nView is a multi-display technology developed by NVIDIA, which is only available for models with dual video output ports. 18 Vertical Span Check to set independent resolution, color depth, and refresh rate on two screens. Horizontal Span Check to display the output video. Software Settings Display Properties- Four modes are available under Windows...
... latest GeForce series video cards. nView is a multi-display technology developed by NVIDIA, which is only available for models with dual video output ports. 18 Vertical Span Check to set independent resolution, color depth, and refresh rate on two screens. Horizontal Span Check to display the output video. Software Settings Display Properties- Four modes are available under Windows...
User Manual
Page 23
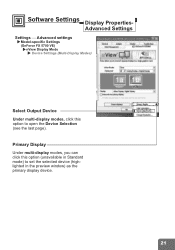
Advanced Settings Settings ¾ Advanced settings Model-specific Settings (GeForce FX 5700 VE) nView Display Mode Device Settings (Multi-Display Modes) Select Output Device Under multi-display modes, click this option (unavailable in the preview window) as the primary display device. 21 Software Settings Display Properties- Primary Display Under multi-display modes, you can click this option to set the selected device (highlighted in Standard mode) to open the Device Selection (see the last page).
Advanced Settings Settings ¾ Advanced settings Model-specific Settings (GeForce FX 5700 VE) nView Display Mode Device Settings (Multi-Display Modes) Select Output Device Under multi-display modes, click this option (unavailable in the preview window) as the primary display device. 21 Software Settings Display Properties- Primary Display Under multi-display modes, you can click this option to set the selected device (highlighted in Standard mode) to open the Device Selection (see the last page).
User Manual
Page 24
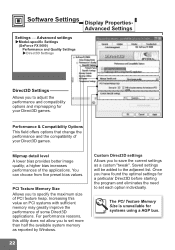
... Windows. Saved settings will be added to set more than half the available system memory as a custom "tweak". Custom Direct3D settings Allows you to set each option individually. Software Settings Display Properties- Advanced Settings Settings ¾ Advanced settings Model-specific Settings (GeForce FX ... need to the adjacent list. Increasing this utility does not allow you have found the optimal settings for systems using a AGP bus. 22 34 Mipmap detail level A lower bias provides better image quality; Once you to adjust the performance and compatibility...
... Windows. Saved settings will be added to set more than half the available system memory as a custom "tweak". Custom Direct3D settings Allows you to set each option individually. Software Settings Display Properties- Advanced Settings Settings ¾ Advanced settings Model-specific Settings (GeForce FX ... need to the adjacent list. Increasing this utility does not allow you have found the optimal settings for systems using a AGP bus. 22 34 Mipmap detail level A lower bias provides better image quality; Once you to adjust the performance and compatibility...
User Manual
Page 25
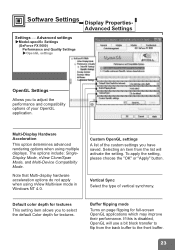
Advanced Settings Settings ¾ Advanced settings Model-specific Settings (GeForce FX 5600) Performance and Quality Settings OpenGL settings OpenGL Settings Allows you have saved. Buffer flipping mode Turns on page flipping for textures. Note that Multi-... full-screen OpenGL applications which may improve their performance. Multi-Display Hardware Acceleration This option determines advanced rendering options when using nView Multiview mode in Windows NT 4.0. Default color depth for textures This setting item allows you to the front buffer. 23
Advanced Settings Settings ¾ Advanced settings Model-specific Settings (GeForce FX 5600) Performance and Quality Settings OpenGL settings OpenGL Settings Allows you have saved. Buffer flipping mode Turns on page flipping for textures. Note that Multi-... full-screen OpenGL applications which may improve their performance. Multi-Display Hardware Acceleration This option determines advanced rendering options when using nView Multiview mode in Windows NT 4.0. Default color depth for textures This setting item allows you to the front buffer. 23
