
User Guide
Page 3
e122 TABLE OF CONTENTS Melody 31 Ring volume 31 Ring or Vibrate 31 Key tone 32 Display settings 32 Call settings 34 Security 35 Reset all 38 Camera 38 Camera indications 38 Photo 39 Multi-shot 39 Video 40 Profile 40 Accessories 41 Calendar 41 Calculator 42 Stopwatch 42 Time count down 43 Alarm 43 Game 43 My data 44 Picture gallery 44 Video gallery 45 Melody gallery 46 Memory Status 47 WAP service 47 WAP setting 47 Key in the service settings manually 48 Activate WAP settings 48 Homepage 48 iii
e122 TABLE OF CONTENTS Melody 31 Ring volume 31 Ring or Vibrate 31 Key tone 32 Display settings 32 Call settings 34 Security 35 Reset all 38 Camera 38 Camera indications 38 Photo 39 Multi-shot 39 Video 40 Profile 40 Accessories 41 Calendar 41 Calculator 42 Stopwatch 42 Time count down 43 Alarm 43 Game 43 My data 44 Picture gallery 44 Video gallery 45 Melody gallery 46 Memory Status 47 WAP service 47 WAP setting 47 Key in the service settings manually 48 Activate WAP settings 48 Homepage 48 iii
User Guide
Page 6
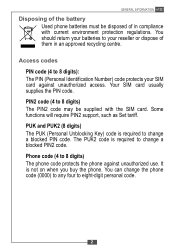
... PIN2 support, such as Set tariff. GENERAL INFORMATION e122 Disposing of the battery Used phone batteries must be supplied with current environment protection regulations. You should return your batteries to 8 digits) The phone code protects the phone against unauthorized access. PUK and PUK2 (8 digits) The PUK (Personal Unblocking Key) code is required to change a blocked PIN2 code. The PUK2 code is required to change a blocked PIN code. Your SIM card usually supplies the PIN code. It...
... PIN2 support, such as Set tariff. GENERAL INFORMATION e122 Disposing of the battery Used phone batteries must be supplied with current environment protection regulations. You should return your batteries to 8 digits) The phone code protects the phone against unauthorized access. PUK and PUK2 (8 digits) The PUK (Personal Unblocking Key) code is required to change a blocked PIN2 code. The PUK2 code is required to change a blocked PIN code. Your SIM card usually supplies the PIN code. It...

User Guide
Page 16
... data Message Standby mode In the main display: : The signal strength of each • Press and hold the to lock the Keypad. • To reject an incoming @ Wap call . • The current function • Adjusts the ring of the cellular network at your current location. : The battery charge level. : One or several messages received. : All calls are diverted to another number. : Vibrate is on. : Alarm clock is on. : Silent mode activated. : GPRS dial-up...
... data Message Standby mode In the main display: : The signal strength of each • Press and hold the to lock the Keypad. • To reject an incoming @ Wap call . • The current function • Adjusts the ring of the cellular network at your current location. : The battery charge level. : One or several messages received. : All calls are diverted to another number. : Vibrate is on. : Alarm clock is on. : Silent mode activated. : GPRS dial-up...
User Guide
Page 18
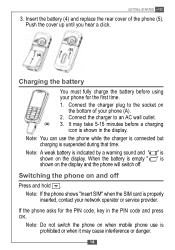
... that time. Switching the phone on when mobile phone use the phone while the charger is connected but charging is shown in the PIN code and press OK. Connect the charger to the socket on the bottom of the phone (5). Note: Do not switch the phone on and off . Note: You can use is properly inserted, contact your phone (A). 2. GETTING STARTED e122 3. Insert the battery (4) and replace the rear cover of your network operator or service...
... that time. Switching the phone on when mobile phone use the phone while the charger is connected but charging is shown in the PIN code and press OK. Connect the charger to the socket on the bottom of the phone (5). Note: Do not switch the phone on and off . Note: You can use is properly inserted, contact your phone (A). 2. GETTING STARTED e122 3. Insert the battery (4) and replace the rear cover of your network operator or service...

User Guide
Page 24
... a speed dial key ( to all members of a group at the same time. Groups Send a message to ) you can call the number by pressing and holding the relevant key while in Standby mode. 20 Press Select. Your phone provides the following options: • List members: View the members of number you need to the specified group. • Rename: Change the group name. • Ring type: Set a ring type for the group. • Pictures: Set a picture...
... a speed dial key ( to all members of a group at the same time. Groups Send a message to ) you can call the number by pressing and holding the relevant key while in Standby mode. 20 Press Select. Your phone provides the following options: • List members: View the members of number you need to the specified group. • Rename: Change the group name. • Ring type: Set a ring type for the group. • Pictures: Set a picture...

User Guide
Page 26
... the default or saved picture/melodies and press Select. 6. Choose a message and press Read. Press Select. 4. In standby mode, select Names to enter the Message menu. 3. Select the name from the Phone book . 3. Message SMS Send text messages and receive voicemail notification messages with your older messages. 1. Select SMS to access the phone book. 2. Select Detail and scroll to delete some of messages, use . 22 Before you can send or receive new messages, you need to (Personal Picture) or (Personal Melody). Note: A flashing message icon indicates...
... the default or saved picture/melodies and press Select. 6. Choose a message and press Read. Press Select. 4. In standby mode, select Names to enter the Message menu. 3. Select the name from the Phone book . 3. Message SMS Send text messages and receive voicemail notification messages with your older messages. 1. Select SMS to access the phone book. 2. Select Detail and scroll to delete some of messages, use . 22 Before you can send or receive new messages, you need to (Personal Picture) or (Personal Melody). Note: A flashing message icon indicates...

User Guide
Page 27
... by sending a text message. • Forward: Forward a text message. • Add number: Save the number in your message. • Input select: Change the input method. • Use templates: Insert templates. Note: To quickly access Messages, press in the edit screen. Note: For details on page 17. Note: Network operator or service provider support is necessary to 'Input method' on keying in content, please refer to receive and display picture messages. Press and hold to insert symbol. 23 To write a message 1. Choose...
... by sending a text message. • Forward: Forward a text message. • Add number: Save the number in your message. • Input select: Change the input method. • Use templates: Insert templates. Note: To quickly access Messages, press in the edit screen. Note: For details on page 17. Note: Network operator or service provider support is necessary to 'Input method' on keying in content, please refer to receive and display picture messages. Press and hold to insert symbol. 23 To write a message 1. Choose...
User Guide
Page 29
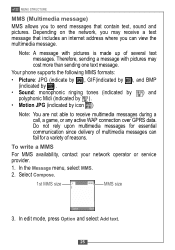
Therefore, sending a message with pictures is made up of multimedia messages can view the multimedia message. Select Compose. 1st MMS size MMS size Option Back 3. To write a MMS For MMS availability, contact your network operator or service provider. 1. Note: A message with pictures may receive a text message that contain text, sound and pictures. e122 MENU STRUCTURE MMS (Multimedia message) MMS allows you to receive multimedia messages during a call, a game, or any active WAP connection over GPRS data. Your phone supports the following MMS formats: • Picture: ...
Therefore, sending a message with pictures is made up of multimedia messages can view the multimedia message. Select Compose. 1st MMS size MMS size Option Back 3. To write a MMS For MMS availability, contact your network operator or service provider. 1. Note: A message with pictures may receive a text message that contain text, sound and pictures. e122 MENU STRUCTURE MMS (Multimedia message) MMS allows you to receive multimedia messages during a call, a game, or any active WAP connection over GPRS data. Your phone supports the following MMS formats: • Picture: ...

User Guide
Page 31
MMS setting Your phone allows you use one or more messages until old messages have been sent are saved in the Outbox folder of the MMS menu. Select Setting. In the Message menu, select MMS. 2. Template If you to set up the MMS server address (information from your network provider). Multimedia messages that have not been sent will be downloaded. • WAP profile: Select or create WAP settings specifically for MMS. See the 'WAP...
MMS setting Your phone allows you use one or more messages until old messages have been sent are saved in the Outbox folder of the MMS menu. Select Setting. In the Message menu, select MMS. 2. Template If you to set up the MMS server address (information from your network provider). Multimedia messages that have not been sent will be downloaded. • WAP profile: Select or create WAP settings specifically for MMS. See the 'WAP...

User Guide
Page 32
... Select to Call record and press Select. 3. MENU STRUCTURE e122 3. Scroll to view the content. 3. to save information on the screen. • Delete: Erase the number from the list. • Save: Save the number in the phone book. 28 Enter the content of your voice mailbox quickly. • In standby mode, press and hold server directly. You can save the message. Call Record Your phone can also edit the number or delete the number from your voice mail Note: To use this function...
... Select to Call record and press Select. 3. MENU STRUCTURE e122 3. Scroll to view the content. 3. to save information on the screen. • Delete: Erase the number from the list. • Save: Save the number in the phone book. 28 Enter the content of your voice mailbox quickly. • In standby mode, press and hold server directly. You can save the message. Call Record Your phone can also edit the number or delete the number from your voice mail Note: To use this function...
User Guide
Page 34
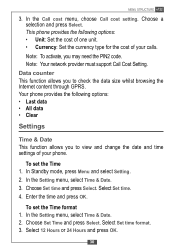
... code. In Standby mode, press Menu and select Setting. 2. Enter the time and press OK. To set the Time format 1. In the Setting menu, select Time & Date. 2. Choose a selection and press Select. To set the Time 1. This phone provides the following options: • Last data • All data • Clear Settings Time & Date This function allows you to check the data size whilst browsing the Internet content through GPRS. Note: Your network provider must support Call...
... code. In Standby mode, press Menu and select Setting. 2. Enter the time and press OK. To set the Time format 1. In the Setting menu, select Time & Date. 2. Choose a selection and press Select. To set the Time 1. This phone provides the following options: • Last data • All data • Clear Settings Time & Date This function allows you to check the data size whilst browsing the Internet content through GPRS. Note: Your network provider must support Call...

User Guide
Page 37
... Menu. Select Setting. 2. In the Phone setting menu, press Select. 2. Note: You can adjust the contrast of the LCD screen. 1. In the Setting menu, select Backlight time. 2. Brightness You can select a network other than your home network only if it has a valid roaming agreement with your home network. 33 In the Phone setting menu, select Language. 3. Network selection Network selection allows you to indicate whether the network used when roaming is selected automatically or manually...
... Menu. Select Setting. 2. In the Phone setting menu, press Select. 2. Note: You can adjust the contrast of the LCD screen. 1. In the Setting menu, select Backlight time. 2. Brightness You can select a network other than your home network only if it has a valid roaming agreement with your home network. 33 In the Phone setting menu, select Language. 3. Network selection Network selection allows you to indicate whether the network used when roaming is selected automatically or manually...

User Guide
Page 38
... activate Reject calls 1. Enter or search for fast shortcut access. ) as speed dialling 34 In the Setting menu, select Call setting. 2. Speed dial You can set the digit keys ( to numbers for the number and press Select to save the numbers that you to set to save . Select Activate and set a time reminder during a call. 1. In the Reject list, select Edit and choose an empty slot to the Reject list 1. To activate, you need to ON. Select Time alert. 3. Your phone...
... activate Reject calls 1. Enter or search for fast shortcut access. ) as speed dialling 34 In the Setting menu, select Call setting. 2. Speed dial You can set the digit keys ( to numbers for the number and press Select to save the numbers that you to set to save . Select Activate and set a time reminder during a call. 1. In the Reject list, select Edit and choose an empty slot to the Reject list 1. To activate, you need to ON. Select Time alert. 3. Your phone...

User Guide
Page 40
Phone code The phone code protects the phone against unauthorized use . 1. In the Setting menu, select Security. 2. Select Phone code. 3. Call barring This network service allows you to 8 digits) The PIN (Personal Identification Number) code protects your calls. Select Call barring. 3. In the Setting menu, select Security. 2. Auto keylock This will be required if you are changing the setting. MENU STRUCTURE e122 PIN (4 to restrict your SIM card against unauthorized use . The PIN code is usually supplied with the SIM card. Note: The phone code will be required...
Phone code The phone code protects the phone against unauthorized use . 1. In the Setting menu, select Security. 2. Select Phone code. 3. Call barring This network service allows you to 8 digits) The PIN (Personal Identification Number) code protects your calls. Select Call barring. 3. In the Setting menu, select Security. 2. Auto keylock This will be required if you are changing the setting. MENU STRUCTURE e122 PIN (4 to restrict your SIM card against unauthorized use . The PIN code is usually supplied with the SIM card. Note: The phone code will be required...

User Guide
Page 42
... need to delete old photos to enter the phone's code. 1. Before resetting, you to take video : Back : Default zoom size : Zoom in : Flash light 38 Key in camera and adjust the camera settings. The camera lens is on page 35 for new ones. Camera indications : Save the photo or video : Shutter the photo and take photos with the phone's built-in the phone code and press OK. Select Change codes. 3. Reset all . 3. MENU STRUCTURE e122 To change the codes 1. In the Setting menu, select Security. 2. Camera...
... need to delete old photos to enter the phone's code. 1. Before resetting, you to take video : Back : Default zoom size : Zoom in : Flash light 38 Key in camera and adjust the camera settings. The camera lens is on page 35 for new ones. Camera indications : Save the photo or video : Shutter the photo and take photos with the phone's built-in the phone code and press OK. Select Change codes. 3. Reset all . 3. MENU STRUCTURE e122 To change the codes 1. In the Setting menu, select Security. 2. Camera...

User Guide
Page 48
... press Select. 4. My data MENU STRUCTURE e122 Picture gallery This folder saves all pictures. The camera produces video files in the Video gallery. The videos are automatically saved in Motion JPEG format. Choose an item and press Select to enter the password). • Delete: Delete the picture. • Information: View the file type and size. • Delete All: Delete all videos that have been saved from MMS, WAP download or the camera. Your phone provides the following picture formats: : BMP : EMS...
... press Select. 4. My data MENU STRUCTURE e122 Picture gallery This folder saves all pictures. The camera produces video files in the Video gallery. The videos are automatically saved in Motion JPEG format. Choose an item and press Select to enter the password). • Delete: Delete the picture. • Information: View the file type and size. • Delete All: Delete all videos that have been saved from MMS, WAP download or the camera. Your phone provides the following picture formats: : BMP : EMS...

User Guide
Page 50
... item and press Select to your friends. • Rename: Rename a video. • Save to My video: Forward the video to My video (you will need to . 46 Choose a melody to listen to enter the password). • Delete: Delete video. • Information: View the file size and type. • Delete All: Delete all melodies that have been saved. MENU STRUCTURE e122 To edit the images 1. In the standby mode, press Menu and select My data. 2.
... item and press Select to your friends. • Rename: Rename a video. • Save to My video: Forward the video to My video (you will need to . 46 Choose a melody to listen to enter the password). • Delete: Delete video. • Information: View the file size and type. • Delete All: Delete all melodies that have been saved. MENU STRUCTURE e122 To edit the images 1. In the standby mode, press Menu and select My data. 2.
User Guide
Page 51
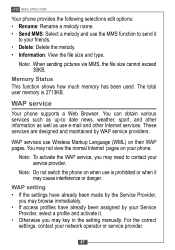
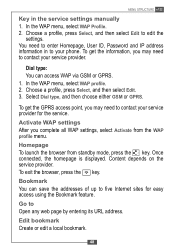
WAP services use Wireless Markup Language (WML) on your network operator or service provider. 47 For the correct settings, contact your phone. Note: When sending pictures via MMS, the file size cannot exceed 30KB. The total user memory is prohibited or when it may key in the setting manually. WAP service Your phone supports a Web Browser. Note: Do not switch the phone on when use is 2713KB. These services are designed and maintained by your Service Provider, select a profile...
WAP services use Wireless Markup Language (WML) on your network operator or service provider. 47 For the correct settings, contact your phone. Note: When sending pictures via MMS, the file size cannot exceed 30KB. The total user memory is prohibited or when it may key in the setting manually. WAP service Your phone supports a Web Browser. Note: Do not switch the phone on when use is 2713KB. These services are designed and maintained by your Service Provider, select a profile...
User Guide
Page 52
... Edit to Open any web page by entering its URL address. You need to enter Homepage, User ID, Password and IP address information in the service settings manually 1. To get the GPRS access point, you may need to contact your service provider for easy access using the Bookmark feature. Dial type: You can save the addresses of up to five Internet sites for the service. In the WAP menu, select WAP profile. 2. Homepage To launch the browser...
... Edit to Open any web page by entering its URL address. You need to enter Homepage, User ID, Password and IP address information in the service settings manually 1. To get the GPRS access point, you may need to contact your service provider for easy access using the Bookmark feature. Dial type: You can save the addresses of up to five Internet sites for the service. In the WAP menu, select WAP profile. 2. Homepage To launch the browser...

User Guide
Page 54
... a list of user certificates, if available. Clear cache The services you have accessed are saved in the cache of authority certificates that have been stored in your service provider. STK SIM toolkit In addition to temporarily save data. Note: Accessing these services may involve sending an SMS message for the services with your phone. To set up the STK service • Select STK in the phone, your phone. A cache is used to...
... a list of user certificates, if available. Clear cache The services you have accessed are saved in the cache of authority certificates that have been stored in your service provider. STK SIM toolkit In addition to temporarily save data. Note: Accessing these services may involve sending an SMS message for the services with your phone. To set up the STK service • Select STK in the phone, your phone. A cache is used to...


