User Manual
Page 1
MultiSync VT440/VT540 LCD Projector User's Manual English
MultiSync VT440/VT540 LCD Projector User's Manual English
User Manual
Page 2
..., it here: CAUTION To turn off and on the right side of your NEC MultiSync VT440/VT540 Projector and keep the manual handy for a Class B digital device, pursuant to the unit EXCEPT those specified by NEC Technologies in a residential installation. The power outlet socket should be installed as possible... WITH AN EXTENSION CORD OR IN AN OUTLET UNLESS ALL THREE PRONGS CAN BE FULLY INSERTED. If this manual carefully before using your MultiSync VT440/VT540. In UK, a BS approved power cable with moulded plug has a Black (five Amps) fuse installed for help. The information ...
..., it here: CAUTION To turn off and on the right side of your NEC MultiSync VT440/VT540 Projector and keep the manual handy for a Class B digital device, pursuant to the unit EXCEPT those specified by NEC Technologies in a residential installation. The power outlet socket should be installed as possible... WITH AN EXTENSION CORD OR IN AN OUTLET UNLESS ALL THREE PRONGS CAN BE FULLY INSERTED. If this manual carefully before using your MultiSync VT440/VT540. In UK, a BS approved power cable with moulded plug has a Black (five Amps) fuse installed for help. The information ...

User Manual
Page 3
...lens, and be installed by qualified technicians in - Doing so can dam- E-3 Dropping or jarring can cause damage to have the projector installed on top of bodily injury. b. Power Supply 1. Handle the power cable carefully and avoid excessive bending. appears. Important Safeguards These...are alternately flashing. age internal components. 6. This mes- Please read them carefully and heed all warnings. Installation 1. If you wish to the projector: * While the Hour Glass icon appears. * While the message "Please wait a little." Never use a mild detergent. sage will be...
...lens, and be installed by qualified technicians in - Doing so can dam- E-3 Dropping or jarring can cause damage to have the projector installed on top of bodily injury. b. Power Supply 1. Handle the power cable carefully and avoid excessive bending. appears. Important Safeguards These...are alternately flashing. age internal components. 6. This mes- Please read them carefully and heed all warnings. Installation 1. If you wish to the projector: * While the Hour Glass icon appears. * While the message "Please wait a little." Never use a mild detergent. sage will be...

User Manual
Page 4
Do not insert any metal objects such as magnifying glass out of the light path of the projector. Do not place any items such as a wire or screwdriver into your NEC dealer for lamp replacement. • Allow a minimum of 30 seconds to elapse after the lamp has reached the ... 1. Allow at least 3 inches (10 cm) of space between your projector, disconnect it immediately and have the object removed by a qualified NEC service personnel. 3. If you continue to use the lamp after turning off the projector. Then disconnect the power cable and allow 60 minutes to melting of the...
Do not insert any metal objects such as magnifying glass out of the light path of the projector. Do not place any items such as a wire or screwdriver into your NEC dealer for lamp replacement. • Allow a minimum of 30 seconds to elapse after the lamp has reached the ... 1. Allow at least 3 inches (10 cm) of space between your projector, disconnect it immediately and have the object removed by a qualified NEC service personnel. 3. If you continue to use the lamp after turning off the projector. Then disconnect the power cable and allow 60 minutes to melting of the...
User Manual
Page 5
... E-32 Keystone Save E-32 Clear Lamp Hour Meter E-32 Help E-32 Contents E-32 Information E-32 4. INTRODUCTION Introduction to the MultiSync VT440/VT540 Projector E-6 Getting Started E-6 What's in the Box E-7 Getting to Know Your MultiSync VT440/VT540 Projector E-8 Front / Side Features E-8 Rear / Side Features E-9 Top Features E-10 Terminal Panel Features E-11 Remote Control Features E-12 2. INSTALLATION Setting...
... E-32 Keystone Save E-32 Clear Lamp Hour Meter E-32 Help E-32 Contents E-32 Information E-32 4. INTRODUCTION Introduction to the MultiSync VT440/VT540 Projector E-6 Getting Started E-6 What's in the Box E-7 Getting to Know Your MultiSync VT440/VT540 Projector E-8 Front / Side Features E-8 Rear / Side Features E-9 Top Features E-10 Terminal Panel Features E-11 Remote Control Features E-12 2. INSTALLATION Setting...
User Manual
Page 6
...complements any angle. • Manual zoom control enables you to adjust the image between video modes depending on your new MultiSync VT440 (SVGA)/ VT540 (XGA) Projector and describes the features and controls. The lamp life can skip it. offers a crisp image with SXGA (1280 x...SVGA, XGA*2 , SXGA(with NEC technology's Advanced AccuBlend on VT440. *3 An SXGA image (1280ן1024) is square. • You can use the projector to mount the projector on a ceiling*1. PAL: TV standard used wirelessly. E-6 INTRODUCTION Introduction to the MultiSync VT440/VT540 Projector This...
...complements any angle. • Manual zoom control enables you to adjust the image between video modes depending on your new MultiSync VT440 (SVGA)/ VT540 (XGA) Projector and describes the features and controls. The lamp life can skip it. offers a crisp image with SXGA (1280 x...SVGA, XGA*2 , SXGA(with NEC technology's Advanced AccuBlend on VT440. *3 An SXGA image (1280ן1024) is square. • You can use the projector to mount the projector on a ceiling*1. PAL: TV standard used wirelessly. E-6 INTRODUCTION Introduction to the MultiSync VT440/VT540 Projector This...

User Manual
Page 7
... box and packing materials if you ever need to ship your box contains everything listed. POINTER POWER MUTPEIC. What's in the Box? Make sure your MultiSync VT440/VT540 Projector. CANCEL ADAJU. SELECTVol. TO Card remote control String and rivet Power cable GCuoidneQnuecictk MaUnusaelr's Signal cable ON 1 2 3 4 DIP 5 6 Pin adapter for Macintosh E-7 STATPUOSWER ENTER...
... box and packing materials if you ever need to ship your box contains everything listed. POINTER POWER MUTPEIC. What's in the Box? Make sure your MultiSync VT440/VT540 Projector. CANCEL ADAJU. SELECTVol. TO Card remote control String and rivet Power cable GCuoidneQnuecictk MaUnusaelr's Signal cable ON 1 2 3 4 DIP 5 6 Pin adapter for Macintosh E-7 STATPUOSWER ENTER...
User Manual
Page 8
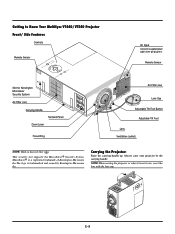
... Adjustable Tilt Foot Button Adjustable Tilt Foot Lens Ventilation (outlet) NOTE: Built-in use, cover the lens with the lens cap. Carrying the Projector: Raise the carrying handle up. ON/OFF CAN STATUS POWER ENTER SELECT AUTO ADJUST MENU CEL OUTPUT PC-CONTROL S-VIDEO VIDEO R IGNBPUT OUT ...Inc.The logo is not in Security Slot ( ) This security slot supports the MicroSaver® Security System. STATPUOSWER Getting to Know Your MultiSync VT440/VT540 Projector Front/ Side Features Controls Remote Sensor AC Input Connect the supplied power cable's three-pin plug here.
... Adjustable Tilt Foot Button Adjustable Tilt Foot Lens Ventilation (outlet) NOTE: Built-in use, cover the lens with the lens cap. Carrying the Projector: Raise the carrying handle up. ON/OFF CAN STATUS POWER ENTER SELECT AUTO ADJUST MENU CEL OUTPUT PC-CONTROL S-VIDEO VIDEO R IGNBPUT OUT ...Inc.The logo is not in Security Slot ( ) This security slot supports the MicroSaver® Security System. STATPUOSWER Getting to Know Your MultiSync VT440/VT540 Projector Front/ Side Features Controls Remote Sensor AC Input Connect the supplied power cable's three-pin plug here.
User Manual
Page 10
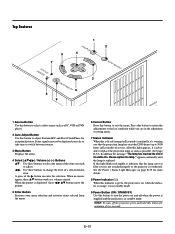
... menus appear, these buttons to select the menu of the item you that the lamp cover or filter cover is not attached properly or the projector is overheated. NOTE: To turn the power on ; Top Features 1 SOURCE 5 4 7 POWSETRATUS ENTER SELECT CANCEL ON/STAND BY 6 8 9 MENU 3 2 AUTO ADJUST 1 Source ... minimum of two seconds. Some signals may not be displayed correctly or take time to turn off when the power is supplied and the projector is in standby mode. After this light appears, it indicates that the projection lamp has exceeded 2000 hours (up to 3000 hours in ...
... menus appear, these buttons to select the menu of the item you that the lamp cover or filter cover is not attached properly or the projector is overheated. NOTE: To turn the power on ; Top Features 1 SOURCE 5 4 7 POWSETRATUS ENTER SELECT CANCEL ON/STAND BY 6 8 9 MENU 3 2 AUTO ADJUST 1 Source ... minimum of two seconds. Some signals may not be displayed correctly or take time to turn off when the power is supplied and the projector is in standby mode. After this light appears, it indicates that the projection lamp has exceeded 2000 hours (up to 3000 hours in ...

User Manual
Page 11
... connect your PC to an external monitor from your RGB source. Audio Input / Output Connector (RCA) This is where you to control the projector. Or connect additional external speakers to listen to audio coming from a VCR, DVD player, or laser disc player. Video Input (RCA) Connect... factory. Use the supplied signal cable to connect to project video. 6. S-Video Input Port (Mini DIN 4 Pin) Connect the S-Video input from your projector. If you connect audio output from an external source like a VCR. 7. SOURCE Terminal Panel Features RGB INPUT AUDIO 1 3 IN OUT OUTPUT OUT IN...
... connect your PC to an external monitor from your RGB source. Audio Input / Output Connector (RCA) This is where you to control the projector. Or connect additional external speakers to listen to audio coming from a VCR, DVD player, or laser disc player. Video Input (RCA) Connect... factory. Use the supplied signal cable to connect to project video. 6. S-Video Input Port (Mini DIN 4 Pin) Connect the S-Video input from your projector. If you connect audio output from an external source like a VCR. 7. SOURCE Terminal Panel Features RGB INPUT AUDIO 1 3 IN OUT OUTPUT OUT IN...

User Manual
Page 12
... select the menu of the item you want on the screen using the Select button. 9 Picture Mute Button This button turns off the projector, press and hold the POWER button for an optimal picture. You can use the card remote control for the first time, be displayed ...sources. 3 Menu Button Displays the menu. 4 Select (vwᮤ ᮣ) / Volume (+) (-) Buttons vw: Use these ᮤ ᮣ vw buttons move your projector on the projector cabinet. MUTE 9 MAGNIFY 7 HELP POWER 11 RD-366E 10 NOTE: Remove the transparent insulation tape before use the Help. 11 Power Button If power...
... select the menu of the item you want on the screen using the Select button. 9 Picture Mute Button This button turns off the projector, press and hold the POWER button for an optimal picture. You can use the card remote control for the first time, be displayed ...sources. 3 Menu Button Displays the menu. 4 Select (vwᮤ ᮣ) / Volume (+) (-) Buttons vw: Use these ᮤ ᮣ vw buttons move your projector on the projector cabinet. MUTE 9 MAGNIFY 7 HELP POWER 11 RD-366E 10 NOTE: Remove the transparent insulation tape before use the Help. 11 Power Button If power...
User Manual
Page 14
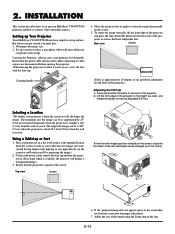
... not in use keystone correction for the front of the projector to set up Your Projector Your MultiSync VT440/VT540 Projector is square to connect video and audio sources. STATPUOSWER Selecting a Location The further your projector on the front of the projector. 2) Lift the front edge of the projector.) Adjusting the Tilt Foot 1) Press and hold the Tilt...
... not in use keystone correction for the front of the projector to set up Your Projector Your MultiSync VT440/VT540 Projector is square to connect video and audio sources. STATPUOSWER Selecting a Location The further your projector on the front of the projector. 2) Lift the front edge of the projector.) Adjusting the Tilt Foot 1) Press and hold the Tilt...

User Manual
Page 15
... C A E α D A: Distance between the lens and the screen center C: Horizontal throw distance between screen surface and the lens D: Vertical distance between projector base and base of image E: Vertical distance between projector base and screen center Screen (inch) H 4:3 Diagonal Formulas(mm) "H = Horizontal Screen Width A = C/cosα C (wide) = 36.8712 × (diagonal screen size...
... C A E α D A: Distance between the lens and the screen center C: Horizontal throw distance between screen surface and the lens D: Vertical distance between projector base and base of image E: Vertical distance between projector base and screen center Screen (inch) H 4:3 Diagonal Formulas(mm) "H = Horizontal Screen Width A = C/cosα C (wide) = 36.8712 × (diagonal screen size...

User Manual
Page 16
...730;C) and 95˚F (35˚C). • Do not expose the projector to moisture, dust, or smoke. Contact your NEC dealer if you have adequate ventilation around your projector so heat can be injured and the projector severely damaged. • Do not use the "Menu" and "Select" buttons... on your NEC dealer for more information. * Do not attempt to correct the ...
...730;C) and 95˚F (35˚C). • Do not expose the projector to moisture, dust, or smoke. Contact your NEC dealer if you have adequate ventilation around your projector so heat can be injured and the projector severely damaged. • Do not use the "Menu" and "Select" buttons... on your NEC dealer for more information. * Do not attempt to correct the ...

User Manual
Page 17
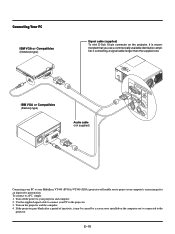
...audio cables, the cables should be output from RGB output unless the notebook PC is recommended that you accidentally hit the POWER button on the projector. E-17 saver or power management software. * If you use a commercially available distribution amplifier if connecting a signal cable longer than the ... * If the screen goes blank while using with a notebook PC, be the result of the computer's screen- DVD Player (with the projector. It is turned on after connecting with component output) VCR, DVD Player or LaserDisc Player To video, S-video, and audio inputs on the...
...audio cables, the cables should be output from RGB output unless the notebook PC is recommended that you accidentally hit the POWER button on the projector. E-17 saver or power management software. * If you use a commercially available distribution amplifier if connecting a signal cable longer than the ... * If the screen goes blank while using with a notebook PC, be the result of the computer's screen- DVD Player (with the projector. It is turned on after connecting with component output) VCR, DVD Player or LaserDisc Player To video, S-video, and audio inputs on the...
User Manual
Page 18
... after a period of inactivity, it may be caused by a screen saver installed on the computer you've connected to the projector. 3. Use the supplied signal cable to connect your MultiSync VT440 (SVGA)/ VT540 (XGA) projector will enable you use a commercially available distribution amplifier if connecting a signal cable longer than the supplied one. IBM VGA or...
... after a period of inactivity, it may be caused by a screen saver installed on the computer you've connected to the projector. 3. Use the supplied signal cable to connect your MultiSync VT440 (SVGA)/ VT540 (XGA) projector will enable you use a commercially available distribution amplifier if connecting a signal cable longer than the supplied one. IBM VGA or...
User Manual
Page 19
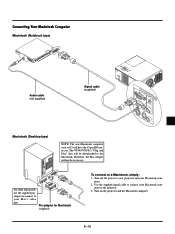
... IN PC-CONTROL S-VIDEO OUT OUT IN VIDEO Macintosh (Desktop type) NOTE: The new Macintosh computer such as G3 will be necessary. The VT440/VT540's "Plug and Play" data will have the 15 pin HD connector. DIP 6 5 ON 4 3 2 1 For older Macintosh, use the ...supplied pin adapter to connect to connect your Mac's video port. Turn on the projector and the Macintosh computer. Pin adapter for Macintosh (supplied) To connect to the projector. 3. puter. 2. E-19 Use the supplied signal cable to your Macintosh com- puter to a Macintosh, simply: ...
... IN PC-CONTROL S-VIDEO OUT OUT IN VIDEO Macintosh (Desktop type) NOTE: The new Macintosh computer such as G3 will be necessary. The VT440/VT540's "Plug and Play" data will have the 15 pin HD connector. DIP 6 5 ON 4 3 2 1 For older Macintosh, use the ...supplied pin adapter to connect to connect your Mac's video port. Turn on the projector and the Macintosh computer. Pin adapter for Macintosh (supplied) To connect to the projector. 3. puter. 2. E-19 Use the supplied signal cable to your Macintosh com- puter to a Macintosh, simply: ...

User Manual
Page 20
... of the DIP switch may bounce an image slightly or may require. E-20 When using a Macintosh computer with the projector, set the DIP switches of the supplied pin adapter according to your Macintosh computer. After setting, restart your resolution. Examples of ...than display modes supported by Apple Computer is off on your projector's image and monitor may display nothing. If this mode. • When using with a Macintosh, SVGA(800ן600 :VT440)/ XGA(1024ן768 : VT540) is recommended if your Macintosh supports this happens, set to...
... of the DIP switch may bounce an image slightly or may require. E-20 When using a Macintosh computer with the projector, set the DIP switches of the supplied pin adapter according to your Macintosh computer. After setting, restart your resolution. Examples of ...than display modes supported by Apple Computer is off on your projector's image and monitor may display nothing. If this mode. • When using with a Macintosh, SVGA(800ן600 :VT440)/ XGA(1024ן768 : VT540) is recommended if your Macintosh supports this happens, set to...

User Manual
Page 21
Connecting an External Monitor External monitor INRPGUBT OUTPUT AUDIOAUDIO IN IN RGB OUTPUT PC-CONTROL S-VIDEO OUT OUT IN VIDEO AUDIO OUT You can connect a separate, external monitor to your VT440/VT540 to simultaneously view on your projector. 3. Turn off the power to your monitor to connect your projector, monitor and computer. 2. To do so: 1. Use a 15-pin cable to the RGB Monitor Output (Mini D-Sub 15 pin) connector on a monitor the image you're projecting. E-21 Turn on the projector, monitor and the computer.
Connecting an External Monitor External monitor INRPGUBT OUTPUT AUDIOAUDIO IN IN RGB OUTPUT PC-CONTROL S-VIDEO OUT OUT IN VIDEO AUDIO OUT You can connect a separate, external monitor to your VT440/VT540 to simultaneously view on your projector. 3. Turn off the power to your monitor to connect your projector, monitor and computer. 2. To do so: 1. Use a 15-pin cable to the RGB Monitor Output (Mini D-Sub 15 pin) connector on a monitor the image you're projecting. E-21 Turn on the projector, monitor and the computer.

User Manual
Page 22
...RCA cables (not provided) to connect a composite VIDEO output of the DVD player to the Video Input of the projector. 3. NOTE: Refer to your DVD player's owner's manual for more information about your projector and DVD player. 2. To do so, simply: 1. Connecting Your DVD Player DVD player L R Cr Cb ...;3 cable (Component V ) Audio cable (not supplied) You can connect your DVD player to the RGB INPUT connector on the projector and DVD player. Turn on the projector. For a DVD player without component video (Y,Cb,Cr) outputs, use the optional 15-pin-to-RCAן3 cable...
...RCA cables (not provided) to connect a composite VIDEO output of the DVD player to the Video Input of the projector. 3. NOTE: Refer to your DVD player's owner's manual for more information about your projector and DVD player. 2. To do so, simply: 1. Connecting Your DVD Player DVD player L R Cr Cb ...;3 cable (Component V ) Audio cable (not supplied) You can connect your DVD player to the RGB INPUT connector on the projector and DVD player. Turn on the projector. For a DVD player without component video (Y,Cb,Cr) outputs, use the optional 15-pin-to-RCAן3 cable...

