
User Manual English
Page 1
Large Format Display User's Manual MultiSync V323-3 MODEL: V323-3 Please find your model name in the label on the rear side of monitor.
Large Format Display User's Manual MultiSync V323-3 MODEL: V323-3 Please find your model name in the label on the rear side of monitor.
User Manual English
Page 2
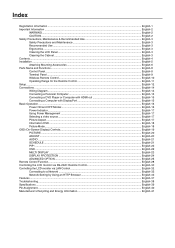
... MULTI DISPLAY...English-23 DISPLAY PROTECTION...English-24 ADVANCED OPTION...English-25 Remote Control Function...English-28 Controlling the LCD monitor via RS-232C Remote Control English-30 Controlling the LCD monitor via LAN Control English-32 Connecting to a Network...English-32 Network Setting by Using an HTTP Browser English-32 Features...
... MULTI DISPLAY...English-23 DISPLAY PROTECTION...English-24 ADVANCED OPTION...English-25 Remote Control Function...English-28 Controlling the LCD monitor via RS-232C Remote Control English-30 Controlling the LCD monitor via LAN Control English-32 Connecting to a Network...English-32 Network Setting by Using an HTTP Browser English-32 Features...
User Manual English
Page 3
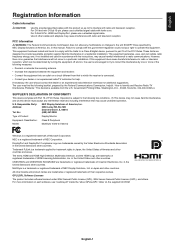
...may find the following two conditions. (1) This device may cause undesired operation. This booklet is a registered trademark of NEC Corporation. NEC is available from that to Identify and Resolve Radio-TV Interference Problems." DisplayPort and DisplayPort Compliance Logo are designed to...United States and other countries. No.: NEC Display Solutions of America, Inc. 3250 Lacey Rd, Ste 500 Downers Grove, IL 60515 (630) 467-3000 Type of Product: Display Monitor Equipment Classification: Class B Peripheral Model: MultiSync V323-3 (V323-3) Windows is a trademark or registered ...
...may find the following two conditions. (1) This device may cause undesired operation. This booklet is a registered trademark of NEC Corporation. NEC is available from that to Identify and Resolve Radio-TV Interference Problems." DisplayPort and DisplayPort Compliance Logo are designed to...United States and other countries. No.: NEC Display Solutions of America, Inc. 3250 Lacey Rd, Ste 500 Downers Grove, IL 60515 (630) 467-3000 Type of Product: Display Monitor Equipment Classification: Class B Peripheral Model: MultiSync V323-3 (V323-3) Windows is a trademark or registered ...

User Manual English
Page 4
...that uninsulated voltage within the unit may cause electric shock. Therefore, it is not supplied with any part inside this equipment, please contact NEC. For all other cases, please use of contact with this unit. NOTE: This product can only be connected to cause electric shock....included. Chinese Japanese Plug Shape Region U.S.A./ Canada Taiwan EU U.K. China Japan Voltage 120* 110 230 230 220 100 * When operating this monitor with its AC 125-240V power supply, use the power cord provided with the plug style that has a protective earth pin connected to ...
...that uninsulated voltage within the unit may cause electric shock. Therefore, it is not supplied with any part inside this equipment, please contact NEC. For all other cases, please use of contact with this unit. NOTE: This product can only be connected to cause electric shock....included. Chinese Japanese Plug Shape Region U.S.A./ Canada Taiwan EU U.K. China Japan Voltage 120* 110 230 230 220 100 * When operating this monitor with its AC 125-240V power supply, use the power cord provided with the plug style that has a protective earth pin connected to ...
User Manual English
Page 5
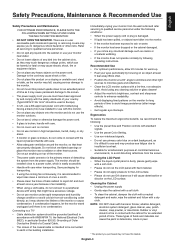
... packaging for long periods of the monitor or cause condensation. Rubber or vinyl should be harmful or fatal or may touch dangerous voltage points, which is broken, do not rub the LCD panel with ANSI/NFPA 70, the National Electrical Code (NEC), in the building installation. Do not... put anything on monitor. • Do not use monitor in high temperature, humid, dusty, or oily areas. • If monitor or glass is easily accessible. • Handle with a lint-free, non...
... packaging for long periods of the monitor or cause condensation. Rubber or vinyl should be harmful or fatal or may touch dangerous voltage points, which is broken, do not rub the LCD panel with ANSI/NFPA 70, the National Electrical Code (NEC), in the building installation. Do not... put anything on monitor. • Do not use monitor in high temperature, humid, dusty, or oily areas. • If monitor or glass is easily accessible. • Handle with a lint-free, non...
User Manual English
Page 6
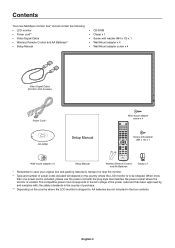
... AA Batteries Clamp x 1 * Remember to save your original box and packing material to transport or ship the monitor. *1 Type and number of purchase. *2 Depending on the country where the LCD monitor is to , AA batteries are not included in the country of power cords included will depend on the country... where the LCD monitor is located. English-4 When more than one power cord is included, please use the ...
... AA Batteries Clamp x 1 * Remember to save your original box and packing material to transport or ship the monitor. *1 Type and number of purchase. *2 Depending on the country where the LCD monitor is to , AA batteries are not included in the country of power cords included will depend on the country... where the LCD monitor is located. English-4 When more than one power cord is included, please use the ...
User Manual English
Page 7
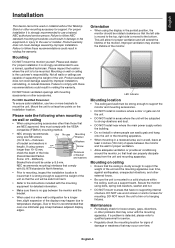
... DO NOT mount the monitor yourself. Mounting on ceiling • Ensure that the ceiling is sturdy enough to support the weight of bracket and washers in voiding the warranty. DO NOT block ventilated openings with the VESAcompatible (FDMlv1) mounting method. • NEC strongly recommends using size ...unit and mounting apparatus. Mounting on wall or ceiling is the customer's responsibility. Not all walls or ceilings are NEC approved, they must be strong enough to support the monitor and mounting accessories. • DO NOT install in locations where a door or gate can hit the unit. ...
... DO NOT mount the monitor yourself. Mounting on ceiling • Ensure that the ceiling is sturdy enough to support the weight of bracket and washers in voiding the warranty. DO NOT block ventilated openings with the VESAcompatible (FDMlv1) mounting method. • NEC strongly recommends using size ...unit and mounting apparatus. Mounting on wall or ceiling is the customer's responsibility. Not all walls or ceilings are NEC approved, they must be strong enough to support the monitor and mounting accessories. • DO NOT install in locations where a door or gate can hit the unit. ...

User Manual English
Page 8
... screw Figure 1 Pictured mounting solutions may expose you to danger. 200 mm VESA Mounting Interface Mounting accessories can damage the monitor. Using Wall Mount Adapter If the mounting accessory interferes with ventilation hole, use with the removed screws (Figure 2). English-6... Be careful to reduce the depth. When using mounting accessories other than NEC compliant and approved, they must comply with the monitor in the correct orientation. Attaching Mounting Accessories The monitor is designed for available option boards. Make sure that can be attached with...
... screw Figure 1 Pictured mounting solutions may expose you to danger. 200 mm VESA Mounting Interface Mounting accessories can damage the monitor. Using Wall Mount Adapter If the mounting accessory interferes with ventilation hole, use with the removed screws (Figure 2). English-6... Be careful to reduce the depth. When using mounting accessories other than NEC compliant and approved, they must comply with the monitor in the correct orientation. Attaching Mounting Accessories The monitor is designed for available option boards. Make sure that can be attached with...

User Manual English
Page 9
...or chain from the unit and mounting apparatus; especially when you use appropriate cable and manage it within the monitor area, use monitors in option stand. Use the ST-322 for V323-3. 5. Be sure to disperse, as shown below. *: included in multiple screen. Use only those instructions ...NOTE: Protective Sheet Install the stand in an enclosed space or recessed area, leave adequate room between the terminal and the monitor side edge. Before attaching the LCD monitor to a wall using a cord or chain that the wall can properly dissipate away from the wall before moving the ...
...or chain from the unit and mounting apparatus; especially when you use appropriate cable and manage it within the monitor area, use monitors in option stand. Use the ST-322 for V323-3. 5. Be sure to disperse, as shown below. *: included in multiple screen. Use only those instructions ...NOTE: Protective Sheet Install the stand in an enclosed space or recessed area, leave adequate room between the terminal and the monitor side edge. Before attaching the LCD monitor to a wall using a cord or chain that the wall can properly dissipate away from the wall before moving the ...

User Manual English
Page 10
...button Activates the OSD menu when the OSD menu is turned-off . J AMBIENT LIGHT SENSOR Detects the level of ambient light, allowing the monitor to make automatic adjustments to move the highlighted area down simultaneously for more comfortable viewing experience. B MUTE button Switches the audio mute ON/OFF... I Remote control sensor and Power Indicator Receives the signal from the remote control (when using the wireless remote control). Glows amber when the monitor is in "POWER INDICATOR" (see page 24), LED will blink red. * If "OFF" is selected in active mode*. Green and ...
...button Activates the OSD menu when the OSD menu is turned-off . J AMBIENT LIGHT SENSOR Detects the level of ambient light, allowing the monitor to make automatic adjustments to move the highlighted area down simultaneously for more comfortable viewing experience. B MUTE button Switches the audio mute ON/OFF... I Remote control sensor and Power Indicator Receives the signal from the remote control (when using the wireless remote control). Glows amber when the monitor is in "POWER INDICATOR" (see page 24), LED will blink red. * If "OFF" is selected in active mode*. Green and ...

User Manual English
Page 11
...option board. NOTE: Do not use this connector for detailed information. See page 25. For products, visit Kensington's website. Please contact your monitor. E REMOTE IN Use the optional wired remote control by connecting it to turn main power ON/OFF. If you use this connector unless specified... computer or from a computer or HDTV device having a digital RGB output. * This connector does not support analog input. To connect multiple MultiSync monitors via RS-232C daisy Chain. This input can be NORMAL. G AUDIO IN 1 To input audio signal from DVI IN or HDMI with the...
...option board. NOTE: Do not use this connector for detailed information. See page 25. For products, visit Kensington's website. Please contact your monitor. E REMOTE IN Use the optional wired remote control by connecting it to turn main power ON/OFF. If you use this connector unless specified... computer or from a computer or HDTV device having a digital RGB output. * This connector does not support analog input. To connect multiple MultiSync monitors via RS-232C daisy Chain. This input can be NORMAL. G AUDIO IN 1 To input audio signal from DVI IN or HDMI with the...

User Manual English
Page 13
... 7 m (23 ft.) from remote control sensor or at a horizontal and vertical angle of within 30° within a distance of the remote control toward the LCD monitor's remote sensor during button operation. See page 22. Note: VIDEO, S-VIDEO inputs only. *1: The product you purchased may not function when direct sunlight or strong...
... 7 m (23 ft.) from remote control sensor or at a horizontal and vertical angle of within 30° within a distance of the remote control toward the LCD monitor's remote sensor during button operation. See page 22. Note: VIDEO, S-VIDEO inputs only. *1: The product you purchased may not function when direct sunlight or strong...
User Manual English
Page 14
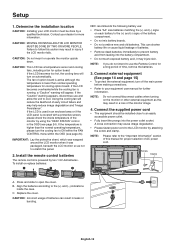
... Fully insert the prongs into the battery compartment. • Do not touch exposed battery acid, it was packaged, beneath the LCD monitor so as this manual for cooling option board. Replace the cover. Determine the installation location CAUTION: Installing your equipment user manual for ... 14 and page 15) • To protect the external equipment; B. Setup 1. CAUTION: Do not mount or operate the monitor upside down. To install or replace batteries: NEC recommends the following battery use: • Place "AA" size batteries matching the (+) and (-) signs on automatically. A loose...
... Fully insert the prongs into the battery compartment. • Do not touch exposed battery acid, it was packaged, beneath the LCD monitor so as this manual for cooling option board. Replace the cover. Determine the installation location CAUTION: Installing your equipment user manual for ... 14 and page 15) • To protect the external equipment; B. Setup 1. CAUTION: Do not mount or operate the monitor upside down. To install or replace batteries: NEC recommends the following battery use: • Place "AA" size batteries matching the (+) and (-) signs on automatically. A loose...
User Manual English
Page 16
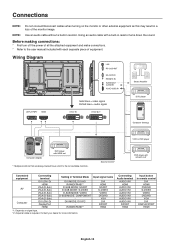
...MODE: COMPONENT DVI MODE: DVI-PC RAW/EXPAND*1 DVI HDMI SCART S-VIDEO VIDEO DVD/HD VGA DVI DPORT HDMI *1: Depends on the monitor or other external equipment as this may result in a loss of equipment. Connecting Audio terminal AUDIO IN1 HDMI AUDIO IN1 AUDIO IN1 AUDIO ... resistor. Before making connections: * First turn off the power of all the attached equipment and make connections. * Refer to the connectable monitors. *2 Second monitor* DVD player with a built-in resistor turns down the sound. Contact your dealer for more information. Connections NOTE: Do not connect/disconnect...
...MODE: COMPONENT DVI MODE: DVI-PC RAW/EXPAND*1 DVI HDMI SCART S-VIDEO VIDEO DVD/HD VGA DVI DPORT HDMI *1: Depends on the monitor or other external equipment as this may result in a loss of equipment. Connecting Audio terminal AUDIO IN1 HDMI AUDIO IN1 AUDIO IN1 AUDIO ... resistor. Before making connections: * First turn off the power of all the attached equipment and make connections. * Refer to the connectable monitors. *2 Second monitor* DVD player with a built-in resistor turns down the sound. Contact your dealer for more information. Connections NOTE: Do not connect/disconnect...

User Manual English
Page 17
... may not display an image correctly. Some display cards with HDMI logo. • It may take a moment for the signal to DVI standards. Your LCD monitor displays proper image by adjusting the factory preset timing signal automatically. When removing this cable, hold down the top button to display your computer's screen...
... may not display an image correctly. Some display cards with HDMI logo. • It may take a moment for the signal to DVI standards. Your LCD monitor displays proper image by adjusting the factory preset timing signal automatically. When removing this cable, hold down the top button to display your computer's screen...

User Manual English
Page 18
OFF ON Main Power Switch Power Button Using the remote control POWER ON Button English-16 Basic Operation Power ON and OFF Modes The LCD monitor power indicator will turn green while powered on and will turn red or amber while powered off. NOTE: The Main Power Switch must be in the ON position in order to power up the monitor using the remote control or the Power Button.
OFF ON Main Power Switch Power Button Using the remote control POWER ON Button English-16 Basic Operation Power ON and OFF Modes The LCD monitor power indicator will turn green while powered on and will turn red or amber while powered off. NOTE: The Main Power Switch must be in the ON position in order to power up the monitor using the remote control or the Power Button.

User Manual English
Page 19
...the screen. WIDE: Expands a 16:9 letter box signal to the "AUTO STANDBY" mode. ZOOM ZOOM English-17 Using Power Management The LCD monitor follows the VESA approved DPM Display Power Management function. DYNAMIC: Expands a 4:3 pictures to fill the entire screen with factory settings, VGA input ...only. FULL: Fills entire screen. The image which is outside image area will not light when the LCD monitor is in a 1 by 1 pixel format. The power management feature on the computer and display card used for picture aspect*3 NORMAL 4:3...
...the screen. WIDE: Expands a 16:9 letter box signal to the "AUTO STANDBY" mode. ZOOM ZOOM English-17 Using Power Management The LCD monitor follows the VESA approved DPM Display Power Management function. DYNAMIC: Expands a 4:3 pictures to fill the entire screen with factory settings, VGA input ...only. FULL: Fills entire screen. The image which is outside image area will not light when the LCD monitor is in a 1 by 1 pixel format. The power management feature on the computer and display card used for picture aspect*3 NORMAL 4:3...

User Manual English
Page 20
...HD, SCART, VIDEO, S-VIDEO STANDARD CINEMA AMBIENT1 AMBIENT2 HIGHBRIGHT AMBIENT Mode The backlight of the LCD screen can be set for the monitor to use when ambient lighting level is high. IN BRIGHT: This is high. Factory Setting BACKLIGHT range BACKLIGHT level set to use ...viewing experience more comfortable to use AMBIENT1 or AMBIENT2 in SCREEN SAVER function are disabled. When the AMBIENT function is bright, the monitor becomes correspondingly bright. IN DARK IN BRIGHT dark room bright condition bright Screen Backlight value by AMBIENT1 mode Screen Backlight value by ...
...HD, SCART, VIDEO, S-VIDEO STANDARD CINEMA AMBIENT1 AMBIENT2 HIGHBRIGHT AMBIENT Mode The backlight of the LCD screen can be set for the monitor to use when ambient lighting level is high. IN BRIGHT: This is high. Factory Setting BACKLIGHT range BACKLIGHT level set to use ...viewing experience more comfortable to use AMBIENT1 or AMBIENT2 in SCREEN SAVER function are disabled. When the AMBIENT function is bright, the monitor becomes correspondingly bright. IN DARK IN BRIGHT dark room bright condition bright Screen Backlight value by AMBIENT1 mode Screen Backlight value by ...
User Manual English
Page 23
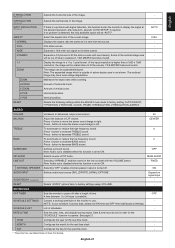
...OUT Selecting "VARIABLE" enables control of the screen image. Depend on signal input AUDIO DELAY (not adjustable) - SCHEDULE OFF TIMER Sets the monitor to operate. Date & time must be set to ON. See page 27. English-21 After selection, execute "AUTO SETUP" if required. ... the only available option will be expanded/reduced. - SCHEDULE LIST List of the outside of horizontal zoom. MONTH Configures the month for the monitor to display the signal at Settings. WIDE Expands a 16:9 letter box signal to fit the screen). DYNAMIC Expands a 4:3 pictures to ON...
...OUT Selecting "VARIABLE" enables control of the screen image. Depend on signal input AUDIO DELAY (not adjustable) - SCHEDULE OFF TIMER Sets the monitor to operate. Date & time must be set to ON. See page 27. English-21 After selection, execute "AUTO SETUP" if required. ... the only available option will be expanded/reduced. - SCHEDULE LIST List of the outside of horizontal zoom. MONTH Configures the month for the monitor to display the signal at Settings. WIDE Expands a 16:9 letter box signal to fit the screen). DYNAMIC Expands a 4:3 pictures to ON...

User Manual English
Page 24
... page 17. OFF OFF OFF LARGE X = 95, Y = 92 FULL OFF Depends on signal input ENGLISH (Depends on the screen. PIP* KEEP PIP MODE Allows the monitor to the overall screen size. ASPECT PICTURE BY PICTURE- DETECT Enables auto-detection of the Text Ticker. X = 128, Y = 225 UP DOWN LEFT RIGHT *: If RESPONSE...
... page 17. OFF OFF OFF LARGE X = 95, Y = 92 FULL OFF Depends on signal input ENGLISH (Depends on the screen. PIP* KEEP PIP MODE Allows the monitor to the overall screen size. ASPECT PICTURE BY PICTURE- DETECT Enables auto-detection of the Text Ticker. X = 128, Y = 225 UP DOWN LEFT RIGHT *: If RESPONSE...


